Installing an induction hob
The induction hob is sold in packaging, which must be opened upon receipt and the surface of the panel checked for integrity.
Panel power supply
Typically, the panel kit does not include an electrical plug for connecting the panel to an outlet. It must be purchased separately.
Since the hob is a powerful household appliance, to connect it you need to run a separate electrical circuit, allocating a separate electrical group for it with a separate circuit breaker.
For panels with a power of no more than 5.9 kW, in 220 Volt networks, the cable for powering the panel must have a cross-section of copper conductors of 4 mm2 (the circuit breaker for the panel's electrical circuit must be 25 A). For panels with a power of up to 7.4 kW, the cross-section of the cores must be increased to 6 sq. mm. (raise the rating of the circuit breaker to 32 A).
Electrical installation kit
To connect the equipment to the electrical network, you will need to prepare:
- cable for laying the line;
- circuit breaker;
- socket;
- fork;
- flexible wire.
All installation equipment is selected depending on the power of the VP. Having it at your disposal, you can begin direct electrical installation. Additionally, you may need crimp sleeves, solder, electrical tape, heat-shrink tubing and other small items used when working with electrical wiring. Also, depending on the chosen connection method, you will need a socket box or junction box.
Requirements for electrical wiring and its installation
To turn on a built-in electric stove, you need to use a cable coming directly from the electrical panel
That is, it is important that it be laid directly without the use of junction boxes with branches. It is necessary that the cable only powers the hob
The fact is that such equipment is very powerful, so if other equipment operates from the wire, it may overheat, causing a short circuit.
Wire 5 cores for 3-phase network
If the house or apartment has old wiring, and there is no powerful socket with a direct cable from the panel or meter, then you will need to lay a new separate line. From the desired location of the outlet, a vertical groove is made to the ceiling. Next, horizontal grooves are carried out directly to the cable connection point. If you plan to use suspended ceilings in the future, then the wire can be fixed directly to the floor slab, since in the future it will be hidden.
Cable in groove
The line for the electric stove is laid using 2 types of cables: VVGng-Ls or NYM. Their throughput is selected based on the power of the built-in equipment.
Table 1. The ratio of the cross-section of the cores and the power of the hob.
| power, kWt | Core cross-section, mm2 | |
| 1-phase network | 3-phase network | |
| 3-5 | 2,5 | 1,5 |
| 5-7,5 | 4 | 2,5 |
| 7,5-10 | 6 | 2,5 |
These types of cable are used to lay lines directly to the outlet. They consist of a monocore, so they have little flexibility. For this reason, flexible wires are used directly from the plug to the hob: KG or PVA. They are often included as standard with the electric stove, so there is no need to purchase them separately.
Flexible extension cord
Selecting an outlet and requirements for its installation
The socket for turning on the panel can be located depending on the features of the tabletop, as well as personal preferences
It is important to maintain the convenience of turning the hob on and off. As a standard, it is placed at a height of 90 cm from the floor.
If you want to hide communications, you can fix the socket directly below the bottom of the lower kitchen cabinets. With this placement, access to it is provided through the space created by the height of the legs of the bedside tables. It should be raised above the floor to a height of at least a few centimeters so that in the event of a leak, the electrical contacts do not get wet.
Socket under the cabinet
Connecting the hob through an outlet, rather than directly to the panel, has its advantages. Although you will have to do a more complicated installation, it will be easier to turn it off in the future when you wet clean the stove. If you connect without a socket and plug, you will need to go to the electrical panel, which is not so convenient.
The 2-burner stove can be powered through a regular outlet. More powerful equipment requires special switches. They can be made of ceramic or plastic. Sockets from 10A are used.
Selecting a circuit breaker
The line for connecting the built-in electric stove must be laid through a circuit breaker. This is a mandatory requirement since the slab can create network overload. At critical loads, the switch will prevent short circuits
It is very important to choose it correctly, in accordance with the power of the stove. If the cable itself for the panel can be used more powerful, then the circuit breaker must fully comply with it
You should not save on purchasing it, since cheap devices often do not work or turn off even when the stove is operating in normal mode with a low load.
Prices for automatic machines
Difavtomat
Standard shield machine
Table 2. Correspondence of the current of the machine to the power of the stove.
| Circuit breaker current, A | Circuit power | |
| 220V | 360V | |
| 5 | 1.1 | 2.6 |
| 6 | 1.3 | 3.2 |
| 8 | 1.7 | 5.1 |
| 10 | 2.2 | 5.3 |
| 16 | 3.5 | 8.4 |
| 20 | 4.4 | 10.5 |
| 25 | 5.5 | 13.2 |
| 32 | 7 | 16.8 |
| 40 | 8.8 | 21.1 |
Panel and old wiring
It should be taken into account that the power of the panel indicated in its passport is the total power of the panel when all heating elements are turned on. Therefore, if you already have old aluminum wiring for an electric stove, with a conductor cross-section of 4 mm2, you can connect a hob up to 5 kW to it, but do not turn on the panel at full power. According to the standards, a hob with a power of up to 4.6 kW (220 Volts) can be connected to aluminum wiring with a cross-section of 4 mm2. Source: PUE (chapter 1.3, tables 1.3.4 and 1.3.5).
Related article: How does an induction cooker differ from other electric models
Dependent and independent kits
Dependent sets are those that have common controls (the hob control handles are located on the front panel of the oven). There are not many advantages to such options: the top and bottom have the same style, so there is no need to run around the shops looking for components that match the color and design. In addition, the kit will cost slightly less than an oven and hob with similar functions but sold separately. The disadvantages of dependent equipment are much more significant: they are rarely found on sale, so choosing the appropriate option is problematic; if one of the components fails, you will have to send the entire set for repair.
Independent, as the name suggests, are sold separately and do not affect each other in any way. It is not necessary to purchase a kit from one manufacturer. An oven or stove can be from different companies and of different designs. You can also place them in opposite places of the headset.
Induction panel wiring
Electrical wiring for the panel must be grounded. It is prohibited to connect the grounding conductor to the working zero, as well as metal pipes and fittings in the kitchen or apartment . By doing this you will not create a grounding loop, but will only expose yourself to danger.
If the apartment does not have a grounding system, then the grounding conductor of the panel power cable is connected to the body of the metal electrical panel (storey or apartment) with a separate clamping screw, if the panel does not have an equipped grounding bus.
Plug and socket for hob
The plug and socket for the hob are purchased as a set. They are recognizable. The operating currents of the circuit for which they are designed are written on the socket body. According to the standards, for panels with a power of 5.9 kW the operating current is 27 Amperes, for panels with a power of up to 7.4 kW this is a current of 34 Amps. The values indicated on the socket body are 2-3 points lower (25 and 32 A).
Important! For safety reasons and to avoid sparking contacts in the socket, you cannot turn off the panel from the socket when the load is on (the panel is operating).
Connection process
Anyone with basic electrical installation skills can connect a modern hob to a 220V power supply. All live work is performed only with dielectric gloves, standing on a rubber mat in shoes with leather (rubber) soles. Work cannot be performed when a person is at home alone. In case of electric shock, a second person will be able to turn off the power, provide first aid, or call an ambulance. When performing installation work related to the modernization of a 220V household electrical network, it is necessary to remember that not only the successful completion of the work, but also health and even life depends on strict adherence to safety rules and electrical regulations.
The operating magnetron of the hob contains a life-threatening high voltage – 4000V. Getting closer than 50 centimeters to a working magnetron or checking its performance “for a spark” with a pencil or finger is dangerous to life. Connecting the hob begins with installing a special three-pin (for single-phase connection) or five-pin (for three-phase connection) electrical socket and plug. The socket is attached to the surface using screws. When installing the socket on a wooden surface, it is necessary to place a special gasket made of fire-resistant material under it. Do not install the socket in close proximity to the sink, because the electrical contacts may accidentally splash water from the tap.
After connecting the phase and neutral wires, you need to connect the ground bus (switchboard housing) to the side lamellas of the socket. It is strictly prohibited to use the induction hob without a ground connection; this may result in electric shock. Let's consider the process of connecting an induction hob to the electrical network step by step:
we purchase an electrical cable of the required length connecting the plug to the induction hob; remove the cover from the power compartment by unscrewing the screw using a screwdriver; connect the power cord to the plug, paying attention to the connection of the grounding conductor (yellow-green); remove the protective plate covering the contacts; we connect the cord from the power plug to the panel's power block, observing the color of the insulation (blue and brown are phase and neutral, yellow and green are grounding), place a jumper between the phase terminals and firmly clamp it with bolts; tighten the cable terminals on the power supply; we check the installation and turn on the panel using touch buttons or touching the touchscreen of the service display.
When connecting a protective relay and a differential circuit breaker, it is necessary to observe the correct polarity (by marking the device terminals and the color of the wires). When screwing terminals into connectors, do not apply excessive force, as this may lead to stripping of the threads or destruction of the contact. The standard types of phase distribution in an apartment are single-phase and three-phase circuits. The two-phase circuit is quite rare and for this reason raises the greatest number of questions. If the internal wiring in the apartment is made of 4 wires, then when connecting you need to connect the corresponding colors. Black and brown - phase 0 and phase 1, blue - neutral wire, yellow and green - ground bus.
The most common (standard) option is a three-phase connection. The neutral wire must be connected at the top, the ground at the bottom, and the phases in the middle. The symmetrical arrangement of flowers is repeated in the rosette. If the block for connecting an induction hob is designed for 4 wires, then one contact (any) is not used either on the power block or in the socket. For a single-phase connection, the following actions are performed:
- three phase wires are connected together (L1, L2, L3);
- two neutral wires (N1, N2) are connected together;
- the green wire is connected to the “ground bus”.
General features of installing an induction panel
The induction hob belongs to the type of built-in household appliances, with general rules applied to the installation, namely:
- All cuts made in a wooden tabletop must be treated with a sealant to protect them from moisture. Stone countertops do not require additional protection;
- It is necessary to achieve a hermetically sealed connection between the panel and the countertop surface so that moisture from the countertop surface does not damage the electrical part of the panel. For this, gaskets (seals) included with the panel are used. If the panel is installed on ceramic tiles, then the gap between the panel and the tile must be sealed with tile adhesive.
- It is not recommended to use additional liquid sealants to seal the gaps between the panel and the countertop, due to the complications of its removal.
Related article: Ventilation in the kitchen, types of ventilation and types of air ducts
Options available only in electric ovens
- Double boiler. It is either a built-in container that automatically supplies water during cooking, or a plastic container with a double bottom.
- Microwave oven. Few people know that ovens can combine the function of a microwave. In such models, in addition to standard heating elements, a magnetron is additionally built-in. Cabinets with microwaves are somewhat more expensive than conventional ones, but they can save a lot of free space.
After the buyer has decided on the type of oven and the desired functions, he needs to select a hob to make a set of them. The selection criteria will depend on which panel is needed: gas or electric.
Special features for installing an induction panel
As I said, an induction panel works a little differently than regular electrical panels. There is a separate article about this. How an induction cooker differs from other electric models.
The magnetic fluxes generated by the panel elements extend not only towards the dishes, but also downwards and to the sides. This creates additional rules and the installation of an induction hob changes somewhat.
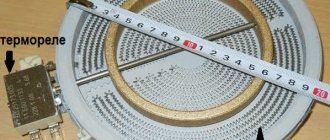
1. Firstly, the thermal plugs that stand under the panel elements get hot, which means it is necessary to provide ventilation under the panel. Ventilation gaps of 6-10 cm must be made as shown in the figure. These gaps cannot be closed or blocked.
Installing an induction hob: ventilation gaps 2. Secondly, despite the thermal plugs that block the spread of magnetic waves under the panel, it is not recommended to store metal utensils under the panel. 3. Thirdly, the induction panel has a fan in its design. It stands at the bottom of the panel and provides cooling for heat traps (if any) and induction coils. This fan is partially open and it is necessary to prevent small household items from falling into it, of which there are a lot in the kitchen. Therefore, there is no need to store anything under the induction hob. Just a ventilation gap and that's it.
induction cooker fan 4. Fourthly, modern induction panels well protect the surrounding space from the magnetic induction currents of the panel. However, it must be taken into account that during operation of the panel there may be a negative impact on mobile phones, television antennas, metal utensils and even bolts and screws with ferromagnetic properties in the area of the panel operation.
5. In addition, there is a fifth, sixth and tenth feature, but this is the operation of induction panels, which are radically different from the use of a simple electrical panel. For example:
- Do not turn on the burner if there is no cookware on it;
- Do not cook with the lid open;
- The diameter of the cookware must exactly match the diameter of the burner;
Related article: Installing a Gefest electric hob with your own hands
The following sounds are heard when the panel is operating:
- crackling (wrong dishes),
- buzzing (fan operation),
- whistling (more than two burners are on),
- clicking (power switching),
And all these sounds are normal.
Oven functions
Once the choice has been made between a gas and electric oven, it is worth considering in more detail their capabilities and functions.
Material
Most often, doors are made in combination: metal and glass. But there are models that not only have a completely glass door, but also a control panel. This design does not provide any tangible advantages other than the original design. On the contrary, in case of an accidental impact the glass will break more easily.
Often it is this that becomes the decisive argument when purchasing. The most common options: stainless steel cabinets, as well as cabinets coated with black and white enamel. However, the color palette of manufacturers is quite diverse; you can find yellow, blue, green, red and other models. It is worth considering that a cabinet of unusual colors will cost the buyer more than a standard silver one.
Cleaning system
One of the most important characteristics when choosing an oven. At the moment, there are 3 main ones: easy-to-clean enamel, pyrolysis and catalytic plates. Easy-to-clean enamel is the most budget-friendly and widespread option. On such a surface, dirt accumulates less and can be easily removed with a regular cloth and detergent. Catalytic plates are coated with a special compound that decomposes fat into water and carbon (soot). The disadvantage of this system is that the plates cover only part of the inner surface and have a limited service life of 5 years.
Operating principle of induction cookers
An induction cooker is a new generation device - an invention that combines the effects of electric and magnetic current, due to which food is cooked much faster and safer than on conventional stoves. During operation, the device generates a high-frequency magnetic field, and the dishes heat up under the influence of radiomagnetic waves. The glass-ceramic surface coating heats up exclusively at the point of contact with hot cookware. Therefore, food on such a stove will definitely not burn. If you use this technique correctly, you will be able to experience all the ease, convenience, and comfort of the cooking process.
Important! The radio waves generated by an induction furnace become completely harmless at a distance of 30 mm. By the way, this point is the most important for people who use pacemakers.
The positive qualities of induction hobs are as follows:
- The fastest possible heating of the surface to the desired temperature.
- Significant energy savings.
- A perfectly smooth surface that allows for easy maintenance of equipment.
- A high level of safety for children, because such stoves are not associated with gas, open fire, or high temperatures.