Shutter speed units and terminology
Measured in seconds. Cameras display a number, for example, 50. This means the shutter speed is 1/50 s. Those. The camera shutter will open, the matrix will receive light for 1/50 s, the shutter will close and exposure will stop. If the camera displays, for example, 5”, then this means that the shutter speed = 5 s.
Distinguish between short and long exposure
Examples of fast shutter speed values: 1/1000 s, 1/2500 s (will be marked on the screen and in the camera viewfinder as 1000 and 2500, respectively). Example of a long shutter speed: 3 s (marked as 3 on the camera).
The boundaries of the classification of short and long exposures are very arbitrary, including depending on the subject. For example, when shooting a fast bird, a shutter speed of 1/500 s may turn out to be long - the bird will turn out blurry. It is important to understand the principle that terminology depends on the plot. If somewhere you come across a phrase like “make the shutter speed shorter/longer,” you’ll know what I’m talking about.
The shortest shutter speeds on modern DSLRs are 1/4000 or 1/8000 (in more advanced models). On mirrorless cameras in electronic shutter mode they can be set up to 1/32000 s. Such short shutter speeds may be necessary when shooting very fast objects or when using open apertures on high-aperture optics in bright sun. Long exposure is limited to 30 seconds, but there is a BULB mode in which the first press of the shutter button opens the shutter, and the second press closes it. To avoid movement, use remote controls. In other words, the long shutter speed is not limited in any way, and you can expose the matrix for at least hours. Such long shutter speeds are used for evening/night photography and special transmission of motion.
We haven’t looked at exposure yet, but I’ll still mention that shutter speed affects the amount of light received in direct proportion. The longer the shutter speed, the more light falls on the matrix; the shorter the shutter speed, the less light. When you increase/decrease the shutter speed by 2 times, the amount of light received increases/decreases by 2 times. For example, changing the shutter speed from 1/400 s to 1/200 s will double the amount of light received. This change is called an exposure stop. At this stage, it is important to understand that with a shorter shutter speed, the resulting photo will be darker, and with a longer shutter speed, it will be lighter.
An example from life.
During photo practice, our group was given several Canon 550D and Nikon D3100 devices to work with exposure time. On the first camera, I practiced the Freezelight technique, called light painting in Russian. It was decided to set the value to 30 seconds (the maximum for this device). The quality of the pictures was quite pleasing.
On the second Japanese we decided to practice working with a super short value. For comfortable work without a tripod, we used the 1/1000 parameter, written as 1000 in the camera interface.
In the end, I was right. Canon showed the best quality of shooting in low light using long shutter speeds. Compared to Nikon, its frames were less noisy. But with “instant” shooting, the results surprised me. The pictures were difficult to distinguish from each other, except that the Canon showed better detail due to the larger number of pixels on the matrix.
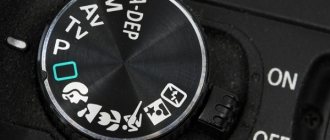
How to adjust shutter speed in camera?
The camera sets shutter speed in two modes: manual (M) and shutter priority (S).
In other cases, it is calculated automatically by the camera. It is displayed on the camera:
- in the viewfinder;
- on the main screen;
- on the top screen
Shutter speed 1/320 on main screen
Shutter speed 1/320 in the viewfinder
Let me remind you that an integer number will be displayed, for example: 50, 640. This means that the shutter speed is set to 1/50 or 1/640. Or, if the number is displayed with a “seconds” icon, then the number is the shutter speed in seconds.
To learn how to change the shutter speed on your camera, refer to the manual. For example, on Nikon cameras, it is changed by turning the wheel under the thumb of the right hand.
Those. set the mode to M or S and turn this wheel to change the shutter speed. In S (shutter priority) mode, the camera will select the aperture automatically. In M mode, all parameters must be set manually.
If you scroll the wheel all the way to the left, the last value will be BULB mode, in case 30 seconds is not enough.
ISO sensitivity - lower is better
The last parameter is ISO. It does not in any way affect the artistic component of the frame, it only affects its quality. The lower it is, the better. The ISO value reflects the sensitivity of the camera sensor. The more we increase the matrix sensitivity, the more noise will appear in the frame.
Sensitivity is referred to as ISO. The minimum value is usually 100. The maximum is different for all cameras.
Below is a visual table showing which parameter affects what.
Effects that can be achieved with exposure
It is clear that shutter speed can radically change the frame. As a result, you need to achieve an understanding of what kind of frame you want to get, whether shutter speed is important for these purposes and in such conditions. If important, then what? Over time, these questions will automatically flash through your head and your brain will produce a bunch of answer options, forming them from past experience and observation.
Let's now look at exactly what effects you can get.
Freeze motion
If the object is moving, then you can get a clear photograph using a short shutter speed, “freezing” it. The object can be anything: an athlete performing on stage, splashes of water, running animals, cars. In general, there is a lot of movement in our world) The main thing is to make sure that what you are shooting will look good in a “frozen” state.
Photo hack - no one bothers you to try several techniques when shooting the same thing, if time permits. And there will be plenty to choose from, and experience will be gained.
The dove just froze in the sky.
In this case, you can get a static photograph, which can look boring and even fall out of context. These shortcomings are offset by compositional techniques, for example, tilting the object. Or like in the example with the pigeon above - notice the feathers at the tip of the wing - they are blurred. Those. the shutter speed was slightly longer than required to completely freeze the movement. This adds a feeling of flight; the viewer understands that the dove is flying, and that this is not just a figurine.
The shutter speed must be selected depending on the speed of the object and the distance to it. We’ll talk about approximate recommended values below; you can use them as a guide. More accurately determined experimentally.
Dynamic water, for example, fountains, can look good in a “frozen” form:
Water drops can look interesting at very short shutter speeds:
The technique of freezing movement is worth keeping in mind, but I don’t recommend getting carried away with it - you can lose the atmosphere of what is happening and get only dry facts in the photo.
Motion Blur
The effect is exactly the opposite of the previous one. Our eye cannot see the result of prolonged exposure to light; it forms a picture frequently, i.e. conditionally - the shutter speed of our eyes is constant. The camera can “look” at the world with an eye wide open) In general, show us what we don’t see.
For example, above we can “see the wind” (vapor), which, when illuminated, brings zest to an ordinary cityscape. This is achieved through long exposure.
Moving clouds in the sky are a good option for blur. This way the photo can become more dramatic and voluminous.
It would seem that an ordinary static picture acquires dynamics due to slightly blurry clouds and treetops on the right. True, the wide angle, the converging perspective of the median strips on the road and twilight time contribute here.
The longer the shutter speed, the fewer small details will remain on moving objects (sky, water), all other things being equal.
Water, transport, sports, crowds of people, carousels - all are good candidates for using this technique. Try it, experiment.
Panning or panning
When using this technique, the object appears sharp , as if we are freezing it, and the background is blurred . Sufficiently long and medium shutter speeds are used. Conditional range – 1/10 – 1/200 s. The required shutter speed depends on the speed of the object and the distance to it.
The basic principle is to hold the camera tightly and very smoothly rotate it either with your hands or with your body so that the position of the object does not change in the frame. That is, if the car is in the upper left part of the frame, then when moving you need to rotate the camera so that it remains in the same upper left part. Due to the change in distance, it may change slightly in size, but there is nothing wrong with that - the shutter speed is not so long that trails will appear, and those that exist will only enhance the effect of the movement.
Cars are a classic example and an ideal target for such experiments. By the way, pay attention to advertising car brochures - very often you can see photographs with panning. The result is a very effective transfer of dynamics and the feeling that the car exists outside of time. But not just cars, you can try to photograph cyclists too)
Select the shutter speed experimentally:
- if everything turns out blurry, shorten it;
- if, on the contrary, everything is clear, lengthen it.
By the way, when selecting shutter speed, pay attention to the degree of background blur depending on the speed of the subject. Let me explain - in a frame with a bicycle (if it is assumed that this is not a flying road bike), the background should not be blurred into trash, as if the cyclist is rushing like a racing car. It will look unnatural. In the case of cars, the background may be more blurred.
Let's go back to cars again) It's very good if the background itself is beautiful and eye-catching, especially if we look at the car from an angle. And, ideally, you should not forget about the foreground - a clear division of the photograph into plans is always beneficial.
We are leaving towards the sunny horizon!)
In addition to cars, try filming running people, athletes, birds, running animals (with a predictable trajectory). But I note that this technique is not easy and requires proper skill and training. If it doesn't work out, don't be upset. The output of suitable personnel here is low. Just change the shutter speed and analyze the changes. And in the end everything will work out.
Evening and night photography
It can be nice to walk through the city at night and take pictures of this beauty. If you shoot portraits, then fast lenses with open apertures and cameras that are less noisy at high ISO will come to the rescue. The shutter speed, of course, will also have to be shortened, but to certain limits. Even if your model tries to freeze, it will still be difficult to shoot at shutter speeds shorter than 1/30 - there is a high risk of getting movement and blur.
When shooting evening landscapes, the approach is different. For a sharp photo, it is advisable to close the aperture. This means that much less light will reach the matrix. To learn about the relationship between the amount of light received and aperture values, go to the material.
Blurry landscapes are a frequent bane of photographers. If this problem occurs, be sure to look at the checklist!
Since there is less light, the mandatory attributes for evening landscape photography are long shutter speeds and a tripod. In the first example I will show water.
Blurred water and clouds
Water is generally a very multifaceted topic from a photography point of view. Long exposures can produce a calm, mirror-like surface. The camera allows us to see what we cannot see with our own eyes. The clouds are also blurred - exactly what we discussed in the motion blur effect. The principle is the same, only in view of the evening shooting we use long shutter speeds.
How long the exposure is will determine whether any detail will remain in the sky or water.
If it were not for the long exposure, even taking into account the light from the lanterns, the picture would have turned out to be severely underexposed (dark).
Another magical example of evening shooting is tracers and people. With long exposures, only those details remain that were in the same place for the maximum exposure time (light received by the matrix). For example, when shooting oncoming traffic, the main bright object is the headlights. If held for a long time, they will form tracers. If the shutter speed is not too long, then “ghosts” from car bodies will be noticeable.
The situation is similar with people - the longer a person stands still, the more clearly he will be captured. If a crowd of people moves, “ghosts” will appear. They can be barely visible at very long exposures, but at short enough we may be able to see individual people as if they were blurred. Again, this depends on the shutter speed, the speed of people moving and the intensity of the flow. Our task is to learn how to select shutter speed so that the flow is captured the way we want it.
In the example above, there are tracers from oncoming traffic on the left, and a blurry guy on the right near the bench. At the same time, the rest of the company on the bench turned out to be clear, which means the exposure was not too long.
How to choose shutter speed?
Choosing the appropriate shutter speed can be difficult. To begin with, I will describe the basic algorithm that you should focus on.
- Is shutter speed important in principle for the subject being filmed? Maybe at any shutter speed you will get approximately the same results, or will its incorrect value ruin the frame? If the first option is ours, then we turn our attention to other parameters. For example, on the diaphragm. Read about choosing aperture and its recommended values for specific scenes here.
- Determining how the frame should look . We build the final look of the photograph in our heads. Let's focus on the effects presented above. And, based on this, we select a suitable shutter speed from the approximate range.
- We identify problems that need to be mitigated with endurance . In some situations, by adjusting the shutter speed, we are not chasing the effect in the frame, but are leveling out the problems that arise during shooting. For example, when shooting with an open aperture using high-aperture optics in bright sunlight, you will have to set very fast shutter speeds to get the correct exposure. There is no artistic effect achieved here - you just need to get the frame with the correct exposure.
- We take sighting shots, analyze the results and change the parameters . And so iteratively in a circle until we get the desired result.
The more experience you have, the faster and easier it will be to complete step 4.
When to use what shutter speed?
For clarity, I compiled a table describing frequently encountered situations. It will help you decide when to use a long shutter speed and when to use a short shutter speed.
I note that the values I indicate are approximate. There are no dogmas here, each case is unique. Therefore, treat these numbers as basic ones, from which you can build on and select the appropriate value.
| Situations | Description and shutter speed ranges |
| Little light. | Whether it’s a dark room or twilight, we lengthen the shutter speed so as not to get blur and movement. We focus on the formula: the shutter speed should be no longer than 1/EGF. If you don't know the equivalent focal length and crop factor, here you go. If the subject is static, then we simply try to get a sharp frame without movement at a minimum ISO. In this case, we select the aperture to suit the subject. As a rule, we are talking about shutter speeds around 1/25 – 1/50. If there is movement in the frame, then we use fast optics and an open aperture, raise the ISO and select the shutter speed so that there is no blur. Don't forget about an external flash - it can help out indoors. |
| Exposure is the main remedy in the fight against smearing and movement. | Don't forget about the formula: shutter speed is shorter or equal to 1/EGF. We shorten the shutter speed if it is not possible to take a clear photo at values that are not too long (for example, 1/30). |
| Night city photography. | Depending on the illumination, the values can vary approximately as follows: 1/10 - 15 s. Be sure to use a tripod and don’t forget to turn off VR (vibration reduction function), if available. |
| Evening portraits. | At shutter speeds longer than 1/20, even with short-focus optics, it is difficult to obtain clear images. Advice: in the evening we do not use long-focus optics (105 mm or more). Even 85mm can be left at home. Try fast 50mm and 35mm lenses (with VR stabilization) and shoot more atmospheric portraits of a person in the city, rather than just a person with a blurry background. This will allow you to use longer shutter speeds. It's hard to make a person freeze anyway, so long shutter speeds won't work for us anyway. If even with an open aperture the frame turns out to be underexposed, raise the ISO. And we definitely shoot in RAW - later it will be possible to pull out the dark failed details and partially level out the noise that appeared due to the high ISO. If you have an expensive full-frame camera, then it will be much easier to shoot - you can raise the ISO too much without the risk of getting low-detail soap with poor color, shorten the shutter speed, and it’s easier to use long-focus optics. And it’s easier to draw details in RAW. In general, for such shooting, a full frame frees up your hands. |
| Long-focus optics. | Again, the rule about 1/EGF is the same. If you choose optics, give preference to stabilized options (with VR). The motor compensates for vibration, and it’s easier to shoot handheld at longer shutter speeds - there’s less risk of getting shakes. Example: you are shooting birds with optics with a 200 mm DF on a crop lens. On Nikon the EGF will be 300 mm. This means that a necessary condition for shooting is to use a shutter speed of 1/300 or faster. Please note that the condition is necessary, but may not be sufficient, because We film not static, but the movement of birds. For fast flight, 1/300 will probably not be enough - 1/800, 1/1000 or shorter is better. |
| Excess light. | We compensate with closed apertures and short shutter speeds. What if we are shooting a portrait in the desert under the scorching sun? And at the same time we want to get strong blur and open the aperture to 1.4. A? It will still be overexposed. Ultra-short shutter speeds come to the rescue - 1/2500, 1/4000 and even 1/8000 s. By the way, not all cameras support a shutter speed of 1/8000 (we are talking about a mechanical shutter). Some consider its presence a sign of professionalism of the camera. In any case, this makes it easier to work with high-aperture optics in situations like in the example. |
| Shooting with wiring. | Approximate range – 1/10 – 1/200 s. For fast moving cars and birds, try starting with the range – 1/80 – 1/160. Cyclists, other athletes – 1/40 – 1/60. If the image still comes out clear, zoom in to 1/20 - 1/40 or more extreme values. |
| Water, clouds. | For freezing, we try shutter speeds of 1/500 and shorter. Need a water flow with details? Try ¼ - 4 s. Need a blurry water stream with no details? Try > 4 s. The transmission of cloud motion is highly dependent on their speed. Movement in very strong winds will be noticeable at a shutter speed of 1/15 or 1/10. Usually, a beautiful blur is obtained at 3–15 s. If you want to get an abstract photo, where water and sky turn into a monochromatic substance without details, we try the range of 20 - 30 s and more. |
| Tracers. | You can try sighting for 10 – 30 s. If there is a large dense flow of cars, you can try for 3 – 5 minutes. If the flow is small, then the tracers will be almost invisible. |
| Sport. | The more dynamic, the shorter the shutter speed) Everything is individual, I will not give specific values. It all starts at about 1/200 and shorter. Let me draw your attention to one detail - the speed of the subject being photographed relative to the photographer changes. For a car rushing past, the shutter speed should be much shorter than for the same car that we are filming from afar, when it is moving towards us or away from us. If there is not enough light and the plot allows, you can use this fact. |
Summary
Shutter speed is the time during which the matrix receives light.
It often greatly influences the perception of the frame; it can be used to create various effects and solve problems. It is one of the 3 building blocks of exposure, along with aperture and ISO. And it is important to learn how to identify it correctly.
Take the advice and approximate values from this material as a starting point and try, try, try! If you use automatic mode and have never set shutter speed manually, start using S or even M modes. See how much more freedom they give. Based on experience, the brain itself will then offer the necessary values. Success in creative work!
What is ISO in a camera?
Currently, ISO is the light sensitivity of the camera matrix. This is the third parameter that can affect the exposure of a photo. Basic ISO on modern cameras is 100-200 units. The maximum can be ISO 6400, 12800 and more. The physically larger and better the camera matrix, the greater the ISO capabilities.
In general, roughly speaking, ISO is the parameter that affects the noise of the image. The higher the ISO, the more so-called noise there is in the photo. Accordingly, low-noise matrices are highly valued today, because they allow you to shoot handheld in poor lighting conditions and get good pictures. Here are the cameras that currently lead in ISO performance: Sony A7s, Nikon D800e, Nikon D800, Nikon Df, Nikon D4s, Nikon D4, Nikon D600, Nikon D610. As you can see, Nikon cameras, which mostly have Sony matrices, cope best with noise so far. This is the paradox. However, the leader is still the Sony A7s, which at the time of writing this article had just appeared.
This photo was taken at ISO 900. Below are enlarged fragments (crops) of this frame at different ISOs. Enlarged the upper right part of the candlestick