Any dishwasher user knows that the machine “knows how” to lock the door open. In this position it is convenient to load or unload dishes, leave the dishwasher to air, and clean the filters. Unfortunately, sometimes the door stops holding open. There are two types of problems possible:
- The door does not lock in the open position and falls . To avoid mechanical damage to the door when it falls to the floor, you have to hold it when opening.
- The dishwasher door closes on its own. This creates inconvenience when loading and unloading dishes: you need to constantly hold the door with one hand.
When it is necessary
In modern dishwashers, the movement of the door is controlled by a special mechanism that contains springs. This is done, for example, in Siemens dishwashers. It ensures not only its smooth movement and fixation, but also allows it to be stopped in an intermediate position. If the door malfunctions, if you open it slightly, it may close on its own, creating discomfort when loading the dishwasher.
Various breakdowns of this kind more often occur in built-in dishwasher models, for example, from Bosch.
Preparation of tools and materials
No special tools are required to secure the façade trim.
The same items that are used to install the dishwasher as a whole will be useful:
- drill;
- screwdriver;
- awl;
- screwdriver;
- tape measure or ruler;
- pencil or marker.
If you don’t have a power tool, then one screwdriver is enough - you can screw in the screws by hand if the holes for them are pre-drilled.
The work is simplified by the presence of a stencil for the façade overlay included in the delivery set. It is a large sheet of thin paper with marked attachment points.
The stencil is placed on the back side of the decorative panel and the places where the screws are screwed in are marked.
In addition to the tools, you will need double tape. Several “Velcro” pieces of tape will come in handy when you need to try on the facade. It is not recommended to immediately “mount” it on screws, since an error of 2-3 millimeters will mean all the work is in vain.
Preparing for the adjustment procedure
Before starting work, it is necessary to carry out the appropriate preparation:
- It must be remembered that when making adjustments, you must turn off the dishwasher and also disconnect the power cord from the outlet.
- If we are talking about a built-in dishwasher, such as Electrolux or another similar one, the unit must be removed from the niche.
- Disconnect the hoses that supply water, as well as the drain hoses.
- Before starting work, you will need to prepare the tools that will be used.
- Before carrying out adjustment work, it is useful to familiarize yourself with the instructions for carrying it out.
When disconnecting from communications, it is important to remember the following:
- You need to unplug the dishwasher from the outlet. The wire must be rolled up and hung on a special holder, which is provided in the dishwasher for this purpose.
- It is necessary to close the valve, which will turn off the flow of water from the water supply network to the dishwasher.
- The water intake hose must be completely disconnected from the dishwasher.
- Next, the drain hose is disconnected. After this you need to install a plug.
If a built-in dishwasher model is used, then it is removed from the kitchen furniture set as follows:
- First of all, you need to find the fasteners that hold the dishwasher.
- Using a Phillips screwdriver, you need to remove the screws that hold the car in the niche.
- Next, you need to carefully pull out the car. Typically, the weight of built-in units AEG or others of the same kind does not exceed 50 kg - this makes it possible to move it yourself. In this case, it is necessary to act as carefully as possible.
- Before placing the machine on the floor, you need to prepare a place for this and cover the floor so as not to damage it when moving. The dishwasher should be placed in such a way that it is easily accessible from all sides.
To prepare for door adjustment, you will need the following tools:
- crosshead screwdriver;
- pliers;
- hexagon;
- you need to prepare a metal cable one and a half millimeters thick.
Conclusions and useful video on the topic
Video instructions help not only to imagine, but also to see the installation process in detail. We offer several examples of self-installation of a dishwasher façade.
Sequence of actions in the video with useful comments:
Installation of a panel from an IKEA set:
Testing of the installed facade:
Installing a decorative panel to disguise a dishwasher is a simple procedure that does not require special skills. However, you need to act very carefully and skillfully, otherwise you can ruin the lining .
If you are not confident in your abilities, invite an experienced furniture maker to install it - he will cope with the installation work in 15 minutes.
Have you completed the façade installation yourself and want to share your success with other users? Share your experience in the comments to this article and the difficulties you encountered. Also add a photo of the finished work.
After purchasing a wonderful helper for household chores, the process of installing a dishwasher follows. If you decide to install the equipment yourself and adjust it, then you can watch a video with a master class, which will clearly show what actions need to be performed.
Dishwasher Installation
In general, installing a dishwasher, regardless of brand, looks about the same. In any case, if necessary, you can call a specialist, but in fact it is quite simple and you can do everything yourself, following the instructions.
Carrying out work
After the preparatory stage, you can begin making adjustments. Unfortunately, this procedure cannot be completed in a few minutes. In order to do the job efficiently, you will need, in particular, to disassemble the machine and check the condition of the springs.
- You need to unscrew the fasteners that hold the right side wall of the car. After this, it must be removed and set aside.
- Then you need to detach the top cover. To do this, simply unscrew the screws that hold it in place.
- Under the cover you will notice two fasteners from which cables extend. They run down along the right and left sides of the body. The ends of the cables are connected to springs.
- There are screws that regulate the tension of the cables. If you twist them in the right way, the opening will become tighter or, on the contrary, more free. The door spring stiffness must be adjusted.
- It is possible that one of the cables has broken. In fact, this leads to the fact that the remaining person takes on double the load. In this case, the damaged element, including the spring, will need to be replaced.
In order to carry out the replacement correctly, it will be necessary to perform the following operations:
- the screw on which the damaged cable is attached must be loosened slightly;
- Using pliers, the fastener must be carefully removed from this screw;
- now you need to disconnect the spring from it;
- in order to carry out this operation, such an element must be purchased in advance;
- then a new, serviceable cable is placed on the spring;
- its other end is placed onto the screw using pliers;
- after this element is assembled, it is necessary to adjust the tension so that it is optimal;
- Now we need to install this cord in its place.
It is possible that the steps performed were able to adjust the door. However, in some cases they may not lead to the desired result. In this situation, repairs continue. Now the following actions are performed:
- You have to open the door all the way. Now, holding it with your knee, unscrew the screws that are located around the perimeter of the end.
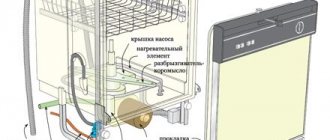
- Now we have to disassemble the door. It should be taken into account that it is made according to the sandwich principle. There are internal and external parts, between which there is a mechanism for opening and closing the door. To see it, remove the inner cover.
- During operation, it is necessary to weaken the spring so that the door cannot slam shut.
- You need to remove the cover from the cable.
- After this, you need to install a new locking mechanism instead of the old faulty one.
It is important to remember that it is not recommended to immediately assemble the door. The point is that you need to ensure the quality of the work. This rule applies to any dishwasher: Beko or other brands.
In order to carry out such a check, you need to hold the cable and spring and see how easy it is to open or close the door. It is also important to make sure that the door is held steady in the middle position. If the door spring adjustments have been made correctly, the door can be reassembled.
The mechanism that is responsible for fixation
To understand how to secure the dishwasher door, you need to look inside where it is attached. There you can see:
- Special spring;
- Cable;
- Fixing element for locking, which consists of plastic;
- Loop.
The loop begins to move when we fully open the machine door. To open it, you need to apply a certain force, which is quite enough for the spring to stretch as much as possible. The locking element secures the cable, so that the spring does not pull back, thereby keeping the doors open. They will remain in this position until you close them yourself. The blockage will immediately be released, which will lead to compression of the spring, which will tighten the cable. You must hold the door, because it will be attracted by a spring, so it will slam shut quickly.
Let's assume a situation where the locking element is broken. In such a case, you must constantly hold the door so that the tension of the spring does not cause it to return to the closed position. It will require constant force to keep it open while loading dishes. If the locking device fails, operation of the dishwasher door is not permissible. Otherwise, the mechanism will completely break down, which will ultimately lead to serious repairs.
Other faults
The most common situations were discussed earlier. However, other damage may occur:
- The door leaf falls when opened. This suggests that the most likely cause is a broken cord or a broken spring. In this case, appropriate replacement is carried out.
- Sometimes the door does not lock when closed. As a result, the dishwasher does not start working. In such a situation, the dishwasher will show an error code on the display. In this case, it is necessary to take the actions indicated in the instructions for this situation.
- If the machine is leaking, one possible reason could be broken cables or a broken spring. When carrying out repairs it is necessary to check them.
- If you hear a strong creaking sound when opening or closing the door, this indicates that the hinges need to be lubricated. It may also turn out that they have become faulty. In this case, they need to be replaced.
Although in the situations under consideration, adjusting the door tension can be done independently, but if the dishwasher is under warranty, it is better to contact a service center.
Do-it-yourself PMM door repair
Start small: check that the dishwasher body is installed correctly. Here are the main criteria for successful operation:
- The housing is located on a flat, hard surface.
- Each leg is in contact with the surface.
- The location is verified by the building level.
If the car is leaning forward a little, then the door may not close all the way. If necessary, adjust the legs of the PMM.
Check the placement of dishes in the hopper. Nothing should rest against the lid and prevent it from closing.
Checking and replacing the seal
There is a rubber cuff around the perimeter of the chamber. It covers the cracks, protecting equipment from leaks. If it becomes deformed, problems with tightness begin. Replacing an element is not difficult.
Buy in advance a new rubber gasket specifically for your Ariston, Electrolux, Zanussi, etc. model. Universal seals do not always fit tightly into place.
Sequence of work:
- Unplug the machine.
- Open the door.
- Remove the old seal. Just pull one end and it will come off.
- Install the new rubber into the groove. Ensure a snug fit.
- If the product is longer than usual, cut off the excess.
- Check if the hopper closes properly.
That's all, nothing complicated. Next, we’ll look at the PMM fasteners.
Self-installation of the front on a dishwasher - instructions and advice
Published by Artyom on 04/15/2019 04/15/2019
Installing the facade, unlike connecting a dishwasher, is quite easy, you just have to follow the instructions and do everything step by step. To install the facade, you will need the following tools and items:
- screwdriver,
- furniture panels,
- roulette,
- table top,
- appropriate fittings.
Basics of installation and model selection
There are three main types of dishwashers:
- Freestanding.
- Partially built-in.
- Fully built-in.
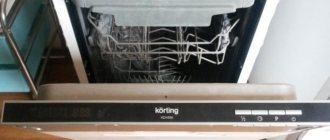
If free-standing machines are placed anywhere in the kitchen, then other types of PMM “Electrolux”, “Ikea”, “Gorenye” and other brands are built into the furniture set. Initially, decide on the installation location and prepare a niche for the dishwasher. How to connect the PMM correctly, read one of the previous articles.
The advantage of the built-in PMM model is that it is completely hidden behind the door, being part of the interior.
- This option is easier to choose; you don’t need to look at the design of the case that will fit into the kitchen set.
- The hidden control panel is a big advantage if there are small children in the house.
- Reduced noise level. It is hidden by the cabinet panels where the equipment is mounted.
The decorative panel can be screwed to the door, hiding the equipment from prying eyes. Most often, the wall part is made of the same material as the rest of the kitchen: for example, Leroy MDF.
A template for mounting a decorative facade is supplied complete with built-in models from Siemens, Beko, Miele. Depending on the type of installation, the front panel may be attached before the door is attached to the dishwasher.
How is installation done?
The façade canopy is made only if the dishwasher needs to be installed in a ready-made kitchen. Due to the fact that many of these devices come with installation instructions, this should not be a problem.
To install the facade, a handle is first attached to it, which will open the Bosch, Electrolux, Kandy, Ariston or Indesit dishwasher. After this, it is necessary to install fasteners adapted to engage with the door of the device. On the facade element to be installed there is a special paper overlay, which indicates exactly where the holes need to be drilled in order to apply the fasteners. You can drill directly according to the drawing to eliminate the possibility of error.
After all the holes are made, you need to install special fasteners. After this, the front is simply attached to the dishwasher. This happens by inserting fasteners into special grooves on the dishwasher door.
But the installation of the facade is not yet complete, since this hanging element needs to be secured. To do this, first open the car door and then unscrew several bolts from the inside of the door. They are replaced with longer ones, which will allow the facade to be attached. At the same stage, you can adjust the tension of the machine door springs by turning the screws. By watching the video, you can get a more accurate idea of the process.
How to install a dishwasher under the façade
Before starting work, read the installation instructions and make sure you can handle the job. Remember to follow safety precautions. It is useful to watch a current video, e.g.
To begin with, installation of communications is carried out: water supply, sewerage, electrical network. Only after a test check can the PMM be secured in a niche, under the tabletop, and a decorative panel hung. Fastening is done with bolts (screws, self-tapping screws) included in the kit. Along with fasteners, gaskets, instructions, you will find a stencil. Applying it to the cabinet walls, countertop (depending on the PMM model), draw the locations of the holes for fastening. They are easy to make with a hammer drill. Do not make through holes; drilling ¾ of the wall thickness will be enough. All that remains is to screw on the countertop protection and place the dishwasher in the cabinet. Last steps:
- Attach fittings, slider mechanism (if necessary).
- After attaching the stencil, determine the attachment points on the inner surface of the facade.
- Use a narrow drill to drill points, not all the way through, to avoid damaging the exterior finish.
- Remove the transport screws from the door (if equipped).
- If you are working without an assistant, try temporarily fixing the facade on the door with double-sided tape so that you can easily screw in the fastening bolts in the right places.
- Check the tightness of the fit, the quality of fixation, locking, and the presence of interference when opening and closing.
If the lock is broken
When the machine's lid does not close, the cause may be a mechanical failure of the lock or lock. Older models have plastic lock parts that break easily. In most cases, a broken lock cannot be repaired, but you can replace it with a new one. The main thing is to choose the same one that was installed in the dishwasher. You can do this yourself or call a dishwasher repairman to your home. He will remove the old lock, install a new one and check its operation. To do this, you do not need to dismantle the entire device and take it to a workshop; everything can be done at home.
Another reason why the door does not close tightly and the washing process does not start is the failure of the triac responsible for blocking the door. The control unit simply does not understand that the door is closed, so it does not give a command to supply water and start the program. In this case, you will not be able to repair the machine yourself. You'll have to call a specialist.
How to place a call to a specialist?
Would you like our employees to come to your aid as soon as possible? Then apply for an urgent call right now. You can do this:
- By phone +7 (499) 397-72-20;
- By email [email protected] ;
- Or by sending a message in the feedback form .
Within a few hours after receiving the application, specialists armed with all the necessary equipment and tools will arrive at the place where your household appliances break down. They will quickly determine the causes of the malfunction, tell you the options and cost of eliminating them, and after agreeing with you, they will begin the direct “treatment.”
Note! Calling our employees and diagnosing the condition of the equipment are free services (subject to further repairs by our specialists).
It is possible to repair a dishwasher inexpensively and efficiently, and we, the service specialists, are ready to prove this to you right now. Call!