The basis for choosing a projector screen is the purpose of the purchase. A model that is acceptable in one setting is not suitable in another. The purchase entails expenses, but without this device it makes no sense to purchase the main device - a projector. Achieving maximum quality content without a suitable screen is difficult.
Before purchasing a screen for a projector, you need to familiarize yourself with the existing types of similar devices, their sizes and materials. If the purchase is made for installation in a small room, then a roll-up screen that has wall or ceiling mounting options is optimal. When purchasing equipment for various presentations, monitors on a tripod or folding frame are preferable.
Determining the required screen format and whether its size matches the area of the room are important steps, without which ease of viewing and quality of content are impossible. The coating material affects the brightness of the video projector, its location in the room, and the degree of illumination.
White matte screen
A popular and simple projector screen is white with a matte surface. This is a win-win variation for the average buyer who does not need to understand the technical nuances himself. Instances with such a surface are divided into budget and expensive ones. There are budget options for devices that adequately project video onto a perfectly smooth matte white canvas.
Important! A white matte screen is a safe choice for a buyer who has a lack of contrast due to exposure to indoor light. To compensate for such a defect, you need to darken the room, or use lamps from a more powerful projector.
When displaying a variety of images on a matte screen, light is scattered in all directions, resulting in content that looks vibrant from any angle. The black edging of the screen canvas serves as contrast and “hides” distortion defects.
How to choose a projector screen?
Experts suggest choosing an inexpensive option, warning about the presence of minor disadvantages:
- The coating may have a visible granular texture.
- The surface shines in brighter light.
- Uneven brightness of the canvas.
- Imperfect white tone.
A screen canvas for a projector may have a low cost, but be durable and easy to fold. A high-quality projector will perform its functions efficiently, even if it comes with a simple screen.
Here is another article dedicated to projection screens. Basically, the screen consists of some fabric of a certain size that is attached to something. What kind of fabric, what size and what is it attached to - these are the questions that have to be answered in the process of choosing a projection screen.
Content:
1. Screen size - depending on the lens 2. Screen format 3. Screen purpose 4. Black frame 5. Screen size - depending on brightness 6. Gain 7. Matte white screen 8. High gain screens 9 .High contrast screens10. Perforated screens
Screen size - depending on the lens
How to choose the screen size? To do this, you need to take into account the characteristics of the room and the capabilities of the projector. The fact that there may not be room for a screen of the desired size is already understandable. Now let's look at the user manual for the projector you are interested in - there we will find a table that says at what distance from the screen the projector should be in order to get the desired image size. That is, even if you have space for a screen, the projector must also be in a predetermined position relative to the screen and may not fit into your room.
Below is an example table from the user manual of one of the office projectors I tested. Since most projectors have a zoom (optical zoom adjustment), in the table the screen size you are interested in will correspond to two different distances from the projector to the screen - minimum and maximum:
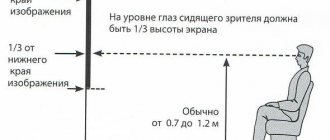
The diagram even showed us that there are two options for installing the projector - tabletop and ceiling (upside down). Obviously, the ceiling version allows viewers to sit closer to the screen, while the tabletop version is easier to install.
From the table we see that this projector projects an image with a diagonal of 100 inches from a distance of 302 to 363 cm. You can immediately estimate whether you have these 3 meters in stock or not.
Please note that when mounted on a tabletop, the bottom edge of the image will be below the center of the lens, and when mounted upside down on a ceiling, the opposite is true. This is called "offset", or fixed offset. According to the table, it is 17 cm. If it were not “-17 cm”, but “+17 cm”, then the bottom edge of the image when mounted on a tabletop would be above the center of the lens.
But with advanced home projectors, the shift can be adjusted (the “ lens shift ” or “lens shift” function), and the range of shift can vary greatly from model to model - starting from the ability to correct a small error in height made when installing the projector, and up to to such a range of image shifts that would allow the projector to be placed on legs, either on a low table or on a high shelf, projecting over the heads of the audience - while the shift is adjustable by the user. However, installing a projector is not the topic of this article - I was simply pointing out that all these options can greatly limit your choice of screen size and location.
Screen Format
Regarding the table above, I think you noticed that it is given for a screen aspect ratio due to the fact that the projector resolution is initially 1024 × 768 (1024: 768 = 4: 3). This projector is better suited for displaying documents and presentations due to its more vertical image. As you know, the more popular image format today (Full HD, Ultra HD) has an aspect ratio of 16:9. If you buy a home projector, then most likely this is the screen you need.
Various screen formats located within the CinemaScope format
Various screen formats arranged within a 1:1 format
Other popular formats correspond to resolutions of 1280x800 and 1920x1200 (16:10 aspect ratio) - also a fairly popular “business” format, ideally displaying video in 1080p (Full HD) or 720p, but with a vertically elongated screen shape, giving additional 10% height, which is good for viewing documents and presentations.
Projecting a 4:3 image onto a 16:9 screen (pillarbox)
Well, movie buffs may prefer a wide cinemascope screen (aspect ratio from 2.35:1 to 2.4:1). In the latter case, the projector must be able to switch between cinemascope and 16:9 format, which is a topic for another article. Therefore, the screen is taken in either a 16:9 format - then a cinemascope movie will occupy the entire width of the screen, but there will be an empty area (strips) above and below. Or you can use a cinemascope screen - then 16:9 movies will take up the entire height of the screen, but there will be unused areas on the sides.
By the way, in English there are special terms for this - if there are stripes at the top and bottom, then this is a “letterbox”. If the stripes are on the sides, then it is a “pillarbox”.
Projecting a 16:9 image onto a 4:3 screen (letterbox)
So, the table above for a budget office projector is for its “native” resolution of 1024x768 (4:3 format). However, the projector can also display a full HD (16:9) signal if required - naturally within its 4:3 image, letterboxing (leaving stripes at the bottom and top). Of course, clarity is lost in this case. All I mean is that the user manual for this projector contains two more tables with screen sizes - for 16:9 and 16:10 images.
Still, you should usually choose a screen of the same format as the projector resolution - you can't go wrong.
Please also pay attention to the fact that many roll-up screens do not have a fixed format - as far as you expand it, that will be the format.
Purpose of the screen
The screen is a canvas that can be conveniently transported by rolling it up, so you also need to decide what to attach it to (on what frame). Looking through the catalog of screens, you will find that they are sorted into groups precisely according to the frame design:
- Framed wall screen
- Portable screen
- Roll screen (manual or motorized, sometimes built into the ceiling, sometimes with tension)
- With a hard surface (similar to a marker board)
- Rear projection film
Here are a couple of examples of tasks that a projector owner faces that require different screen frame designs:
Carrying out road presentations - you need a portable screen with the most common matte canvas, but the screen frame must be collapsible, lightweight and mounted on a tripod. All this should be rolled up and carried in a case.
Conducting a presentation to a large audience in a room that does not have a stationary screen. Here you will need a large collapsible screen on a rigid frame, which is transported in large cases. Most likely, an installation projector with a brightness of 6000 lumens will be used.
Epson Hosts Press Event - Using Screen on Prefabricated Frame
A projector for a school - there is a high probability that for this task a simple roll-up screen will be used, which, if necessary, unfolds to cover part of the blackboard. You can also use the mobile screen for presentations, or project it onto a whiteboard.
However, the simplest roll-up screen is unlikely to be suitable when using an ultra-short throw projector that shines from a distance of several tens of centimeters - even small folds will distort the image. Most likely, UKF projectors will be used with a marker board. Although if there is room for a screen stretched over a rigid frame, why not? It is better for an interactive projector to work only on a hard surface.
The specifics of using projectors in educational institutions and offices are almost the same.
Also, no one will stop you from projecting on the wall if it is more or less white.
A projector in a home theater usually uses a screen stretched over a rigid frame. Enthusiasts also use a painted wall, although I will not touch on the topic of screen paints in this article. Another common case: let’s say you want an image that covers the entire wall, but the projector does not fit across the room, and if you place it along the room, then there is a window. In this case, you can cover the window with a motorized roll-up screen covering the entire wall. Motorized roll-up screens are also good for living rooms, as they allow you to transform the room into a home theater only for the duration of viewing. In this case, you might want a recessed ceiling screen. It should be noted here that there are roll-up screens with tension. Tension allows you to make the screen surface perfectly flat, eliminating the slightest image distortion.
Projection onto a store window - you will need to stick a rear projection film onto the glass.
Photo of SHENZHEN SMX Display curved projection screen
Image stitching and mapping . Here a single image is projected by several coordinated projectors. It helps a lot when projectors have built-in support for Edge Blending (seamlessly joining two images) and the ability to correct image geometry for projection on convex or concave surfaces. The building of the Ministry of Defense can be used as a screen (mapping to buildings). If you want to create an airliner simulator, you can use a large concave screen or even project onto the walls of a room, creating a 270-degree view, and if necessary, a full 360-degree view using 4 projectors.
As you can see, almost anything can work as a screen, so be guided by your goals and wishes - in most cases, you just need to fix the screen canvas of the size you need somewhere. But the screen canvas itself is a topic for another discussion.
Generally speaking, when it comes to buying a budget-level screen, it may turn out that you pay the bulk of the cost of the screen for the frame - you shouldn’t count on any “increase in image quality.” It is quite possible that a wall painted with good matte white paint will give even better image quality than an inexpensive purchased screen.
Black frame
Most likely, the projector image will not match the shape of the screen down to the millimeter. The frame, as it were, cuts off the part of the image protruding beyond the borders and produces the effect of a large TV, which becomes a screen for the viewer. Some home theater screen manufacturers produce screen frames with very thin borders - as a nod to current trends in the world of televisions.
The frame also has another significant role. If you project onto a large screen canvas without a frame, you will be able to see where the projector's image begins - the blacks will be a little brighter than a blank screen, and you will notice that the projector's blacks are not perfect. And in complete darkness, it will seem to you that even the most expensive projectors illuminate the black, although the contrast can be prohibitive. The frame will not allow you to detect the border of the image, since it itself will be one. Everything inside the frame is perceived “as is” and is not compared with surrounding objects.
Some screens allow you to adjust the projection area by covering unused areas with black matter. This is useful, for example, for home movie enthusiasts who watch 2.35:1 and 16:9 movies on a 2.35:1 screen. When viewing 16:9 on such a wide screen, masking the black bars on the sides will come in handy.
Historian Klim Zhukov talks about the history of infantry
There are many situations where you have to project onto a screen without an edge, or when the image does not fit exactly into the shape of the screen. It probably won't matter much in a classroom or at a roadshow.
Screen size - dependence on brightness
The size of the screen is limited not only by the size of the room. The most significant limiter on screen size is the projector's brightness in the color mode you'll be using it in, not the maximum advertised brightness. For example, 3000 lumens are stated, but it may turn out that the colors at maximum brightness are not very good. You switch to a more precise mode, and there are 2500 lumens.
The most serious limitations on projector brightness are in well-lit rooms. Yes, there are some standard, proven options - for example, a typical office projector is about 3000 lumens, and a typical screen is from 80 to 100 inches. This is a fairly standard option for a school classroom or meeting room.
But if you suddenly want to calculate the required brightness of the projector in a lit room, then you cannot do without a lux meter. The fact is that you, as a customer, must determine what level of contrast you want to achieve in a lit room - both the size of the screen and the brightness of the projector will depend on this.
A lux meter measures the illumination of a surface by a projector or lighting lamps. For example, the illumination of the screen surface without a projector is 50 lux. It's pretty bright. Now we turn on the projector and display a white screen at the same place - the illumination is now 500 lux. This means image contrast = 500/50 = 10:1. 10:1 is normal for presentations (if you say it’s not normal, it means you need a brighter projector or a smaller screen). Now move the projector back - the white color became 250 lux. This means the image contrast is 5:1. This is the bare minimum of what I would consider normal when it comes to presentations. 3:1 is the lowest level providing minimal intelligibility. The advantage of the projector is scalability and flexibility, but you should not abuse this in strong lighting conditions.
I note that this method of measuring contrast assumes that you have a white matte screen or a white wall, since the lux meter is turned towards the projector and does not take into account the reflective properties of the screen surface. We'll talk about this later.
Much less radically, the brightness of the projector limits the size of the screen in a dark room . Here they try not to “overdo it” with brightness in order to maintain the depth of black. Some high-end home theater projectors have features that allow you to smoothly reduce the overall brightness of the projector. Please note: not at the expense of contrast (unlike adjusting the image parameters “brightness” and “contrast”). This is achieved by adjusting the laser brightness (if the projector is laser) or manually adjusting the aperture. The maximum that inexpensive projectors can offer here is a switch to lamp saving mode.
I will express my personal opinion: you can lower the maximum brightness several times compared to the recommended level and still get an image that is pleasing to the eye - the eye will still adjust to the lower brightness level. And yet, it is impossible to convey a sunny summer scene without adequate brightness - the effect will not be the same. And I’m no longer touching on the topic of HDR - the HDR effect clearly requires more brightness than for normal viewing.
Since in a real home theater, in the name of preserving the depth of black, they strive to drown out all unnecessary light sources in the room, the image contrast becomes closer to the maximum capabilities of the projector. In a home theater, the way to determine the required brightness will be different than when installing a projector in a school classroom or other well-lit room - we only look at the brightness of the image .
When we talk about lumens, we're talking less about brightness and more about the power of the projector - image brightness will depend on screen size and other factors. Just compare the image brightness of a 3000 lumen projector on a 27" and 130" screen. I think you know what I mean. Lumens are “luminous flux.” “Brightness” is a slightly different unit of measurement, and the American version is often used in home theaters - “foot-lamberts”, although there are also “nits” (candelas per square meter). It is believed that a typical HD home theater should have a brightness of 12 to 22 foot-lamberts. Some people consider 14 to be optimal, others - 16 foot-lambert. I previously drew attention to the fact that the surface of the screen can have different reflection parameters. Obviously, on a gray matte screen the image will be less bright than on a white one. Thus, we smoothly approached the topic of “gain” of the screen surface.
But before doing this, I bring to your attention the figures that I once took from the table of one of the manufacturers of elite screens, which indicates the correspondence of the luminous flux in lumens to the brightness in foot-lamberts for a matte screen with a gain of 1.0 .
| Projector luminous flux (lumens) | screen diagonal 80 inches (16:9) , foot-lambert | screen diagonal 100 inches (16:9), foot-lambert | screen diagonal 130 inches (16:9), foot-lambert |
| 500 | 20 | 12,8 | 7,6 |
| 600 | 24 | 15,4 | 9,1 |
| 700 | 28 | 17,9 | 10,6 |
| 800 | 32 | 20,5 | 12,1 |
| 900 | 36 | 23 | 13,6 |
| 1000 | 40 | 25,6 | 15,1 |
| 1100 | 44 | 28,2 | 16,7 |
| 1200 | 48 | 30,7 | 18,2 |
| 1300 | 52 | 33,3 | 19,7 |
| 1400 | 56 | 35,8 | 21,2 |
| 1500 | 60 | 38,4 | 22,7 |
| 1600 | 64 | 41 | 24,2 |
| 1700 | 68 | 43,5 | 25,8 |
| 1800 | 72 | 46,1 | 27,3 |
| 1900 | 76 | 48,6 | 28,8 |
| 2000 | 80 | 51,2 | 30,3 |
As can be seen from the table, for a 130-inch diagonal screen, the luminous flux of the projector in precise mode should be from 800 to 1500 lumens (optimally 900-1100 lm), and for an 80-inch diagonal screen - even less than 600 lumens.
Gain
An integral attribute of the screen material is the so-called gain - a number that tells how many times the screen increases the brightness of the image for the viewer sitting in the center. It is generally accepted that a matte white screen will have a gain of 1.0 (although it could be 0.9).
Let's say your projector produces 700 lumens in precision mode. At Gain 1.3 this will be perceived as 910 lumens, and at Gain 0.8 it will be perceived as 560 lumens. Thus, this coefficient, to one degree or another, allows you to control the brightness of the image at the screen selection stage.
Matte white screen
A matte screen is a screen that (ideally) diffuses light evenly in all directions. This means that the image appears almost equally bright when viewed from any angle. By default, it's best to assume that the user wants a plain white matte screen.
As an example of an ideal matte screen surface, I would suggest a thick sheet of matte photo paper. Unfortunately, in reality there are no guarantees that the screen surface will be as good - especially this should not be expected in the budget price segment. Typical problems with inexpensive matte screens include:
1. Surface granularity - the surface has its own texture, which can be noticeable to the viewer. Hence the more expensive “4K compatible” screens.
2. Shine effect - reminiscent of frost. If you look closely, in bright light you can make out rare pinpoint reflections on the surface of the screen.
3. Despite the fact that the canvas is stated as matte, it may have slight unevenness in brightness (light spot).
4. White balance (hue) may differ slightly from ideal white.
All these qualities are related to the fact that the screen fabric must be cheap, durable, and can be rolled up and unfolded for transportation without any problems. Therefore, even the quality of the simplest white matte screen has room to improve.
The above should in no way scare you away from buying inexpensive screens. I believe that the most expensive projector will still be able to achieve its potential with the cheapest matte screen.
In the context of what has been said, I will repeat that a wall painted with high-quality matte paint may turn out to be an even better screen than a budget screen. And, of course, you should not count on the fact that every seller will understand what kind of shine or light spot we are talking about on a screen that says “matte white”. Just know that a matte white screen can cost different amounts of money - which means the quality will vary.
If the gain is 0.8 or lower, then we are talking about a gray screen . In the simplest case, this is a gray matte screen - it can only be useful in that it cuts off excess light without affecting the contrast. Such a screen makes sense if the projector has excess brightness - by reducing the brightness, you improve the black color in dark scenes (although I haven’t seen anyone use them in practice for a long time). It is important not to overdo it and not make the picture faded.
High gain screens
For a screen with a gain of 1.1 or more, the surface begins to acquire “glossy” properties - falling on the screen, light is not reflected evenly in all directions, but like a mirror, more light will be reflected according to the principle “the angle of incidence is equal to the angle of reflection.” For example, the projector is on the left - the picture will become brighter on the right. Well, if the viewer and the projector are located approximately in the same direction (which is most likely the case), then the viewer will see a brighter picture than a matte screen would give, and those sitting on the side will see a less bright one. But the beauty of this type of screen is that...
In general, what happens in the case of a matte screen?
When there are light sources in the room, when light leaks through curtains, or when projector light is reflected from walls and other surfaces back onto the screen, unwanted light falls on dark areas of the image, degrading contrast.
Contrast is the ratio of white brightness to black brightness (for example, 500:10 = 50:1) - in the case of unwanted light, the brightness of white and black will increase by the same amount, and the contrast will decrease (for example, 510:20 = 25.5:1) .
All thanks to the matte “communist screen”, which equally reflected stray light in all directions, including to the viewer.
If the screen has a large gain, then external light falling from the side tends to be reflected not evenly, but according to the principle “the angle of incidence is equal to the angle of reflection.” For example, the light came from a side window and went into the wall on the opposite side, and not at the viewer - that’s where it belongs. This results in increased image contrast.
However, a side effect of high-gain screens is greater unevenness of brightness across the screen—a light spot may appear in the center of the screen (the center is brighter than the edges).
When viewed from the side, the brightness also decreases. To determine the optimal viewing area, the parameter “ half gain ”, or “angle of half drop in brightness,” is used. It allows you to determine the acceptable position of the spectator seats - it is believed that a drop in brightness by 2 times is still acceptable.
For example, if you lean your back against the screen, stretch out your arms and start moving them apart, then the angle between your arms will be “half gain”. For example, if it is said that HG = 90 degrees, then spread your arms 90 degrees - this is the area where you can place spectator seats. At its edges the brightness will be 50% of the center.
High contrast screens
They are also “ ALR screens” (ambient light rejecting screens, screens that block background light).
As a rule, these are quite expensive canvases. They are multi-layered - the layers can contain various microstructures or act as optical filters. The complexity of the fabric structure can impose restrictions on its bending and folding.
As we have already indicated, screen manufacturers are trying to block background illumination by increasing “gain” - side light is not reflected evenly, but mainly to the side, and light from the side of the projector is reflected mainly at the viewer.
ALR screens are the next step. only the light coming from that direction can be reflected with greater
If you sit in front of such a screen, it will likely seem gray to you - it will be darker than a sheet of paper, since the light falling from above and from the sides does not reflect back to you. But then you turn on the projector, and its light, without scattering in all directions, goes mainly back to you - the brightness of the image may turn out to be higher than when projected on a white matte screen. You can imagine how microscopic “reflectors” in the structure of the screen return the light strictly in the direction from which it came.
It turns out, as it were, two gain numbers:
1. Base layer gain - since the projector looks gray, it should be less than 0.8.
2. When white is projected, it turns out brighter than a matte screen - therefore, the gain is 1.1 or more.
Witchcraft! However, going against nature, manufacturers risk introducing (and do introduce) a number of undesirable artifacts into their creation - the uniformity of color rendering may deteriorate, the effect of a “dirty window” may appear, and at midnight a blank screen stares at you...
I'm kidding! Sit in the forest at night in front of a mirror and make sure that nothing like that exists.
Manufacturers of ALR screens strive to balance on the brink of a noticeable effect of increasing contrast and the absence of unwanted artifacts. The more the room is illuminated, the more noticeable the effect. In a well-prepared black room it may not be present.
By selectively redirecting to the user only the light falling on the screen at a certain angle, it is possible, for example, to make high-contrast screens for ultra-short throw projectors - after all, it is more or less known at what angle the light falls from below onto the screen - this light must be received and redirected perpendicular to the screen - at the viewer, cutting off the rest.
But it is usually recommended to place the projector further away from the screen - this will reduce the light spot and better fit into the optimal zone with the best brightness.
Perforated screens
Acoustically transparent screens are required, as a rule, in a home theater, when the central speaker of the acoustic system is conveniently located behind the screen.
To make an acoustically transparent screen, small holes are made in the canvas. Another option is a special woven fabric. In such a screen, the holes form gaps between the threads. Of course, a perforated surface may be less smooth. In addition, they usually try to take into account the fact that light also penetrates behind the screen through the holes - here you need to make sure that there is a black light-absorbing surface behind the screen. I hope that this article was useful to you and will help you better understand what manufacturers write in the characteristics of screens. Remember that the screen only reflects what the projector projects - its importance should not be overestimated. And yet, I gave examples of situations where the screen can significantly affect the image quality.
Gray screen
A gray screen helps enhance contrast. This type works well with high-brightness projectors. The gray screen reflects some light onto the walls, ceiling and floor, and blocks excessively reflected light.
The condition for using a gray screen is that the wall opposite should not reflect light, since the canvas does not block the perpendicular beam. The eye perceives the difference between bright and dark areas. On such a canvas, the decrease in brightness is not visually noticeable, and dark-colored details look advantageous.
Important! External lighting must be limited so that the image on the screen is correct - not “overexposed”.
Any projector is optimally suited to canvases with a high-contrast gray tint. Such screens became popular with the development of home cinemas. They are resistant to light sources resulting from poor room darkening. Gray surfaces have an advantage over white ones in the deeper transmission of black colors.
What to look for when choosing
When purchasing such a product, you should pay attention to:
- Diagonal of the working surface. You should proceed from the location where you plan to install the screen. Based on the results of measurements, the required size is selected.
- Coating. More expensive options offer anti-reflective coating, thereby allowing you to use the screen even in bright side light.
- Availability of fasteners or tripod included. Not all options are equipped with accompanying fittings - please pay attention to this.
- Weight. Different manufacturers use material of different planes. Before purchasing, you should familiarize yourself with the product specifications so that installation does not become an overwhelming task.
High Gain Screens
A widescreen screen with a high index (1.5-2.5) focuses the light flux directed from the projector.
The disadvantages of such screens include:
- Dimming the brightness of content for people sitting off center;
- Limitation of the number of comfortable seats;
- Red, green and blue colors change as they move away from the center;
- The “hot spot” effect is enhanced.
Such screens have found their application in conference rooms, where a little lighting is enough, and the seats are placed compactly in front of the canvas. In a home cinema, preference is still given to a screen with a low ratio. By giving the received light to the space, some screens seem brighter, while others distribute the light evenly, covering a larger area, but the brightness is lost.
Relative black levels
Under this projector and specific lighting conditions, the eleven screens produced significantly different effective black levels. The deep black level gives the picture cinematic contrast and a vibrant dynamic range of scenes, including significantly enlivening the colors.
However, the perception of black is highly dependent on the viewing angle. In this sense, screens with a narrow viewing angle have a clear advantage in frontal viewing and quickly lose it as the viewing angle increases.
The ability of contrast screens to “hold” the black level also depends on the direction of external illumination. Naturally, the Stewart FireHawk G4, which impressed with its chic black when viewed from the front and purely side illumination, changed its character when the ceiling illumination was turned on. Remember that the contrast screen is a specialized development, in contrast to the universal one - the Lambertian screen. The first clearly shows its advantages only when you have thoroughly studied the special conditions of your cinema hall. The second is ideal in reference conditions, but it is ready to quickly give way to the first when the cinema hall begins to deviate from the “reference”.
Projection films
For the screen, rear projection film is used as a basis.
The system consists of main elements:
- Projector;
- Film;
- Plexiglas sheet;
- Fastening elements.
Designs of this type have advantages:
- Low cost;
- Viewing angle;
- Visibility of advertising in any lighting;
- Removes from the surface without leaving any traces;
- Harmless;
- No special care required.
A transparent film-shaped projector screen is used for advertising events. The film is installed on transparent glass, regardless of its size, and is glued to the inside of the glass.
Projection film material comes in different types:
- Transparent film, when the projector is turned off, returns the glass to its original appearance. It is recommended to use a bright projector, as the films have contrast.
- White film has high brightness but low contrast. It is suitable for advertising in white colors.
- Gray film has optimal brightness and contrast. In this case, outdoors you need a projector with higher brightness. Dark gray film is the best option for decorating street display windows.
Quality products are recognized by the Japanese and Americans. After them come products made by South Korean manufacturers, which have acceptable quality and an affordable price. When choosing film, you need to pay attention to the projector. It must have qualities that ensure the normal operation of the entire system.
Is your projector broken? Contact our service center! Our qualified technicians will quickly and efficiently repair any breakdown! (We work only in St. Petersburg)
We offer you:
- High quality services
- Own logistics department with polite couriers
- Reliable transportation in a shockproof thermal bag
- After diagnosis, the technician will call and agree on the cost of repairs.
- Original spare parts
- Warranty for spare parts and repairs
- Inspection by quality control department
- Full technical maintenance of equipment
Leave a request and get a 15% discount!
Submit your application
Best lists
We will highlight the leading devices in each selected category as a separate selection, namely:
- Best price – Classic Solution Scutum.
- Portable – CINEMA TRISCREEN.
- Stationary – SAKURA SCPSM-200x150FG.
Details below.
Best Price – Classic Solution Scutum
Features of Solution Scutum screens: high-quality fabric without seams on the projection surface provides a flat, smooth working surface; wide viewing angle of the canvas surface; wall and ceiling mounting; locking mechanism for selecting the desired format and projection height.
| Aspect Ratio | 1:1 |
| Diagonal | 83″ (212 cm) |
Cost: from 2,890 to 3,300 rubles.
Classic Solution Scutum
Portable – CINEMA TRISCREEN
TriScreen line – tripod-mounted screens in 4:3 format. Screens are recommended for small and medium-sized rooms, easy to install and assemble, portable, with a viewing angle of over 100 degrees, with a border around the perimeter for a decorated image.
| Aspect Ratio | 1:1 |
| Diagonal | 71″ (180 cm) |
Cost: from 4,630 to 5,100 rubles.
CINEMA TRISCREEN
Stationary – SAKURA SCPSM-200x150FG
The Sakura screen is designed for small and medium-sized rooms. Features quick installation and assembly. It is light in weight (relative to other stationary models). It folds and unfolds easily, there are no creases or unevenness, the black fields are painted evenly, and the canvas itself is clean and white.
| Aspect Ratio | 4:3 |
| Diagonal | 100″ (254 cm) |
You will have to fork out from 12,200 to 13,000 rubles.
SAKURA SCPSM-200x150FG
Alternative options
A person who wants to save money can use the funds at hand. In addition to the flat plane of the screen canvas, it has a light-scattering property. Previously, white cotton was used; it easily transmitted light through its surface, as a result, contrast was reduced to a minimum.
Today, a popular method is to paint walls with special projection paint. Its composition reflects light well and increases contrast. It is applied to the surface, which is beneficial for large rooms with huge screens. Here you need to invest labor to finish the surface to a uniform state.
Another way is to make a black screen for the projector yourself. This may save your budget, but the procedure itself is quite complicated. Finding a projector board is not difficult, but choosing a special matte film can be an impossible task.
The most unique today is a model of a curved 3D viewing surface designed by Canadian specialists. The border of such a screen smoothly transitions into the visual room, as a result of which the line between them is erased. The result is a real image that makes the viewer feel like they are in the story.
Popular manufacturing companies and their brief advantages
Products are represented by dozens of brands.
The following manufacturers of projector canvases have proven themselves well::
- CACTUS is a Chinese company that produces portable and motorized screens with diagonals from 67 to 150 inches;
- Classic Solution is a German company specializing in the production of projection screens for more than 10 years, producing unique sliding models for home and office;
- Digis is a Russian screen manufacturer that focuses on environmental friendliness and functionality;
- ScreenMedia is a Chinese company whose line includes projection screens and other interactive equipment.
Type of construction and purpose
Screens can be either stationary or mobile according to their design features. The first is suitable for watching films, video clips at home or in halls for seminars and conferences. The canvas is rolled up and folded into a tube, stretched onto a special frame. This category has its advantages and disadvantages. The organizer does not need to spend time installing, assembling or disassembling the structural system; such a screen is always ready for use. But a permanent place must be allocated for it. And this is not always convenient.
What are the mobile screens for video projectors called?
These are mobile devices that are used for numerous outdoor events:
- Presentations;
- Training seminars.
They are used as screens for home theaters, which go with the owners to the dacha or country house. And they are also used if there is no physical possibility to allocate part of a stationary wall in the room.
Types of stationary screens
Stationary screens of any type are made according to the roller shutter principle. When assembled, the entire structure is protected by the housing. The canvas is attached to any fixed plane. This could be a wall or ceiling. The screen can be used to cover the window opening; it can be mounted on a board or large card. Instances that have a black projector screen block sunlight.
There are designs of devices that can be mounted in the ceiling: suspended or suspended. The system with mechanisms is almost invisible and does not require additional space.
The budget option involves manual control of the system. It consists of a few simple steps: folding or unfolding the canvas. For adherents of modern technologies, experts have developed an electric drive for the mechanisms, allowing control using a remote control.
Among the more modern options, devices with a separate button output and other improvements have recently appeared on the market.
Reminder! An electric drive is convenient if the screen surface is located at a considerable distance, raised high to the ceiling or has large dimensions. At home, models of this type are rarely used.
The disadvantage of the design is the inability to provide a smooth and even surface of the canvas. In this case, a type of structure with a tension system is used. Tension screens are also a type of stationary type, the canvas of which is attached to the frame base with rivets. The ability to stretch provides a perfectly smooth surface, which is a necessary factor for high-quality images.
Types of mobile screens
Mobile types of devices include mobile projection devices. Their standard application is in the business area, consisting of seminars held on location, as well as other events.
There are three types of such devices:
- Tripod design;
- Floor-standing devices;
- Canvases on legs.
The structure is installed using a tripod - a stand in the form of a “tripod”, a case for storing and transporting the canvas. The width of the canvas matters here. If it exceeds more than 2.5 meters, moving becomes more difficult.
The copy, installed, as they say, on the floor, is transported in a special case, which still has the basic properties of the design. An image viewer that has a frame at the base or rests on legs is more stable and is suitable for canvases with a width of 3 meters or more. The design is easy to assemble and disassemble; these actions do not take more than 15 minutes.
There are tabletop versions of canvases, the design of which is distinguished by the presence of fastening elements to the tabletop. Before choosing a projector screen, you need to decide on the appropriate type.
Main types
Similar screens can be positioned as:
- Mobile. They are transported in special bags and cases, and deployed on site without additional tools. Due to their compactness, they are widely popular in small presentations, debates, and meetings.
- Portable (or foldable). A full-size and massive canvas that can be transported from one classroom to another, no further.
- Stationary. Non-removable, mounted on walls or ceilings. Certain models, for example, are never removed from the wall and remain in constant tension, others are rolled up, but they can also be rolled up manually or using an electric motor.
A little about sizes and formats
Screen sizes depend on their function, purpose and room dimensions. The most popular format has a ratio of 16:9; it is used for watching movies. If you choose the wrong screen format, this leads to distortion of images, dark stripes appear on all sides of the screen. For reading texts, viewing photographs, and Internet pages, there is a 4:3 vertical format.
The screen size for the projector corresponds to standard values, otherwise the picture may be reduced in height and cut off at the sides.
When choosing a screen according to the diagonal, its shape matters. Two surfaces of different formats can have equal values, but be directed differently.
The choice of screen for a projector is carried out taking into account various nuances in order to satisfy the desires of the owners. Having followed all the recommendations, only one criterion remains - cost, but here everyone has the right to choose according to their wallet.
Comparison table of characteristics
Brief specifications of the considered positions are presented in the summary table.
| Model | Diagonal, cm | Angle, ° | Weight, kg | Price, rub |
| Lumien Eco Picture LEP-100101 | 212 | 100 | 4 | from 1,520 to 1,800 |
| DEXP WM-100 | 254 | 100 | 7.54 | from 2,720 to 3,100 |
| ScreenMedia Economy SEM-4303 | 241 | 100 | 6.8 | from 3,890 to 4,440 |
| DEXP WE-120 | 305 | 160 | 9.5 | from 4,720 to 5,000 |
| Cactus Wallscreen CS-PSW-206×274 | 343 | 100 | 12.5 | from 5,800 to 6,450 |
| Cactus Wallscreen CS-PSW-187×332 | 381 | 160 | 18.2 | from 7,130 to 7,600 |
| SAKURA CINEMA MOTOSCREEN | 305 | 210 | 12.6 | from 10,890 to 12,000 |