Despite the incredible popularity of modern television equipment, which amazes with its technical capabilities, display sizes and picture quality, traditional projectors remain a very useful tool.
Many business conferences, seminars, lectures and other important events cannot do without them. In order for the image to be transmitted accurately and efficiently, you need to pay due attention to finding a good screen, the cost of which is sometimes prohibitive. Fortunately, there are many ways and instructions on how to make a projection screen with your own hands, so anyone can save money and do without large financial expenses.
A projector screen is the main element of a home theater
Projectors are often purchased for home theaters. They play videos with improved quality. The fan makes virtually no noise, and the ability to reproduce computer images makes them an indispensable device for everyday purposes and family movie watching.
If you have bought a projector for your home, then the next question that should concern you is purchasing a canvas . Its cost is very high, so you can try to make it yourself. It is important to understand that the main task of the canvas is to display the image in a high-quality manner.
Considering the interior properties of your room, you can use stretched or rolled fabrics . By the way, roll ones significantly save free space, so they are especially popular. They are also great for different interiors and display images with the most accurate color reproduction without distorting the picture. The presence of a special mechanism prevents damage to the fabric due to uniform tension and neat folding.
Tripod-mounted screens are not always effective and can be difficult to use in tight spaces. The screen on a tripod can easily be damaged during transportation. It can also be spread by a pet or child.
Rolled screen made of synthetic fabric
Owners of projection devices prefer screens made from roller blinds. In them, the canvas is wound onto a shaft, which is hidden inside the tube, and is pulled out as needed . Such structures can be either wall-mounted or floor-mounted; they can be mounted on a tripod or permanently mounted on a wall or ceiling. Sometimes roller screens are equipped with a motorized electric drive with automatic control. You can buy them at specialized sales points.
The main element of a roll screen is a tube in which the rolled sheet is stored. Anyone who has basic plumbing skills can make it with their own hands.
Required material
For this you will need:
- a piece of plastic pipe with a diameter of 50 mm;
- 2 rolling bearings;
- synthetic fabric;
- cord for hanging the tube (if necessary);
- 2 Twist off lids with a diameter of 53 mm;
- wooden slats with a diameter of 25-30 mm.
Work algorithm
The algorithm for manufacturing a simple tube with a fabric screen includes a sequence of such actions.
- The tube itself is prepared, for which, using a grinder, a plastic pipe is cut to the size of the screen and a cut is made along its axis. The width of the cut is approximately 1 cm. The edges of the hole are carefully cleaned so that there are no burrs or sharp protrusions.
- One of the wooden slats is used as an axis for winding the screen. Its length should be 5 cm greater than the width of the canvas. Bearings are tightly fitted onto the ends of the slats so that 1 cm of the board still peeks out from them on both sides. If necessary, the seats on the rail are adjusted to the inner diameter of the bearings.
- One end of the canvas is attached to the rail using a stapler. It is recommended to tuck the material by 2-3 cm before doing this. For reliability, you need to pin the edge of the fabric with two rows of staples.
- The canvas is carefully wound onto a rail, which is then inserted into the tube so that the bearings do not protrude beyond the ends of the latter. In this case, the free edge of the blade is passed through the cut.
- The edges of the tube are closed with Twist off type lids, and a hole with a diameter of 2 cm is pre-drilled in one of them, through which the axis for attaching the handle will pass. If necessary, the ends of the tube are wrapped with electrical tape, adjusting their diameters to the size of the caps.
- Through a hole in the lid, a flywheel is attached to the rail, with which you can roll up the screen. The design of the flywheel can be arbitrary. You can find quite a lot of videos on the Internet that show in detail numerous options for manufacturing roll-up screens with a drive of this type.
- The second strip is cut to the size of the canvas. The free edge of the material is attached to it with a stapler. Then the rail is rotated so that the row of staples is under a layer of fabric, which must be stapled again.
- A cord is attached to the tube, with which you can carry the screen or hang it on a wall or tripod.
Advice! Good results can be obtained if, instead of a screen, you use a roller shutter for windows with a single-color curtain of the required size. The fabric in roller blinds undergoes special treatment and therefore does not deform and does not collect dust.
So, every home craftsman can easily make a projection screen on his own. Complexity and appearance will depend on image requirements, availability of required materials and plumbing skills, from a painted wall to a roll-up of synthetic or electrically powered fabric.
Choosing a quality fabric
As mentioned above, the quality of the canvas is the main characteristic of a projector screen. The implementation of two important points depends on it:
- High-quality picture transmission.
- Correct distribution of light towards the viewer.
When choosing, you need to take into account the characteristics of the room, viewing angle, and placement of the projector on the ceiling or table. Don’t forget to pay attention to the lighting in the room, as well as the brightness of the projector.
What tools and materials are needed
To make a monitor, you will need the following tools:
- fiberboard sheet;
- fabric for the screen (we take 2.6:1.6 m as an example);
- screwdriver Can be replaced with a screwdriver;
- wooden beam - 4 pcs., 2500:40:15 mm;
- sanding paper;
- aluminum box - 5 pcs., 2500:65 mm;
- self-tapping screws for fastening the structure;
- pliers;
- paint brush or roller, matte white paint;
- furniture stapler;
- construction knife or metal scissors;
- thin felt.
Don't forget to prepare the necessary material
It's all about the size
If you intend to build a projector screen with your own hands from a banner or special fabric, do not forget to carry out a series of calculations to select the appropriate dimensions and correctly determine other characteristics, such as the placement of seats and room design. The canvas is placed directly in front of the audience, but not in front of the projector itself. In this case, the event will be accompanied by a high-quality computer presentation, which will be available to every viewer.
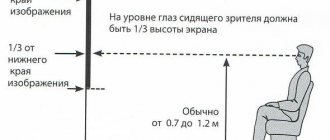
If you have to use a wall-mounted screen for the projector, its height should be 1/6 of the distance between the canvas and the last row of spectators .
In this case, the text will be readable and clear. Ideally, the feature is provided that the first row of spectators is placed at a distance of two canvas heights. Such a gap is considered the minimum from which it is comfortable to read the information offered. The lower area of the canvas is placed at a height of 1.2 meters from the floor. If you take this feature into account, viewers from the last row will be able to notice all the data and not miss anything important.
Making a screen by painting a wall
A good option for those who are sure that the furniture will not be moved and the walls will not be repainted. The advantage of the technology is that you can paint the entire wall, and thus be able to increase or decrease the image area. Although sometimes craftsmen make a black frame to emphasize the position of the screen in the interior.
The paint color can be white, light gray or even black. The most common color is, of course, white. However, when watching old black and white films, it is better to have a black background color, otherwise the balance of contrasting colors will look completely unnatural. Gray color is a compromise solution, best suited for regular 2-D films.
The work plan is as follows:
Preparing the wall
Preparing the wall:
- Alignment . Use a building level to determine whether the wall is vertical and smooth. You can replaster the wall if necessary.
- Priming . The primer paint should be matte and provide the outer layer of paint with maximum smoothness of texture.
Coloring
Let's move on to choosing and applying paint. There are many options on the market for painting walls to look like a projector - all of them are called "screen paint". There are quite expensive varieties that need to be applied in several layers. Their prices can reach hundreds of dollars. But you can use screen-paint even more simply - for 300 rubles a bank.
It is best to apply paint with a roller. This way you will avoid uneven distribution of paint, hairs falling out of the brush, sticking to the wall, and in general it’s faster to paint with a roller.
Improvised frame
Most home craftsmen frame the screen in black - they paint the frame with black paint or apply thin magnetic strips to special paint for screens (the strips are usually included in the package). But you don’t have to do this in order to maintain “room for maneuver” and not experience discomfort when watching a movie with an aspect ratio of 3:4 inside a 16:9 frame.
Installation Rules
The quality of the image will depend on how correctly the projection equipment is installed. There are only two important tasks that need to be solved :
- Choose the location of the canvas.
- Select image size.
When choosing the appropriate location for your projector and screen, be sure to consider the room size, layout, and personal preferences. Also, the choice may depend on the width and height of the canvas, the location of the outlet, the distance to the devices and other subtleties.
Projectors are installed in several positions:
- In front of the screen on the table.
- In front of the screen on the ceiling.
- Behind on the table.
- Behind on the ceiling.
To adjust the equipment, use a special remote control or push-button control of projectors . And if your homemade screen is made exactly to the established requirements, it will be as easy to operate as a shop canvas.
The second point of installation of the projector and the accompanying unit - the screen, depends on the size of the picture that will be shown on the homemade monitor. The width and height are determined by the distance between the screen and the projector, the video signal format and magnification. It is important to place the equipment on a flat horizontal surface so that the beam falls strictly perpendicular to the center of the canvas.
If these steps are completed correctly, you can begin connecting the projector. It's no secret that on its back there are a large number of different connectors. In most cases, users connect the computer to the device through the same input. True, if you need to show video rather than slides, you will most likely have to change the base connector to another. Typically this is HDMI capable of playing audio files.
What requirements must the screen meet?
Any special surface on which an image is projected must have certain properties, otherwise there is no difference between the screen and plain white plaster on the wall. What are these properties?
- Smooth and flat surface . The correct geometric shape of the surface is necessary to avoid distortion. This is especially important if you want to watch movies or play games with a 3D effect - uneven surfaces and curves will distort the image.
- High reflectivity . If the screen material absorbs light rather than reflecting it, the picture will be dull and inexpressive, or you will have to look for a projector with increased brightness (see how to choose a projector), but the higher the brightness, the higher the price, and you will also have to replace the expensive one more often lamp, pay more for electricity. So, it is easier to choose the right material, given that the surface of the screen should not be glossy, but should only reproduce the color and not mirror it.
Noticeable differences in the reflectivity or color intensity of the material are unacceptable, otherwise the overall visual impression will immediately deteriorate.
- Light weight . Most likely, the screen will be located next to electronic equipment - a projector, personal computer, TV, audio system. There is a risk of a heavy screen falling onto a fragile device, which could damage it.
Based on the requirements put forward, in our review we will not consider the design option for a flexible screen that can be rolled up. Moreover, the option with an electric drive for folding is eliminated, since this:
- the cost of materials for manufacturing (box, electric drive) greatly increases in price;
- requires a lot of labor;
- there is a high probability of assembling a low-quality structure; as a result, the flexible fabric may become deformed or even deteriorate when folded.
We will make a cheap stationary screen that can be made alone and in a few hours. No special skills are required - it is enough to be able to use ordinary tools.
Alternative solutions
If you can’t go to a hardware store to buy a PVC sheet, you can make do with alternative options. According to users, instead of a screen you can use:
- Clean apartment wall. It is important that the surface on top is not used. Perhaps there is a white door, cabinet or refrigerator in the house. They are also quite suitable.
- Often people project a picture onto a white ceiling. In this case, you will have to increase the number of pillows that will be laid on the floor. You will also have to fix the projector not in a horizontal position, but in a vertical one.
- Large flip calendars, which are turned to the audience with the white side, are often used as a screen. A good solution could be a white shelf from a closet or chest of drawers, which is placed on a stool and leans against the wall. The picture may not be accurate if projected onto a white Roman shade or light-colored curtain.
That's all, now you know what the features of projection equipment are and how to make a canvas for a projector with your own hands.
Originally posted 2017-12-21 06:22:24.
Screen material
When making your own projection screen, you can use a variety of materials, including:
- sheet of plasterboard or foamed PVC;
- Fiberboard or cardboard;
- thick linen fabric;
- vinyl cloth;
- raincoat fabric (raincoat fabric);
- fabric or PVC film for suspended ceilings;
- synthetic material for advertising banners.
Each of these materials has advantages and disadvantages, so the projector owner will have to decide what to make the screen from independently, based on his preferences.
Banner fabric
For making a screen, banner fabric is best suited - a synthetic material with high strength and excellent reflective properties.
Advice! When making a screen from a banner that has previously been in use, you need to make sure that there are no folds or damage on its surface.
PVC film
A good option for projection screens in terms of price/quality ratio is synthetic fabric or PVC film, which are used in the design of suspended ceilings. The only condition is that the material must have a matte texture. Then there will be no glare on the canvas, typical of glossy coatings. In addition, it is desirable to have a lining made of black polyethylene film - this will reduce the transparency of the material.
Raincoat and vinyl fabric
Good screens are made from “raincoat” - a durable material that is not afraid of strong tension. In addition, such a fabric will be characterized by increased moisture resistance and immunity to contamination that occurs when you touch it with your hands.
Screens made from vinyl fabric are not inferior in quality to the above materials. However, it stretches easily and breaks if handled carelessly.
Thick linen fabric
Often, thick linen fabric, for example, a regular new sheet, is used as a material for making projection screens at home. It is stretched over the frame, and to increase light reflectivity, it is painted with white matte paint and/or supplemented with a backing made of thick black polyethylene film.
Drywall
Cheap structures that can provide minimal projection quality can be made from plasterboard, fiberboard or cardboard. To do this, just cut out a rectangle of the required size, paint it with white matte paint and fix it directly on the wall or on a special frame. These materials are used in cases where it is necessary to quickly organize viewing, and the quality of the image is not particularly important.
How to make a 3D projector
To create a 3D projector you will need the following parts:
- Pieces of transparent plastic or glass, you can also use transparent CD boxes;
- Ruler;
- Stationery knife;
- Scotch;
- Mobile device through which the image will be broadcast;
- Simple pencil;
- Glue.
You can make a similar projector in about 10 minutes as follows:
- First you need to take transparent plastic. In this case, a transparent disc box will be used;
- Then you need to make a pyramid, having decided in advance on its dimensions. A pyramid can be made by printing a template on paper;
- Next, you need to use this template to cut out four trapezoids from plastic using a stationery knife;
- After this, the resulting pieces will need to be glued together to form a pyramid. To do this, you can use both glue and tape;
- The finished design must be placed on a mobile device on which the image is open. The picture will be much better visible if you place the structure in a dark room.
In a bright room, the 3D image will be very faintly visible.
Design
Based on the type of design, screens can be divided into two main groups: stationary and mobile.
Stationary
On a frame - this design involves assembling a frame and then tensioning the canvas on it, the assembled structure is fixed to the wall. The main advantage of this type of screen is the uniform tension of the canvas, which eliminates the appearance of distortions.
The roll-up screen can be mounted on the ceiling or wall-mounted. Such screens are compact and allow you to deploy them on top of a TV that can hang on the wall, thereby turning an ordinary living room into a cinema room.
For tension, a weighted tape is used, which is sewn to the bottom of the screen, which causes imperfect tension. More expensive models may also use side tensioners that solve this problem.
The deployment of roll screens can be done manually or be motorized by an electric drive. Some projector models have a special trigger output that generates a signal to open the screen when the projector is turned on.
Wall projection is also a fairly common and inexpensive screen option. Here it is important to determine in advance exactly the location of the future screen, because it will no longer be possible to move it.
Photo: Roberto Nickson
Mobile screens
Mobile screens can be the same roll-up screen, which is mounted on a special tripod and folded for transportation. This screen is perfect for outdoor presentations and for moving between different rooms within the same office or educational institution.
On a collapsible frame , due to its design, such a screen has better web tension and better stability, which allows you to comfortably work with large-sized webs. For transportation, such screens are folded into a special case.
An inflatable screen is a type of design for use in open outdoor areas, similar to an inflatable children's trampoline.
The inflatable frame for transportation is folded into a bag, installed and maintained in working shape with the help of fans that pump air and maintain pressure even if the shell is damaged.
Projector from tablet, laptop
When projecting a device from a laptop, tablet, or even from a small computer monitor (the PC unit itself will stand separately), the image quality will be better, since the screen is larger.
Let's consider a “humane” method in which there is no need to disconnect the matrix with the monitor from the laptop. The inhumane method is the same, but the gadget is disassembled, the specified assembly is pulled out and used as a display, in which case you will need an extension cable to the part with the keyboard (it is sold in electronics stores and on online sites).
You will need the same tools as in the previous case, but you need to take a larger cardboard box or box, for example, from large household appliances. Its front part should fit the size of the matrix, the length should be from 50 cm. The lens should be large. You can buy (Fresnel or regular lenses), remove from a device for reading full-page books or from special lamps that are used in restoration work, in medicine, in laboratories (an illuminated circle with a magnifying glass).
Assembly process step by step:
- For a magnifying glass, make a hole at the end of the box slightly smaller than the lens to securely fasten it.
- Fix the lens with tape, silicone glue, acrylic sealant, epoxy resin. The fit should be tight to prevent light from entering.
- A connector for the laptop screen is cut on the opposite wall. The edges of the cardboard should overlap it for the reason stated above.
- Open the laptop and place it upside down, so that the keyboard is on top of the box and the monitor is placed in the hole for it. Thus, the principle of optical reversal by the lens that we need is simultaneously implemented.
You can adapt the tablet in the same way as described.