Screen installation
In order for the installation of projection equipment to be successful, you must first take into account the layout of the room and special rules for installing projection equipment. It is best to choose a wall that is not illuminated by direct sunlight, otherwise the projector screen will begin to glare. If there is no suitable wall, and the whole room is very bright, then you need to take care of good darkening of the windows. An excellent solution would be curtains made of thick fabric or metal blinds.
Advice! It is better not to take plastic blinds, as they easily let in the sun's rays and become translucent.
Projector Ceiling Mount Manufacturers
The highest quality hangers for projection equipment are produced in Germany, they are expensive, very reliable and durable. On average, the price is 15% higher than that of the nearest European manufacturers.
Good reviews about ceiling holders, models of the same type with “Sunne” are 15-20% cheaper, and the quality and reliability of the holder are almost the same.
The original model of the ceiling bracket can be easily distinguished from a cheap fake by the quality of the paint. Most holders are painted with powder paints and special antistatic enamels. Products made in Southeast Asia are almost always painted with alkyd enamel.
Screen height
The height where the screen is planned to be placed directly depends on the dimensions of the room. If you place your impromptu cinema in a standard room, where there will be only a sofa and a couple of armchairs, then the projector screen can be hung at a distance of 60 - 90 cm from the flooring.
If the room is larger, then it is better to choose a higher location for the screen so that viewers from afar can also watch the presentation. However, it is important to take into account the disadvantages here: make sure that the screen installed too high does not project onto the ceiling, otherwise it will be completely uncomfortable for viewers to look at it.
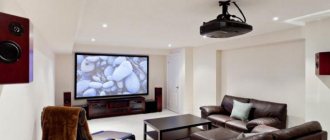
Projector instead of TV, view from inside the apartment
You have a premises that gives significant freedom in the implementation of high-quality recreational activities, why do you want to turn it into useless space? If you want to save money, do it step by step and BY YOURSELF! If your hands grow from the right place, you can make good furniture for a recreation center, adhering to certain parameters. First of all, start with such necessary things as high-quality air exchange (ventilation), at least 3 times an hour, otherwise 3-4 people will breathe in so much moisture that mold will begin to deposit on the walls, and the air in the room will be constantly musty. The air exchange can be stirred up using a pair of autonomous and inexpensive (compared to stationary systems that cost thousands of dollars) Marly heat exchangers (just drill the wall and supply 220V to them). Think about heating and air conditioning (if they are not already in the room, the projector and equipment are still “stoves”!), implement automatic dimming (it now costs quite a lot of money), or (if the toad is completely choking and does not bother you) - implement a system with manual drive. Today you can implement this (manually) when placing a window AT ANY HEIGHT: you can open/close double-glazed windows for ventilation and blinds, although such a system (when placing window openings in an inaccessible area, for example at a high altitude) will not differ much in price from simple electrical systems . The work can be done gradually and the budget can be planned as optimally as possible for the family. 7x7 is a rather large room; from the point of view of a cultural center, you can “stir up” a cinema hall in it with a screen of 3 meters in width, i.e. with a diagonal of more than 4 m, but in this case the budget for the projector will grow to a completely unaffordable amount. 120-150K is the budget of a good Full HD cinema projector, which means you will either have to sit further from the screen, or cut down to a screen 1.9-2.3 m wide and sit no closer than 3 m from it (this is of course a compromise, but acceptable) . For a large square room, it is better to choose a “living room layout” cinema design (that’s what I call it), which is ONE viewing point located in the most optimal area. For example, a large corner sofa of a modular design, which can be configured as desired and can comfortably accommodate 3-4 people (the width of the room allows), but you should avoid the classic row cinema layout, because the first row is most likely to be too close to the screen, and the second is close to the back wall and both will be outside the optimal placement area. By “living room layout” I mean that having placed a screen, a projector, an audio system, and a viewing area, the square room usually still has plenty of space that can be further decorated, for example, with a bio-fireplace (it doesn’t need a chimney), a storage rack, a coffee table, a couple of chairs, etc. similar elements of a standard living room, placed taking into account their influence on the sound (the shelf should not block the surround channels or be located close to the subwoofer, etc. In general, with this approach you will realize the maximum potential of your room, and the children will be extremely grateful to you (as well as my grandchildren to me). Don’t forget that today they are watching “SpongeBob”, and very soon they will be watching thrillers and playing shooters recklessly, and the option of “a bright holiday recreation center for kids” will come to naught very quickly and everything will have to be redone. Me and my I fight for hours in such furious battles, you can’t drag me by the ears.
If you choose the option of stage-by-stage implementation of the design project, I am ready to help with experience and advice on each of them, including very detailed ones (choice of materials, cost, design solutions, etc.). It’s not difficult for me, I myself went through this headache, actually acting as a chief installer for the contractor (to be honest, it would be better if I did everything myself, because I have to monitor and provide for ANY small issue myself, which in the future can greatly spoil life).
Screen sizes
It is customary to take the screen dimensions as its width and height, which are taken into account when calculating the distance for placing the device.
Today, projector models are so advanced that they can display images even on a 100-inch screen, which is approximately 2.54 m.
Naturally, everything depends on the room, however, if you don’t know which projector to choose, then it’s best to choose a 100-inch one, so the picture will be the clearest.
How to connect the projector to other devices
Connection to other devices is possible if the connectors match each other. Otherwise, you will need to select special adapters and cables.
How to connect a projector to a computer
Most often, the following types of connectors are used to connect the device to a computer:
- HDMI;
- VGA;
- DVI.
The last option is used the least often.
To connect, you need to take a suitable cable (use an adapter if necessary) and connect the computer and the projector with it. Using an HDMI cable provides a number of benefits to the user. Firstly, the image quality will be the best. Secondly, it allows you to transmit sound to the projector. Accordingly, you will be able to connect the speaker system. This cannot be done with a VGA cable.
After this, you need to decide which display mode will be used. To do this, you need to press the “Win + P” combination on the keyboard and select one of the offered options:
- the image is shown on the computer, but is not on the canvas;
- the video is broadcast only on the projector;
- the image is visible on both screens;
- a special feature in which the projection surface becomes a continuation of the image on the monitor.
Duplication, when the picture is visible on both screens, is often used for presentations and lectures. Image expansion comes in handy when you need to perform several tasks at once - for example, watching a video and writing a report on it.
How to connect a projector to a TV
If the TV does not meet the user's quality requirements, then the image from it can be transferred to the projector. It is important to remember that this can only be done if the TV has the following video outputs:
- RCA;
- SCARD;
- S-Video (OUT).
Modern TV models most often do not have such connectors. Another connection option is to connect the Out output on the TV with a cable and the In output on the projector. If any problems arise, you need to use special adapters.
After this, just turn on both devices. In the projector settings, you need to select playback through the connector to which the TV is connected.
Read more about connecting a projector to a TV.
How to connect a projector to a set-top box
In addition, you can connect an ordinary satellite/cable/digital set-top box to the device. This is the easiest way to do it. It is enough to find the same connectors on both types of equipment and purchase the appropriate cable. HDMI is usually the most suitable. When everything is ready, all you have to do is turn on both devices and select on the projector to display the image from the connector connected to the set-top box. Thus, you can replace the large and bulky TV in your apartment with a flat screen, which can be easily removed if you do not plan to use it.
How to connect a projector to a phone
Those projectors whose HDMI connectors are marked MHL can easily be connected to a mobile device. Thanks to this, you can display an image from a smartphone or tablet on a projection screen. The main thing you need to do before this is to buy an HDMI cable and an MHL adapter. This adapter connects your phone via micro USB to the HDMI connector on the projector. The most important advantage of this connection method is the ability to simultaneously charge the device and transfer an image from it to the projector. In addition, this method allows you to watch all the videos saved on your smartphone in good quality and in full screen size, and not on a small screen.
It is important to remember that the projector itself does not guarantee high quality images. To do this, you must connect and configure the device in accordance with the instructions. In addition, you should correctly calculate the distance between the projector and the screen. If everything is done correctly, you can enjoy high-quality images transmitted from almost any device you have at home.
Projection distance
This definition refers to the digital value of the distance from the projector to the screen. The projection distance (PL) is often indicated in the instructions for the projector itself, since it may differ for different models. In the device's operating manual there is a paragraph about projection ratio (PO). This is either a single number or a range of numbers for some devices.
It is this value that is necessary to calculate the PR:
- PR = width of the reflecting surface x by the value of the projection ratio.
Any units of measurement, such as centimeters, inches, decimeters, etc., are suitable for this formula and for recording the projection distance of the projector .
Example:
There is a projection screen with a diagonal of 100 inches, that is, 254 cm, the software is in the range of 1.4 - 2.8, this means you need to place your projector approximately 3.5-7 m from the reflective surface.
Note! If you need your ceiling projector to be placed at a specific point, you can change the formula: Screen Width (WE) = Throw Distance / Throw Ratio. And then the calculation will be as follows: if PO is from 1.4 to 2.8, then SE is approximately equal to 5/1.4 = 3.6. And this means that it is better to take a screen with a maximum width of 3.6 meters.
Equipment installation: video walls and LCD panels again
Let's return to video walls.
Video wall of 22 panels in the situation center
I praised the Epson EB-L1755U projector for its light weight.
And for good reason.
Because as for video walls, with a 55-inch panel weighing about 20-30 kg, a 110-inch wall will weigh more than 80-120 kg, and a 165-inch wall will weigh from 180-270 kg
.
The same diagonal, as a rule, is easily provided by a single
Epson EB-L1755U. For reference, the Epson EB-L20000U projector, which is more “severe” in terms of protection from various environmental factors and better suited for 24/7 operation, already weighs 49 kg with a brightness of 20,000 lm, where in this category this is still considered quite light weight.
Epson projectors at Integrated Systems Europe 2020
If we talk about single panels, then 80-inch LCD panels weigh on average from 70 kg (but there is a significant spread in values, be sure to check with the manufacturers). In any case, as mentioned in the example with home projectors, transporting such a large and heavy LCD display will cause more concern than transporting the projector
, even if it weighed more: the case provides fairly reliable protection for the electronics, and the interchangeable lens is usually carried in a separate case.
The process of installing a classic video wall made of 55-inch panels is demonstrated in this video:
Please note both the complexity of the process of fitting the panels to each other, and the rather complex switching
. In the case of a projector, the most elegant solution to this problem would be to use an ultra-short throw lens. If the image width of a video wall with four panels in one row is approximately 485 cm, then a projector with an ultra short throw interchangeable lens to achieve the same image size must be located at a distance of about 170 cm from the screen, directly below or above the image. However, the image format shown in the video for the projector is not natural (there are 3 rows of 16:9 panels instead of four).
But that’s why it’s a projector, to work with a screen with any aspect ratio.
An interesting installation with a “camouflaged” UHF projector (the lens is visible in the upper right corner)
Placement nuances
After calculating the maximum distance, you need to think about how to place the equipment or where the optimal point for attaching the reflective surface is.
Naturally, you should not forget about certain points:
- Seating. It is best to install all sofas, benches, rows of chairs so as not to disturb the acoustics of the room. For example, furniture that is too soft and plump and has a lot of mass should not be placed in front, as the sound for the back rows will be muffled.
- Wires. If you are installing projection equipment for the first time, you should take care of the length of the cables and the location of the sockets. They should be close to each other, or you should get a projector with an extended cable.
- Image quality. When displayed, the picture quality may deteriorate due to incorrect calculation of the software interval. The further the reflective surface is from the projector, the clearer and brighter the image will be. Before the final stage of installation and installation, test the projector at different distances from the screen to select the desired position.
Is your projector broken? Contact our service center! Our qualified technicians will quickly and efficiently repair any breakdown! (We work only in St. Petersburg)
We offer you:
- High quality services
- Own logistics department with polite couriers
- Reliable transportation in a shockproof thermal bag
- After diagnosis, the technician will call and agree on the cost of repairs.
- Original spare parts
- Warranty for spare parts and repairs
- Inspection by quality control department
- Full technical maintenance of equipment
Leave a request and get a 15% discount!
Submit your application
Connecting equipment: projectors
However, a local network connection is also used to control projectors, and HDBaseT is an integral attribute of an installation projector, and in some situations it is a real salvation, since it allows you to increase the distance of the projector from the signal source to 100 meters
.
Yes, you didn’t think so: HD signal, 100 meters. “Delicate” HDMI cables with signal fading after 3-5 meters smoke nervously on the sidelines.
But the point is not even what connection method to use. It makes absolutely no difference which device to use to create a multi-screen system: a projector or panels. It's all about the number of connected devices:
A projector typically covers the area of four 55-inch panels or more, and stitching two 110-inch images side-by-side requires only
two projectors
, or an
eight-
panel video wall.
At the same time, let me remind you once again that a 110-inch diagonal is available even to the most budget office projectors. You understand that connecting 2 devices is easier than eight.
Sometimes it happens that placing the projector away from the screen can easily solve the problem of wires if the signal source is located near the projector. However, in the case of ultra-short throw projectors, this most likely will not work, because... they are placed either close or almost close to the wall.
"Holy simplicity". The signal source was carelessly “thrown” onto the lighting truss next to the projector (Epson EV-100). “Namana! The task is completed, all is well"
Projector Vertical Offset (VSP)
This value affects the installation height. If you do the VSP calculation correctly, then the image quality, and specifically its geometry, will be at the proper level. VSP varies for different projector models. These numbers can also be found in the instruction manual for your projection unit. For example, VSP is positive +96.3%, and negative - -96.3%.
If this value has a minus, that is, it becomes negative, then the image will go below the lens and will not reach the projector, and if + is positive, then the image will go above the reflective surface.
Important! Projectors are installed in an upside-down position (they are also attached to the ceiling), so you need to pay attention to the correct setting of the positive value.
Sometimes the projectors themselves have a special vertical adjustment ring (optical assembly). This thing allows you not to move the entire device, but simply adjust the image configuration on the spot.
Projector setup features
Any projector, regardless of model, must be configured after installation. This is done in a step-by-step sequence.
- You need to turn on the device and make sure the room is dark.
- If the projector has adjustment capabilities, then they can be used to adjust the position of the image. If this option is not available, then this is done manually. It is enough to simply change the position of the projector itself or the projection surface.
- Adjust focus, contrast and brightness.
Benq Projector Setup Menu
Many owners of this equipment offer to use automatic settings options. You can choose the one that suits you and use it for viewing. When everything is ready, you should connect the signal source and start watching the video.
Installation height calculation
To calculate the mounting height (VM), you need a certain formula: VM=VSP x screen height. If we take as an example a device with a projector offset height in the range from -96.3% to +96.3%, then for a standard screen with an aspect ratio of 1.78, the height will be 124.4, because the standard diagonal is 254 cm, and the width is 221.4 cm.
The height of the reflector always affects the installation height. And these numbers will tell you how much lower or higher you should place the center point of your surface to make the image as clear as possible.
Installation of equipment: video walls and LCD panels
Let's now compare all this to a video wall. Facts and only facts.
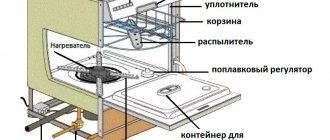
Stages of installation of video wall panel mounts
To install a video wall, you need to have a supporting wall or install an additional frame. Then the mounts for the LCD panels are installed on the frame or wall. The panels themselves must also be installed on fastenings and properly adjusted to each other, and then connected to each other with cables. It is possible that the image will also need to be calibrated to ensure its uniformity across all segments from which it is collected. All these are the steps necessary to simply get a ready-to-use screen.
Installing a video wall is a slow process and requires care and precision. Even if the panels are not installed “forever”:
I note that the smallest video wall will consist of 4 panels (that is, have a diagonal of more than 100 inches). Since we are talking, first of all, about bright installation projectors, this diagonal for the projector can be considered the “starting point”.
As for single LCD panels, they are not much different from the TVs mentioned above: you worry about the surface during transportation, but the diagonal is relatively small - 65-90 inches.
What is it and how to choose it?
The projector mounting bracket is a special holder to which the projector will be attached.
To choose it correctly, you need to take into account several nuances:
- Device weight and dimensions. When choosing a bracket for a bulky projector, you should focus on more durable metals, such as steel or titanium.
- Ceiling mounts for projector. If you plan to use the projector for quite a long time, you should also take care of reliable mounting. It is better not to take the cheapest screws, as they will quickly become loose due to their short service life and cause your unit to be positioned incorrectly.
- Installation kit. You won't be able to install the projector with a simple screwdriver. To do this you will need a special installation kit.
Installing the mount
After carefully reading the instruction manual, you can begin assembling and installing the software. The first step is to screw the special mounting plate for the projector onto the ceiling. Its size must match the model of your device.
Check all hanger mounting screws. Are they securely fastened? Remember, you are hanging the projection device on the ceiling, and this is a sufficient distance to disable it at the first unsuccessful fall.
After checking the projector ceiling mount screws, take a tape measure and calculate the number of centimeters from the projector optics (its front point) to the center of the bracket. Don't forget to add these numbers to your already pre-calculated distance to the reflective surface.
For example: the length from the edge of the optics to the center of the bracket mount is 20 cm, and the PR is 5 m. This means that you need to add 20 cm to the PR, and then the projection distance will be 5.2 m.
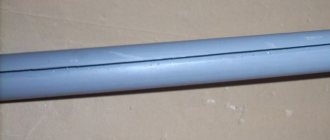
DIY ceiling bracket for a projector
A simple budget version of the holder can be made with your own hands. Its design will not have systems for adjusting the angles and height of the suspension, but the ceiling suspension will be durable, reliable, and most importantly - cheap.
To build the bracket you will need:
- Aluminum pipe;
- Galvanized corner;
- Mounting perforated plate to fit the projector;
- Fasteners, bolts and screws.
The diagram of the ceiling holder is shown in the photo.
For hanging from the ceiling, two corners are bolted to the top of the stand.
The pipe is connected to the plate in a similar way. If the lower pair of corners is secured to wing nuts, it will be possible to adjust the angle of inclination of the device. The presence of perforations on the plate ensures reliable and efficient removal of warm air from the video projector, so the operating time of the device is almost unlimited.
The most difficult part of the assembly is to accurately align the axis of the stand with the center of mass of the projector. You have to select the attachment point experimentally. The optimal height of the stand is 60-70 cm. Since there are no recommendations for installation, the length of the ceiling rod for a homemade bracket also has to be selected empirically.
The network wire and cable from the computer are laid inside the pipe and led through a corrugated hose to the corner of the room. In general, the ceiling system cost a little more than 500 rubles.
Mounting the bracket on the ceiling
The first thing you need to pay attention to when mounting the projector to the ceiling is the type of base itself:
- Concrete. If the room with the projector has a concrete ceiling, then you need to drill the required number of holes with a hammer drill to securely fasten the bracket. How to hang the projector on the ceiling in this situation? After you have made the holes, hammer in plastic dowels with a hammer. It is better not to use wooden ones, as they crumble and break over time. After preparation, we align the holes on the ceiling and the mounting plate, and then screw everything in with self-tapping screws. The wire remaining from your projection unit can be covered with a special plastic cable duct, or you can think about hiding the wire on the ceiling in advance, even at the stage of renovation of this room. Then you will need to make a special groove in the concrete for the cable, which will later have to be covered with a layer of putty and the final coating for the ceiling part of your room.
- Drywall. This type of ceiling is simply created for installing projectors, since quickly hanging and hiding wires is as easy as shelling pears - attach a bracket to the selected square of drywall, and then simply attach this piece to the ceiling with a screwdriver. Another option is to use a butterfly dowel, which opens halfway when screwing in a self-tapping screw and securely fastens the bracket to the surface of the drywall. Using a drill or hammer drill, you need to drill a hole for the dowel-nail so that there are no gaps when entering, otherwise, after screwing in the screw, the dowel will “walk” and fall out. This method is suitable for small projectors weighing up to 5 kilograms. If your device weighs more, then it is best to mount it on a metal partition that supports the plasterboard ceiling itself.
- Suspension. This type of ceiling is similar to a plasterboard ceiling, because you can remove the cells and install the projector directly on a concrete base, as in the first option. After fastening, you need to cut a hole for the bracket itself, take it out together with the device and put the cell in place.
- Stretch ceiling. It’s better not to take risks here, but to immediately contact specialists who will carry out the operation to install your projection equipment. Of course, you can try to do everything yourself, but there are not enough guarantees that your stretch ceiling will not be damaged. First, you will need to think about at what stage you are going to install the projector: before assembling the stretch ceiling or after. If this is the first option, then you will need to attach a mounting rod or stand to a regular ceiling or base, to which the mounting plate will later be attached. If the bracket stick is of a suitable length, then such a stand does not need to be attached. After installing the bracket and your projection unit, you should burn a suitable hole in the stretch ceiling material, and also install a special ring for greater strengthening. You need to pass the bracket stick through it. If the stretch ceiling is already installed, then the only option for installing the software is to dismantle part of this stretch ceiling and then put it in place, since it will not be possible to install the projection equipment without damaging the surface.
Thus, installing a projector on the ceiling can be quite a pleasant and hassle-free task if you calculate the projection distance in advance, think about the vertical offset of the screen projection, and most importantly, pay attention to the material of the ceiling or wall for installing your device.
How to mount a projector correctly and avoid common mistakes
If you want to set up a cinema at home with a large diagonal screen, then the best option would be to buy a projector. Purchasing equipment is only the initial stage of the matter. The most important part is the correct installation of the device, which requires certain knowledge and skills. People who are inexperienced in this matter make many mistakes. They result in low-quality images on the screen.
Common mistakes when installing projectors
Proper installation of projector equipment can ensure high-quality images. When carrying out work, it is necessary to take into account many different factors, as well as perform diverse installation operations. Therefore, for a person carrying out installation activities, not only theoretical knowledge, but also practical skills are important. Beginners or inexperienced installers make a number of both minor and serious mistakes when performing installation work, which in the end greatly affects the result.
The main mistakes when installing projectors are divided into two groups:
- incorrect installation of equipment;
- inaccurate or erroneous calculations of geometric distances.
Incorrect installation
Errors directly during installation work are as follows.
- An unsuitable bracket has been selected for fastening the project equipment: it does not match the model of the product being installed or is not designed for the material of the wall or ceiling to which it should be fixed.
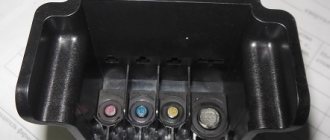
- The fact that the HDMI cable can only be a few meters long was ignored. Exceeding this parameter leads to a complete absence or distortion of the original signal, and to avoid this, it is necessary to use special technical devices.
- In addition to the screen and the projector itself, the required additional parts (for example, HDMI cable, HDMI splitter, HDMI receiver, HDMI transmitter, AV receiver, connectors and power cables) are not taken into account, which introduces unplanned costs.
- The bracket is positioned incorrectly - its rod is not placed at the desired angle to the vertical plane.
- The need to connect a 220V power supply to the video projector is not taken into account, which causes a number of complications with the installation of electrical wiring.
- The wires are left hanging unsightly.
The ideal option for laying electrical wiring indoors is to have it hidden or placed in a special cable channel.
Making incorrect calculations
Errors in calculating geometric dimensions are associated with inaccurate or incorrect calculation of the following parameters:
- optimal projection distance (distance of placing the projector from the screen);
- vertical displacement of the video projector, indicating the angle at which the image projection is tilted;
- the installation height of the projector equipment, which determines the minimum distance up from the center point of the screen it should be located;
- precise horizontal position of the projector in relation to the screen.
In addition, many people mistakenly believe that the device projects the output image directly in front of its own lens. Minor deviations in calculations or incorrect installation will lead to design problems: the boundaries of the image will not coincide with the perimeter of the screen, and the displayed image will go beyond its boundaries.
All that is required for high-quality installation of the projector is to contact specialists. With an impeccable reputation, it has been working in the information technology market for more than 3 years. Experienced employees find the best way out for the client from any situation in the shortest possible time. Sub Project branches operate not only throughout Russia, but also abroad, while prices for services are fixed at the same level in all regions of the country. All installation work is carried out by specialists in a comprehensive manner, while observing the requirements of the relevant GOSTs, SNiPs, and recommendations of equipment manufacturers. The customer can also order additional equipment maintenance: replacing lamps, cleaning lenses or filters, etc.
Projector Installation Guidelines
The installation of a video projector can be roughly divided into two separate stages:
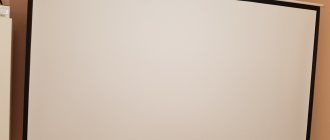
- fixing the screen on the wall;
- installation of projector equipment.
Modern video projector models can display the reproduced image on screens with a diagonal of 2.54 meters (100 inches). For convenience, it is recommended to use those varieties that can be rolled up (reminiscent of blinds). In this case, the dimensions of the canvases should be related to the area of the room. To avoid affecting image clarity, it is recommended to choose a place on the wall for installing the screen that is not directly illuminated by sunlight.
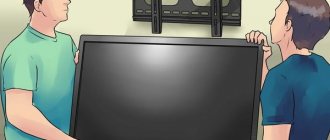
It happens that you need to hang the screen canvas on the ceiling. The work is performed in a similar way as with wall mounting, but this option is more difficult to implement in practice. In some cases, for example, when the room is small in size, it is convenient to first hang the video projector, and then the screen to it.
An important point is the correct choice of bracket: it must support the weight of the device being installed and match its model in size.
Often indoor ceilings are not concrete, but are made of other materials and different designs, for example, plasterboard, modular or suspended. Such options are problematic cases. You have to work very carefully so as not to damage the ceiling covering. All activities involve the need to change or strengthen the existing structure. In this case, you need to know how to attach the bracket correctly in each case. Operational errors can result in the entire ceiling needing to be redone, causing significant unexpected cash costs.
If the ceiling is suspended, then you cannot do without special tools and skills. In this case, only specialists can perform the installation work correctly.