Symptoms of a problem
A faulty water heater will make unpleasant sounds when operating or not turn on at all.
Often, when an equipment malfunction is indicated by a leak from the cables, the appearance of error codes on the dashboard.
The indicator on the panel is on
If the water heater does not heat water, but the indicator lights are working, there is a breakdown of the heating element. To check that the heating element is not working properly, you need to use a multimeter to adjust the resistance determination and connection to the heating device. Zero may light up and appear on the indicator due to a short circuit or break in the system.
Note! Another evidence that the heating element is not working is that the automation is triggered, turning off the device immediately after it turns on. This indicates combustion of the tubular electric heater.
Determining such a malfunction is easy. The thermal protection button plunges inside when the device is turned off. If the heater turns on after this, it is necessary to remove the scale or replace a new heating element.
Lime deposits form on the heating element due to the fact that the anode - a magnesium rod responsible for destroying and preventing the formation of scale - is faulty.
The light on the panel does not light up
If the light on the dashboard does not light up, you need to take a tester or multimeter and see if there is voltage to the thermostat. To do this, the tester is connected to the boiler. If there is voltage, then you need to try to restart the system. If the device shows zero phase or surges, then the thermostat needs to be replaced.
The boiler does not warm up to maximum
Often, many people encounter the problem that the boiler does not heat the water to the maximum volume and the light bulb does not light up. In this case it could be:
- the heating element is faulty or inoperative;
- The heating element has deposits in the form of scale;
- safety valve is faulty;
- The electronic board does not work.
If one of the above malfunctions is suspected, it is necessary to remove water from the water heater and disassemble it. Then check all the elements with a multimeter, tester and voltage indicator.
Most often, the reason for the lack of maximum heating of the boiler is in the heating element. This problem is relevant for old boilers. The service life of heating elements in them is limited. They work for no more than 4 years. When there is prolonged use of the heating element, a thick layer of deposits appears in it, which reduces the thermal output. The element may short circuit with a break. The part may also burn out. Then there will be a need to purchase and install a new heating element. Often the reason is improper installation and operation of the boiler installation.
The boiler does not heat the water, the lamp is on
When the water in the water heater does not heat up and the indicator light is on, there are two ways to solve the problem:
- Perhaps the knob is set to the “min” position, so the water in the tank does not heat up to the required temperature. The handle should be turned clockwise.
- The thermostat may have turned on. It is necessary to turn on the thermal protection button, which is located in different places of the case for different models. For example, for Thermex water heaters, the button is located at the bottom of the tank and is closed with a lid.
How does a boiler work?
There are storage and instantaneous water heaters. The first ones consist of a large container in which a heating element is installed. Water enters the device and is stored there at a certain temperature.
Using a temperature sensor connected to a thermostat, the temperature is maintained at the set level. To prevent loss of thermal energy, the body of the storage tank is covered with a layer of insulation.
Before starting to operate the boiler, you should study its structure, technical characteristics and manufacturer’s operating recommendations in order to prevent breakdowns
Flow models work differently. They also have a housing and a heating element, but do not store water inside. The device turns on the moment water flows through its body.
The liquid quickly heats up to the desired temperature. These devices are more powerful than storage models; they consume more electricity. But their sizes are compact and installation is a little easier.
And yet, in everyday life, a storage version of the water heater is more often used. Failures of different types of devices are similar, and they are eliminated using approximately the same means.
To automate the operation of the water heater, use a thermostat. This element receives data about the current state using a temperature sensor. It turns the heating element on and off based on incoming information.
This helps not only maintain the optimal temperature inside the drive, but also makes it possible to save energy. The device also prevents dangerous overheating of water, which could cause a serious accident.
If the boiler is leaking in the area where the water pipes are connected, incorrect installation of the device is most likely to blame, and the connections will need to be resealed
Hot water is gradually withdrawn from the tank and replaced by cold streams from the water supply. At this moment the heating element usually turns on. If the hot water in the boiler has not been used for a long time, it may cool down. Too low a temperature also gives a signal to turn on the heating element.
An article dedicated to the design differences and technical characteristics of equipment models popular among consumers will introduce you to the features of choosing electric water heaters.
Determining the cause of the malfunction
Typical causes of malfunction of instantaneous water heaters and boilers include:
- poor water quality;
- error during installation of the device;
- damage to electrical wiring;
- improper operation.
Failure of the heating element is associated with the appearance of scale accumulating on the surface of the tank or due to a malfunction of the thermal protection button and safety valve.
Another common reason why a water heater does not heat water is a faulty electronic module of the device. It is strictly forbidden to replace it yourself , especially if the equipment is under warranty. Contact our specialist for qualified assistance.
To determine the cause of the malfunction, a careful visual inspection of the boiler is required. Be sure to pay attention to the light that lights up while the device is operating (when heating). If it doesn't light, try increasing the heating temperature. There may be 2 situations:
- The lamp (or indicator) lights up.
If the water heater does not heat water, but the indicator lights on the panel are on, this indicates a failure and the need to replace the heating element. You can verify this with a multimeter , which is connected to the device and adjusted to a certain resistance value. If you see zero on the indicator, the problem is a short circuit. You see the infinity symbol - there is an electrical break in the circuit.
It may also happen that when you turn on the device, the automation immediately turns it off. This is another indicator of failure of the tubular electric heater . Use a little trick to check! Fix the thermal protection button with your finger and turn on the water heater. If it starts to work, you can return it to its full state by removing the scale. At the same time, do not forget to check the condition of the anode.
- The lamp did not light up.
If there is no glow indicator on the display, you need to check with a tester whether voltage is supplied from the network to the thermostat . If voltage is passing to the thermostat, check the status of the input/output. If there is no data on the tester indicator, the heating element should be replaced.
Poor water quality
Source water with a high content of hardness salts at high temperatures creates conditions for the rapid deposition of scale on the walls of the water heater and heating element. Dense growths do not conduct heat well, and the boiler does not heat the water. With this phenomenon, there is also a disruption in the process of heat removal from the heating element, which causes it to overheat.
In addition, poor quality of source water often causes a hydrogen sulfide odor in the hot water supply coming from the boiler. It may appear due to the chemical composition of the water or the presence of bacteria in the device’s container.
We repair the heater ourselves
To begin with, we establish the reason why the electrical appliance does not work. If there is no leak, there is no need to rush to drain the water heater tank. Some items can be repaired without draining the water. Moreover, 80 or 100 liters is not a trifle. Check the dryness of the casing at the bottom of the boiler. This can be done using gray toilet paper: the slightest stains literally “appear” on it. In some models (for example, in the Ariston water heater), the bottom cover can trap condensation. Then you will find leaking points only after dismantling the lower part of the case.
If the water heater does not leak, check the electrics
After dismantling the panel, first of all we “ring” the power cable using a multimeter. How to check the control module? We start with a visual inspection. All connecting tracks on the circuit board must be continuous, and there are no signs of charring or thermal darkening on the parts. If you have an electrical circuit, take the characteristics of the radio components using a multimeter
We pay special attention to power relays and powerful terminal connections. If moisture gets in, these elements can oxidize.
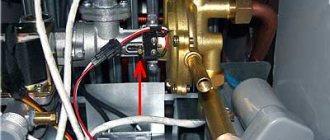
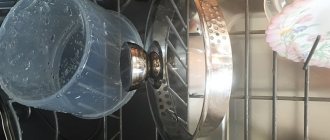
We check the serviceability of the heating element; many models allow access to the contact group
For example, when diagnosing a Thermex boiler with your own hands, it is not necessary to remove the heating element. However, it is necessary to disconnect all wires from the contacts. The electrical resistance of a tubular heater in most cases is about 500 kOhm (0.5 mOhm). How to check the resistance if it is not possible to accurately set the range in kOhm (mOhm)? We set the multimeter mode switch to the measurement limit as close as possible to the actual one. We connect the probes to the heater contacts without touching them with your fingers. Otherwise, you will introduce error into the measurement. If “0” is displayed on the device display, it means there is a break in the spiral of the tubular heating element. If the reading is “1”, there is a short circuit inside.
We check the tubular heater for a short circuit to the housing. This procedure is mandatory, especially if the boiler is electrocuted.
Other faults can be repaired only after draining the water. There are several ways:
- You can use a pressure relief valve, or a pre-installed additional tap. If your boiler has such shut-off valves.
- Some models have a third water drain fitting. It makes it much easier to repair the boiler yourself.
What else could break?
If the power light is on, but the water still does not heat up, the reason may be the pressure sensor (not to be confused with the mechanical safety valve, which is built into the inlet pipe). It protects the container from deformation when the water overheats, if there is a problem with the thermostats. There is a membrane inside the device.
This is the moving part of the sensor that reacts to excess pressure. If the measuring receiving hole is clogged with scale, the membrane does not return to its original position and gives a heating blocking signal. If the hole cannot be cleared, it must be replaced.
A faulty thermostat can either overestimate or underestimate readings. If in the first case, one of the protection sensors will work, then in the second, heating to the set temperature will simply not occur. This module is difficult to test.
How to change the thermostat? It is located below, on the heating element placement site.
The water heater does not heat if the elements are faulty
The water heater stops heating water, in most cases due to the fact that some elements are faulty. Most often the cause of failure is due to:
heating element
Namely due to the tubular heater, which breaks down with prolonged use without maintenance and general wear and tear.
Protective anode
If it is necessary to replace the anode in the water heater, which protects it from corrosion, be sure to first disconnect it from the electrical network.
In mounted vertical devices, the magnesium cathodic protection rod is placed on a common area with the heating element, on the bottom of a steel container. In horizontal modifications of boilers, the heating unit is fixed to the side wall of the container.
In order to remove the heating element assembly from the housing to replace the anode, you will need:
- Unscrew the screws securing the cover and remove it.
- If the length of the wires allows, remove the thermostat and sensor, which are held on the contacts.
- In another embodiment, the electrical cable is disconnected and the thermoelement is removed.
- I unscrew the block flange with a wrench.
- The basin is placed and the block is removed.
- Use pliers to grasp the damaged anode and unscrew it from the housing.
- Then they begin to clean the heating element and wash the tank from the inside.
- The new element is simply screwed into the socket on the site.
- Next, assemble the apparatus in reverse order.
Causes of water heater failure
Algorithm for troubleshooting a water heater.
If your water heater tank is leaking, you need to, as already mentioned, try to understand why this is happening.
The boiler is deformed externally, water flows from or through it. This drawback may appear on the second day after purchasing and installing the water heater. The case, by the way, is not covered by warranty; the fault is entirely yours or the installer’s. The safety valve was not installed, it was plugged or defective. As a result, the following could happen:
- The boiler filled with cold water and the heating turned on. During the heating process, the water expands, the pressure in the boiler increases and, in the absence of a safety valve, expands the internal tank.
- They stopped using the boiler and shut off the cold and hot water valves when the water heater was hot. The liquid cools and decreases in volume. A vacuum is created in the boiler, and the internal tank of the equipment is compressed.
- The house was drained of water. If the safety valve malfunctions or is missing, a vacuum will be created in the tank and its deformation may occur.
The cause of tank leakage may be improper installation and connection of equipment.
Another common case: water flows from the top of the water heater, no deformation is visible. The boiler was installed correctly and even the anode was changed regularly. In this case, you need to call a warranty technician and submit the equipment for repair. Be careful, make sure there are no other external factors not related to equipment breakdown (for example, whether your upstairs neighbors are drowning you).
A leak in the supply pipes from the boiler usually indicates that the tank is leaking. Quite often the reason for this is incorrect installation and connection of equipment. For the sake of imaginary reliability and beautiful appearance, plastic pipes are installed. Ultimately, the hydraulic shocks are transmitted to the boiler and a leak appears at the junction of the thin-walled tank and the water supply pipes.
First you need to make sure that it is not a water leak through the connection on the liner. In some models of water heaters, this may also be a leak in the heating element. Some models are made in such a way that the tank lid does not always have a hole for water drainage in the event of a leakage of the heating element. These are almost all the malfunctions that, if they occur, require replacing the boiler with a new one.
If the boiler leaks from the hole in the tank lid, then in most cases this is a leak of the heating element, which is most often caused by the formation of scale on the heating element. Repair consists of replacing the heating element. It also happens that it leaks from under the heating element gasket. In this case, you just need to tighten the fasteners.
We suggest you read: The pilot burner is noisy, what to do, how to fix it
And finally, the last place for leakage is the water supply connection. Fixing this plumbing problem is quick and quite simple if you have at least basic skills and minimal experience.
Carrying out self-diagnosis and repairs
Diagnostics are carried out with the device turned off using special tools.
Having found out the possible reasons why the water in the water heater does not heat up, it is necessary to diagnose the device in order to identify and eliminate the malfunction. First you need to prepare your tools and supplies.
To work you will need:
- indicator or tester;
- screwdriver;
- pliers;
- set of wrenches;
- plumbing pliers;
- rubber gaskets;
- FUM tape;
- flexible hoses;
- container for collecting water;
- rags and rags.
In order not to stop work at the dismantling stage, it is advisable to purchase an emergency valve and ball valve in advance. These devices need periodic replacement; it is better to do this in advance, without waiting for them to break down.
Cleaning must be carried out every 2–3 years in order for the device to operate stably.
Diagnostics are carried out in the following sequence:
- External inspection of the boiler and devices connected to it. Darkened areas indicate poor contact or burnt wires.
- Checking the socket and plug. Over time, the petals of the rosette weaken and oxidize. The same thing happens inside the plug. Products need to be adjusted or replaced with more powerful ones. Ideally, the plug should fit into the sockets with effort and be difficult to remove from them. For prevention, it is better to replace the power cable.
- Checking the performance of the heating element. To do this, turn the thermostat regulator clockwise to its extreme position. When the device is working, it will light up. If the relay does not work, you should buy and install a new thermostat. This is easy to do even for a housewife.
- Disconnecting the boiler from communications. The water supply taps are turned off and the bag is turned off. You need to immediately make sure that there is no voltage on the contacts. You need to take a photo of the connection diagram in order to reassemble correctly. After this, the cable cores and indicator wire terminals are disconnected and the cover is removed.
- Draining. The pipes are unscrewed from the nozzles and plugs are put on them. After this, you can open the water supply to the apartment. It is better to screw long flexible hoses to the nozzles to direct the flow of water in the desired direction or into containers.
- Laying protective material in the bath. During further actions, hard and heavy objects will fall into it, which can damage the enamel. Old carpets, blankets, coats and jackets are best suited for this purpose.
- Removing the heating element. In different boiler designs this happens according to its own technology. For some models, it is enough to unscrew one nut holding the clamping bracket. Other products require loosening several bolts. When removing, you need to act slowly and carefully. There may be a thick layer of scale on the element, and above it there is loose sediment that clogs the hole in the tank. First you need to lift the heating element and remove deposits. Then it is pulled out after tilting to the right or left.
- The removed heater is cleaned of dirt under running water. It is better to do flushing over the toilet to avoid clogging the sink or bathtub drain.
If the boiler tank is not damaged, it should be cleaned from the inside. To do this, it is better to use a shower head and a soft brush with a long handle. The advantage of this method is that you do not need to remove the heavy boiler from the wall. For such manipulation, plugs are installed on underwater pipes. At the end of washing, you need to remove all debris from the bath. The material used to protect it can be washed or disposed of immediately.
Ways to solve problems
The problem with a non-working boiler needs to be solved depending on the reasons that led to the breakdown of the equipment.
Replacing the heating element
Replacement of the heating element must be carried out by a competent and experienced technician or the user himself, in accordance with the instructions provided with the equipment. It is worth noting that despite the fact that all boilers are different in appearance and design features, replacing the heating element is done in the same way.
To work you need to take:
- pliers;
- indicator screwdriver, flat and Phillips;
- wrench included in the set.
Note! Regardless of what led to the need to replace the heating element, you must perform the following steps step by step:
- Turn off the boiler and turn off the water;
- Place the hot water tap in the closed position;
- Drain all liquid from the heating element;
- Remove the cover with an indicator screwdriver and make sure that there are no voltage terminals;
- Place the boiler on the floor, unscrew the nuts and disconnect the wires. It is better to photograph the process of disconnecting all the parts so that all the wires can be inserted back in the same order.
- Replace the heating element and put everything back in place, proceeding in reverse order, making sure that no water gets on the contacts.
It is worth noting that often, along with replacing the tank, it is necessary to change the magnesium anode, gaskets and insulation if there are dents with breaks on it.
Cleaning the heating element
To clean a scale-covered heating element, you need to take citric acid and keep it in a water-lemon solution for several days. Remove any remaining scale and dirt using a stiff brush.
Replacing the thermostat
If it is necessary to replace the thermostat, you must first remove the clamping ring, remove the thermostatic sensors, remove the adjustment block, install a new thermostat with the clamping ring and reassemble the water heater.
Note! Immediately after the thermostat is replaced, the water heater cannot be used. It is necessary to check if there are any leaks in the connections, open the hot water tap and release the accumulated air.
Only then can you perform a test run with a gradual increase in heating temperature.
The fork gets hot
If the plug heats up slightly when the boiler is operating, it may be due to the power of the heating device. However, with strong heating, the problem may be a poor-quality extension cord or tee. To maintain safe operation, it is necessary to use an extension cord with a large cross-section of wires.
Sometimes the issue may be with the outlet. With prolonged and repeated use, the socket and plug become loose. This causes the temperature of the fork to rise. It is recommended to constantly check the tightness of the socket in the socket. If the plug falls out of the socket, the device must be replaced.
If only the plug heats up and the cable adjacent to it heats up slightly, then the problem may be that the contact of the internal wires is poor. The problem with the plug can be easily fixed by tightening the terminals. If it is not removable, it is necessary to replace such a plug.
Note! The cord heats up due to insufficient cross-section of the wire in the extension cord, breakdown in the heating element or heater connections. Often due to such things, the wire may burst into flames.
To prevent fire and explosion from occurring, reliable insulation of the wiring and replacement of defective heating elements is necessary.
Troubleshooting Methods
Important!
In order to ensure that, after disassembling the device, all parts are completely in place, as well as the correct wiring connection, you need to take step-by-step photographs during the process.
If the boiler does not heat well, this may be the cause of a thermostat temperature failure. In this case, it needs to be replaced. Draining is carried out in the standard mode, turning off the power from the network. After removing the protective cover, the heating element pipe is exposed, then remove the pressure ring and thermostat (in most designs a rod one is used). Install a new copy, and then the fasteners in reverse order.
Boiler does not heat water well
Poor heating of water in a boiler in 90% of cases is caused by the condition of the heating element. The service life of this element is no more than 4 years. Over time, scale appears on its surface, reducing heat transfer. Sometimes an open circuit or short circuit occurs. This can only be determined with a multimeter. At the same time, be sure to pay attention to the condition of the thermostat !
The average boiler heating time is from 2 to 4 hours, depending on the volume of the tank. If it heats at half the set temperature, then there is a functional problem with the equipment.
How to avoid breakdowns in the future
After the technician has found out why the boiler does not heat the water and has repaired it, follow these recommendations:
- Once a year, call a service technician to clean the barrel and heating element from scale.
- Monitor the position of the valves.
- Set the thermostat to economical heating mode +55-60°C.
- If voltage surges are observed in the electrical network, connect the water heater with an electronic module through a voltage stabilizer or relay.
- If there is strong pressure in the cold water supply line, install a reducer on the riser so that excess pressure does not deform the tank.
Sources
- https://www.tproekt.com/vodonagrevatel-ne-greet-vodu-indikator-ne-gorit/
- https://kvanta.ru/vodonagrevateli/neispravnosti-s-vodonagrevatelyami/chto-delat-esli-vodonagrevatel-ploho-greet-ili-ne-greet-vodu-vovse
- https://polotentse-sushitel.ru/prichiny-nepolnogo-podogreva-vody-vodonagre.html
- https://kotle.ru/bojlery/perestal-gret-bojler
- https://StrojDvor.ru/otoplenie/pochemu-ne-nagrevaetsya-voda-v-bojlere/
- https://vivoz-gbo.ru/vodosnabzhenie/pochemu-boyler-ne-greet-vodu-i-chto-delat
- https://remtochka.com.ua/neispravnosti/bojlerov/bojler-ne-greet-vodu-lampochka-gorit.html
Replacing the thermostat
To replace the thermostat, follow these steps:
- Remove the fixing ring (clamping) near the heating element.
- Remove the sensor adjustment unit and the thermostat itself.
- Install a new element.
- Secure it with a clamping ring.
- Check the condition (position) of the safety valve.
Please note that after replacing the thermostat, it is not recommended to immediately start operating the device! Check that cold water is flowing correctly inside, check that the connecting element does not hiss. The hot tap is then opened to release any air that has accumulated inside the boiler. Only after this can a test run be carried out .