A microwave transformer is an important link in the chain that generates microwave radiation. This is a converter of the mains voltage to the value supplied to the magnetron input. A high-voltage converter often causes a microwave oven to break down.
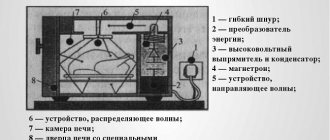
Checking the transformer for operability is a mandatory item in the list of technical diagnostic measures to determine the causes of the malfunction. Since we are talking about high voltages, independent intervention is only possible if all safety measures are observed.
Where can I get high voltage?
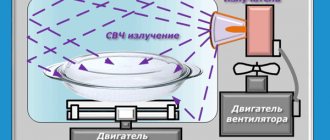
Food in microwave ovens is heated by the operation of ultra-high-frequency waves. Microwaves are generated by a special emitter - a magnetron. To operate within the specified characteristics, it needs a high voltage - 2,000 V. This is almost an order of magnitude higher than what a household electrical network provides (220 V).
Where do kilovolts come from? They are created at the output of the secondary winding of the high-voltage converter.
Important! A microwave oven, even disconnected from the power supply, can cause an electric shock (U up to 5,000 V).
Creation of electrodes
When making spot welding from a microwave transformer, you need to create suitable electrodes. At the same time, their diameter must correspond to the diameter of the wires with which they will be connected. Copper rods are suitable for this, and at low power you can use a tip from a professional soldering iron.
While working, homemade spot welding actively wears out the electrodes. To adjust the geometric dimensions, they need constant sharpening. Accordingly, over time they will have to be replaced.
To connect the device to the electrodes, it is necessary to use wires as short as possible. Otherwise there will be significant power losses. They will also occur when there are a large number of connections.
To increase the efficiency of a device created on your own, you can create copper tips on the wires connecting the electrodes. This way you can avoid any resulting power losses at the contact points.
Wires need to be selected with a fairly large diameter. To make soldering easier, you can use tinned tips. Since the electrodes are of a removable type, soldering should not be done at the fixation points with the tip. Naturally, oxidation and subsequent power losses will occur at these points. However, they are much easier to clean than with crimped tips.
The tips are fixed to the electrodes with a simple bolt connection. It must be made reliable so that there is no increase in transient resistance, which contributes to the loss of power of the spotter. It is advisable to create holes of equal diameter in both parts.
It is better to select connecting elements made of copper or an alloy that has minimal electrical resistance.
Types of high voltage converters
Elements of the converter installed in the microwave oven:
- magnetic circuit;
- frame;
- primary winding;
- two secondary windings.
U = 220 V is supplied to the primary winding. The incandescent filament is powered from the secondary windings. The first of the two secondary windings is made of heavy gauge wire. U at the output is approximately 3 V. At the output of the second winding - variable high U = 4 kV.
Microwave ovens of different brands use converting devices from different manufacturers. The converters do not look the same and have different characteristics. They differ:
- power;
- output voltage of secondary windings;
- the number of turns in the coils and the cross-section of the wire;
- dimensions;
- method of fastening.
The secondary coil, like one of the emitter terminals, is connected to the housing.
Features of transformer upgrade
In order to create a secondary winding, it is necessary to wind two or three turns on the core. This will help to obtain an output voltage that will be equal to 2 V. And will give 0.8 kA of short-term current. These indicators are sufficient for the full functioning of the spot welding device.
Due to the winding of this number of turns, problems may arise if the wire has a thick insulating layer. It is quite easy to eliminate it. It is necessary to remove the standard insulation, and then wrap the wire with electrical tape. The insulating tape should consist of cotton fabric.
Position of the new secondary winding
The wire used for the secondary winding should be as short as possible. This will not allow its resistance to become greater, therefore, the current strength will not become less.
If you need to weld metal sheets that are up to five millimeters thick, then for these purposes you need a device with much more power. To create such a unit, it is necessary to connect as many as two electromagnetic devices into one circuit. To do this, you need to strictly adhere to the rules. If the terminals of the primary and secondary windings are connected incorrectly, a problem will arise in the form of a short circuit. In order to check whether the connection is made correctly, you need to use a voltage measuring device.
After correctly connecting the windings of two electromagnetic devices, you need to find out the current strength. Most often, for transformers intended for spot welding machines that are planned for use at home, current restrictions are made. It does not exceed 2 kA. If the indicator exceeds this value, then interruptions in the functioning of the power grid will occur. You should use an ammeter.
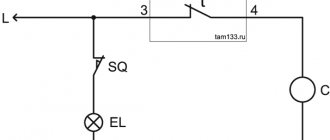
Electrical circuit diagram
In addition to the converter, the electrical circuit of the microwave oven contains:
- diode;
- high voltage capacitor;
- magnetron;
- fuse;
- electric motor - one or two (for rotating the tray, if provided for in the design, and for the fan);
- Control block.
In expensive microwave ovens, instead of a converter, a pulse unit is used, which has a more complex structure, but weighs less.
Replacing a microwave transformer
To replace a faulty high-voltage transformer, you need to select a similar part. Microwave transformers have a general operating principle, but they differ in class (see markings 200, 220, 250 class), power and location of mounting fixtures. The power of the transformer must be matched to the power of the connected magnetron.
If the power of the new transformer is less (100-200 watts), then the oven will be slightly underheated; it is necessary to increase the heating time. If the power is greater, nothing bad will happen, the power reserve will increase slightly and, accordingly, the life of the transformer will increase.
1″ :pagination=pagination :callback=loadData :options=paginationOptions>
A high-voltage transformer provides power to the microwave magnetron. If the step-up transformer malfunctions, power is not supplied to the high-voltage part of the device, the microwave oven stops generating microwaves and, accordingly, heating food.
What are the signs of a faulty transformer:
- The microwave hums and vibrates during operation
- There is a pungent smell of burning or smoke
- The microwave works, but does not heat
What types of malfunctions occur?
You need to check the transformer in two cases: when the stove is not working well and when it is not working at all. You can suspect a malfunction of this particular element based on the following signs:
- The microwave oven makes an unusually loud noise;
- food placed in the chamber is not heated or only slightly heated;
- When working, it smells like burnt insulation and the equipment smokes.
If at least one of the listed symptoms appears, it is better not to turn on the device until the problem is resolved. Turning on a faulty stove can worsen the breakdown.
One of the most common causes of electrical equipment failure is power surges. If there is a suspicion that the device is faulty due to changes in the network, urgent repairs are necessary. However, it is possible that during repair work a manufacturing defect will be discovered.
Disassembling a microwave oven yourself
If the above reasons are not confirmed, then you need to disassemble the device to troubleshoot. Before doing this, be sure to turn off the oven from the network and wait a couple of minutes.
What should you look for when looking for breakdowns? There are several main elements that often fail:
- Circuit breakers
- Capacitor
- Diode
- Transformer
- Magnetron
These elements are directly involved in the operation of the device and were mentioned earlier. First you need to check the serviceability of the fuses. Their breakdown is immediately visible, because when burned, the conductor inside is destroyed. If this does not happen, then you should look further. For further checking, you need to take a multimeter, because externally it is extremely difficult to find a breakdown on the remaining parts. To check the capacitor, you need to switch the device to ohmmeter mode and then connect it to the part. If there is no resistance, the part must be replaced. It is impossible to check a high-voltage diode with a tester. It is recommended to replace it if other parts break, because often it also gets hit. It can be checked using a slightly different method - by connecting it to the network on the way to the light bulb. If the light is dim or blinking, then the part is working properly. If it lights up brightly or does not turn on at all, then the diode must be replaced
It is important to follow safety precautions, because this element can hold a charge for a long time. It will take several minutes to discharge a working transformer, and much longer if the discharge resistor breaks down.
It is worth discharging it on the body or not touching it at all if you have no experience working with such equipment. Next, the transformer windings are checked.
How to check a microwave transformer:
You need to remove the terminals and check the device terminals one by one with an ohmmeter. First, the primary winding is checked, for which the norm varies from 2 to 4.5 Ohms. For the secondary winding, the limits are 140 and 350 Ohms. It is also worth checking the filament winding by connecting the terminals leading to the magnetron to a multimeter. The norm here varies from 3.5 to 8 ohms. All previous tests have failed, then the problem may lie in the magnetron. To test the magnetron, simply connect the tester to its power terminals. The tester switches to ohmmeter mode. If the resistance is 2-3 Ohms, then this means the device is broken. The same situation occurs if the tester shows infinity. In both cases, the device must be replaced.
https://youtube.com/watch?v=8N6_PDELdOs%3F
Causes of malfunctions
The converter fails most often due to:
- Wire break. The wire of one of the windings may break.
- Short circuit in the windings. This can happen in one coil or both.
- A break or short circuit in the magnetron coil.
The magnetic core of the converter is assembled from steel plates. If the plates peel off, the machine will make noise. It is necessary to find out the power of the transformer and replace it. Such global breakdowns can be easily identified by eye, but they do not happen often. The overwhelming majority of problems are still caused by coils.
What homemade products can you make from a microwave?
A broken microwave can be given a second life and used to make homemade items. The housing from an old microwave can be easily adapted for storing vegetables and food, and also as a wall cabinet.
It is often much more expensive to repair a microwave than to buy a new one.
Therefore, you can either install a heating element in the microwave and use it as an oven, or disassemble it into spare parts, and this is: a transformer, from which you can make spot welding, an engine, from which you can easily make a 220-volt generator and a fan, which can easily be used for a homemade incubator.
So, let’s look at the top microwave homemade products on the site, which are sure to come in handy in every craftsman’s household.
Check procedure
To check the serviceability of the high-voltage converter, you need to arm yourself with a multimeter; you will also need:
- screwdrivers with different tips;
- pliers;
- ohmmeter
Sequencing:
- turn off the device - remove the plug from the socket;
- unscrew the screws and remove the casing;
- discharge the capacitor;
- remove the terminals from the transformer;
- check the coils with a tester - if there are no deviations, put them back;
- if damage is detected - the wire has broken or a short circuit has occurred, replace the device;
- assemble the oven and check its operation.
If the device still does not work after taking measures, you should continue troubleshooting or check the device under voltage.
A transformer with traces of melted insulation and a burning smell does not need further inspection: it is broken and cannot be repaired.
Important! To check the transformer, you have to disassemble the microwave oven - this can only be done when it is disconnected from the power supply.
A high-voltage capacitor easily retains a huge electrical charge, so it must be discharged before measurements. How to achieve this? Simply close its contacts to each other - this can be done, for example, with pliers.
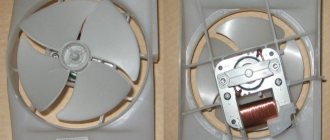
220 Volt microwave generator
In this case, you will need to remove the motor from the microwave, the one that rotates the bowl. The uniqueness of the electric motor from a microwave oven is that it is capable of generating decent voltage, over 110 Volts, and has a power of 50 W.
To make a simple generator from a microwave, you will need to take a small cream jar with a lid in which the motor will actually be installed. Next, on one side of the cover you will need to drill a hole for the handle, which is then connected to the motor. Thus, by rotating the handle, you can set the motor from the microwave in motion, which will produce electrical voltage.
Be sure to provide a small socket or just an outlet on the back side of a homemade microwave generator to which current consumers could be connected. Without a doubt, a homemade generator from a microwave engine will be an excellent helper on hikes where there is no electricity.
In addition, the microwave motor can be used to make an effective turning mechanism for an incubator.
Diagnostic options
Let's look at common options for finding the causes of a breakdown.
Secure Checkout
The safest test is carried out by a tester and involves examining the coils for damage. Procedure:
- The multimeter is adjusted to the required limits and with its help the resistance of all windings is determined - the primary and two secondary ones. The study is carried out on a removed transformer.
- If the tester displays one, it means a break has occurred.
- When the circuit is closed, a value in the range of 2–4.5 Ohms will appear on the primary coil (the tester is set to 200 Ohms). On the filament - 3.5–8 Ohms, on the high-voltage secondary (2,000 Ohms) - 140–350 Ohms.
If the resistance value is outside the specified ranges, an inter-turn short circuit has probably occurred.
When taking measurements, it is necessary to take into account the multimeter’s own error. It can be determined by short-circuiting the probes within the set limit. The resulting value is the error.
You can perform a secure check yourself or invite a specialist from the service. To ring the windings, the user only needs to know the basics of electrical engineering and have the skills to work with a tester.
Test under voltage
If measurements have been taken, the measurements obtained are normal, but the stove still does not work, it is necessary to examine a number of characteristics. Measuring the output voltage on the secondary windings is a rather dangerous business. Procedure:
- 220 V is supplied to the microwave.
- The tester measures U at the outputs of both secondary windings. High voltage - 2 kV, filament - 3 V.
This method requires equipment that can measure AC voltages greater than 2 kV.
Reverse check
This option is less problematic. 220 V is supplied to the secondary winding, about 24 V is removed from the primary winding. The coefficient is 9.1. If 12 V is applied to the primary winding, the secondary will be about 109 V.
If the transformer heats up when idling, an interturn short circuit has probably occurred. If the device heats up under load, and when it is turned off, it stops heating, you should continue to look for the problem.
Definition of pins of the same name
It is possible that the terminals of the windings of electromagnetic devices that must be combined are not marked. Therefore, it is necessary to determine the names of the same name. The primary and secondary windings must be connected in series. After this, voltage is applied to the input, and an alternating voltage measuring device must be connected to the output.
The meter can manifest itself from different sides, it depends on the direction of connection.
The measuring apparatus can record the following:
- Show voltage.
- Do not record voltages in the circuit.
If the measuring device gives readings, this means that there are opposite terminals in the circuit. This connection was not made correctly, so the following phenomena can be observed here:
- The voltage value supplied to the input of the primary windings becomes less than half.
- On the secondary side the indicator becomes higher
Therefore, the meter will show the total voltage, which is equal to twice the input value.
Transformer terminals
If the measuring apparatus registers a zero value, this indicates that the voltages that come out of the secondary windings are equal, but have different signs. They compensate for each other. One pair of windings is precisely connected by terminals of the same name.
Therefore, with the correct connection, you need to focus on the voltmeter and its indicators.
Which microwave ovens have problems?
Most often, problems with the converter occur in microwave ovens of the Samsung, Daewoo brands.
Considering the eminence of the brands, it is difficult to assume that they all neglect the quality of the electrical circuit components used. Most likely, this trend is associated with the popularity of these brands. They are bought more often, which is why the breakdown statistics are higher. But when calculating the number of breakdowns per number of units sold, it becomes obvious that they break down no more often than other well-known brands.
Indicators of the condition of a high-voltage diode
Wire pv-3: technical characteristics, cross-sections, application
If you decide to take the measurement yourself, you need to know how it works correctly.
- If the element is in good condition, the multimeter's index arrow will show 0.25 volts. If you check the resistance in the opposite direction, it will not show anything.
- The failure of the part is indicated by the absence of indicators when measuring in all directions. If a fault occurs, the mechanism lamp will glow evenly or not light up at all.
Considering the above data, we can conclude that the high-voltage diode in the microwave is faulty and must be replaced with a new element. After replacing the element, the microwave oven will function like new.
When checking the resistance on both sides, it is important to know: the terminals differ in purpose and connection. The mechanism element with the + sign is marked on itself and ends with a bolt at the end - this is the anode
The mechanism element with the + sign is marked on itself and ends with a bolt at the end - this is the anode.
The terminal with the sign - has a connection to the capacitor, and it ends with a bracket - this is the cathode.
If the microwave strip is not a faulty high-voltage diode, it will be difficult to repair and check it yourself.
Precautionary measures
When carrying out measurements under voltage, electric shock, even death, can occur. Two rules will help you avoid danger:
- It is strictly forbidden to touch the internal parts of the microwave oven while it is operating. To carry out measurements, you need to put crocodile probes on the tester’s terminals and connect them to sections of the circuit.
- If you need to touch high-voltage parts with your hands, you should not only disconnect the stove from the power supply: you can prevent electric shock by shorting the magnetron leads to the housing. Thanks to this precaution you will protect yourself from capacitor discharge. There is a resistor in the microwave electrical circuit to discharge the capacitor, but it does not eliminate the danger 100%. The resistor may burn out or they completely forgot to install it, and such a mistake could cost the life of a do-it-yourselfer.
Repairing any electrical equipment involves the risk of electric shock. When testing a transformer in a microwave, you need to be extra careful due to the high voltage and capacitor. Use safe measurement methods and follow safety regulations.
Starter design
The first tests of the rectifier were successful, so assembly into the housing began. The rectifier contains a 200 A ammeter, a mains switch and a three-stage LED voltage indicator for the thresholds of 14.2 V, 14.6 V, 15 V. The LED indicator was supposed to indicate whether the batteries were not charging after connecting the rectifier. In the future, it is planned to replace it with a conventional analog voltmeter.
The case is made of sheet metal from an old computer, and although it is not particularly beautiful, the main thing is that it works, is convenient and reliable. Construction costs amount to 600 rubles for rectifier diodes, everything else was already there. Although if you had to buy everything (transformer, diodes, transformer cable, alligator clips, switch, housing, ammeter), then it would be better to buy a ready-made starter-charger.
Now let's move on to field testing and measurements. The tests were carried out on an old tractor with 10-year-old batteries, which could not start the tractor even in summer. First try to start it with the rectifier itself. The voltage dropped to 5 V, the ammeter went off scale, and the tractor shaft made some movement, but to no avail. So try with batteries. After connecting the charger, the batteries began to charge at approximately 50 A, so I quickly turned on the starter to prevent them from boiling. The start-up was successful and fast, the ammeter rectifier showed 130 A of current consumption, and the voltage at start-up did not drop below 10.7 V. As you can see, the rectifier is suitable for large cars, and will cope with a small car in half a kick.
The weight of the entire device with wires and clamps is 10 kg. In principle, an ammeter is not needed, but it was interesting to know what charge current is flowing. To simplify the design, no fuse was used either at the input or output of the rectifier.
If desired, you can assemble a full-fledged charger from it to not only start, but also charge the battery. You just need to install a charging current limiter (for example, according to this scheme), and reduce the transformer current at idle so that it is suitable for long-term operation.
The starter works in extreme cases for a maximum of 20 seconds, in addition, the rectifier diodes have high power, so both the transformer and the diodes do not heat up too much, and the housing is spacious. Testing after 5 consecutive startup cycles showed that both diodes only warmed up slightly. It was supposed to put a thermal fuse on the transformer, but this was not necessary.
There is also no protection against reverse connection of connecting cables. You just have to think about what you are doing or add a freewheeling diode. In general, we highly recommend creating similar designs based on the MOT transformer, because it has really good power.
This 50 A of battery charging current can boil it, causing a drop in the active mass and deformation of the plates. But this imperfection can be easily corrected - the power switch on the cable itself is in the form of a button, activated by the other hand, while the starter is operating. A more complex circuit is also possible - with control of the transformer through a thyristor and a system of secondary circuits that detects a voltage drop at the rectifier terminals below 10 V - ready-made devices on the market operate on this principle.
On the other hand, the car battery is charged without current limitation (voltage only), and in some cases it briefly reaches more than 100 A.
Transformer in an electrical circuit
The simplest circuit involving a high-voltage transformer contains:
- magnetron;
- diode;
- network filter;
- high voltage capacitor;
- door lock switches;
- fuse;
- electric motors for ventilation and rotation of the pallet;
- control module;
- lamp for illumination.
Starting the oven, which is only possible with the door closed, involves moving the tray and cooling the magnetron fan. If the lamp temperature reaches more than 105°C, the thermostat will operate, which will cut off the voltage supply to the primary winding of the transformer.
In expensive models, the circuits are additionally equipped with program-controlled units, LCD displays, dissectors, grills and steamers. And the high-voltage transformer is replaced with a complex pulse unit, which lightens the weight of the entire structure.
Selecting Electrodes
The electrodes of equipment for spot welding perform several functions simultaneously: compression of the sheets being joined, supply of current to the welding zone, and subsequent heat removal. Important parameters when choosing an electrode are its shape, dimensions, etc. It is these parameters that directly determine how high-quality the welded joint will be. The geometric shape of the electrodes can be straight or curly, but preference is given to straight models, as they provide better access to the welding area.
When choosing electrodes for a microwave welding machine, you can simply refer to the corresponding GOST (14111-90), which already specifies all possible diameters of these elements (10, 13, 16, 20, 25, 32, 40 mm).
The diameter of the copper rods that will be used as electrodes must be greater than or equal to the diameter of the working wires. To avoid active oxidation of the electrodes during operation, they are connected to the working wires by soldering. The electrodes of a resistance welding device (including one made from a microwave) actively wear out during operation, so they must be regularly sharpened, giving them the shape of a sharpened pencil using a file.
Bottom electrode installed
Electrodes for the device
A welding machine, like a spotter from a microwave oven, works under an electrode. For reliable operation, the rods should be carefully processed, slightly sharpened, otherwise they will easily lose their shape. The cable connecting to the electrodes should be as short as possible and have the least number of connections so that there is no power loss. Copper lugs should be attached to each end of the wire. During the welding process, oxidation of copper is possible; unsoldered areas will provide excess resistance, which will lead to loss of power.
What tools and materials will be needed
To make a spotter from a microwave oven with your own hands, you will need to prepare several basic spare parts. Among them:
- housing - you can also take it from an old microwave oven;
- electrical transformer - it will become the main element of the device;
- reverse hammer, you can assemble it yourself or buy it ready-made;
- welding cable with a terminal for connecting to power and thread for a gun;
- control circuit, in the basic version it consists of a button on the gun, a wire and a power supply that powers the system, and an input voltage relay;
- welding gun with the ability to connect electrodes;
- a ground cable having a terminal and a contact pad;
- electrodes for studs and washers.
To assemble the spotter, you will also need to prepare a tape measure and a multimeter.
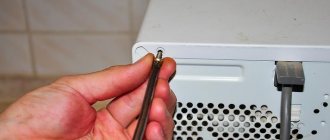
Extraction
To remove the transformer from the microwave oven, you must carefully disconnect the fasteners on the microwave body without damaging the transformer winding. If removed abruptly or very roughly, a break in the circuit may occur, and then unnecessary problems will arise in rewinding the coil with winding. Next, you need to clean the coils and core from small chips or debris that got in during disassembly. For cleaning, you can use a regular brush for painting, the main thing is that it is dry and clean, as in the photo.