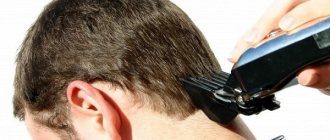
Today, many men prefer to cut their own hair. This is not only very convenient, but also profitable, since it saves money significantly.
Unfortunately, not everyone knows how to set up a hair clipper correctly, but this will largely determine the quality of work and the service life of this device. We offer several recommendations for setting up the machines.
Why is it necessary to adjust the machine?
At first glance, it may seem that the machine is a completely ordinary and simple device that does not need to be configured, but can be used immediately. But this is far from true. It is very important to take care of your device so that it will last for many years.
Over time, the knives of some devices may begin to cause some inconvenience during use, leave hair uncut, bite it, and even receive an electric shock. In this case, it is necessary to service the device and adjust the blades. Let's look further at how to set up a hair clipper.
How is it structured?
Before adjusting the hair clipper, it is very useful to understand its structure. If you have just purchased a unit, it should come with:
- set of nozzles;
- instructions.
Important! Some manufacturers complete their products with the most necessary tools - for example, a screwdriver and a set of spare screws are sometimes included.
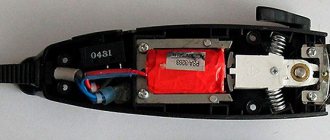
In the instructions you will find a detailed diagram of the insides of the unit. The machine, in addition to the body, cord, battery container and blade unit, has:
- transformer;
- stator coils;
- core;
- rocker or pendulum.
The transformer is usually designed for two voltages - 127 V and 220 V. This is very convenient because it allows you to use the unit in different conditions. There are as many coils as there are supply voltages, that is, two. The rocker or pendulum begins to vibrate when an alternating field appears. This part is held in place by two return springs. The first thing you need to know about the knife block is that it consists of moving and fixed parts. Adjustments when setting up the hair clipper must be movable.
Important! The stator must be in contact with the rotor, otherwise the machine will make an extremely unpleasant grinding sound.
Two words about ergonomics
If you haven’t bought a car yet, but are just choosing, pay attention to a few more points. The question of how to assemble a hair clipper can be solved faster and easier if you have made the right choice. Please note what the blades are made of:
- of steel;
- made of steel with ceramic coating;
- made of steel with titanium coating.
Important! Inexpensive household machines are most often made with steel knives. This is quite suitable if you are only going to cut a few heads. To open a private hairdresser, it is better to choose higher quality coated knives. But steel knives have their own considerable advantages - they, of course, hold an edge worse than those with a ceramic coating, but sharpening them at home will not be difficult.
One or many?
An important point is how many nozzles there should be. Here again it all depends on individual needs:
- For a hairdresser, a machine with one universal attachment is more suitable - it is adjustable depending on the type of haircut;
- in order to do hairstyles for your family members, it is preferable to have a set of several specialized ones.
Important! Those with beards need to find out in advance whether the unit is intended for such work - this is indicated in the instructions.
Blade adjustment
Adjusting the blades of this device is a very important procedure. It needs to be done when the machine starts to work poorly. She may begin to cut her hair sloppily or bite her hair.
In order to adjust the blades of the clipper, you must clean it from dust and dirt. There may be hair left on them, which also needs to be removed. How to set up a hair clipper? To do this you will need a regular screwdriver. Use it to unscrew the screws that secure the blades to the body of the machine.
It is worth noting that different manufacturers place these mounts in completely different places, but the design itself does not change. Once you have managed to do this once, you don’t have to worry, because then everything will be much easier.
Initially, you need to loosen the bolts on the body and unscrew two screws. The end of the blade should be moved to the edge of the top. This position must be fixed and set correctly. This is the procedure that will allow you to get an excellent hair and beard cut.
There is another easier way to set up a hair clipper without focusing on the angles. Everything happens in the same way, but in this case the middle of the upper blade will serve as the mark. This is how most budget machines are configured.
If the device has been used for a long time, then most likely it will be necessary to lubricate all the elements of this device so that they can last as long as possible. Usually the blades are adjusted once, and after that the machine works perfectly for a long time. It is important to know that after each use it should be thoroughly wiped to remove dirt and hair residues. And the most important thing is to ensure that the device does not come into contact with water, otherwise it may break down.
The adjustment scheme is the same for all devices. Let's look at how to set up hair clippers from the most popular brands.
Features of setting up various models
The standard (generalized) methods for setting hair clippers are described above, but the adjustment also depends on the type of model. How to configure the most common and popular devices:
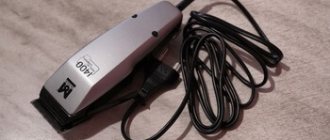
- Vitek is a high-quality model that cuts hair from 3 mm to 12 mm. The machine is equipped with a vibration-type motor and operates silently. Feature - the blade is made of steel material, the body and fasteners are durable, so you rarely have to adjust the gadget. To ensure normal operation, it is enough to change the gap between the knives located at the top and bottom - it should be small. If you decide to clean the inside of the device, do not tighten the bolts.
- Scarlett is also a high-quality model, made of durable materials. Adjustment is carried out without removing the blades. Unbalance is eliminated by tightening the fasteners, which become loose quite often.
- Moser - the peculiarity of the brand lies in the strength of the threads that hold the screws for attaching the blade. Thanks to this, the adjustment consists of positioning the blade so that the outer teeth on the small knife extend slightly beyond the teeth on the large knife.
- Domoteс models are based on a vibration motor, which puts stress on the knives, causing imbalance. When adjusting the equipment, the blades are ground on a sharpening unit (board), more than once.
Read the following article about how to choose a hair clipper.
Vitek hair clippers
Vitek is considered a very high quality hair clipper. With its help, you can quite easily cut your hair up to a length of twelve mm, as well as down to the smallest length - three mm. The main advantage is that the blades are made of steel, and, as you know, this is an excellent material. The machine has a low noise level and low vibration. Many people don't like it to be too noisy, so this is a great option for them. The body is made of high-quality materials, which allows you to protect the machine from impacts and other damage. In this case, the machine will serve for a long time.
How to disassemble and reassemble the machine
To disassemble the machine you will need screwdrivers (regular and Phillips), pliers, a tester and, preferably, a multimeter to “ring” the cables. If the integrity of the soldering is broken, you will need a soldering iron. When disassembling and repairing, be sure to clean the parts inside the case. Therefore, prepare a small brush and a soft, lint-free cloth.
Before disassembling, check the voltage with a tester to see if the wire is broken. If everything is fine with the cord, “ring” the switch and voltage switch with a multimeter. This will help you understand how the device works and detect burnt contacts. Then you can disassemble the machine:
- The housing parts in most models are held in place by screws. They are carefully unscrewed with a screwdriver, holding the lid. If the thread turns at the fastening point, it will no longer hold the part.
- The cover is removed, the rotor and eccentric are cleaned of dirt, dust, and old grease. Brushes and other tools should be small to prevent damage to work surfaces.
- The position of the knife block is checked. It needs to be cleaned and, if the blades are not positioned correctly, align them with pliers and fix them.
- When opening the case, pay attention to the integrity of the soldering at the point where the conductors connect. If there are problems, you can fix them with a soldering iron or take the machine to a workshop.
- The integrity of the springs is checked (if they break, you can simply replace these parts yourself), the condition of the motor, wiring and other parts.
- After work, the parts are assembled in the reverse order. You need to put the cover on the machine and tighten the screws tightly. The device is then checked for functionality.
Even if it was not possible to repair the device, it is important to carefully assemble all the parts. It is recommended to periodically disassemble a working machine to clean the internal parts and adjust the position of the blades.
recommended products
Bamboo massage hair brush…
Art. ID1008
Small bamboo massage hair brush. Rounded wooden pieces…
Buy for 589 rub.
Brushing 23 mm
Art. 00165
Brushing with nylon bristles on a wooden base with a comfortable rectangular…
Buy for 465 rub.
Ergonomically shaped foot grater
Art. 3020/ST
Double-sided foot grater with an egronomically shaped sanding surface...
Buy for 226 rub.
Cutting scissors Katachi Basic C...
Art. K0655
Katachi scissors, continuing the Basic Cut line. Unlike …
Buy for RUR 1,474.
Machine model Scarlett SC-1263
This brand is quite popular among users. This machine has excellent quality and an inexpensive price.
Its power is 13 W. The length of the wire is about two meters, and it works from the network. The most common model has four attachments included. This includes scissors, a comb, a knife cover, an oiler and a storage case. It runs on battery power and charges within seven hours. The blades are very high quality and durable. Also has seven steps in length. Scarlett is an excellent choice for the category of people who do not consider it necessary to spend money on hairdressing services, but prefer to do their own haircut at home.
How to set up the Scarlet SC-1263 hair clipper?
Such models are usually adjusted without removing the blade. You can get away with simply tightening the bolts. You may also need to lubricate worn-out elements of the device. Motor oil (working off) is best suited for this procedure.
The main thing to remember is that clippers of this particular model require constant adjustment, but the entire setup scheme is somewhat simpler than that of clippers of other models. Therefore, taking proper care of the equipment will not seem like such a big problem.
Proper machine care
To ensure long-term operation of the machine, you should follow some important rules:
- Before setting up, be sure to look at the instructions and study in detail all the information written in it. If you don’t do this, you can start doing everything wrong and worsen the condition of the device.
- After each haircut, the clipper should be cleaned thoroughly. As a rule, this is necessary for hygiene purposes and to ensure that the hair that remains after the procedure does not clog the motor and it does not overheat. If you do not take this seriously, the machine will simply burn out, and in this case you should not count on a guarantee. Based on this, you should clean the blades as best as possible using a special brush.
- Be sure to lubricate the blades, and do this often. A large percentage of people do not follow this rule because they consider it a waste of time, and then complain that the machine does not do its job well. The best option is to lubricate after each haircut. Immediately after this, you need to turn on the machine so that the oil evenly lubricates all the elements.
- Under no circumstances should you lubricate with substances other than the special lubricant included in the kit. If the lubricant runs out, you can use engine oil.
- Sharpening the blades is also a necessary condition. This can be done once every three months.
- The machine should not be left in a room where the temperature is around zero degrees. It must be kept at room temperature.
- If the machine is charged using a battery, then you first need to completely discharge it, and then charge it for about eight hours.
- Even if no one uses the machine for a long time, the battery still requires charging once every six months.
- Never adjust the blades by force. If you cannot get the blades into the desired position the first time, then you can assume that there is some kind of problem. Therefore, you must initially follow the recommendations and read the instructions for use again. Many models come with a special key for this procedure. If this option is not available, you can use a screwdriver.
- A situation may occur that the adjustment does not help at all, and the device continues to malfunction. In this case, you can purchase new knives. They cost an order of magnitude cheaper than a new machine. It is worth noting that many come with special blades and attachments.
How to know when an adjustment is needed
You can understand that it’s time to adjust the knives in the Wahl Legend machine by the following signs:
• the device begins to pull the hair, “chews” it;
• equipment vibrates strongly, increasing noise during operation;
• the blades allow individual hairs to pass through, which is striking against the general background;
• after switching on, the knives do not move.
It is necessary to completely disassemble the equipment, repair it yourself or at a service center in the case when it does not turn on at all and begins to beat properly. In addition to the machine itself, significant noise and vibration can be caused by a faulty socket. Therefore, it is worth checking the device by connecting it to another network.