Electrical equipment service professionals claim that the electric drill is the most popular tool. Today it is almost impossible to find a person who has never heard of it. Many home craftsmen use a drill not only for drilling holes, but also as a mixer for mixing paint or mortar during repairs. But we will tell you about the structure of the most ordinary electric drill and the purpose of its main components.
Main components and parts
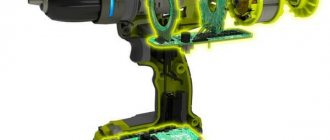
In principle, all drills have the same design - all components and parts are shown in the photograph. Impact models have additional fixed ratchets, which, interacting with each other, force the drill to perform translational-impact movements for drilling particularly strong reinforced concrete walls.
The operating principle is quite simple: by pressing the start button, the user allows current access to the electric motor brushes, which spin the motor rotor to the speed required for operation. The torque is transmitted through the spindle to the gearbox - it ensures rotation of the chuck with the drill clamped in a special device. As a result of this interaction, various materials are drilled.
The operating principle of any model of modern drill is identical, with the exception of the specific nuances of impact options.
Design features of devices
The rotary and manual varieties of drills differ in design from each other, but perform the same function. If in a rotator the moment directly depends on the number of rotational actions by a person’s hand, then in hand drills this value is 2-4 times higher at the same speed of rotation of the handle.
Hand tools are divided into one- and two-speed. The two-speed hand drill is equipped with 4 gears. It is through these gears that the torque decreases and the speed of rotation of the cartridge increases, at a time when a person applies a force of equal magnitude. To change the rotation speed, you need to change the drive shaft.
Design features of a two-speed manual drill
This is interesting! A single-speed drill has only two gears with different numbers of teeth. Due to this difference, the torque decreases and the rotation speed of the cartridge increases.
The main structural elements of a handmade product are:
- Gears in the amount of 2-4 pieces
- Lever
- Drill chuck
- Handle used as additional support
- Stop foot
The principle of operation of such a product is very simple, and even a child can use the tool. When the handle rotates, a large diameter gear with a large number of teeth moves. A large gear, called the drive gear, drives the driven gear, which is several times smaller than the previous one. This is how the torque changes downwards, with an increased speed of rotation of the shaft to which the cartridge with working attachments is attached.
Polish-made hand drill: this is what this tool looks like
The heart of the instrument
The commutator motor consists of three main parts: stator, rotor and graphite brushes.
Stator
As a rule, it is made from special grades of electrical steel that have a very high degree of magnetic penetration. Structurally, it looks like a cylinder with grooves into which a winding of copper wire is placed - there are two of them and they are located opposite each other. The stator is rigidly fixed in the drill body.
Anchor
Its second name is rotor, because it is in constant rotation when the tool is working. The armature is a shaft with a core made of steel similar to the stator pressed onto it. Along the entire length of the rotor, special recesses are machined at equal distances into which its winding is placed. They are wound from solid copper wire, and the taps are attached to the collector plates. The entire armature is divided into segments, its collector is rigidly mounted on the shaft shank, and during operation this entire structure rotates on bearings mounted on both sides of the shaft.
The design of the rotor and stator is perfectly shown in the photo: a large ribbed wheel located on the shaft in front of the armature is a fan for cooling the internal parts of the electric motor.
Brushes
Brushes with built-in springs move along special guides in the stator housing during engine operation - they transmit voltage to the rotor, so sparking constantly occurs between them and the armature housing, indicating that everything is normal. During operation, the brush body, made of pressed graphite, wears out due to constant friction, so they are periodically inspected and replaced.
Typical tool failures
Knowing the design of an electric drill, it is easy to determine the reason why one or another of its functions does not work. It should be noted that you can avoid breakdowns of power tools if you periodically carry out preventive maintenance related to replacing the lubricant of mechanical parts.
After completing drilling work, it is necessary to remove dust from the tool, especially from its ventilation holes. The nature of faults is divided into electrical or mechanical origin.
Electrical damage
This type of breakdown occurs due to exceeding the permissible load on the device and violations in its operation. They manifest themselves in the refusal of the tool to turn on, in a malfunction of the reverse or speed controller. Most often, to restore functionality, you will need to disassemble the start button and clean all places associated with the electrical contact.
The appearance of a burning smell indicates an overload in the operation of the electric motor. In this case, the condition of the brushes and windings is first checked, and the connection points of the power wire are examined to ensure there are no burns. Burning is associated with the ingress of dust, as a result of which the contact resistance increases, which leads to heating. Electrical faults are easily calculated using a multimeter and visual inspection.
Mechanical breakdowns
Mechanical faults are more difficult to detect. This kind of breakdown is usually accompanied by the appearance of extraneous sounds, and it will not be possible to eliminate them without disassembling the instrument. If the drill is poorly fixed in the chuck, it will need to be replaced, since the wear of the gear connection cannot be restored independently.
The appearance of a wedge during operation is associated with damage to the gearbox or bearing. If you disassemble the device, the damaged unit will be immediately visible. Wear on gears or splines will indicate the need to replace them. Bearings are checked by rocking them on the shaft. If the movement is not smooth or extraneous sounds are heard, then the bearing is replaced. After you manage to find the faulty unit and repair it, before putting the device back together, you need to clean the gearbox of old lubricant and apply new one. Then the device will be able to serve for more than one year.
Originally posted 2018-07-04 08:18:20.
Triac regulator
In a conventional drill design, this part is located in the start button. Visually, it is similar to a trigger and acts similarly: when pressed, the drill starts and the drilling process occurs. When you press firmly until it stops, the engine speed and the rotation speed of the drill increase.
The adjustment scheme is simple: the regulator is assembled from a small number of parts using microfilm technology, located inside the start button on a special PCB substrate. We will not plunge into the jungle of technological nuances, since this issue may be of interest to specialists, and not to the average user.
Structure of a hand drill
Hand-held drills come in one- or two-speed types. The first ones are considered the least effective and in demand. But two-speed devices have a more complex and versatile design. They have different rotation speeds, which increases the possibilities.
Standard single-speed mechanisms have two gears that rotate the handle and chuck. The most common tool option is the open model, when the gears are not covered with a housing. Thanks to this structure, parts can be lubricated without problems.
The large gear is connected to the handle, it rotates when the small gear moves, which drives the chuck. On the opposite side of the body from the handle there is a stop handle, which allows you to fix the tool in the desired position.
A tool with two speeds has a different design, complicated by a multiplier. The device is a connection of gears on an axis that regulate the speed of rotation.
To speed up the rotation of the tool, you need to move the handle in the desired direction. This changes the gearbox number, thereby changing the number of revolutions of the chuck. There are designs in which you do not need to move the handle to change the speed. To adjust rotation, they use a longitudinal displacement axis.
Drills can also differ in the type of chuck. It may have 3-4 cams. The rotation handle is attached to the shaft with a special screw, and the thrust handle is located on the opposite side of it. If the drill stops working, it is easy to disassemble.
Chuck types
In practice, you can find only two main types of this simple mechanism for fixing a cutting tool.
- Drills are fixed manually - there are single-sleeve chucks, where the drill is clamped with one hand, and there are double-sleeve chucks, where both hands are already involved.
- The cartridge is tightened using a special key of complex design. This is considered the most common type of chuck - used on all models of modern drills, especially on powerful versions.
Kolovorot
The “descendant” of the hand drill is the brace, which is still used to this day for repairs and other work. The device is useful for unscrewing screws or self-tapping screws that are firmly stuck.
The design of the brace is simple; it consists of a frame and a drill chuck. The frame has a special bend for convenient fixation. There is a handle on the side of the device, with the help of which the tool moves.
The top of the structure is equipped with a mushroom handle. By which you need to hold the brace for the best entry into the material. A fishing drill has a similar operating principle.
Functional nuances
Manufacturers of drilling tools always try to equip their products with exclusive options, so today users have the opportunity to purchase an excellent and very high-quality device. Here is a short list of the main innovations from the developers of modern electric drills.
- Electronic speed controllers. The latest models of electric tools are equipped with smart regulators, they are very convenient - the motor automatically turns off in emergency cases, for example, when the drill gets stuck inside the hole. Then we turn on the reverse and pull out the drill - this way the electronics prevent the engine from overheating.
- Reverse - with its help, the drill is capable of not only tightening fasteners, but also quickly unscrewing them when dismantling. The regulator is located next to the start button.
- Impact mechanism. It is installed on special models, due to its use it is possible to drill holes in particularly hard material. Impact drills can drill into concrete and natural or artificial stone.
- Fixing the start button. This function greatly facilitates the drilling process - the operator’s finger does not get tired. The lock is located next to the button, it is very easy to use: one press, and the drill works in constant mode, pressing again unlocks the trigger, and it turns off the power supply.
- A drilling depth limiter is a metal rod that rests against a part or wall and stops the drill from deepening at the desired level.
- Recently, a unique feature has appeared, such as additional illumination of the work area, which can be very useful in places with poor lighting.
Each drill of medium size and power is equipped with an additional handle, which is installed immediately behind the chuck and helps the process: you can hold the tool with two hands and apply constant pressure with your whole body.
Necessary tool
An ohmmeter is an indispensable thing for determining the causes of malfunctions.
Before you begin repairing an impact drill, you need to familiarize yourself with the list of tools that may be needed:
- pliers;
- ohmmeter;
- grinding sandpaper;
- vice;
- straight and Phillips screwdriver;
- spanners.
A vise may also be useful for securing some parts.
Battery model
Cordless drills are very popular among home craftsmen because the work is not limited by the length of the wire, which allows their use in any conditions. They also apply to electric tools. There are options when the charger is located in a tool storage case, and after use it is stored and charged at the same time. Basically, battery-powered drills have two spare units, which are enough to carry out the work.
This removable battery charges in no more than an hour, so you won’t have to take long breaks when you have a large amount of work planned for the day. As a rule, the charging unit is designed for several thousand times, but you need to specifically find out this indicator when purchasing; there are more expensive replaceable batteries that charge in 15 minutes.
The cost of cordless drills is slightly higher than ordinary models.
Advantages and disadvantages
Each tool has its own advantages and disadvantages. The product in question has the following disadvantages:
- Physical strength required to perform drilling work. Nowadays, it won't hurt to work your muscles sometimes
- Length of the product. When working, such a tool is convenient, which cannot be said about its transportation.
- Heavy weight, which sometimes exceeds the mass of electric analogues
Among the advantages we should highlight:
- There is no need to connect the tool to an electrical network. The device operates depending on the user’s physical strength
- Low cost, even today manual modifications of drills are produced, the cost of which does not exceed 1000 rubles. However, the quality of these products is inferior to those that were produced during the USSR.
- Simple design. The simplicity of the design affects the cost of the unit, which is already low, as well as reliability. The simpler the design of the tool, the more reliable it is, and you can repair it yourself
Maximum efficiency
In the operating instructions, each manufacturer indicates the range of rotation speeds at which the drill will make maximum use of its capabilities. For example, when working with wood, the highest speed is used, and for concrete and stone, a slower mode is selected. To use a drill as a screwdriver, select the lowest speed.
With each part of the device, you can carry out some small manipulations that will significantly increase the efficiency of using the drill.
- Cartridge. When the drill is clamped in the chuck with a key, you must manually close the jaws until they stop, and then, moving in a circle, finally clamp them with the key. In keyless models, which are increasingly difficult to come across, the entire process is done by hand.
- Drill. This cutting tool must always be well sharpened; wear and various damages significantly reduce its productivity. The use of low-quality drills can cause the motor and gearbox to experience overloads, affecting their service life.
- Secure hold. This tool is a very dangerous product, so it is necessary to hold it well in your hands during operation. During drilling, vibration is transmitted to the body, so manufacturers add a second handle to comfortably hold the drill, this greatly helps to control the entire process.
Special ventilation openings must be constantly open during operation to ensure normal ventilation of internal parts.
Advantages of a manual mechanical drill
One of the main advantages that a hand drill has is its extremely simple design. Most parts are made of metal and breakdowns, even if they do occur, are most often due to mechanical damage, for example, when something massive falls on the drill. This raises the level of reliability to a height unattainable for electric models - there is practically nothing to break in the device. Due to its simplicity of design and high degree of reliability, a mechanical drill is very durable. There are many examples where these devices last for several decades.
In addition, a hand drill does a good job of drilling holes in wood and other wooden materials (plywood, fiberboard, chipboard), plastic, drywall, and not too thick metal. If the diameter of the holes produced does not exceed 10 mm, a hand drill can make them with almost the same efficiency as its electric counterparts. At the same time, access to electricity is not required, which is of decisive importance for some conditions. Like other types of similar tools, this one can be used for screwing or unscrewing fastening threaded parts (self-tapping screws, screws, screws). To turn the device into a screwdriver, you just need to fix the corresponding bit in the chuck.
An indisputable advantage inherent in such a tool as a hand drill is its low cost. The price of the tool, depending on the model and diameter of the chuck, can range from 400 to 1000 rubles, which makes it affordable for any buyer, regardless of income level.
Drill types
Today, the industry produces universal drills that can be used for drilling wood, metal and hard plastic. But sometimes you need to have special drill bits for a drill to quickly drill holes in concrete, ceramic tiles, metal, to make large holes in wood, for example, to carefully insert a new lock into a door.
There are twist and flat drills for this. Impact drills for brick and concrete, diamond drills for drilling in ceramics, and a large-diameter circular drill for making holes in tiles to install water pipes have proven to work well.
Additional accessories
Using special devices for various purposes for a drill, you can expand the functionality of this universal tool. You need to purchase them separately, but you will never regret the money spent, because special attachments turn an ordinary drill into a grinder or mini-sharpener for home use. Using angle attachments, you can work with the tool in a hard-to-reach place or turn it into a metal cutter by installing an attachment with the original name cricket.
Special guides make it possible to work strictly at right angles; for vertical drilling, special jigs or factory-made stands are used, turning the drill into a drilling machine.
Regardless of which model the user uses, it requires constant care: after any, even short-term work, it is necessary to wipe the body of the product from any dust, paying special attention to the ventilation holes so that dust and small waste from drilling do not get inside the product.
If you are not going to use the drill for a long time, then all metal parts should be lubricated with a thin layer of technical oil - this will protect them from the effects of ubiquitous corrosion. Carry out periodic inspections of internal parts, especially for electric motor brushes - do not allow them to wear out to the limit. If you follow these recommendations, your instrument will not need repairs in the near future.
Possible tool malfunctions
First, you need to familiarize yourself with the main types of electric drill faults. They can be:
- Electric. Most often, breakdowns are related to electronics. There are times when the tool begins to spark due to overload. Some Bosch PSB models stop functioning due to the brushes grinding down.
- Mechanical. Sometimes bearings or gear mechanisms fail. In such situations, only complete replacement of broken parts will help.
Additional Information! The main signs of mechanical malfunctions include humming and a decrease in rotation speed.
Algorithm for finding and eliminating electrical failures
When searching for a breakdown, it is recommended to follow a certain algorithm that will help you quickly find the fault:
- If the device does not turn on completely, you need to open the case and check the cable connections. Perhaps one of them has become detached from the electrical circuit and therefore the device does not turn on.
- If everything is fine with the wires, you need to check the switch toggle switch. In some devices from Bosch and Makita, traces of oxidation appear over time and the device stops working.
- When inspecting the device, special attention should be paid to the brushes. They must press securely against the rotor.
Important! During inspection of the electric drill, do not connect it to the electrical network. Especially if the wire contacts are being checked.