In trade, cooking and many other industries, as well as at home, scales are used for weighing. The devices may malfunction and may not always accurately indicate the weight of the load. The problem can be eliminated by calibration - a method of accurately establishing the relationship between the readings of the scales and the standard indicator determined using weights. It is advisable to have a reference set of weights on hand so that, if necessary, you can independently adjust the weighing accuracy on electronic models.
Calibration of electronic and mechanical scales can be carried out simply as a preventative measure. Regardless of the purpose of the device, the calibration process is mandatory. The procedure is necessary to ensure the accuracy of the scales.
Calibration Methods
The measurement accuracy of the device may be lost both during operation and when simply moving from one place to another. How to calibrate the scales yourself? There are several ways.
- External. For such calibration, a special weight is used, called a standard. External calibration is used for both electronic and mechanical scales.
- Interior. New electronic scales are produced with an installed internal “standard” intended for calibration. This is undoubtedly more convenient than the external method, but such models are more expensive.
- Auto. The latest models have introduced an extremely convenient self-calibration function, which takes place without operator intervention.
Calibration of floor mechanical scales, like all mechanical measuring instruments, is carried out only externally using special weights.
Calibration options for Chinese scales
To calibrate commercial scales, you need to enter setup mode. On models equipped with a jumper, the start of the calibration mode is initiated by switching the toggle switch. Devices without this option are put into setup mode by entering a digital code. The desired combination should be searched in the documentation for the device or on the Internet by the model name.
Setting up models with a cost counter
The further procedure is as follows.
- Open the calibration menu by entering the digital code and pressing the “1” button.
- Start the mode of setting the scales to zero by pressing the “T” (TARA) button.
- The appearance of the number “2” on the “Price” indicator signals that the device is ready to install a reference weight equal to half the maximum possible for this device model. You should install the desired weight and press the “T” button.
- When the number “3” appears, enter the mass of the installed weight in kilograms and press the “T” button.
- When the number “4” appears, enter the value of the maximum permissible load weight and tap “T”.
- When the number “5” appears, enter the accuracy factor (from 1 to 10) and press “T”. You can use the default sampling value of 10.
- The device setup process is complete, remove the weights.
Adjustment using internal calibration mechanism
Scales equipped with a built-in weighing accuracy adjustment program are calibrated using the following algorithm.
- After entering the setup mode, enter a calibration weight value equal to 1/3 of the maximum allowable and tap the “T” button. So, for a device designed for 300 kg of LEL, a third will be equal to 100 kg.
- Enter the calibration mass in grams. To continue the process, press the “T” button.
- Enter the value of the largest weighing limit in grams and confirm by tapping “T”.
- Enter the sampling factor (from 2 to 10) and press the "T" button.
- The device screen should display 100 with the specified number of zeros after the decimal point, which means the end of the device calibration process.
Calibrating electronic scales with your own hands or using a service: how to calibrate commercial scales
Calibrating electronic scales yourself or in a service - how to calibrate commercial scales
Before you start working with new weighing equipment, it is necessary to ensure the accuracy of its operation, for which calibration of electronic scales is used - it is quite possible to do it yourself. Calibration of a weighing instrument is the setting of the connection between the strain gauges, which determine the deformation of the elastic element under the working platform, and the electronic device that displays the weighing result on the display.
Accuracy adjustment methods
In most cases, calibration of commercial scales is performed using standard weights. You need to start the setup mode, set the mass of the weight and make sure that the display shows the readings corresponding to this mass.
There are electronic commercial scales that are calibrated using built-in reference weights. A special device loads the platform with these weights when performing adjustments.
Finally, there are weighing systems that do not even require a command to perform settings - all processes are performed automatically at a certain frequency. Devices with built-in weights are usually not used in trade - they are most often found in laboratories, where measurement accuracy is required significantly higher than when weighing food products.
Frequency of accuracy check
Electronic scales are calibrated independently in the following cases:
After purchasing them, before starting regular use;
Periodically, with the frequency specified in the device passport, even if there are no claims to its accuracy;
When weighing conditions, location, ambient temperature and other conditions that may affect the accuracy of measurements change.
In the latter case, an extraordinary adjustment of the weighing device is performed. so after moving it to another place, you need to spend a couple of minutes performing the appropriate actions.
How to set up
In most cases, instructions on how to calibrate a digital scale will be found in the user manual. Typically, the technology associated with the use of standard weights is used. By pressing a special button on the control panel, the device switches to setup mode.
First of all, the “zero” setting is checked - when the platform is empty, the display should show zero mass. Next, a reference weight of the mass requested by the program is installed on the platform.
If you do not have just such a weight, you can choose from among the options offered by the program such a weight as is available. In this case, the electronics remembers the conditions for weighing the reference mass.
After exiting the setup mode, you can try to weigh the reference weight: the display will not necessarily show a perfectly accurate mass, but the deviations should be within the specified accuracy. Thus, electronic scales are independently calibrated at two points – zero mass and the mass of the reference weight.
Usually, any seller knows how to calibrate electronic scales - there is nothing complicated in this procedure. Only those who do not have the necessary standard weights at their disposal or when the store owner is not entirely confident in the experience and integrity of his salespeople can contact a special service department to carry it out.
After reading how to calibrate a 40kg electronic scale. You can find weights with a total weight of up to 10 kilograms, and to verify a device for weighing loads weighing up to one or two tons, you will need quite heavy weights, so it makes sense to call specialists who come with their own set of standards.
Setting up Chinese technology
Even having a good idea of how to calibrate electronic scales, sellers are often not sure how to properly calibrate Chinese electronic scales.
Of course, if there are no Russian-language instructions, it will be difficult to figure out how to calibrate Chinese electronic scales: each manufacturer has its own design nuances, the control interface is also different, and it’s better not to deal with electronics at random.
You just need to remember that the frequency of verification recommended by the instructions or data sheet of a particular device must be strictly observed, because only in this case can it be guaranteed that weighing will occur with the required accuracy.
Procedure for calibrating jewelry scales
Adjusting the accuracy of jewelry weighing devices requires special care and attention. We will show the procedure for calibrating a weighing instrument using the example of the MH-500 jewelry scales.
- Press and hold the “UNIT” key until the value 500.0 appears on the device display. The device indicates the reference mass required for automatic calibration.
- Press the UNIT button to start the automatic setup process. “CAL” flashes on the screen.
- After the numbers 500.0 reappear on the display, carefully place the weight at 500 grams in the center of the device platform.
- The device will automatically turn off and on again, and the word “PASS” will appear on the screen. The calibration process is completed and the device is ready for weighing.
How to calibrate jewelry scales?
If the question of calibration is raised, then a need has arisen. In other words, there is no longer any trust in the measurement results. Let's look at the reasons why this happens and when it is worth carrying out this basically simple procedure.
When to calibrate
- The automatic zero setting function, in 99% of cases, copes with its important mission and the display will show [0.0].
Of course, a lot here depends on the correct orientation on the surface. Moreover, the lower the metrological error, the more strictly this condition must be met. This is easy to check in practice. If we take, for example, the popular jewelry scales MH-200 (±0.01g) and MH-500 (±0.1g), then in the latter version it will be clear that the device is noticeably “rougher” - after all, hundredths or tenths of grams, there is a difference. If for the MH-200, for example, a platform tilt of 1° will already show a negative value on the screen, then for the MH-500 it is possible that even at 3° we will still see zero.✅ Nuance! A negative value on the screen is normal when weighing with tare. The weight of the container is subtracted, and if it is removed in this mode, we get “-“. But if with containers, then “+”. But this is an exception to the rule.
- We turned it on and first observed “0”.
It would seem that everything is OK. Until we deliver a load, especially with a known weight. It would be better if it was a weight.✅ Advice! Order yourself a set of weights, if used, at a very low price. On olx they are often put up for sale, often for next to nothing, and you can also bargain for rarities of the USSR. But you can carry out the calibration yourself, and even periodically “rent” it to your friends and neighbors.
It is impossible to completely avoid the likelihood of such an event occurring. If only because all devices sooner or later begin to fail. Electronics are aging, component indicators “float”, backlashes appear in mechanical elements and it is not a fact that it will be possible to carry out calibration. If the product’s life cycle has come to an end, then you will have to think about buying new ones.
- But what to do if only a few months have passed, and the reliability of the testimony raises serious doubts? If we are honest with ourselves, it is often the “owners” of the scales who are to blame for the fact that informational “digital noise” appears on the display.
☝ As it was sung in one famous song - and there are 5 reasons for this:
1 My battery is almost done.
You will need an automatic power-off feature to save energy. For example, if the operation is too intense, for example, gold or precious stones are weighed with scales in a pawn shop, it is worth checking the battery so that the device does not fail at an important moment. Perhaps after replacing it, everything will be fine ✅ Nuance! After you replace the battery, you will have to do calibration - the reference data is erased from memory. But if you simply turn off the power with the ON/OFF button, they will be saved.2 There was a fall and the precision mechanism based on the strain gauge was damaged. 3 Overloaded and damaged the sensitive system 4 The load was even within the limits of, for example, only 100g, but it was dropped from a height onto the platform and somewhere there, in the depths of the electronic bowels, a micro-failure occurred 5 We pulled it in our pocket and hit the door in the minibus. Or they sat down poorly.
* For reference. Other types of equipment are also calibrated. For example, by the temperature of the soldering iron tip or the hot air of a hot air dryer at a soldering station. A multimeter with a thermocouple can be used as a reference meter.
Algorithm
As we said, we take out a set of standard weights. We have one. Some of the milligram plates are lost, but the main calibration weights (100,200,500 g) are available. We use small ones to check accuracy after the procedure.
Let's look at the procedure using the MH-500 as an example.
- Press and hold the UNIT key in this state.
- We wait until the numbers appear on the screen: 500.0. This is a calibration weight; the device itself “tells” what value of weight to use.
- Press the same button again.
- We watch the letters CAL flash, and then 500.0 again.
- Considering the above, still half a kilogram, we place the weight exactly in the center and carefully.
- The device will turn off, then the power will turn on again/
- The message “PASS” will appear, shutdown again and the process is completed.
What's the point ?
From a technical point of view, the force of pressure and the weight of the weight are compared. In uncalibrated scales, there is “confusion and vacillation” ➢ even if you set the exact weight of 200 or 500 grams on the plane, the sensor “does not know” about it, no one “taught” it. The same result will be inaccurate. And the analogy we gave makes sense.
☝ Calibration is “training” or adjustment to a reference weight
Is one weight enough for calibration?
Almost always YES. But there are scales on sale, for example with a limit of 600 g, which are calibrated with two weights.
And this depends on two factors: the breadth of the measurement range and the requirements for accuracy.
The wider the measurement limit and the more stringent the requirements for low error, the greater the likelihood that more than one weight will be needed. The fact is that it is difficult to ensure the same deviation over the entire range. And a 200g weight calibrates the lower sub-range, and a 500g weight calibrates the upper. This is the metrological division of labor.
Published: 2016-11-09 Updated: 2020-02-25
Share on social networks
Comments on the article “How to calibrate jewelry scales?”
- Leave your comment on the article...
Leave your comment
Error
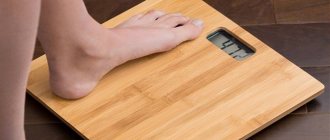
Setting up and checking the accuracy of household floor scales
In order for electronic bathroom scales used to track body weight during fitness or dieting to weigh more accurately, you must adhere to the following rules.
- Place the device on a completely flat, horizontal surface, hard and smooth. The location of the device when it is first turned on after installing the battery significantly affects the accuracy of the scales during subsequent measurements. Most models are configured automatically the first time you turn them on.
- Turn on the scale. Different models, depending on the technological solution, are turned on differently (automatically when standing on the platform, when you press a button on the body or by touching the touch panel). Information on how to turn on the device is contained in the description for the specific model. The display of the switched-on scale should show a zero indicator (0.00).
- When weighing, you need to stand on the platform so that your feet are parallel. When body weight exerts uniform pressure on the scale platform, sensors located on the sides of the center provide a correct weight measurement.
Operating instructions for electronic scales MH-100/200/300/500 series.
October 20, 2018
MN scales • electronic scales • calibration • instructions
Operating instructions for electronic scales 0.01-100/200/300 and 0.1-500 g.
Electronic scales are a high-precision instrument, therefore, when working with them, certain operating conditions must be observed.
- Do not overload the scales! The weighed weight should not exceed the established limit of 100, 200, 300 or 500 g, depending on the model.
- Avoid any contact of the device with high or low temperatures. It is recommended to allow the scale to “acclimate” to normal room temperature for one hour before use. Also, before calibrating the scale, it is advisable to first keep it turned on for 30-60 seconds to allow the internal components to stabilize.
- Keep the scales on the frequency! Dust, dirt, vibration, air currents and proximity to other electronic equipment can adversely affect weighing accuracy.
- Try to avoid increased physical impact on the scales. Carefully place items to be weighed on the platform. Do not drop the scales under any circumstances! A fall is a critical impact on this device and can lead to its complete or partial inoperability.
- You need to work with weights on a flat, horizontal, static surface!
INTRODUCTION/BASIC FEATURES:
I."ON/OFF" - Button to turn the scales on and off.
— Place the scale on a horizontal, flat surface. — Press the power button and wait until the readings are at 0.00 — Place the object(s) on the weighing platform.
II. “UNITS” — Button for selecting weight units ( g, oz, tl, ct, gn).
III. “LIGHT” - Use this button to turn the display backlight on or off.
IV. “TARE” - Button for deducting tare. — Turn on the scale as described above. — Place the “container” on the platform. — Press the “TARE” key and wait until [0.00] is displayed. — After this, you can place the items to be weighed on the scales.
V. “PCS” - Counting function button. — Press and hold the “PCS” button for 2 seconds until “100” appears. - Press the "UNITS" button and you will see "25, 50, 75, 100". — Please select the number of items to be weighed. - Then place the appropriate number of items that you are going to consider as a sample. - Then press “PCS” to confirm. — Remove the sample. - Now you can place the items you want to count in the center of the platform, and the display will show their number.
CALIBRATION:
- Turn on the scale by pressing “ON/OFF” (on/off button).
- Press the “UNITS” button (select weight units) and hold it until “CAL” appears on the display.
- Press "UNITS" again, "CAL" will flash and then show the weight to be placed on the platform.
- Place the desired weight on the platform and wait 3 to 4 seconds until “PASS” appears on the screen.
- Remove the weight and press ON/OFF (on/off button) to turn off the scale.
*This completes the calibration. If calibration is unsuccessful, the screen will display “FAIL.” Please repeat steps 1 to 5 of the calibration function. Watch a detailed video on the MN series scale model. The most popular item from the recommendations of our customers:
Return to list of publications
Repair of electronic scales
Share on social media networks:
- The main nuances in repairing scales
- Power supply
- Plume
- Contact pads
- Foreign bodies in the device housing
- Sensor malfunction
- Calibration
- Video material
Many families have scales in their homes to regularly monitor their weight. Such “concern” is the key to good health, since any changes have some reason. But over long-term use, the models begin to wear out and gradually fail. Is it worth running to the store to look for a replacement in such cases? There’s no need, because you can repair electronic scales with your own efforts right at home.
The main nuances in repairing scales
All devices of this type are based on the same principle, which means that absolutely all faults are of the same nature. If you are at least a little familiar with the basic laws of school physics, then restoring the device to its former performance will not be difficult. The most important thing is to be patient.
Important! Kitchen scales have also become a popular household appliance. A huge number of models from different manufacturers are sold, so to understand their differences, click on the link on how to choose an electronic kitchen scale.
It is also worth noting that self-repair will allow you to save on the services of a qualified technician. In addition, very often problems are solved in a couple of minutes, and you don’t even need to look around the house for rare tools. It happens that the battery in the device is simply dead or it is time for a new calibration.
In order to repair electronic floor scales, let's start with their filling.
Important! If repairing your device turns out to be impossible or unprofitable, we recommend that you familiarize yourself with the rating of the best models of floor scales.
Repair of electronic scales
Electronics require a precise approach. The repair process must take place in strict accordance with the rules, one at a time.
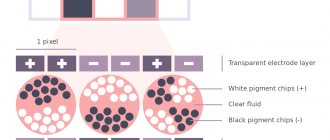
The operating principle of electronic scales is based on the functioning of voltage sensors, thanks to which the device’s readings are displayed on a liquid crystal display. Depending on the model, the device can be turned on automatically when exposed to a load or by pressing a button.
Note! Electronic scales may have a weighing error of 100–500 grams. It is also important to take into account the maximum load of the device, which ranges from 100 to 220 kg for different scale models.
Elements that make up electronic floor scales:
- display;
- strain gauges;
- electronic printed circuit board;
- buttons.
Preparatory work
First of all, you need to determine what the problem is. Defect identification includes:
- checking batteries;
- inspection of appearance;
- checking all electrical contacts;
- checking the condition of scale parts.
Let's take a closer look at them.
Checking the batteries
The scale may not display numbers clearly or may not turn on at all. This is a reason to check the state of the power supply. The process is quite simple: take out the battery and check it with a tester. If this device is not available, you can do it even simpler: place the battery in any other device with the same type of power. If it does not turn on, then the problem may be in the battery, and most likely it will be enough to replace it. Otherwise, you need to look for other reasons.
The tester will help you determine if the battery needs to be replaced
When conducting such a check, consider two important factors. Just because a battery works in another device does not always mean that it will give the same result in a scale. The battery’s contacts could also have oxidized. The reason for this could be a violation of storage rules, for example, at high humidity. Try wiping the battery contacts with a flannel cloth, it is quite possible that it will work again. But still, the most reliable way would be to check with a tester.
Inspection of appearance
Carefully inspect the scale from all sides for any changes that have occurred in it compared to its normal state. This could be deformation of a part, a crack, melting or charring. Each such defect indicates where the fault is located.
First of all, carefully inspect the scale for external damage.
Checking all electrical contacts
Perhaps this check will help you repair the device right away. If you find a torn or detached wire, just solder it in place. The same must be done if the track on the board is damaged.
Check if the wires on the electronic board are securely fastened
This is done as follows. Take fine sandpaper and clean the damaged area with it, then degrease it, wipe it with white spirit or another solvent and sand it. Create a jumper over the defect or solder a large layer of tin. When the solder has cooled, coat it with varnish. You can use regular nail polish.
Checking parts and their condition
If the previous manipulations did not reveal the problem, you need to check the condition of the scale parts. Approach this with extreme care. You will need precision tools: an angle, a caliper and a level. Look carefully to see if the internal frame is deformed and what condition each part is in. This way you can detect hidden defects.
Repair work
Having determined the type of malfunction, prepare the tools that will be needed for repair:
- pliers;
- screwdrivers;
- soldering iron;
- tester.
You will also need a clean rag to wipe away dust and dirt. If it is necessary to restore the tracks on the board, you may need a solvent, varnish and sandpaper.
Elimination of mechanical defects
Device malfunction can be caused by exposure to a mass exceeding the maximum permissible. The load cells are located at the corners of the inner frame, which bends under too much weight.
You can determine the presence of such deformation using a level or measure it with a caliper. Fixing the problem is not difficult: just straighten the frame at the bend. This can be done by gently tapping the deformed areas of the frame with a hammer, constantly measuring the result with a level. Thus, the functional balance of the sensors will return to normal, and the functionality of the device will return.
Note! It is recommended to remove the frame from the scale before alignment.
Loop repair
Electronic scales may stop displaying numbers if the contact of the cable with other parts weakens. Disassemble the scales, carefully inspect the cable - a set of wires collected in a ribbon connecting the display and the printed circuit board to each other. If the cable contacts are loosened, the display does not receive power, which is why the characters on it are not visible. You need to ensure a tighter connection of the contacts in the cable to the board. Lift it slightly and press it against the display with a suitable size block, ensuring permanent fixation. Such a block can be cut from a piece of wood or take a regular office eraser. The block will tightly fix the board, restoring contact, and the device will function again.
If a damaged wire is found in the cable, solder it at the break site.
Display damage can also be detected by other symptoms. Are there any visible stains, smudges, or air bubbles on it? This is a clear sign that the problem is not with the wires, contacts or cable. When my scales had this problem, I had to take them to the workshop. The display was replaced: the failure was in its matrix, the ink simply spread over the internal surfaces. This problem cannot be fixed at home with your own hands.
Video: soldering a cable in an electric scale
Problems with strain gauges
Another necessary part of electronic scales is strain gauges. They are responsible for converting the load level into a signal, which becomes the image of numbers on the display after processing by the electronic board.
This is what a strain gauge looks like
The scales contain 4 such sensors: they are built into each leg at the corners of the scales. Mechanical impact does not destroy them, but the wiring coming out of the sensor may break. They need to be soldered, but this can be difficult to do. The problem is that the sensor is very small and housed in a rugged housing.
The performance of strain gauges can be determined using a tester. To do this, unsolder all sensors from the board and measure their resistance. Without load on the scale, the resistance of all load cells will be approximately the same. A larger deviation in resistance values will indicate a malfunction of any of the sensors.
Schematic diagram of bridge resistance measurement of strain gauges
The sensor itself may fail, but this happens very rarely. This malfunction can be determined by ringing the part with a tester. If the result is negative, then the sensor is replaced with a new, serviceable one. This task can be difficult, since the part is filled with a compound - a special glue. If you manage to find strain gauges in an electrical store, take 4 of them at once and install them in place of the old ones. You can also replace the damaged sensor with a part with similar resistance values from an identical scale model.
If you are unable to find a new sensor, try carefully picking out the compound. Inside you will see a copper plate with three soldered wires. If one of them is broken, just solder it back in place. Usually this is enough to restore the scales to functionality.
Calibration of electronic scales
The accuracy of their readings directly depends on how well the scales are calibrated. Violation of calibration does not affect the performance of the device, but the scales will not be able to display the measured mass correctly.
Restoring calibration is carried out as follows.
- Place a certain weight on the scale platform - any thing whose weight you know down to the gram. This is necessary in order to determine whether the device is actually showing incorrect information about the weight acting on it.
- Press the power key and do not release it. After a few seconds, the letters CAL will appear on the display.
- After some time, the device will display the word PASS. Then the inscription will be deleted. After this, you need to turn off the device. This way the data is reloaded, and after turning on the scales will show the correct information.
This was the only method that helped me calibrate electronic scales myself. If it turns out to be ineffective, take the scales to a service workshop: only there there are special instruments for carrying out accurate calibration, which, most likely, has gone completely wrong at the hardware level.
Note! The load you will use must weigh no more than the weighing limit of the device.
Video: what calibration of scales means and how to do it
Cleaning electronic scales
Another reason for the device to not work can be dust and dirt getting inside. Disassemble and carefully clean the internal surfaces of the device. To do this, use a clean rag, and at the places where the board parts are fastened, use a soft small brush. Do not use detergents or cleaners as they may be harmful to electronics. Cleaning of any electronic devices should be done “dry” and in a switched off state. Carry out the work carefully and carefully: the parts are fragile and can easily be damaged.
Electronic scale errors
Usually we expect numbers from scales to indicate body weight, but sometimes letters or other symbols appear on the display. Let's figure out what they mean.
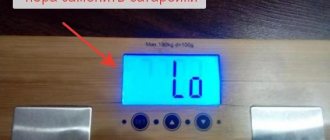
- If the letters LO appear on the display, this is a signal about the low battery level. This is a system message, short for "low battery". To correct the situation, it is enough to replace the battery, which has exhausted its resource, with a new one. After this, the functionality of the scale will be restored.
- The ERR does not indicate that the scale is faulty. Any electronic device can reboot on its own, after which the system requires an update. If you see this error, step off the scale and wait until the display returns to “0.00.” Now you can repeat the weighing.
Non-standard messages on the display may indicate certain errors in the operation of the scales - After the batteries have been replaced, the display may show 8888. This is normal: changing the batteries causes a reboot, after which the scale is in the initialization process for some time. This usually lasts 5–30 seconds. Just wait until the value 8888 disappears from the monitor.
- The “—–” indicator indicates that the weight sensors are not functioning properly. In this case, it is enough to restart the scales or change the battery.
- Some (professional) types of electronic scales have additional functions, such as determining your body fat percentage. The message Err-h on the display of such scales indicates that this indicator is above the limits of the upper range of the scales, Err-L - that it does not reach the limits of the lower limit.
Different weights on the same scales: what to do?
Owners of bathroom scales sometimes encounter the fact that the device produces different body weight readings. There are several reasons why this happens.
- The scales are standing on an uneven surface. This makes the device unstable and tilts when you step on the platform. The same happens if the device is placed on something soft, such as a carpet. Place the scale on a flat, hard surface and then weigh yourself to get an accurate result.
- The correct position of the body on the platform is also important, especially the placement of the legs: try to place your feet strictly parallel to each other.
- When weighing, stand straight so that your body is perpendicular to the scale platform. Any movement may cause the reading to change. For example, if you try to put your weight on your toes, you may become “heavier,” but if you try to put your weight on your heels, you may become “lighter.”
Any change in body position on the scale can give a completely different weight reading. - The room in which the scales are constantly located should not be subject to sudden and frequent temperature changes. Electronics are highly sensitive; they often fail when moisture enters or elements overheat, which damage the contacts and even break the wires.
- Do not keep the scales close to heating devices, stoves, or fireplaces. Electronic devices may give incorrect results due to intense heat due to damaged contacts.
- Improper maintenance also causes errors in the operation of the device. When cleaning the scale, do not use any chemicals. Most often, it will be enough to wipe them regularly with a dry cloth.
Power supply
Most often the problem lies in the power supplies. This issue can be resolved very quickly using your own hands without any extra knowledge or skills. If the information image no longer appears on the digital display, then you need to start by replacing the batteries. In order to find the batteries, you will need to unscrew a few screws or open the case cover that covers the battery compartment.
Important! To check the operation of the power elements themselves, you just need to use another electrical appliance. Place batteries in the equipment or use new batteries that you simply need to insert into the scales.
How to find the source of the problem
Carrying out diagnostic measures on your own is extremely problematic. You will need to run the following algorithm in order to find the problem:
- Carefully inspect the scales for deformations.
- Remove the protective feet from the strain gauges. Inspect the metal plates.
- Disassemble the body. Check all internal components.
In some devices, the bolts may be hidden behind a sticker. Before opening the scale, you need to make sure that all the bolts have been unscrewed, otherwise the case may be damaged.
To restore the device to functionality, you will need a special tool. You need to prepare in advance:
- soldering iron (may be required if there is a break in the wire);
- small screwdrivers.
Spare sensors may also be required. They can be purchased at a specialty store or removed from other products. At home, a person can only fix minor damage. If difficulties arise, contact specialists. In every city there are companies and craftsmen who carry out repair work.
What are medical floor scales and how to choose them, read here.
Plume
If you go into the design features of such devices, you will notice that a special cable connects the display and the printed circuit board. Problems with this component will also cause the device to not work.
It often happens that the contact of this part with other components is greatly weakened, which is why the display stops showing digital values. In order to get rid of this problem, you need to put the printed circuit board in place, using, for example, some kind of block of wood.
Important! Remember that excessive force when using a wooden beam can damage the delicate components of the scale.
Do-it-yourself repair of electronic scales will also help in cases in which other parts of the device have been damaged.
The most common causes of breakdown
There is a list of the most common breakdowns. The following reasons are identified:
- loop malfunction;
- reducing the area of contact ends;
- failure of electronic board elements;
- breaking contacts;
- problems with calibration.
The scale may not work due to a dead battery. In this case, you only need to replace the batteries yourself.
You need to start diagnosing a device by looking for simple problems.
The device is made of tempered glass, which rarely fails due to the high strength of the case
The process of operating a bathroom scale involves constant pressure on its surface. After this, the load will be evenly distributed across the sensors. Metal strain gauges can fail due to the passage of time. If one of them sends the wrong value, the scale will start showing the wrong weight.
If the scales do not work, then repairing the scales yourself is a difficult procedure. To fix most problems, you need to use a special tool. You also need to have skills, for example, to cope with replacing and soldering a new contact.
To diagnose a breakdown, you will need to check each element of the product. If the scales are completely turned off and do not turn on, you need to disassemble them and check the integrity of all wires. If they show incorrect data, then you need to look for a problem among the strain gauges.
To choose smart bathroom scales for your home, check out our article.
Sensor malfunction
A strain gauge is a component that is responsible for converting the strain value into the signal that the human eye is accustomed to seeing on the display. The use of such parts is very convenient for accurate weight measurement.
Important! All changes that are recorded by this device are so small that they cannot be recorded in any way. The main work in this design is performed by a special plate, approximately 2 cm in size. It is this plate that “collects” data from each of the corners of the electronic scales, processes it and transfers it to another unit for display on the monitor.
In other words, a strain gauge is a piece of hardware that can only be damaged by mechanical action, which is a very difficult task. In order to carry out diagnostics, you will need a special electrical tester.
Also, a malfunction in the operation of the scales can occur due to the wiring that goes to this very sensor. Here everything can be fixed with a regular soldering iron, but if the sensor is completely broken, you will have to look for a replacement.
Important! Pay more attention to the selection of a new component, since it must have the same technical parameters. If the parameters do not match the model, you risk getting inaccurate weight measurements.
Calibration
Calibration must be carried out regularly in order for bathroom scales to function properly. There are no two absolutely identical sensors on our planet, even if they were manufactured at the same enterprise with a short time interval. If one of these devices is damaged, you can simply turn it off and redistribute the work to the remaining ones.
Unfortunately, this approach only works for temporary repairs, when the consumer does not have the opportunity to quickly find a replacement for the old part, and the work of the scales is required right now.
Important! In fact, calibration is carried out by just pressing a key, which is specified by the device manufacturer. This procedure is unlikely to take you more than a minute, since there should be brief instructions on the case and on the display.
Device of electronic floor scales
The product consists of several elements. As a rule, experts distinguish the following parts of it:
- display;
- frame;
- printed circuit board with various microcircuits;
- strain gauges.
The body of the product can be made of plastic, glass or metal. Each option has its own advantages. If the case is deformed, it is almost impossible to repair the scales.
The most important part of the scales are the load cells. They are metal plates that are located on the back of the product.
Inside the product there is a board that reads the data and displays it on the display. The functionality of the scale depends on the electronic board. 4 sensors are connected to the board. The entire structure is reliably protected by the housing. The display in most devices is black and white. It displays all the necessary information well.
How to calibrate electronic scales
In many industries, correct weighing is an important indicator. But the scales may from time to time fail to operate normally and accurately. To carry out preventive maintenance or troubleshoot problems, you need to periodically carry out adjustments.
This is called calibration. Many people are faced with the need to carry it out and want to know the answer to the question: “how can you calibrate electronic floor scales yourself.”
- Calibration Methods
- Periodicity
- Instructions
- Conclusion
Elimination of the most common breakdowns
To successfully repair, you will need to follow a simple algorithm of actions. If a person wants to know how to repair an electronic floor scale, he should read the step-by-step repair instructions.
Sensor repair
If the scales break due to sensors, first of all you will need to establish the type of problem (sensor bending, wire breakage, complete breakdown). If the malfunction is related to the curvature of the structure, it will need to be straightened. Most often, one of the load cells fails. In this case, you will need to perform the following steps.
- Check the functionality of the sensors. To do this, you need to press your hands on each of them. Even with slight pressure on only 1 sensor, the scale should turn on.
- Disassemble the scales and carefully examine the wiring.
- If there is a break (near the board or the sensor itself), it will need to be repaired. To do this you will need to use a soldering iron.
- In some cases, the break is hidden behind the adhesive base. It is necessary to carefully open it and check the reliability of the connection.
Wires connected to the strain gauge
If the sensor is completely broken, it is replaced. Finding and buying a suitable spare part on your own is quite problematic. When looking for a new load cell, you need to pay attention to its compatibility with the device. It is better to purchase it in specialized stores. When purchasing, you must use the help of consultants. The new sensor will need to be secured in the mounting location, and the wires will also need to be soldered to it.
Recommended reading: choosing electronic bathroom scales.
Repairing the cable
Loop repair is usually required when the numbers on the display are not fully displayed. A cable is a set of wires that connects the display and the board inside the device. To assess the condition of this element and carry out repairs, perform the following steps:
- Complete disassembly of the case. Checking the integrity of the loop.
- If the numbers are not fully displayed, this means that the cable is coming off.
- Elements that move away from the board are securely soldered.
Fuzzy display of numbers on the display (example in the picture) may be due to its breakdown or poor-quality wire connection
You can use a special conductive glue to press the cable and all contacts to the board. After this, the problem should disappear. All gluing or soldering work must be carried out with great care. There is a possibility of damage to the board due to careless actions.
Device calibration
In some cases, the malfunction is due to incorrect sensor settings. Incorrect data may appear on the display if for some reason calibration has not been performed. Modern scales are automatically calibrated every time they are placed in a new location.
Calibration Methods
Here are some options:
- External – the standard is used;
- Internal - modern devices have an internal reference mechanism with which the process is carried out;
- Automatic – the built-in function starts itself after switching on.
Important! Calibration of floor electronic scales is carried out only by an external method.
Instructions
The instructions include several points:
- Place the device on a flat work surface;
- Turn on;
- Use “MODE” or “UNIT” to select when “CAL” flashes on the monitor;
- Press “MODE” / “UNIT” again;
- Place the standard on the platform;
- “PASS” will appear;
- At the end of the process, the transition to work occurs independently;
- Remove the load from the platform.
The method is also used to tare electronic floor scales. There is another way to calibrate the scales.