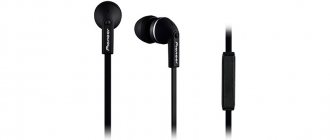
Many users of smartphones, MP-3 players and other portable devices for playing music often experience their headphones breaking. This happens because thin wires are regularly subject to deformation due to twisting, rewinding or other bending that occurs every time the accessory is put into a pocket or bag. On expensive large headphones, you can replace the cable, as this is provided for by the design of the gadget, but this solution is not suitable for inexpensive accessories. However, there is no need to rush into buying new devices - there are several simple ways to fix headphones if the wire breaks. Most users can do the repair work themselves at home.
Identification of the rupture zone
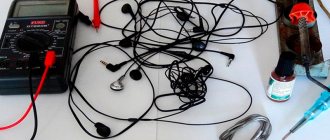
To repair damaged headphones, you first need to find a break, and this can be done by probing or using a multimeter . Probing the cable to detect a breakdown is the easiest way. You need to connect the headphones to the sound source, start the music and begin to carefully bend the wire in the direction from the plug to the speakers, without missing a single centimeter. If in some place the music begins to be interrupted, a crackling sound or other noise appears - this is the place where the wire breaks.
Using a multimeter is a professional and more accurate way to detect cable damage. It is necessary to turn on the measuring device, set the sound diagnostic mode, and then connect the probes correctly: black to the COM connector, red to mA. Now you need to carefully make notches near the plug and the earphone itself, and then install the probes in them. If the device beeps, this means that the wire is intact, and the problem needs to be looked for elsewhere. If the multimeter is silent, you need to make a cut in the middle, and then check both halves of the cable one by one. Where the wire is intact, the device will beep. The tester is silent on the damaged part of the cable. In this area you also need to find the middle and make a cut again. In this way, you should check the cable until there remains a faulty section a couple of centimeters in size.
Important! The best way to reconnect damaged wires is to use a soldering iron. If the user does not have such a device or experience working with it, it is allowed to twist or connect the torn wires with solder or solder paste.
Connecting wires by soldering
Once a damaged section of the cable has been identified, it is recommended to cut it out completely, rather than looking specifically for the break point. Next, you need to remove the outer insulation from the wire by about one and a half to two centimeters. Under it you will find several wires (from three to five, if the headphones have a microphone), which also need to be cleaned of protective insulation, if present. These steps will need to be repeated for the second piece of cable.
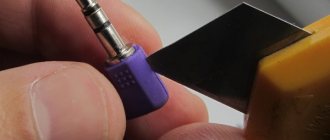
Important! Heat shrink tubing will be used to insulate the repaired cable. A piece of the required length should be placed on one of the cable sections before connecting them. Also, small pieces of heat-shrinkable tubing of a smaller diameter must be placed on each core.
Next, you need to firmly connect the wires of the same color, and then apply a layer of solder on top with a soldering iron. After the solder has cooled, you need to put pieces of heat shrink on the exposed wires and heat them with a hairdryer so that the tube shrinks and wraps them tightly. This is necessary so that the wires do not touch each other and do not cause a short circuit . Next, the insulated pieces of cable need to be assembled together, a piece of heat shrink of a larger diameter must be put on them and heated. This way they will not dangle, and the repair site itself will look beautiful.
Cable break near the plug
If one ear does not work, and diagnostics of the break point showed that the cable at the plug or the element itself is damaged, it is recommended to replace it with a new one. To do this, you first need to purchase another plug, and then cut off the old one along with a couple of centimeters of wire. Next, the new plug is unscrewed, and the insulation and braiding are removed from the cable by about 1.5-2 cm.
Important! The grounding conductor (usually yellow or two-colored) should be soldered to the copper sleeve, and the remaining two wires to the plug contacts. Solder correctly by first cleaning the contacts with fine sandpaper to ensure the best connection.
After completing the work, you need to assemble the plug, and it is important to make sure that the wires are not connected to each other. Otherwise, the headphones will not work. Read more about this in our article “how to repair a headphone plug.”
Break near the speaker
If, upon inspection of the accessories, it is discovered that they are torn at the speaker, you will need to disassemble the earphone to repair it. It is usually connected with latches, screws, or glue.
Advice! If the case is connected with glue, you need to clamp the device in a vice and apply pressure - the crack will go along the place of gluing.
The wire inside is almost always tied in a knot to prevent it from being pulled out during careless movement. It needs to be cut, the insulation removed, a safety knot made again and soldered to the contact with a soldering iron. After the repair, you need to reassemble the earphone. Other reasons why one earphone does not work are in our material.
Causes of headphone malfunction
The most common causes of headphone failure include the following:
- Broken wire. There are thin copper strands running inside the headphone wires. If the device is subjected to increased tensile stress, they may rupture. At the same time, such a gap may be completely invisible from the outside. However, with such a malfunction, the contact is broken and the headphones (or one of them) stop producing sound.
- Poor contact at the plug. The connection between the plug and the wire on the headphones is the weakest. This is due to the fact that in this area they are constantly bent. Even if the connection is protected by a thick rubber coupling, there is still a high probability of breakage.
- Plug bend. If the plug is under heavy load, it can easily bend. Such a malfunction can not only disrupt the contact between the headphones and another device, but also damage the audio output.
- Speaker malfunctions. If handled carelessly or over time, the headphone speakers may wear out. This leads to extraneous noise during playback and a quieter sound. Also, the speakers can completely fail (this happens when the membrane is severely peeled off). It is not uncommon for the speaker contact to come off due to strong jerking of the wires. This is a simpler case that can be repaired.
Connecting wires without a soldering iron
If the user wants to do without a soldering iron to repair torn headphones, he can use solder paste, solder, or make a reliable twist.
Solder
You can fasten wires with solder without the help of a soldering iron. For this you need a small metal container. You need to put a small amount of solder in it and also add rosin. Now you should light the stove, place the dishes on it and melt its contents.
Next, you need to lower wires of the same color one by one into the solder and run them along a wooden block so that the substance is distributed evenly . You can perform the same steps and remove excess solder using a simple rag. Next, the wires are connected together, after which you need to wait until the material hardens. After this, the exposed sections of the wire must be insulated using heat shrink tubing or electrical tape.
In the same way, you can solder a wire if it breaks at the plug or near the earphone. In this case, you need to pour crushed solder and a little rosin onto a flat surface (contacts), and then heat it so that the substance melts. After this, the material is evenly distributed with any convenient object and the prepared wire with applied solder is applied to it.
Another convenient way to solder two wires together without a soldering iron is to use foil. The action diagram is as follows. It is necessary to remove the top braid from the cable, and then remove the insulation from the contacts (usually varnish with thread). Next, you need to cut strips from the foil along the width of the exposed wires. They are used to make grooves into which contacts twisted in pairs are placed separately. Solder and rosin are poured on top of them and distributed evenly along the surface. Now you need to wrap the foil tightly around the wire so that there are no gaps, and heat it until the solder melts. Next, the foil is removed, and the wires are tightly compressed with pliers, but this must be done carefully so as not to damage them. Excess solder can be easily removed with fine sandpaper.
Solder paste
Solder paste is more often used than regular solder to repair broken wires without a soldering iron. This process is faster and easier than working with solder and rosin.
On a note! It is inconvenient to work with a solid substance, but the paste is much easier to apply to the surface being treated. You can buy it at the store or make it yourself.
To repair headphone wires, you need to coat the exposed contacts with paste, connect them together and heat them over an open fire or in any other way. With this connection, soldering occurs deep between the wires, so its strength is significantly higher than when using solid solder.
Twist
Twisting the cable is the simplest solution. You need to take two identical wires from 2 to 4 cm long, connect them together and braid them, after which you need to put a heat-shrink tube on top or wrap electrical tape . The connection should be very strong, but do not tug the cable too much during operation. If everything is done correctly, the headphones will last for a long time.
How to seal a leak in a pipe: chemical methods (sealants)
The use of chemical methods for eliminating leaks uses various chemical compositions. Most often silicone based. Their use is due to high heat resistance (up to 350 degrees) and increased wear resistance. Fiberglass painting cloth is usually used as a reinforcing element.
The damage repair steps are as follows:
- A 2-3 mm thick sealant is applied to the cleaned damaged surface of the pipe, over which a painting cloth is rolled (back to back, layer to layer)
- On top of the first layer, another layer of sealant is applied and then reinforcing fabric, but with an overlap of 5 mm turns.
- The total number of layers must be at least 4
- The fabric is laid tightly, without “air” layers.
- The last layer of sealant is applied
- The treated section of the pipe must be left to dry. Depending on the type of sealant, this can take from several hours to several days.
Seal a hole in a metal or polymer pipe
Top Articles: Retroarch emulates almost all classic gaming consoles on your Android
In case of very minor damage to a straight section of a pipe, a bend or a threaded connection, you can use ordinary superglue (eg: “Minute”) and soda. When using this method, the main thing is to properly prepare the damaged area for applying the adhesive. The surface must be completely cleaned and degreased. To do this, use a file (or grinder) and any solvent.
- At least 3 layers of molar tissue are applied alternately to the damaged area, with a layer of baking soda applied to each layer. The last layer will be a layer of glue, which reacts with soda to form a dense waterproof shell.
- If the damage is a crack, then soda is driven inside and glue is applied on top. The chemical reaction will create a dense shell.
Features of headset restoration
Repairing a headset from a Samsung phone or another brand is a little more complicated than repairing regular headphones, because it is equipped with a microphone and a control button. There are usually four or five wires in a headset - one or two for microphone, two for headphones and ground. A control unit with a microphone is often installed where the cable branches to the left and right headphones. If a wire breakdown occurs above the area with the control unit, you will need to repair only one contact with or without a soldering iron. If the cable below the branching area is deformed, it is important not to make a mistake and connect the wires correctly.
Important! Usually the yellow (in some cases without insulation) cable is the grounding cable. Sometimes it can be wrapped over the microphone wire to reduce interference during a call. In any case, the cut wires are connected according to color.
Headphone device diagram
Telephone headphones consist of the following parts:
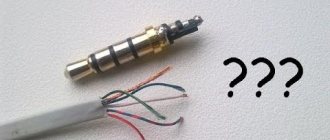
- Plug. It is a metal (usually copper) pin with a diameter of 3.5 mm. Divided into 3 or 4 parts using polymer spacers. This separation is necessary to ensure separate signal transmission for the second channel and microphone. On the back side there are seats for soldering wires leading to the speakers.
- The wire. Three or four wire wire. The wires are soldered to the plug seats on one side, and to the speakers on the other. If we are talking about a four-wire wire, the 4th wire and ground are also soldered to the microphone.
- Speakers. They are dynamic heads that are designed to reproduce an audio signal coming from a plug along the wire cores. They consist of a metal body, a permanent magnet, a coil and a membrane. Current is supplied to the coil. Since it is located inside a permanent magnet, this results in opposing magnetic fields. The coil is pushed out of the magnet and pulls the membrane along with it. It creates air vibrations and thereby generates sound waves. The speakers are hidden in plastic housings that are inserted into the ears.
- Microphone unit. Allows you to answer calls using headphones. Consists of a microphone, a response board with a button, and a protective housing. It is connected to the plug using a separate core, as well as a common “ground” wire.
Schematic representation of a headphone device without a microphone unit.
Plug repair
If the headphones are damaged near the plug, it was suggested above to cut off the old part and replace it with a new one. If you cannot purchase a new plug for some reason, you can repair the old element. To do this, you need to cut off the plug, stepping back two or three centimeters from it, since it is in this place that the wires can be broken. It should then be cut and cleaned if there is resin or other material inside. Next, you need to remove the remaining wires, after remembering how they are located.
Advice! To ensure that the cable at the exit point from the future plug does not bend or break, it is important to protect it. To do this, you will need a needle from a medical syringe, or rather, the cap itself. It is necessary to make a hole in the plastic nozzle to suit the size of the wire, and put a heat-shrinkable tube on top of it to make the structure look aesthetically pleasing.
Now you need to put heat shrink on the cable, then a syringe cap, after which the contacts should be soldered to the plug. To do this, you will need to first apply solder to them, and treat the contacts themselves with fine sandpaper. When soldering, the yellow wire is attached to the sleeve - this is grounding, and the remaining two - to the contacts. Now you need to connect the headphones to the sound source and make sure that the soldering is done correctly.
Next, you need to insert the cap into the plug, separate the wires inside so that they do not contact each other, and fill the entire space with glue. This will reliably insulate the wires and prevent short circuits. The adhesive substance must fill the entire volume, while preventing the formation of bubbles. After drying, you need to check again whether the headphones are working. Now you can put on the heat shrink tubing and heat it until it fits tightly around the cap. The renovation is complete.
One earphone doesn't work - how to fix it
If only one earphone does not work, it means that only one wire has broken. The rupture site is sought using the methods described above. The repair procedure is also no different. Also, if one of the headphones malfunctions, you can replace the entire wire.
No sound from one of the headphones can also be caused by a faulty audio output jack. To make sure that this is the case, you need to try connecting the device to another gadget. If there is sound on it, then the audio output is to blame.
Prevention
The following simple rules will help prevent wire breaks in headphones.
- If you need to remove the headphone cable from the jack, you should grab the plug and pull it. Do not pull the wire as this may damage it.
- The headset should be kept in a safe place where it cannot be reached by children or animals. It should not be left on the floor where the accessory could be accidentally stepped on.
- When headphones are not in use, they should be disconnected from the sound source and removed from the head or ears. Otherwise, when trying to stand up or make any movement, they can get caught on something and accidentally damage them.
- It is recommended to store accessories rolled up, especially if the cable does not have a braided winding, but regular insulation. If the wire becomes kinked or tangled, it may be damaged.
- It is not recommended to keep the headset crumpled in a clothing pocket. A special clamp should be provided for the wires. An interesting solution would be an old bank card with an expired date. You can make notches on it for more durable winding of the wire. The headphones are also stored in a special case or case.
- Don't sleep with headphones on. During rest, they can be damaged due to negligence. In addition, listening to music while sleeping harms human hearing.
- When purchasing, you should choose more expensive headphones, preferably with a braided winding. It will not allow the wire to get tangled or knotted, which will extend its service life. It is also worth purchasing headphones with protection against breaking the wire near the plug. This is a special flexible part that prevents the cable from bending in this place.
- Some users wrap headphones around an MP-3 player. In this case, it is recommended to pull the plug out of the connector, otherwise the cable may break off at the bend.
- Before loading clothes into the wash, remove the headset from your pockets.
So, if the headphone cable has been damaged due to careless handling, do not throw away the accessories and purchase new ones. With a little time, you can repair the cable, regardless of where it is deformed - in the middle, near the plug or speaker. To restore the integrity of the wire, you can use a soldering iron, but if you don’t have such a tool, you can apply solder or solder paste without it. You can learn about other headphone malfunctions from our article “how to repair headphones with your own hands.”