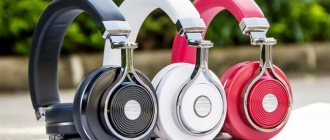
Portable and stationary headphones known to every user, made in the form of “droplets”, “plugs” or “shells” that completely cover the ears, have one significant drawback. They constantly break off in the most inconvenient place, namely in the area of the 3.5 (6.3) millimeter connector. In this case, the only way to correct the situation is to restore the contact or completely replace the plug itself (minijack). This is completely within the capabilities of any user who has held a soldering iron at least once.
But before you solder the plug to the headphones with 3 wires, you will need to familiarize yourself in detail with the internal structure of this transition product.
Device and disassembly
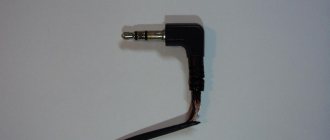
A standard 3.5 mm detachable plug consists of an internal contact part and a plastic protective casing that protects the wires from kinks and damage.
It should be distinguished from a similar device of a larger size (the diameter of the working part is 6.3 mm), called a large jack. The presented design significantly simplifies repair procedures, since soldering the headphone plug in this case comes down to the following simple steps:
- first you need to disassemble the “non-working” plug;
- then remove the damaged conductors and correctly solder new ones;
- Finally, all that remains is to return the plug to its previous form.
The only difficulty that you will have to face when soldering is the need to deal with all the conductors suitable for the contacts (in some cases their number can reach up to 6).
The situation is much more complicated with repairing non-separable plugs, with which you will have to tinker thoroughly. The fact is that in these products the internal contact base is filled with a special plastic compound, which subsequently forms a flexible holder.
In order to solder a mini-jack to a new wiring, you will first need to cut the body of the damaged part and completely remove the mini-jack from the plug itself. Secondly, use some kind of new sheath that reliably protects the plug itself and the wire from breaking.
How to disassemble the headphone plug
To repair headphones, the first step is to disassemble their plug. The vast majority of headphones have a rubber shell on the connector that can be carefully removed. It is more convenient to do this with a thick needle or awl:
We insert the needle shallowly at first, and gradually moving in a circle, we go deeper with the needle to the full depth of the connector. After this, you can pull off the rubber covering.
The second headphones (XBA-H1) had a detachable connector.
As you can see from the picture, the next step is to expose the plastic-filled contacts of the plug. I cut it carefully to demonstrate what was originally there. Usually I cut everything together with the wires 
Preparation for soldering
Regardless of the design of the damaged and disassembled plug product, its working part requires careful preparation before soldering the conductors.
To do this, you will need to take the plug remaining after disassembly with a number of contacts for connection and wires soldered to the terminals. You need to remember or sketch the order of connecting the conductor according to the color of the insulation (the so-called “pinout”).
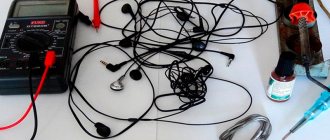
Another important point is to check the plug for a break or short circuit in the internal wires going to three contacts (common wire - right channel - left channel). In order to make sure that it is working properly, you will need a multimeter turned on in the “Dial” mode.
When checking, each of the 2 contact pads on the tip of the disassembled plug should be connected to the corresponding connecting tap at the other end (there should be zero resistance between them).
The body part of the element is made as a monolith with a special bracket for fixing the base of the conductor in insulation and a platform for soldering the common wire (braid).
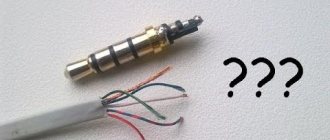
About the colors of wires in headphones
Headphone wire colors are usually standardized. The wire colors for standard headphones with 3 wire types are shown in the photo below.
However, there are still manufacturers who use non-standard wires for soldering headphones and marking channels. For example, Apple uses two-color wires in its headphones.
In such cases, the Internet or the method of checking with a 3-volt battery or comes to the rescue.
When voltage is applied (by a battery or in ohmmeter mode) between the speaker contacts, a rustling sound will be heard in it. It's simple. It’s more difficult with headsets, especially if they have buttons. This is where circuitry comes into play. Because manufacturers often use a minimum of pairs of wires to transmit a large number of signals.
Stripping and tinning
After disassembling the plug from the contact pads, you should unsolder the old wires (remembering their wiring first by the color of the insulation). Having disconnected unnecessary wiring, the contacts themselves must be carefully processed and excess solder removed from them.
If the old plug turns out to be faulty, it must be replaced with a new one. In this case, the contact pads should first be sanded, and then a little flux should be dropped on them and tinned with a well-heated soldering iron.
Common questions and answers
Below is a table with common questions regarding headphone repair and their answers.
Vyacheslav
For several years he worked in mobile phone stores of two large operators. I understand tariffs well and see all the pitfalls. I love gadgets, especially Android ones.
Ask a Question
Question to the expert
How long will a hand-joined wire last?
It all depends on the operating conditions of the headphones. If they are regularly subjected to heavy loads, makeshift repairs will only last 1.5 – 2 months.
Is it possible to re-glue the speaker membrane if it is torn or deformed?
In theory, yes. But you need to take into account that it is very small, so it will be very difficult to carry out the work. In addition, you need to glue the structural element so that its center is exactly above the magnet. This is also not easy. Finally, in headphone speakers, the membrane, coil, and surround are all a single unit, making it very difficult to replace this structural element.
I want to replace the plug. How to understand where the new “ground” is and where the channels are?
Usually on replacement plugs this is very easy to track visually. The contacts there are located one after another, interspersed with layers of insulation. In this case, “ground” has the largest soldering area, and the channels are just small pins.
I want to replace my faulty speakers. Can I borrow them from old headphones?
Yes. But two points need to be taken into account. The first is size. The speakers must have the same diameter as the cabinets. The second is amplitude-frequency characteristics. If one speaker is changed, the frequency response should be the same as that of the second. Otherwise, in one ear the sound will have a different color and it will be uncomfortable to use the device.
The membrane is fine, the wires are intact, but the headphones wheeze. What's the matter?
There are two possible options. The first is that the speaker has become demagnetized. In this case, the device should be replaced. The second is that the input signal is too strong. Try headphones with another gadget. If the sound is normal, then the problem is not with them.
4.8 / 5 ( 31 voice )
Soldering and assembly
Before soldering and assembling the plug, you should familiarize yourself with the diagram for connecting the wires to the contact pads.
The photo shows the standard headphone wiring, marked by the colors of the lead conductors.
In accordance with it, the red and blue wires are soldered to the right and left capsules of the earphone, and the common braid is soldered to the body with an eyelet.
Before soldering the plug to the speakers or headphones (which is practically the same thing), you must remember to put a protective cover on the supply cable.
After soldering is completed, the casing is moved towards the plug and then screwed onto it. It is recommended to check the serviceability of the repaired unit with the same multimeter, which should be used to ring all the restored contacts (including the ground bus).
The case when the plug, in addition to audio contacts, contains a microphone channel requires special consideration.
How to fix a wire
To repair a headphone cable, you first need to determine the location of the wire break in the cable . To do this, carefully put on the headphones and, while listening to music, try bending the cable at different angles along its entire length. As soon as the sound in the earphone appears again, fix the section of the cable with your fingers - this is the place where the wire breaks inside the cable.
How to fix a wire
General repair scheme if the wire is broken:
- Cut the cable where the wire breaks.
- Put on the heat shrink tubing (if you have one, if not, skip this step).
- Carefully remove the braid from the cable with a knife. Do not damage the wires!
- Clean off the varnish (using a knife or lighter) and tin the wires using a soldering iron (if you will be soldering wires).
- Solder the broken wires (or use the solderless method from this article). Just don’t confuse which wire should be soldered to which!
- Check the headphones for functionality.
- Drag the heat shrink tube to the soldering area, heat it with a hairdryer or lighter until it shrinks to the shape of the wire. If you don't have heat shrink tubing, carefully insulate the wire with several layers of electrical tape.
Restoring (repairing) a plug with a microphone input
In the modification of headphones with a headset, in addition to audio channels, a separate line is provided for transmitting a speech signal from the built-in microphone.
If a plug with an additional microphone contact needs repair, it will have to restore three signal channels and one common channel (the so-called “ground”).
All preparatory operations and soldering itself in this case are similar to the previously described options. The challenge here is to correctly label the pins and wires to match the audio and microphone lines. You can solder them according to the same rules, but taking into account the wiring diagram of additional circuits.
Particular attention should be paid to separating (shielding) the transmission channels of the audio and microphone signals of the headphones.
Otherwise, when transmitting signals, they will begin to influence each other, causing sound distortion and reduced speech intelligibility. When installing conductors, each of the braids is combined into one common core, and then soldered to the body of the plug.
Disassembling the microphone housing with volume control
Headphones for computers are produced with a volume control and a microphone. The mobile phone headset is equipped with a call on/off button. All these elements are hidden in a small plastic case attached to a cord. To get to these elements you will have to perform similar actions that are used when disassembling vacuum headphones. The body is glued together, and it can only be separated into two halves by cutting it with a knife.
A malfunction of the volume control is determined by crackling sounds in the speakers and poor sound. The problem lies in the variable resistor. The part consists of a slider that moves along a resistive layer. You can extend the life of the resistor with graphite lubricant. Using a cotton swab, apply the paste to the resistive layer.
A microphone problem is identified by the deterioration in audibility experienced by the subscriber with whom the conversation is taking place. The reason often lies in clogging. The microphone is wiped with cotton wool or gauze soaked in alcohol. After repairing the resistor and microphone, the two halves of the housing are glued together.
Disassembling headphones of any brand is not difficult. The main thing is to be careful. Broken plastic parts cannot be repaired.
Thematic materials: Independent production of simple headphones and a headset with a microphone
, If water gets on the headphones or inside the mobile phone jack
How to properly set up a headphone microphone on a Windows computer
How to properly warm up your headphones and whether you need to do it
How to solder a headphone plug
, How to connect broken headphone wires
How to improve sound quality in headphones
, No sound in headphones
, Headphone pinout
Repair of on-ear wireless bluetooth headphones
The sound signal to Bluetooth headphones is transmitted over the air. In this regard, there is no jack for connecting headphones to the signal source. Therefore, it is impossible to test the integrity of the cord wires using a multimeter.
A distinctive feature of this headphone model is the presence of permanent magnets on the back cover, which allow you to hold phones together. But this does not affect the repair technology, but it is convenient to use.
As a rule, both phones rarely fail at the same time; usually one of them starts to act up. It is more difficult to open the control unit, so troubleshooting must begin with the earphone that has stopped working.
Typically, an earphone consists of two parts connected to each other by friction. To disassemble the earphone, you need to insert a knife blade into the gap between the halves of the housing and turn it.
After opening the earphone, the reason for its failure immediately became obvious. The copper-colored common conductor was broken.
The cord was pulled into the housing and cut along the line where it entered the earphone. Often, in headphones, the cord frays precisely at the entry point, therefore, in order to prevent possible damage in the near future, the cord was cut at this place.
The cord insulation was melted around the circumference using a soldering iron and removed. Here you must not overdo it, so as not to melt the nylon thread inside the tinsel conductors.
The wires are covered with a layer of varnish, which is destroyed when heated. Wires are well tinned with solder when using aspirin tablets as a flux. All that remains is to solder the conductors to the phone, observing the polarity.
The crimped brass brackets were very stiff and difficult to straighten. Additionally, they only secured the cord in the direction of exit of the earphone, but allowed the cord to enter it. As a result, the wire inside broke. To eliminate this, the cord was fixed with a drop of hot-melt adhesive. When you pull the cord into the hole in the headphones, the hot-melt adhesive will compress and firmly fix it.
At the same time, the cord of the second earphone was also soldered. If the wire frays in one, it will soon fray in the second. The photo shows cord trimmings left after the repair.
The DIY headphone repair is completed and now they will last even longer than they lasted before the repair, because the design flaw that caused the headphones to fail has been eliminated.