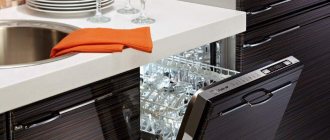
The difference between installing a built-in dishwasher and a freestanding model is that additional design is required for the front wall - the machine door.
It is assumed that the decorative panel is selected to match the surrounding interior, and then the facade is installed on the dishwasher.
If experienced craftsmen cope with this operation quickly, then for beginners the task seems quite difficult. To understand the features of facade installation, you should carefully study the instructions and become familiar with some of the installation nuances. And we will tell you about all this in detail in our article.
Design features of built-in PMMs
The range of models integrated into kitchen units is much wider than their free-standing counterparts. This is explained by the principles of ergonomics and space saving inherent in the concept of constructing a kitchen interior. To get acquainted with the best brands specializing in the manufacture of built-in PMM models, please follow this link.
To install a built-in dishwasher, you will need a separate cabinet, or rather, a niche in the set. It differs from a regular kitchen cabinet in that it does not have a back wall or bottom.
The equipment is built inside furniture modules and decorated with facade panels so that when closed it is completely hidden. This installation method allows you to maintain the kitchen interior in the same style.
The machine is installed directly on the floor, on 3 or 4 support legs. The absence of a rear wall allows for free placement of the water supply and drain hoses.
The cabinet must have reliable walls to which the dishwasher body is attached, and a “roof” - the countertop. The front panel is not fixed to the walls, like conventional cabinets, but directly to the car door.
There is no need to experiment with fasteners : manufacturers have provided installation features and prepared special holes for self-tapping screws. We have provided detailed instructions for installing a built-in dishwasher model here.
What is a facade for PMM? This is a decorative panel, most often made of the same material as the front surface of the entire kitchen unit. It is made from MDF, plastic, laminated chipboard, solid wood or combined materials.
The fasteners are not visible from the outside, since installation is carried out from the inside, from the side of the machine door. Self-tapping screws are screwed into the holes and partially, not completely, enter the panel fabric
Where do you get decorative panels?
There are several ways to make it:
- ordered together with a kitchen set if the dimensions of the machine are known in advance;
- make it yourself from the doors of a disassembled kitchen cabinet;
- if there is no suitable “extra” facade, they are selected in a similar style and color design.
The first method is considered the most practical: when ordering, all dimensions of the car are taken into account, so the facade “fits” perfectly. But this method is not always applicable. We recommend that you familiarize yourself with the options for integrating a dishwasher into a finished kitchen.
How to install a dishwasher under the façade
Before starting work, read the installation instructions and make sure you can handle the job. Remember to follow safety precautions. It is useful to watch a current video, e.g.
To begin with, installation of communications is carried out: water supply, sewerage, electrical network. Only after a test check can the PMM be secured in a niche, under the tabletop, and a decorative panel hung. Fastening is done with bolts (screws, self-tapping screws) included in the kit. Along with fasteners, gaskets, instructions, you will find a stencil. Applying it to the cabinet walls, countertop (depending on the PMM model), draw the locations of the holes for fastening. They are easy to make with a hammer drill. Do not make through holes; drilling ¾ of the wall thickness will be enough. All that remains is to screw on the countertop protection and place the dishwasher in the cabinet. Last steps:
- Attach fittings, slider mechanism (if necessary).
- After attaching the stencil, determine the attachment points on the inner surface of the facade.
- Use a narrow drill to drill points, not all the way through, to avoid damaging the exterior finish.
- Remove the transport screws from the door (if equipped).
- If you are working without an assistant, try temporarily fixing the facade on the door with double-sided tape so that you can easily screw in the fastening bolts in the right places.
- Check the tightness of the fit, the quality of fixation, locking, and the presence of interference when opening and closing.
At what stage should the façade be attached?
The dishwasher is installed in several stages. The main connection is considered to be connection to communications: water supply, sewerage system, dedicated power line.
Decorating the front side is usually done at the very end, when the rest of the work has already been completed.
The housing is pulled out of the niche to provide access to the car door from all sides. But during the fitting process, it is better to push the machine into place so that the panels of the dishwasher and neighboring modules are at the same level
Is it possible to run the dishwasher without the decorative trim installed? It is not recommended to launch before installation work is completed for several reasons.
Only a dishwasher that is completely closed on all sides can fully perform its functions; in addition, the panel plays the role of an additional sound and heat insulator.
Sometimes they mask the machine first and then make the connection. This option is appropriate if there is a delay in connection for objective reasons, for example, at the same time the riser in the toilet is being replaced or a new power line is being laid.
In order not to waste time, decorate slowly.
Facade purposes
The facade of the dishwasher is a decorative panel element made from furniture materials. The main purpose of the facade is to hide the dishwasher in the kitchen furniture, making it part of the kitchen interior. Dishwashers that are fully built-in are usually 450mm or 650mm deep. The hanging facade of such devices has the following advantages:
- there is no need to select the appropriate color of the machine; it fits perfectly into the interior, since it is a common part of the kitchen;
- the control panel buttons are almost invisible, children will not press them randomly;
- has soundproofing properties, the sound of the dishwasher is not so audible.
Dishwasher panels are made from a finely dispersed fraction; this is a medium-density wood fiber board. The thickness of the board is usually standard 16 mm (furniture thickness) and is covered with a film that completely replicates the texture, texture and color of the furniture.
In some dishwasher models, the open door can only be locked after the appliance plate is installed.
Preparation of tools and materials
No special tools are required to secure the façade trim.
The same items that are used to install the dishwasher as a whole will be useful:
- drill;
- screwdriver;
- awl;
- screwdriver;
- tape measure or ruler;
- pencil or marker.
If you don’t have a power tool, then one screwdriver is enough - you can screw in the screws by hand if the holes for them are pre-drilled.
The drill bit is selected according to the diameter of the screws: the holes should be a little tighter so that the fasteners are held firmly in the sockets
The work is simplified by the presence of a stencil for the façade overlay included in the delivery set. It is a large sheet of thin paper with marked attachment points.
The stencil is placed on the back side of the decorative panel and the places where the screws are screwed in are marked.
In addition to the tools, you will need double tape. Several “Velcro” pieces of tape will come in handy when you need to try on the facade. It is not recommended to immediately “mount” it on screws, since an error of 2-3 millimeters will mean all the work is in vain.
Don’t forget about the handle, without which opening the door will be problematic. It is also fixed with self-tapping screws, which are screwed into the back of the panel.
To ensure that the surfaces of the door and facade adjoin as tightly as possible, the heads of the screws should be recessed into the canvas.
It is easier to attach the workpiece than a homemade overlay. If you make the panel yourself, you may need carpentry tools, sandpaper for sanding, antiseptic impregnation and paint to finish the entire surface or just the ends.
Order on YouDo
Take advantage of inexpensive services for connecting the panel to built-in appliances by ordering them on the Yudu website. Entrust the work to experienced professionals. Ordering a master's work is quite simple. To do this, create a task through a special form on the website and indicate the desired cost of installation.
YouDo artists offer the following:
- low prices for fastening kitchen facades to appliances
- prompt problem solving
- quality services
Contact Yudu specialists around the clock. Installation of the facade on the dishwasher will be completed in a short time.
Professional installation advice
To avoid the most common mistakes, we suggest using recommendations from experienced furniture makers:
- be sure to use a tape measure or ruler, do not use your eye, do not be lazy to check the even position of the template and the panel - the appearance of the kitchen facade as a whole depends on this;
- choose the correct length of the screws: they must fit confidently and deeply enough into the panel surface, without coming out from the front side and not deforming it;
- when using a paper template, be sure to secure it on all sides;
- you can use a regular screwdriver, but using a screwdriver speeds up the process;
- Attach the handle, focusing on the location of the handles on adjacent cabinets, try to maintain not only the position (parallel/perpendicular to the floor), but also the height;
- To prevent the PMM door from closing during installation work, place a couple of large books or another heavy object, such as an iron, on it.
If a former cabinet door is used as a dishwasher front, when trying it on, pay attention to the location of the old holes.
It is important to ensure that the old mounting holes do not come into contact with the new ones, otherwise the screws may pop out and the panel may partially come off.
After completion of all installation work, you can begin operating the equipment. But first, it is advisable to carefully study the rules of operation and maintenance of the dishwasher.
How is installation done?
The façade canopy is made only if the dishwasher needs to be installed in a ready-made kitchen. Due to the fact that many of these devices come with installation instructions, this should not be a problem.
To install the facade, a handle is first attached to it, which will open the Bosch, Electrolux, Kandy, Ariston or Indesit dishwasher. After this, it is necessary to install fasteners adapted to engage with the door of the device. On the facade element to be installed there is a special paper overlay, which indicates exactly where the holes need to be drilled in order to apply the fasteners. You can drill directly according to the drawing to eliminate the possibility of error.
After all the holes are made, you need to install special fasteners. After this, the front is simply attached to the dishwasher. This happens by inserting fasteners into special grooves on the dishwasher door.
But the installation of the facade is not yet complete, since this hanging element needs to be secured. To do this, first open the car door and then unscrew several bolts from the inside of the door. They are replaced with longer ones, which will allow the facade to be attached. At the same stage, you can adjust the tension of the machine door springs by turning the screws. By looking, you can get a more accurate idea of the process.
Basics of installation and model selection
There are three main types of dishwashers:
- Freestanding.
- Partially built-in.
- Fully built-in.
If free-standing machines are placed anywhere in the kitchen, then other types of PMM “Electrolux”, “Ikea”, “Gorenye” and other brands are built into the furniture set. Initially, decide on the installation location and prepare a niche for the dishwasher. How to connect the PMM correctly, read one of the previous articles.
Basic installation details
Some built-in models are an additional section of the kitchen unit. They are equipped with wheels and easily slide into a niche under the tabletop after connecting to the power supply and communications.
Basically, built-in dishwashers have fixed dimensions:
- Width 450 or 600 mm;
- Height 820 mm;
- Depth 550 mm.
In order for the dishwasher to be built in without changing the size and shape of the furniture, manufacturers of built-in models subtract a few millimeters from the typical dimensions. Boxes for built-in appliances are also produced with a small margin. All equipment comes with basic instructions for installing it yourself.
The rules for installing a built-in dishwasher imply a 50 mm ventilation air space behind the rear wall of the unit.
Some dishwasher installation schemes include special templates for drilling holes for hanging decorative door frames. The control module of the electrical appliance is located in the end part of the “native” door of the unit. As a rule, all stationary household electrical appliances are equipped with height-adjustable legs, which allows you to fit the machine tightly to the box and correctly set the horizon. For a more rigid fixation, some dishwasher models include mounting angles that secure the unit to the frame using self-tapping screws.
Connection features
So, step-by-step instructions on how to connect a dishwasher in stages:
- If you are installing a built-in PMM, then first you need to prepare a niche, which, as a rule, should be 60 cm wide, and for narrow models 45 cm. You can level the machine with the level of the cabinets by removing the tabletop and adjusting the legs of the lower cabinets. You also need to drill holes in the cabinet body for the drainage hose, water intake hose, and electrical wires.
- Installing a dishwasher under the hob is prohibited;
- The installation location is selected so that the length of the drainage hose does not exceed 1.5 meters. An increase in length up to 5 meters is allowed, but stable operation of the equipment in this case will be difficult to guarantee.
- The next step is connecting to electricity. Please note that the socket must be of the Euro type. You need to replace the socket if it does not meet the standards (but not the plug of the machine). Do not forget that we ensure safety when connecting, and the dishwasher has significant energy consumption. This determines the ban on the use of tees and extension cords. Installing a socket involves using a wire with a diameter of more than 2 mm. In addition, a 16A circuit breaker is additionally installed in the electrical panel. Grounding is also carried out using a 3-core wire, and it cannot be connected to pipes.
- Next is connecting the dishwasher to the water supply. To do this, the water is shut off, a tee is connected to the pipe, then a filter, a ball valve and a hen. All threaded joints are insulated with foam - it must be wound in at least 10 layers.
It is also necessary to install a coarse filter, as it will prevent sand and rust from the water pipe from getting inside the machine.
- As for connecting equipment to the sewer system, you can go the simple route by installing a siphon with an additional outlet and valve. In order to protect the device from water entering from the sewer pipe, you need to place the drain hose in a special way - at the point of exit into the sewer network, it is placed at a height of 600 mm along the wall, and then bent to ensure water flow.
- The final stage in connecting a dishwasher is checking the device for functionality. In this case, the machine is tested idle, controlling the rate of water flow, its heating, and operation in drying mode. The test is carried out without dishes, but with the obligatory addition of regenerating salt and detergents.
- How to choose a dishwasher - getting ready to buy
- How to choose built-in appliances for the kitchen
- Common dishwasher sizes
- The dishwasher is broken - can I fix it myself?
- Using the dishwasher correctly
- Major dishwasher cleaning in 7 steps
Possible errors and problems
There are several possible problems that people may encounter during the installation of façade panels. These include the following:
- Choosing the wrong façade. Some people initially choose the wrong panel, which is not suitable for the dishwasher. In this case, you will have to independently adjust the dimensions for the dishwasher or buy a new façade.
- Incorrect marking of mounting holes. There are times when people make mistakes in the process of marking places for future fastenings. This causes the dishwasher door with the panel attached to be difficult to open and close.
conclusions
In order to independently integrate a dishwasher into a kitchen furniture set and correctly connect it to the power supply and communications, you need to know certain nuances of installing and connecting the unit and not be afraid to do something wrong, because based on the mistakes made, life experience is formed.
I continue to work on my long-term construction. I'm hanging facades. The line reached the dishwasher that I had installed earlier. The microwave was installed between adjacent boxes.
A tin strip from the kit was nailed to the bottom of the tabletop. I still don’t understand why it’s needed, but it’s necessary, it’s necessary. The photo shows a view of the table from below - it turned out not entirely clear))
Now the façade. Please note that its width is specified in the passport for the typewriter. And it must fit BETWEEN the boxes. In my case, it was overhead, that is, in order to install it, the adjacent boxes had to be moved apart, which is not correct. One consolation is that the width of the false panel in the corner made it possible to do this completely painlessly.
I marked and drilled holes in the facade for the handle.
Self-tapping screws recessed flush with the rear surface
Now let's move on to the markup. The instructions themselves act as a template; I strongly do not recommend losing them. There is a ruler on the sides (we use it to mark the gap between the facade and the countertop). I bent along this line.
Mark the center of the facade and combine it with the center of the template. We fix the paper on the facade with masking tape.
Gradually smoothing, glue with tape and further.
We drill the marked mounting holes (carefully, not through) with a thin drill. 2 mm.
Please note that the template shows the course of action in detail. Hooks are attached to the lower part of the facade. In this case, self-tapping screws are used under an asterisk
After fixing both hooks, the façade is ready for installation. Legs on top - my daughter is helping.
The machine should be set “to the horizon” and pressed against the countertop. To do this, a pair of legs are rotated in front with a wrench or pliers, and the back leg is rotated with this screw (a screwdriver is inserted into it).
We glue strips of double-sided tape from the kit onto the dishwasher door. They are equipped with Velcro, which allows you to subsequently adjust the position of the facade.
The hooks are placed in the holes under them (there are only two of them - don’t confuse them) and the facade, resting on them, is pressed against the tape. We look, we check the gaps with the neighboring facades (if they do not suit you, then the facade can be torn off and re-glued - Velcro, as I said above, allows it).
All that remains is to firmly fix the façade in this place. To do this, unscrew the short screws that were screwed in from the inside and put the long ones from the kit in their place.
As a result, the facade looks like this (I apologize for the mess - the work is being done in a developed environment)
It is difficult to imagine a modern kitchen without such a household assistant as a dishwasher. It allows you to improve your quality of life, saving time and getting rid of routine work that many people dislike.
It is necessary to allocate and prepare a place before installing built-in household appliances
When purchasing a dishwasher, it is necessary to allocate space and a kitchen cabinet of the required size in advance before integrating the dishwasher into the finished kitchen. The installation of the machine itself is quite simple and does not take much time, but for this you need to have some knowledge.
Door and front dimensions. Canopy and mount
The dimensions of the decorative panel depend on the size of the dishwasher. This can be narrow - 45-60 cm, full-size - from 60 cm or compact equipment - height 50-60 cm.
What to do if the dishwasher front is too long? You won't be able to cut it, as you will ruin the appearance of the set, because it is laminated on top and covered with decorative film.
What you will need for work:
- Screwdriver Set;
- roulette;
- fasteners;
- door handle.
Attached is a full-size template drawing, screws, self-adhesive tape, and fastenings. You can figure out how to secure the panel by following the instructions. For an experienced master this will take no more than 10-15 minutes.
Sequence of work when mounting
- Place the dishwasher in the prepared niche.
- Attach the cabinet to the cabinet panels.
- Make connections to the drain and water supply.
- Prepare holes for the handle using a Phillips screwdriver and an awl.
- After fixing the handle, you need to calculate the distance (Z), which will help place the facade flush with the rest of the kitchen doors.
- Take a tape measure and measure the distance between the door of the adjacent cabinet and the countertop, as shown in the figure (X).
- Then measure the distance from the mount to the tabletop (Y). Calculate: Z = X-Y.
- Place the template on the inside of the door.
- Use an awl to mark the locations for the fasteners.
- To make the fastenings more secure, drill holes ¾ of the way through the door.
- How to remove old screws? Sometimes the panels are tightened with short screws, but their length is not enough to fasten the facade. Therefore, you need to hang the panel, unscrew the old screws and install long self-tapping screws.
After installing the dishwasher under the façade, try closing the door. If the decorative part rests on the base, it means there was an error in the calculations. In this case, you can make a gap in the base as thick as the facade.
You can attach a decorative panel to Hansa and Miele appliances yourself.
Adjust the mechanism: tighten the bolt that secures the tension cable. Since the door is hinged, it should close easily with a gentle push of your fingers.
The video will help you make the correct hanging:
Connection to the water supply system
A tee with a corner tap is installed to the water riser, where the branch with the tap will be used to connect the dishwasher. A tidal hose, which is included in the package, is connected to this branch. If rigid pipes are used to connect the machine, a coarse filter must be installed in front of the shut-off valve. This is necessary so that the dishwasher heating element does not need to be replaced as soon as possible.
An easier way to connect the dishwasher to the water supply is to connect the tidal hose directly to the sink faucet. Disadvantages of this method:
- During the machine's operating cycle, access to the tap will be limited.
- The tidal hose on the tap does not look very aesthetically pleasing.
This method is not very convenient due to its simplicity, but is acceptable as a temporary option.