Modern built-in kitchen appliances are designed for do-it-yourself installation, so washing machines, dishwashers, refrigerators and ovens are equipped with detailed instructions, diagrams, templates, and sets of fasteners.
But first you need to prepare the place, pay attention to the issue of supplying communications, and think through every single nuance of connection.
To make it easier for you to understand the rules for installing a dishwasher, in this article we have provided step-by-step instructions, where each stage of work is discussed in detail. With this guide, installing a built-in dishwasher will be quick and easy.
Preliminary work before installation of PMM
There are two options for installing a dishwasher: yourself and with the help of specialists. In the first case, you risk connecting the car incorrectly; in the second, you will have to part with part of the family budget.
Sometimes the skills of one craftsman are not enough; you have to call a team of specialists: a furniture assembler, a plumber and an electrician.
Installation services for built-in equipment are offered by companies that sell them. For a certain fee, a universal master comes at the appointed time, carries out all the connection work and checks the serviceability of the machine.
However, if you carefully study the installation instructions, think about connecting hoses, find or install an additional outlet, you can save money and acquire new skills by doing everything yourself.
Choosing a location based on size
An important step is choosing a location for installation . For the built-in model, furniture modules of the first level are suitable, that is, cabinets standing on the floor.
But if you like a compact mini-dishwasher, then its installation is a little easier - such equipment can be inserted at waist or chest level (for ease of maintenance).
There are several conditions for choosing a good location. If they are not followed, you may later encounter problems with water supply/discharge or PMM maintenance.
Image gallery
Photo from
Built-in dishwasher next to the sink
Separate grounded socket for dishwasher
Suitable cabinet for dishwasher dimensions
Dishwasher Maintenance
Many installation difficulties arise when a dishwasher is integrated into an already installed kitchen set. You have to adjust cabinets to fit, and sometimes dismantle and remodel some of the furniture.
We recommend that you take care of the installation location before purchasing furniture. This also applies to other household appliances that require integration. Usually, the models you like are first selected, and when drawing up a sketch of the headset, their location and exact dimensions are taken into account. We have provided recommendations for choosing a built-in dishwasher in this material.
Preparation of tools and materials
Manufacturers of built-in PMMs sometimes list in the instructions what tools may be useful during the installation process. However, they expect that preliminary work has already been done.
If measures are required to lay a power line or tap into a pipe, the list of necessary items will increase.
To be on the safe side and save time, you should stock up on the following tools:
- hammer drill or powerful drill;
- adjustable wrench;
- hammer;
- a set of screwdrivers, including flat and Phillips;
- chisel;
- pliers;
- laser level;
- tape measure, square, pencil;
- screwdriver
In addition to tools, you will need connection parts. It is not recommended to use used elements - this will reduce their service life.
To install a socket, you need to buy the electrical installation product itself, a socket box for it, a three-core copper cable, and an additional automatic protective device.
There are special requirements for the socket: it must be of a “European” type, with grounding, preferably protected from moisture, fully operational, without damage
To connect water, you will need a metal tee for inserting into the water supply system, fum tape, a tap for shutting off water, rubber gaskets, clamps or ties for fastenings.
If the siphon is not provided for connecting another drain hose, then it will also have to be changed.
If the voltage in the network often fails, we recommend purchasing a stabilizer. It can be installed on several devices at once.
Necessary tools, materials and consumables
To install a dishwashing machine yourself, you don’t need a specialized tool, all you need is:
- an adjustable wrench, if you don’t have one, as a last resort you can use pliers;
- Screwdriver Set;
- insulating tape, it will be wrapped around metal threaded parts before tightening them with pliers. Accordingly, if you have an adjustable wrench, electrical tape will not be needed.
Materials you will need:
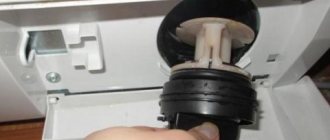
a siphon equipped with a fitting, for example, such as shown in the figure. If you also plan to connect a washing machine, then select a siphon model with two fittings;
Various models of siphons with fittings
To connect the water, you will need to cut into the pipe; for this purpose you will need a tee. If you don’t want problems, we don’t recommend purchasing silumin reinforcement; it can fall apart for no apparent reason. It is best to opt for brass, metal-plastic or bronze products;
Tee 3/4″
ball-type valve, the requirements for the materials from which it is made are the same as for the tee;
The tap to which the hose will be connected
In addition, you will need to buy a special waterproofing tape (FUM). You should not use insulating tape instead: firstly, it is thick and it will be problematic to tighten the thread, and secondly, the insulating tape will soon dry out, resulting in a leak.
Stages of connecting communications
When connecting the dishwasher, it is necessary to prepare an electrical line suitable for the power characteristics.
And also provide a connection point for the hose with the cold water pipe (or mixer outlet), and a hole for the drain hose - it is better not directly into the pipe, but into the siphon, which is located under the sink.
Stage #1 - electrical wiring
To ensure that a dishwasher or other household appliance does not experience interruptions or emergency problems with the power supply, it is necessary to take care of the stability and safety of the entire line, which begins in the electrical panel and ends with the outlet.
The following construction and installation activities may be required:
- Grooving walls for internal electrical wiring. “Rough” work of this type is carried out using a wall chaser or hammer drill even before installing the kitchen unit.
- Installation of a circuit breaker in an electrical panel with a rating of 16A, class “C”. For each powerful unit - boiler, washing machine, dishwasher - it is better to install a separate protective device.
- Laying a three-core copper wire from the electrical panel to the location of the outlet. One of the options is VVGng 3*2.5. This is a non-flammable wire that can withstand loads of up to 3.5 kW.
- Installation of a socket box into the wall and output of wires.
- Installing a socket , connecting a cable.
After connecting, be sure to test - turn on the machine, and then use any household appliance to test.
You can do the work of cutting and laying the cable, as well as installing the socket yourself, but to install the machine in the panel you will have to invite an electrician from the management company or another service organization
Instead of one socket, it is allowed to install a block of 2-4 sockets, but so that the total load of all electrical appliances connected to the line corresponds to two important indicators: the cross-section of the VVGng copper cable and the rating of the machine.
Stage #2 - insertion into the water supply system
Connecting the cold water supply is a little more complicated than connecting the drain hose.
A tee should be installed at the outlet of the pipe or at the connection point of the mixer so that water flows simultaneously in two directions - to the dishwasher and the sink faucet.
There is no point in installing two separate parts - a tee and a tap, when there are tees specially designed for dishwashers or washing machines with the ability to cut off water.
If you only need to connect the dishwasher inlet hose, the procedure is as follows:
- We turn off the water and relieve excess pressure by opening any water-folding mixer.
- Unscrew the flexible faucet connection from the water pipe or adapter.
- To make the connection tight, screw fum tape or flax with Unipak paste onto the thread.
- We mount the tee so that the tap is in a comfortable position.
- Attach the flexible mixer hose. If the old gasket is worn out, replace it immediately.
- We check the operation of the tap: turn it off and open the water supply to the kitchen. If a leak appears, tighten the threaded connections or replace the defective product.
- Attach the drain hose by tightening the union nuts. Before doing this, check that the o-rings are in place.
It is important that the water supply hose is not twisted or kinked, otherwise the dishwashing process will be difficult.
Dishwasher hoses are equipped with Aquastop devices with solenoid valves that prevent leaks. These are large devices, so before connecting you must ensure there is free space to accommodate them
If preparations for connection are made in advance, and you plan to install several household appliances that require water, then it is better to use a collector rather than a tee.
The distributing device (collector) has from 3 to 5 outputs. This is enough to ensure water intake for the PMM, washing machine, water heating boiler and filters.
Stage #3 - drain device
There are several options for integrating a drain hose into a sewer system.
The most successful is to connect the outlet end to the siphon pipe, which is installed under the sink.
An economical and easy way to drain. The hose is connected to the outlet pipe of the sink siphon using a plastic corner adapter and a metal clamp
Not all siphon models are suitable for additional PMM connection. If the water seal is not intended for this, it may be possible to expand it with a separate element with a pipe.
However, the cost of the products is low, so it is better to buy a new device, initially designed for the additional connection of a washing machine or dishwasher.
Plastic siphons have a simple collapsible design and are equipped with clear instructions, so installing the product and connecting the hose from the PMM will not be difficult
Due to the fact that the water first flows into the siphon, sewer odors from biological waste drains will not spread throughout the entire apartment.
For this reason, it is not recommended to discharge the drain directly, without a water seal or at least a loop, into a sewer pipe.
We select components and parts
SONY DSC
If a standard connection is made, then the components and spare parts included with the device will be enough for you. But experts say that every second installation case is specific, so the problem of a shortage of components arises and some things have to be purchased. So, if the dishwasher inlet hose does not have an Aquastop valve, it will need to be purchased separately.
Important! If you decide to equip the filling system with Aquastop, purchase only the original valve, specially produced for Siemens brand dishwashers. In some cases, valves from PMM Bosch are suitable (these are products of the same concern), but they may not fit some models.
Several factors speak in favor of purchasing original components and parts:
- Reliable connection and operation. With factory parts, the car will last longer, so the overpayment is completely justified.
- Guarantee . If a breakdown occurs and the service center determines that this was due to incorrect connection and, in particular, due to the use of analogues rather than original parts, the company may refuse free warranty repairs. So, if the hose length is not enough for you, do not skimp and take an original element from Siemens, but of greater length.
There are some problems when selecting components and spare parts. The manufacturer refused to standardize parts when developing even similar models, so many hoses have a non-standard diameter or unusual fastening. This is the main drawback of equipment from Siemens; otherwise, these are high-quality and modern dishwashers.
- Counter reset Brother HL-1110R/1112R, DCP-1510R/1512R, MFC-1810R/1815R with TN-1075 cartridge
To connect equipment to the water supply and drainage system, you will need the following kit:
- Inlet hose (for drawing water from the water supply).
- Drain hose (for draining waste liquid into the sewer).
- Shut-off valve with several outlets - 2, 3 or 4.
- Gaskets.
- Filters.
- Adapters.
This is a kit for standard connection of dishwashers, which means that other consumables may be needed during operation; this, by the way, can be specified in advance in the user manual for the equipment. What could it be?
- Proper installation also requires a pressure reducing valve . If the pressure in your water pipes exceeds 1 MPa, in order to eliminate possible leaks and other problems, you need a valve that will stabilize the pressure.
- Stabilizer . This item will be needed for a safe connection to the electrical network. The device is simply necessary if periodic power surges are observed in networks. A stabilizer is an excellent investment, because it will protect not only the PMM, but also other equipment in the house from voltage surges.
- Additional hose + tap and filter for connecting the machine to a hot water pipe. All this will be needed if your dishwasher model is capable of drawing hot water from pipes, and the parts to implement this feature are often not included in the kit.
Subtleties of installing a dishwasher in a cabinet
If the cabinet was ordered to fit the dimensions of a specific model, then there should be no problems with installation.
The dishwasher body fits freely into the niche, leaving small gaps on both sides. To reduce vibration, seals are glued to the walls.
When installing some dishwashers, for example, Bosch, there is a mandatory part - a metal protective plate fixed to the bottom surface of the countertop. Cars of other brands may not have it.
To take into account all the connection nuances, the machine must be installed in this order:
- First, carry out a fitting - push the unit into a cabinet or niche, check the dimensions and connectivity;
- pull out and carry out preparatory measures - fix the mounting panels, fasteners and vapor protection;
- connect the hoses , push the housing into place;
- install decorative panels.
The difficulty is that models from different manufacturers differ, and therefore some installation points also have discrepancies. To avoid mistakes, you must carefully study the instructions and follow all the recommendations step by step.
A few tips that may come in handy during the dishwasher installation process:
Image gallery
Photo from
Correct insertion of mounting sleeves
Adjusting the dishwasher support legs
Measurements of actual niche parameters
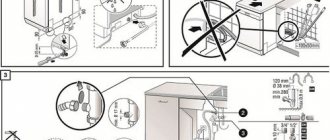
Installation instructions and recommendations from the manufacturer
Before “planting” the decorative facade on the car door, first degrease its surface, then glue double tape and the panel onto it. This is necessary to be able to adjust the position of the overlay.
When it becomes clear that the holes on the door and the panel match, you can take a screwdriver and tighten the screws. We recommend that you read the detailed instructions for installing the front on a dishwasher.
Lastly, the side fastening is done. Insert self-tapping screws from the inside of the case into the holes opposite the bushings and also tighten them with a screwdriver. It is prohibited to use nails, otherwise machine parts may be deformed during dismantling.
Guy getting to know the car
Page 6
- Image
- Text
gi
Getting to know the car
Drawings depicting the panel
controls and internal equipment
dishwasher, you will find the instructions on the cover at the beginning. In the text you will find footnotes relating to individual items.
Control Panel
I ( “ON/OFF” switch I 0 Program selection buttons ** I 8 “Check feed” indicator
water"
I @ Indicator of the presence of a special
salt
I N Rinse aid indicator I P Start timer * IX Additional functions ** I ' CTAPT button I ^ Digital indicator 11″ Machine door handle
* Depending on the model ** Quantity depending on the model
Internal equipment
dishwasher
I 2″ Storage box I 2* Shelf for knives * I 22 Stand for detergent tablets
facilities
I 2″ Better spray
rocker
I 2B Bottom spray
rocker
I 2″ Container for special salt I 2″ Filters I 2L Cutlery basket I 2″ Bottom box I 2″ Container for rinse aid 13″ Detergent chamber 13* Latch on detergent chamber
facilities
132 Type plate
*Depending on model
6
Connecting hoses and testing
We connect the hoses to the machine at the very end, but before the side fastening is made.
The housing moves forward to provide access to all components. Both hoses are usually attached to the body on one side, at the top or bottom.
They protrude a few centimeters, and to provide space in the closet, the back wall is usually simply removed.
The connection is made as described above: the hoses are inserted into the holes and secured with union nuts or clamps. No special tool is needed for fixing; everything is done manually, with a screwdriver or pliers
Once connected, the machine is placed in place for testing. We turn on the machine on the panel, then plug into the socket, ensure the water supply and press the “ Test ” or “ Start ” button. How to perform testing correctly is explained in the instructions.
If there are no leaks, the machine does not hit the countertop or walls, and the test wash cycle went through without incident, then you succeeded in installing the dishwasher yourself.
But before you start using it, it is advisable to familiarize yourself with the rules of operation and maintenance of the machine.
Water and drain connections
Having figured out how to install and where to place the case, proceed directly to installation. You can play around with the sewer system: there are 2 ways to connect to the drain - through a siphon and directly to the pipe. The first option is usually used, consider its sequence:
- TOP 5 best DVRs with a rear view camera from different manufacturers
- Install a siphon with a side outlet . If you already have a siphon installed for your washing machine with two outlets, use the second outlet for the PMM.
- Ensure the tightness of the threads on the siphon outlet using FUM tape. Wind the “fumka” against the thread.
- Screw the drain hose to the siphon.
Now you can install the inlet hose. Proceed like this:
- Twist the sink faucet intake hose from the pipe.
- Screw the tee valve onto the pipe, making sure to seal the connection.
- Screw the mixer hose onto one end of the tee, onto the other end the Aquastop valve together with the PMM intake hose, and attach its other end to the valve thread on the equipment body. Ready!
Important! The filter element requires cleaning at least twice a year, so if you install a filter, do not forget about it. If the water is hard, with sand and other particles, inspect and clean it every couple of months.