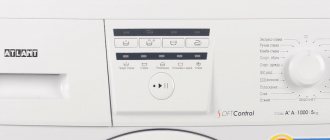
One of the few maintenance operations for a washing machine (WMA) is removing debris from the drainage unit ✔. Many users neglect this, as a result of which the unit stops pumping out dirty water. Cleaning the filter in your LG washing machine is easy. To do this, you need to know where it is located and how to dismantle it.
Where is the filter in an LG washing machine?
To inspect the filters, you need to know where they are located.
Each washing machine has the following systems:
- water fill;
- plum.
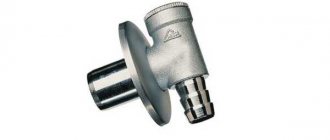
The first one can be seen where the inlet hose connects to the body of the device. It is designed to ensure that water does not carry dirt or debris into the machine.
The drain filter is located in a special compartment at the bottom of the machine. It protects the pump from dirt, debris and small objects from the machine tank. Its position may be different in different models. The LG direct drive has a small hatch at the bottom of the car, opening which you can see the filter outlet.
Preparation
Without knowing how to remove the filter on an LG washing machine, you can burden yourself with unnecessary problems. Do not try to remove the filter immediately upon discovering a blockage. If you unscrew the part right away like this, the remaining water in the tank will quickly flood your bathroom.
So even such a nonsense task as cleaning the drain filter needs to be taken prudently and prepared for it. Follow our tips:
- The washing machine must be unplugged. Not necessary, but just in case.
- There should be nothing lying near the machine that could get wet.
- Stock up on “helpers” - sponges, rags, a basin. Anything that can help collect the water gushing out of the hole.
- Slightly tilt the body of the SM, raising the front legs, and lay rags there or place a basin.
- Additionally, cover your “surgery site” with rags and you can start cleaning.
Filter maintenance intervals
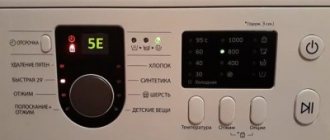
The filter should be inspected regularly and cleaned if necessary. The fact that it is time to do this can be judged by the presence of the following signs:
- If during operation the washing machine suddenly stops working.
- When the filling or draining of water occurs slowly.
- The built-in diagnostic system displays the corresponding error code on the display.
- If you cannot turn on the “Rinse” or “Spin” modes.
If at least one of these signs appears, you need to turn off the machine and check the condition of the fill and drain filters.
Typically cleaning is done once every 2-4 months. The frequency depends significantly on how often washing is done.
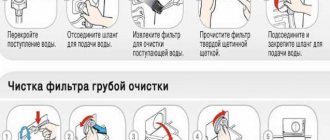
Procedure for cleaning the washing machine filter
It is important to carry out this procedure carefully, in strict accordance with the rules. It is important not to use excessive force during this procedure so as not to damage the parts of the filling and drainage systems of the washing machine.
Means used
To clean the filter for water coming from the water supply, you will need:
- pliers;
- old toothbrush;
- a little soap solution.
To clean the drain filter, you will need to prepare the following:
- screwdriver;
- pliers;
- a kitchen sponge, which is usually used for washing dishes;
- flashlight;
- shallow container or rag.
It is convenient to clean both nodes during one procedure.
Direct extraction and cleaning
During the cleaning process, you will need to remove the filter and clean it thoroughly. This must be done in accordance with the proposed sequence of actions.
Fill filter
Cleaning the inlet filter is much easier compared to servicing the drain filter.
The work procedure includes the following steps:
- Before you begin, you need to disconnect the machine from the network.
- You need to disconnect the hose through which tap water should flow into the washer.
- It will be convenient to use pliers to remove the filter. It must be remembered that it is a metal mesh.
- The dirt and debris that have accumulated there must be removed from the filter. To do this, it is recommended to use an old toothbrush or something similar. During work, it is prohibited to use any chemical cleaning agents. The only allowed option is a soap solution. In this case, the water should be warm.
- After cleaning is completed, the mesh is thoroughly wiped and put back in place.
- Now you need to put the filter in place.
After completing the procedure, the inlet hose is installed in its original place.
Drain filter
Cleaning the drain drain filter is done as follows:
- Before starting maintenance, the washing machine must be disconnected from the power supply.
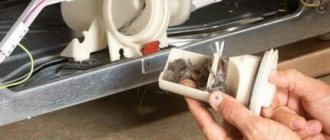
- At the bottom of the front wall of the car you can see a small hatch. You need to remove its cover. To do this, you can use a screwdriver by prying it off the edge. To remove this panel, you need to move it slightly to the side or pull it towards you.
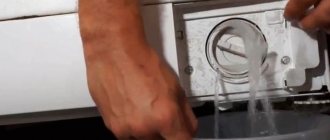
- Usually the drain system does not dry out completely. To prevent water from getting on the floor, place a rag under the hole. After the filter is opened, some liquid will spill onto it. Instead of a rag, you can use a small container for water. Some models provide a special hose to remove water in such cases.
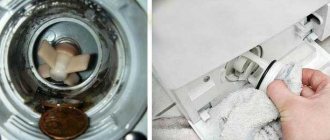
- Now you need to unscrew the filter and take it out. On some models, you may need to remove a plug or unscrew a security bolt.
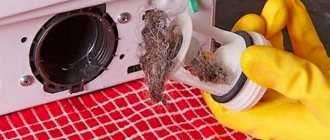
- Now you need to directly start cleaning this unit. First you need to carefully inspect the filter. First of all, various small debris that gets there along with the flowing water are removed from here. In this case, hair, coins, matches, threads or other such objects may come across.
- Next you need to clean off the plaque. To do this, you need to scrub it thoroughly with the hard side of the sponge. Do not use aggressive cleaning agents or hot water for cleaning. Otherwise, it is possible to damage the plastic parts and sealing rubber.
- Next, you need to inspect the hole where the filter was located and thoroughly clean it of debris and dirt. To do this, just wipe it with a soft and damp sponge.
- Now you need to clean the pump and pump. To do this, you will need to shine a flashlight into the hole and remove any dirt found.
- After cleaning is completed, the filter must be carefully put back in place. When tightening it, you need to do this with precise movements in accordance with the location of the thread. Do not apply significant force during installation. Otherwise, the thread may be damaged and the unit will need to be replaced.
- You need to make sure that everything is installed tightly.
After completing the procedure, a check must be carried out. To do this, connect the hose and turn on the washing machine in test mode, without loading laundry. It is necessary to ensure that no water leakage occurs after the maintenance procedure.
Now we need to put the false panel of the small hatch in place. After this, the cleaning procedure will be completed.
If you have difficulty unscrewing
If you cannot unscrew the part with minimal effort, there is no reason to be nervous.
All it takes is a little more effort. If your hand slips, it is enough to use a dry towel or rubber gloves to grab it.
If you still cannot unscrew it, then the most likely reason is that the blockage is very serious. In this case, you need to try to unscrew it even using force. Otherwise, you will have to call a specialist from the service department.
Cleaning the intake valve screen
Cleaning the incoming water filter is performed much less frequently; the frequency of this procedure directly depends on the condition of the water supply and the quality of the water. But even if the water in the tap is close to ideal, it’s worth occasionally inspecting this useful and simple device. The procedure is extremely simple and can be performed even by an untrained person. It is just important not to forget to turn off the power to the device and turn off the water supply before starting work.
- The machine moves away from the wall for ease of operation.
- The hose is unscrewed. There is probably some water left inside, so you need to worry about a container in advance where you can drain it.
- Using pliers, the filter mesh is picked up and pulled out.
- The removed mesh is washed with running water; if it is very dirty, you can use detergent and an old toothbrush or soak it in a solution of citric acid.
- After the mesh is completely cleaned, it is inserted back. The hose is reconnected.
Next you need to open the tap and check the connection for leaks. If everything is fine, the connection is sealed, it is worth running any washing program to make sure that water flows into the device normally.
What happens if you don't clean the filter?
Some equipment owners believe that it is not worth spending time on filter maintenance. However, if dirt accumulates in them, this may have the following consequences:
- Violations associated with insufficient drainage of water from the tank.
- Garbage provides an environment where bacteria can grow and mold can grow. This is not only unpleasant, but can also impart an unpleasant odor to the washed clothes.
- The filter is designed to protect the pump from debris and small objects (for example, coins, buttons, thread or other debris). If it is clogged, it cannot perform its functions efficiently. This may result in poor performance or damage to the pump. In some cases, the pump or blade may break and require replacement.
In the case where washing occurs every day, it is recommended to clean it at least once a month.
Removing a part under normal conditions
There is definitely no need to rush to remove the filter. If you get down to business right away, water will flow through the vacated hole onto the floor. And it doesn’t matter whether the drum is empty or full - dirty waste liquid always remains in the washing machine’s tank, which quickly flows out without a “plug”. The consequences of such a rush depend on the situation surrounding the machine: you can get away with a dirty rug, damaged floor covering or a local flood. In any case, you will have to spend time and effort.
This does not mean that you should forget about cleaning the filter. You just need to approach the procedure wisely and with proper preparation. So, before taking a part out of LG, it is recommended to perform a number of simple steps.
- Disconnect the machine from electricity.
- Remove carpets, extension cords, boxed detergents and other items that are not resistant to moisture from the machine.
- Protect vulnerable floor coverings from water penetration. The most reliable way is to cover the space under and around the unit with oilcloth or film, and put old rags on top.
- Prepare rags and flat containers to collect leaking water. Of the latter, plastic containers and frying pans are perfect.
- Tilt the body of the washing machine back until the front legs are 3-5 cm off the floor, and place the prepared container in the gap under the compartment with the filter.
- “Secure” the container with rags laid out around it.
If you try to remove the dust filter immediately after the end of the cycle, you may get burned by the hot water jet. It is better to wait a few hours until the liquid cools completely.
If the points are completed, we get to work. First, open the technical hatch and find the filter cover. We take the protruding “handle” and turn it half a turn counterclockwise. We pull towards ourselves with some effort. As soon as the nozzle leaves the seat, water will flow out of the hole. You should be prepared for the fact that the stream will be uneven - the plastic lid will splash the liquid, and rags laid out around will be your salvation.
Some useful tips and operating rules
Sometimes water leaks when cleaning is completed. In most cases, the cause of the malfunction is a poorly tightened filter. In this case, you need to unscrew it again and carefully put it back in place. It is also possible that the gasket was too worn.
It is useful to take measures to prevent blockages. To do this, it is recommended to do the following:
- Filters must be cleaned on a regular basis. In this case, dirt will accumulate in them to a minimum extent.
- You need to inspect the clothes being washed and the water for small objects that could clog the machine drain. It is necessary to check the pockets and how tightly the buttons are sewn.
- You need to choose the best quality laundry powder and conditioner available to use.
- If you need to wash clothes that have small parts (for example, beads), it is recommended to do this in a special bag.
Proper care of equipment will extend the life of the washing machine.
How to clean?
The cleaning process boils down to cleaning the impeller. A lot of garbage fibers are usually wrapped around it - wool, hair, threads. Procedure for disassembling the pump:
- Remove the casing - the snail by unscrewing the screws. In this case, you need to remember the relative position of the engine and the cochlea.
- Cleaning the filter is done using a wooden stick to remove dirt and scale. Wipe rubber elements with a slice of lemon.
- Unscrew the impeller with a screwdriver - unscrew the screws that connect the two parts of the pump to each other. Then you get to the impeller - the element that rotates during operation. Remove debris carefully to avoid breaking the blades. Wipe the inside of the snail.
- Reassemble the cleaned pump - assembly must be done in reverse order. To avoid mistakes, record your actions during disassembly - take a photo. Put all the parts in place and start the machine. If assembly is done correctly, there will be no leaks.