Part 1: Connecting iPhone to Projector
Let's consider connecting a phone to a projector based on Ledunix 3.9 and 83 projectors.
Step 1. Go to the settings of this model.
Step 2. Activate the access point (modem mode)
Step 3. Remember the name of the access point, as well as the password, or rename it at your discretion
Step 4. Connect your iPhone to the projector’s Wi-Fi network and go to AirPlay.
Step 5. Having previously launched the Happy cast application on the projector, we find the signal in the application on the iPhone.
Step 6. We make a connection after which the connection should be established. If projection fails, try restarting your iPhone and then repeat the procedure again.
Now let's look at connecting an iPhone to a Ledunix 35 and 37 model projector.
Step 1. Launch the Eshare application on the projector.
Step 2. Launch the AirPlay application on your iPhone. We find the projector network and make a connection.
Selecting a connection method
First you need to determine which connectors are present on the case. Connecting a multimedia projector to a laptop or computer can be done using one of three interfaces VGA, DVI and HDMI or their combinations.
Your laptop or PC must have one of these connectors. Typically this is VGA or HDMI.
Extensions and Duplications: What Happens After a Slideshow Ends
The PowerPoint app does something more behind the scenes to make the process of running a slideshow on a second monitor smoother and faster. When you enter a slide show, PowerPoint automatically changes the display settings (also called screen topology) to extend it.
What might be confusing is what happens after the slide show ends:
In PowerPoint 2013, when slides are displayed, PowerPoint leaves the display topology as advanced. (The advantage of this approach is that the next time you enter the second monitor, the first slide will be displayed with minimal delay. The disadvantage is that PowerPoint may override the "duplicate" display preference. Some users do not like this override.)
In later versions, in the same "end of slideshow" scenario, PowerPoint returns a default value, which is returned as a duplicate if selected.
If you are using PowerPoint 2013 and want PowerPoint to select the default value rather than the Extend option, you can do this by making small changes to the Windows registry as described below.
What to do if the projector shows a dim image
If you are unhappy with the quality of the projected image, we will promptly service your equipment at low prices. Using professional equipment, we will blow dust off the parts and remove deposits from the optics using special means. Before returning the device, we will definitely check the picture quality to ensure that the problem is effectively resolved.
If the image has colored or black and white dots, this indicates a malfunction of the matrix, which consists of many moving micromirrors that form the image. If the micromirror stops in one position, a dot appears on the image. Over time, the number of points increases, so do not delay contacting the service.
Why is the projector not working?
One of the main causes of problems is cable failure
The first and main reason for the absence of an image on the projection screen is a malfunction of the cable transmitting the signal. Of course, projector lamps can also burn out, but you can notice the wear of this element by the dimmed image. The lamp cannot simply refuse. But the cable plug, as a result of careless manipulations, can easily fly out of the connector. Be sure to check this nuance. The following table will help you understand this matter in more detail.
| Malfunction | Possible reason |
| Projector won't turn on | There is a problem with the power cable or power supply. |
| The projector turns on but there is no image | Faulty cable or connector, hardware failure, failure of the lamp module or lamp. |
| The projector gives an error | There is a problem with the settings, or there is an internal failure of the device. |
| The image is distorted | Lens problem, lamp unit problem, or internal failure |
The lamp unit may fail and you will need projector lamps
As you can see, there can be many reasons why the projector does not start. A projection device is a delicate technique, so don't go too far and try to find the cause if you can't fix the situation. It is best to entrust the repair to professionals.
SELECTION OF PROJECTION DISPLAY MODE.
By default, all computers running the Windows operating system are set to display extension mode. Therefore, do not be alarmed when you see your desktop without icons and shortcuts on the projection. In order to use this area, you just need to move the cursor to the right. In essence, it will be an extension of your desktop. You can move open windows and shortcuts to this area, just as you do on your main screen.
To change the mode, you can use the built-in application, but the easiest way to do this is using a key combination. By simultaneously pressing “Win+P” on the keyboard, a menu will appear on the screen allowing you to select the desired mode.
You have four modes at your disposal: desktop extension, screen mirroring, and display only on one or another device.
In addition, the service key can be used to switch modes on a laptop. Pressing the Fn button and the top row key with the 2 screen icon (shown in the picture) also switches display modes.
We hope our article helped you figure out how to connect a projector to a laptop. And you coped with this task. If you have any questions, please contact our specialists for advice. We will always be happy to help you!
At work, many people have to deal with the need to convey information to a mass audience. Teachers, managers, marketers, scientists in the age of modern technology conduct their reports using multimedia materials on a large screen using a projector. And the situation is very unpleasant when the lecture is about to start, but the equipment is not connected. Usually the causes and solutions to the problem are very simple; it is enough to know what to do if your computer or laptop does not see the projector.
There are two fundamental points:
- The situation occurred for the first time when connecting a new projector.
- The problem arose suddenly, everything worked before.
In the first case, the reason is most likely due to incorrect connection of the equipment. In the second case, the situation arose due to some changes in the computer software environment.
How to resolve the problem
If the projector does not start, you can resolve the problem yourself in some cases. It’s great if the device works, but gives an error and asks you to perform certain actions using the internal error correction program. Just follow the instructions and try to diagnose the device and fix the problem. This will help if a malfunction occurred as a result of a sudden power outage or accidental disconnection from the network.
Follow the program's instructions to try to fix the problem.
By the way, it is also possible that the failure occurred due to the fault of the computer. Then try setting up your PC and re-configuring the device using the special menu. Read the instructions and set all the necessary parameters. But first, try resetting the settings and starting the device again.
The settings menu looks something like this
If you still need to replace the light element, then find projector lamps from Acer, Benq, Epson, Nec, etc. you can always visit our store. In addition, there is a wide selection of accessories and consumables for projection devices of different models. Well, as for projector malfunctions, the best thing to do is turn to professionals!
What to do if the projector does not display an image on the screen
How to fix the problem depends on its cause. Contact us so we can determine it. We will carry out a thorough diagnosis and check the functionality of all components. Next, we will agree with you on the timing and cost of repairs. We will promptly restore the functionality of the equipment, regardless of the cause of the malfunction, the make and model of the device.
If the projected image is dim and uneven, the reason is the accumulation of plaque and dust on the optics, which consists of mirrors, lenses, filters, matrices (the design depends on the type of projector). To prevent problems, follow the instructions for using the projector. Do not install equipment in open areas or in areas where smoking occurs. Not every model has a high-quality filter that can last a long time.
HOW TO ADJUST THE IMAGE ON YOUR LAPTOP.
After completing the above operation, your laptop will recognize the projector as a monitor and automatically output the projection. The picture quality will be minimal, perhaps even distorted and floating. Don't be alarmed - this problem occurs when there is a resolution difference between the laptop screen and the video projector. Fixing this problem is quite easy. Look in the projector's specifications for the native resolution (matrix resolution) and set the same in the computer settings. For this:
1. Right click on desktop
2. In the pop-up menu, select the “screen resolution” line and left-click.
3. In the menu that opens, in the “resolution” line, select your value.
After such manipulations, the image should be of maximum quality; then, if necessary, adjust the focus and tilt of the trapezoid on the projector.
Having adjusted the picture quality to your satisfaction, you can move on to the next step.
Projector won't turn on
Pressing the power button, both on the projector itself and on the remote control, simply does not produce any result. The device is silent.
First of all, you need to check whether the cable connecting the projector to the power supply is securely inserted. Visually, the cable may seem connected, however, a situation often arises when it is not fully inserted. “Getting off with a slight fright” is a very appropriate definition of a situation when the problem was solved in this way.
But the situation does not always work out so well. If the cable is clearly connected well, is not damaged, and an attempt to connect the device to another outlet was unsuccessful, then contacting a technical specialist is inevitable.
After all, other reasons will require disassembling the projector:
- damage to the power connector on the projector body
- oxidation of the contact group of the power button
- mechanical damage to internal wiring
- malfunction of the projector board due to short circuit, etc.
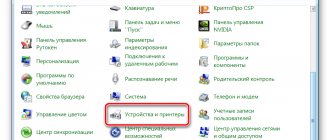
How else can you configure the drive?
Go to device manager and open the DVD drive there. Next, as in the picture, select your drive, click “Properties” and go to the “DVD Region” tab, see what region is indicated here. If the region is “Not selected”, then we leave it as it is and do not change anything. If the region shown is not yours, set yours. Please note that you can only change the region 5 times. Try additionally changing “Not Selected” to any other region. Reflashing will help you get everything back.
What to do next if there are no problems with the hardware?
The first thing we look at is the train. Maybe you did something recently on your PC that could have damaged it. Replace it - maybe you have a spare one, or you can borrow a replacement from one of your friends to check, or buy a new one. Next, look at the power plug. Open the tray, blow out (as far as possible) the insides of the drive. Why is this needed? During operation, the DVD drive becomes covered with dust, this directly affects the operation of the laser. If there is a layer of dust on it, then the discs will not be readable or will be readable, but selectively. If you have previously encountered the repair of any equipment, then you can use this advice
Carefully disassemble the drive, soak an ear stick in alcohol and clean the laser eye with it. For those who are not good at repairs. Not everyone can properly disassemble and reassemble a DVD drive. Tip: Use a cleaning disc that has brushes
If the drive recognizes the disk, it will spin it and the brushes will remove dust from the laser. The second option is flashing the drive firmware. Try to find the firmware on the manufacturer's portal, download and follow the instructions for proper installation.
Also watch the video, it shows another solution to the problem
Situations often occur when the disk drive does not see the disk and does not eject it. The question arises: “Why doesn’t the computer see the disk in the drive?” “What should be done in such situations and what is the way to solve this problem?”
Why and what to do if a laptop or computer does not see the projector
Any laptop or computer with one or another operating system supports connecting a projector. Additional equipment is perceived by technology as a second monitor. If the devices do not see each other, you need to look for a problem in the software or hardware.
Computer, laptop does not see the projector via HDMI
The modern digital HDMI interface is considered the most convenient and reliable way to connect a video projector. It provides the highest image and sound transmission speed without compromising quality.
If a projector connected to a computer does not display a picture and is not detected by the device at all, the first thing you need to do is:
- check the quality of the connection; the cable must fit tightly into the corresponding connectors on the walls of both devices;
- make sure the physical integrity of the wire - if the HDMI is damaged, the connection will not be established;
- check the HDMI specification, perhaps the devices are designed to work with version 1.4 cables, and then nothing will happen when using a 1.3 cable.
If the laptop does not connect to the projector via HDMI due to a malfunction of the latter, the cord will need to be replaced with a new working one. If the connection is poor and the cable is working properly, you just need to connect the devices to each other again, this time making sure that the plug fits tightly to the corresponding socket.
After reconnecting HDMI, you should restart your laptop
Computer, laptop does not see the projector via VGA
The analog VGA interface is considered obsolete, but is still present on many devices. It is quite convenient to use, the main disadvantage is the need to output sound from the computer to the speakers via an additional mini jack cable.
If the laptop does not see the connected equipment when using VGA, then first of all the wire also needs to be checked for physical condition. To do this, they try to connect the computer to another device - for example, to a TV. If the latter is recognized as a second monitor, then VGA is working normally and can perform its functions.
They try to connect the cable again, in case the fit was loose the first time. When using VGA, you must securely tighten the special pins on the plug that secure the wire in the connector.
VGA cables, due to their design, are most often installed loosely into the socket
Usually, when reconnected, the laptop sees the projector. If this does not happen, then the problem is not with the VGA cable, but with a software glitch.
Computer, laptop does not see the projector via Wi-Fi
Wireless connection provides many benefits. First of all, you don’t have to think about where to put away numerous cables. Devices can be freely moved around the room when using Wi-Fi.
Connection is usually carried out in two ways:
- using a special antenna that is inserted into the projector’s USB port;
- via the built-in Wi-Fi module in the video equipment.
If the laptop does not see the connected device, the first thing you need to do is make sure that the correct connection method is selected. A device that requires a Wi-Fi transmitter to operate will not be able to start without it, like a device with a built-in module.
Wi-Fi transmitter turns the projector into a modem with Internet connection distribution
If both devices are completely ready to communicate, but the connection does not occur, then most likely the problem is missing drivers. In particular, for this reason, the Epson projector most often does not see the computer. In this case, you need to go to the equipment manufacturer’s website and download the necessary software. You will first need to specify the specifications of your computer in order to establish full compatibility between the two devices.
Computer, laptop does not see the projector via USB
Connecting via USB is not considered the most popular, as it often leads to loss of image quality. But at the same time, a small wire is convenient to carry with you, and connectors for it are provided on absolutely any device.
If the projector does not work from a laptop when using USB, then first you need to turn off the computer and additional device, disconnect the cable, and then reconnect. When using any wired method, a very common problem is a loose fit of the plug to the corresponding connector. If the next time you turn it on it becomes clear that the laptop sees the new hardware, then the problem can be considered resolved.
If there is no signal from the USB connection, you need to make sure that you have drivers for the projector. Important! When using USB, you need to check that both the laptop and the projector support the same cable specification - B or C.
Laptop, computer does not see the projector on Windows 10
When properly connected, most laptops instantly detect the presence of external equipment. But this does not always happen; sometimes the computer does not see the projector, and it is necessary to manually configure the interaction of devices.
On Windows 10 this can be done in the following way:
- open Notification Center;
- see if the system detects external equipment;
- if the device is not found, click on “Connect to a wireless display”, this will start an automatic search for devices.
Advice! You can also access the desired settings using a hotkey combination by pressing Windows + P.
External connections in Windows 10 appear on the right side of the screen
If the system still does not see the equipment, then the laptop needs to be rebooted. When you turn on the computer again, it will scan all connected devices and detect the projector automatically or after running a search.
Laptop, computer does not see the projector on Windows 8
On Windows 8, the problem is fixed in almost the same way as on Windows 10. You need to go to the corresponding menu by moving the mouse over the right side of the screen. If additional equipment has already been detected, then the duplication mode will be available in the “Devices” tab. If this function is inactive, you need to enable automatic search.
Windows 8 has a special tab for updating device drivers
If the laptop still does not see the third-party device, you need to completely reboot the system. It is also worth checking whether the software is installed for the projector and, if necessary, downloading a utility that is responsible for the quality interaction of devices.
Laptop, computer does not see the projector on Windows 7
If the projector does not see the computer, and there is no signal on Windows 7, you need to go to the screen settings and see if the device is actually shown in the list of available equipment. To do this, call up the context menu by right-clicking on the desktop. You need to select “Screen Resolution” and check if the duplication function for multiple monitors is active.
If you cannot display an image on an additional device because the laptop simply does not see it, you should:
- check the correctness of the wired or wireless connections;
- make sure that drivers are installed on the laptop to ensure interaction between devices;
- check the functionality of the wire.
If no problems are found, but the laptop still does not see additional equipment, you should reboot the system. When turned on again, the computer is highly likely to detect and recognize the projector.
If you don't know what the projector's resolution is, you can set the initial value to 1024 by 768
Another way to fix the problem is to adjust the monitor resolution. If the settings for two devices are very different, the third-party device may not be recognized by the laptop. You should go to the “Screen Resolution” tab again and set a small value that is exactly supported by your video equipment. After this, you can click on the “Find” button in the monitor settings and wait until the laptop detects the device and successfully synchronizes with it.
Laptop, computer does not see the projector on Windows XP
When using Windows XP, problems can occur quite often, since the system is, in principle, considered outdated. If the projector does not display the image from the computer because the laptop simply does not see it and cannot work with it in tandem, first you need to perform a standard troubleshooting. It consists of checking the cables or the quality of the Wi-Fi connection, as well as rebooting the system to possibly eliminate the problem.
You can access Device Manager on Windows XP through System Properties.
If the above steps did not help and the devices do not see each other, you can go to the “Device Manager” and look for the projector in the list of physical equipment. If there is an icon with a yellow exclamation mark next to the name of the device, this indicates that it is incompatible with the computer. The problem is usually solved by installing new drivers, especially if the devices previously interacted smoothly.
Although the new version of the software is installed automatically upon download, you can control the process. To do this, go to the “Device Manager” again, select the projector in the list, call up the menu by right-clicking the mouse and click on “Update Driver”. The location of the files can be specified manually; for greater reliability, it is recommended to first remove old versions of the utility.
Attention! If the problem appears for no apparent reason, the system should be checked for viruses. Drivers often stop working precisely because of malware interference.
How to connect a projector to a laptop with XP version
- After loading the operating system, right-click on the blank screen. From the drop-down list, select “Properties” and then “Display”;
- Then connect the projector to the second output and watch the image of the second monitor appear. This moment does not always happen smoothly, so you can restart the laptop without touching the projector;
- On the second monitor that appears, left-click and select the “Extend desktop onto this monitor” option. Here, set the extension that matches the extension of the projector, and click “Apply”;
- In the same window there are tabs in which you can make the necessary changes for high-quality display of video recordings;
- When work with the projector has already been completed, do not forget to return the previous settings to your laptop so as not to look for a problem where there is none later;
- Do not rush to unplug the projector. Press the shutdown button and wait until the device cools down, and then unplug it.
Common faults and their causes
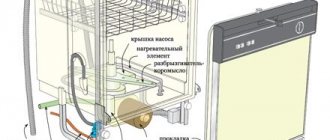
As statistics show, projector malfunctions are often associated with violations of the temperature conditions of the lamp, with the help of which the image is projected onto a large screen surface. This happens because the lamp gets quite hot, and the cooling system of the device cannot cope - the temperature sensors are triggered, the signal to turn on the lamp is blocked, and the image on the screen disappears. This kind of trouble can happen with any equipment, be it Benq or InFocus projectors.
All models have an independent diagnostic system - it constantly monitors the stability of all components and parts, instantly blocking the supply of electricity to the lamp when the temperature rises.
Let's look at the most common problems with projectors and possible ways to fix them.
- The projector has been working for a long time, and then it turned off on its own? Accumulated foreign particles prevent the cooling system from working efficiently. It is necessary to clean this system and optics, carefully remove dust from the motherboard - the built-in computer that controls all the main processes.
- When you turn on the product, an image appears on the screen, but it looks dim and a little blurry at the edges, and then the signal disappears - the problem is in the lamp, it needs to be changed.
- If the projector begins to work incorrectly, does not show, or rather, does not transmit the image to the screen, then the reason lies in the ballast, which supplies high voltage to the incandescent lamp. By the way, the latter is also worth checking.
- Color spots appear on a colored or white background - this is the first signal that the optical system of the product needs to be cleaned. You can’t delay this - the projector may need to be repaired, which usually means replacing the lamp, and its cost is rather high. So, for the BenQ MS500 projector the cost starts from 5 thousand rubles, and for InFocus 4805 - from 8 thousand. The state of the optics is greatly influenced by the state of the environment. We must remember that projectors are very delicate devices; dust, and especially cigarette smoke, have a strong impact on their systems, so in places where people smoke often and vacuum cleaners rarely, these products are more likely to fail.
Don't forget that different laptops are connected to the projector and may have different image settings - so the final image on a large canvas may not be of good quality.
To ensure that the product operates stably, never forget about preventive maintenance of individual components and systems.
System problems
Sometimes it happens that the laptop suddenly stops seeing the projector, although there were no problems before. If this happened after reinstalling the operating system, there was probably a problem with some driver. Go to Device Manager and look for your projector in the list. Problematic equipment is highlighted with a yellow exclamation mark.
If the system has not been reinstalled, run an antivirus scan. The drivers may have crashed due to malware. After treatment, download the necessary drivers from the official website of the developer.
Downloaded drivers are usually installed automatically, but you can do this manually through Device Manager. Right-click on the unidentified hardware and select “Update Driver”, selecting the “Manual” method and specifying the location of the downloaded installation files. Sometimes you have to remove the old driver in order to successfully install the new one.
But still, most often the reason that the computer does not see the projector lies on the surface and is caused by simple inattention when connecting. Modern equipment is created with the simplest possible control and connection method. Carefully read the tips discussed above, they will definitely find a solution to the problem.
Features of working with PowerPoint
Often, a projector is the best option for demonstrating presentations from Microsoft PowerPoint. In this case, for the correct display configuration, you will need to perform a few more steps, namely, decide on the display to display:
- You need to change the connection settings to the projector and change its parameters.
- After preparation, go to the “ Slide show ” section, in the “ Show presentation on... ” menu. Select the desired display device from the list.
PS4 vs Xbox One – choosing which console is better
- How to make the projector show one thing and the laptop show another
It is worth noting that this method displays the presentation directly on the screen. If necessary, you can simply output
How to connect a projector to a Windows 10 laptop
By connecting the laptop to the projector using one of the described methods, the image from the device is automatically displayed on the large screen, but the phrase “The device does not support the format/no signal” may appear or the image will appear, but not correctly (flattened, stretched). To set up the projector on a laptop running Windows 10, you need to do some simple steps:
- As usual, through “Start” you need to go to the “Settings” subcategory.
- There you need to select the active line “System”.
- The “Screen” subsection with settings will automatically open.
- Select additional screen settings to synchronize the operation of the laptop and projector.
- There you need to set the screen resolution, which will match the projector resolution.
- Save the entered parameters.
After this, a normal image of the main display should appear on the device screen.