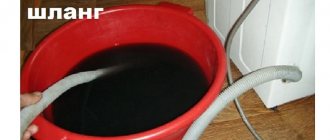
The simplest option for draining water is a hose installed on the edge of the sink or bathtub. Unsightliness and the need to clean the bathtub after each wash, plus high humidity in the bathroom or kitchen, are not in favor of this method. In addition, due to circumstances, the drain hose may fall out of the bathtub or sink, and cause expensive repairs to the neighbors’ apartment on the lower floor. A siphon for a washing machine is a reliable and proven way to connect the unit to a drain or sewer system.
What is a siphon and why is it needed?
A siphon is a container, usually made of plastic or metal, designed to create a water seal between household appliances and the sewerage system to which they are connected. It is mandatory to install it under kitchen sinks and bathtubs, as well as when connecting dishwashers and washing machines.
Some washing machines are equipped with a special filter - a container designed to filter and accumulate large debris or small objects that get into the washing machine along with clothes.
However, not every model has such an element!
Using a siphon, a water barrier is created at the entrance to the sewer system, which allows you to solve a number of important problems:
- prevent the penetration of unpleasant odors characteristic of sewage into residential premises;
- use it as a place for the accumulation of small debris, objects and other contaminants that fall from the washing machine into the drain hole;
- prevent the formation of complex and dangerous blockages in sewer pipes;
- reduce the load on the washing machine pump, etc.
The shorter the washing machine hose, the fewer bends there are, the less work there is for the pumping equipment that pumps dirty water into the sewer.
Siphon effectively copes with this task. Sometimes you can even find jewelry in it that accidentally went to the laundry with a pile of dirty laundry.
The absence of a siphon would then lead to lengthy, labor-intensive search operations in sewer pipes. Another problem that arises in the absence of a siphon is blockages in the sewer system. Installing a siphon is both easier and cheaper than cleaning out blockages.
Is it possible to do without a siphon?
Many automatic washing machines operate without any siphon. You can also create a water seal using a flexible hose designed to connect the washing machine to the sewer. To do this, the hose is placed in such a way that a bend is formed at the bottom, in which part of the water accumulates.
This design is quite functional, but it has a number of obvious disadvantages. First of all, there is the problem mentioned above with the increasing load on the pump due to the excess length of the outlet hose and the presence of an additional bend in it.
In addition, to clean such a structure, you will have to dismantle the outlet hose of the washing machine, and this is not always convenient.
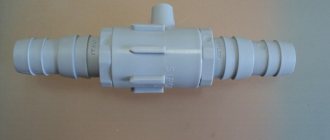
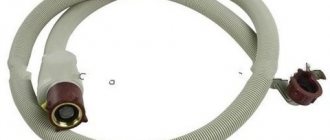
When connecting the drain hose directly to the sewer pipe, use a special rubber coupling, which will ensure a sufficiently tight connection
To connect the drain pipe of a washing machine to the entrance to the sewer pipe, you will need a special cuff, which eliminates the difference in the diameter of the pipe and hose. This device is quite reliable and provides sufficient tightness.
When installing a water seal of this type, you should remember that the sewer pipe outlet must be raised to a height of 50 cm from the floor or higher, otherwise it will not be possible to create a water seal. In this case, it is necessary to take into account the recommendations of specialists on the exact height of connecting the automatic washing machine to the sewer. This information is contained in the instructions for the household appliance.
The length of the outlet hose that comes with the machine is not always enough to install a water seal. Its length is increased using an additional piece of hose and a special coupling. Such a connection is not always strong; with prolonged use it can leak. But as a temporary solution, this option has every right to exist.
Types of siphon designs
The range of siphons for washing machines is not very diverse. They can be divided into three types:
- combined;
- external;
- internal.
Combined models are designed for use with several objects simultaneously. Most often, such a siphon is installed under the sink in the kitchen or under the bathroom. There are also options for more than two objects, for example, for a sink, dishwasher and washing machine.
A separate pipe is provided for connecting the washing machine. If at the time of installation of the machine a regular siphon is installed under the sink, it will have to be replaced with a model with a pipe.
If the washing machine is located close to the kitchen sink or bathtub, most often a combined siphon is used for connection, which is easy to install and convenient to use
If for some reason the use of a combined siphon is not possible (for example, a considerable distance separates the machine and the sink and it is possible to connect to the sewer in a more convenient place), use an external siphon intended only for the washing machine.
The dimensions of such a device usually do not allow placing the machine close to the wall.
A siphon built into the wall is somewhat more difficult to install than a conventional external or combined model, but it takes up very little space and looks quite attractive
The built-in model, which can be placed inside the wall, takes up much less space. Only a short pipe is brought outside, to which the drain hose is attached. You will need to create a cavity in the wall to fit the unit, so it is more difficult to install than an outdoor model.
This type of siphon usually comes with a decorative element that can be used to close the opening made in the wall. If the internal siphon is installed in a wall that is supposed to be tiled, first lay the tiles and then install the siphon.
Important points to know before purchasing
To organize an effective washing process, you can use any type of siphon. The main thing is to take into account ease of installation, use and aesthetic qualities. Therefore, if the washing machine is located far from the siphon, and saving space is not an issue, then you can buy any type of siphon.
It is ideal when the drain fittings are hidden from view by something - a bathtub, sink, door, furniture, or any other object. If the shape of the siphon “hurts the eye”, does not add aesthetics to the room, and there is no way to hide it, then you need to purchase a built-in product.
This solution will allow you to place the washing machine close to any wall the owner needs and hide the drain fittings. This option will significantly improve the appearance of the room.
We suggest you read How to remove stains on wool
A combined siphon is the most universal solution, as it allows you to connect any number of drain hoses to the sewer pipe
If a potential buyer plans to drain contaminated water from 2-3 types of equipment simultaneously, then the optimal solution would be to purchase a combined siphon that has the required number of fittings for connecting drain hoses.
If there is no check valve in the design of the washing machine, you should not save money on its purchase. The owner will not regularly benefit from it, but in a critical situation this product will save you from significant troubles and losses.
In addition, there is no need to skimp on the quality of the siphon itself or its components. Since their service life is always relatively short, and budget options remain operational for an even shorter period of time.
Be sure to initially decide how the urinal will be installed, which mounting method is preferable for you, how waste water will be discharged and what additional options you need. You may prefer a model that has an automatic drain or a device with increased capacity.
It is worth adding that on sale today you can also find devices that do not have a drain. A special absorbent or built-in membrane is used here to prevent the occurrence of unpleasant odors in the room, which also prevents unpleasant odors from penetrating into the room from the sewer.
What is a check valve for?
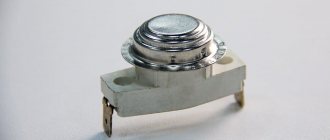
A non-return valve is a device that is installed in the area where the washing machine is connected to the sewer to prevent spontaneous drainage of water, as well as to prevent sewage from entering the machine from the sewer in case of flooding or blockage.
Modern models of high-quality machines are usually equipped with a built-in check valve, so a regular siphon is sufficient for them. But in outdated or inexpensive machines this element is not always present.
In this case, it is necessary to use a siphon with a non-return valve for the washing machine.
A non-return valve is used when connecting a washing machine to a sewer to prevent spontaneous drainage of water from the machine or the ingress of sewage into it in the event of flooding of the sewer
For installation, you can use a special connecting sleeve, which has a built-in check valve. There are different types of such devices. There are models designed specifically for the washing machine drain hose, but you can also use models designed to connect to the water intake pipe.
Recommendations from experts
Antisiphons are sold in every hardware store with a wide range of prices. For long-term operation of the device, it is better to use trusted manufacturers.
- Washing machine non-return valve, made in Italy – “Siroflex”. Made of polypropylene, type – mortise. Installation is carried out in a sewer pipe and a drain hose is attached. It is a stainless steel spring device with a rubber membrane. Effectively protects the drainage system.
- The wall valve from Alcaplast – Czech Republic has also proven itself to be excellent. It is distinguished by quality, availability in the price range and functionality. Suitable for any drain hose. Reliably copes with waste water from the washing machine. Installed as an end mount with a sewer pipe. Consists of a spring mechanism, a reflector and a mounting point.
- Another high-quality polypropylene check valve from the Italian manufacturer “Merloni”. Installed and mounted under the sink for easy cleaning. This is a spring with a rubber membrane.
- Scotch valve “McALPINE”.
- Wall minisiphon ANI Plast.
Connection procedure and rules
Before you begin installing the siphon, you must study the washing machine manufacturer's instructions. In any case, it is not recommended to install the siphon higher than 80 cm from the level at which the washing machine stands, otherwise this will lead to excessive overload when operating the household appliance.
Another important requirement is careful sealing of all joints to prevent leaks. To do this, all connections are tightened tightly using special rubber seals.
The diagram clearly demonstrates the dimensions and distances that should be followed when connecting the washing machine to the sewer system of the house
The installation procedure for the combined and external siphon is largely the same. Before installation, you should check the position of the pipe intended for connecting the washing machine on the combined siphon. If the pipe is in the wrong position, the siphon should be rotated in such a way as to ensure a convenient connection to the outlet hose of the washing machine.
To install an external siphon designed to drain a washing machine, you must:
- Mark the level of the lid of the automatic washing machine on the wall, thus marking the places intended for fastenings.
- Drill holes for fasteners.
- Install the mounting clips.
- Screw the siphon to the wall.
- Install the O-ring.
- Secure the drain hose.
Usually the external siphon is supplied already assembled, therefore, with some skill, such a device can be installed very quickly.
Often the siphon located under the sink or under the bathtub must be replaced with a model with an additional pipe. It is recommended to do this even if the siphon model is designed for an additional connection, but the device itself has significant signs of wear. Before installing a new siphon, you must dismantle the old device.
To eliminate the siphon, you need to stock up on rags or other material that absorbs moisture well. In addition, you will need a container to drain the remaining water in the siphon: a bucket, basin, etc. To remove the siphon, carefully unscrew the two plastic nuts that secure it. Dirty water will immediately begin to leak out, so it is better to take care of rags and a basin in advance.
The siphon is removed, and then the outlets are cleaned of contaminants formed during the operation of the sink (or bath).
Install a new siphon, and then connect the washing machine hose to the sewer.
When installing a built-in siphon to connect a washing machine to a sewer drain, a number of preparatory work will be required. At the level of the machine cover, a niche is made in the wall in which the device can be freely placed. The easiest way to cope with this task is if the wall is covered with a sheet of plasterboard attached to a metal profile.
In this case, a hole of a suitable size is simply made in the drywall, and the siphon is installed in the gap formed between the drywall and the wall
If the siphon has to be installed in the thickness of a solid wall, a suitable recess will have to be hollowed out. Careful attention is required when working on the wall, which is supposed to be finished with ceramic tiles. First you should lay the tiles, and only then choose a place to install the siphon.
In this case, the device will be located clearly under one of the elements (if the tile is large enough), and the decorative grille, which will cover the installation site of the siphon, will fit beautifully into the pattern on the wall.
Here is the procedure for installing a built-in siphon for an automatic washing machine:
- Select a location for installing the device.
- Hole out a sufficiently spacious place for the siphon (you may need a hammer drill).
- Install the siphon, securing it in the niche, and bring out the pipe for connection to the washing machine.
- Bring the sewer pipe to the siphon, securing it with staples.
- Cover the installation site of the siphon with a special decorative cover.
- Connect the drain hose to the siphon pipe and screw it in carefully.
If the pipe of the built-in siphon, which leads outside, is located in plain sight, special attention should be paid to its design.
Chrome elements look impressive, but some manufacturers produce plastic devices that also look quite presentable.
The design of a built-in siphon can be very stylish, especially if the manufacturer uses chrome elements. It is worth making sure that the color of the siphon matches the design of other plumbing elements
The connection between the siphon pipe and the washing machine hose is usually fixed with a clamp. Typically, the manufacturer equips the automatic machine with a hose of a length that will be optimal for connecting to the sewer.
It is not recommended to use a longer hose or to increase its length with an additional piece of hose. If the distance to the connection point is greater than the length of the hose, experts recommend extending the sewer pipe rather than the drain hose.
To ensure a reliable and tight connection of the drain hose with the siphon pipe, special clamps are used, which must be securely fixed
If you still have to extend the hose, it should be fixed to the wall at an angle that ensures free movement of water to the sewer. It is recommended to maintain a slope of 2 cm for each meter of hose. For small areas it will be more convenient to use a parameter of 6 mm per 30 cm of hose length.
Interesting video on connecting washing machine siphons
Step-by-step valve installation
Let us consider in detail the installation of a self-tapping valve for a washing machine:
- first of all, you need to attach the plate to the surface of the wall in order to install the clamp;
- after which it is necessary to place an overhead part with a rubberized gasket, after these manipulations, check the correctness of fixation and if everything is in order, you can screw it on;
- turn the valve so that it is in the closed position to prevent water from flowing in and screw it into the trim. The self-tapping valve is designed in such a way that in its penetrating part there is a cutting edge, thanks to which you can make a hole without much effort;
- After completing all the above steps, you must tighten the control nut tightly using a gas wrench. It is necessary to install the washing machine inlet hose on the branch.
After connecting the hose to the washing machine, do not forget to move the valve to the “open” operating position, which will ensure an unhindered water supply.
Testing connected equipment
Upon completion of work related to installing the siphon and connecting the washing machine, you should check the quality of all connections and their tightness. First, you can check how tightly all the bolts, nuts, clamps and other elements are tightened.
It is very important that the rubber gaskets lie flat in the holes, ensuring an even seal around the entire circumference.
To ensure reliable sealing when connecting the siphon, rubber O-rings are used. Make sure that these seals are placed evenly at the joints.
Then turn on the washing machine and select a washing mode to fill it with enough water. After this, the mode is changed so that the device drains the water. You can put a layer of dry paper towels or toilet paper at the joints.
This will allow you to detect even a small leak during operation of the device. If a combined siphon is used for connection, in the kitchen or bathroom, at the same time as draining the water from the machine, you should turn on the water at maximum flow in order to test the siphon under increased load.
Getting ready for further use
Before starting to work with the product, it is recommended to carefully inspect all components. This will allow you to identify existing defects and defects in advance. The main thing is to take a closer look at the threaded connections.
After this, you can choose the place where the equipment will be installed. We also need to decide on the method of laying communications. It is necessary to take into account the features of a particular siphon model so that the work is done correctly. All that remains is to choose the appropriate tools and additional materials.