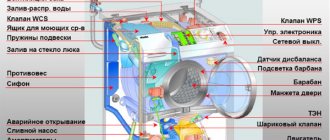
You are here: Home page » Hairdressing art
Do you shell out a large amount of money every time you go to a hairdresser or barber shop?
And you have already calculated that this amount for a year would long ago be enough for an excellent machine, but you doubt the correctness of your choice.
Then remember how much time you will spend on: making an appointment, waiting in line, time listening or chatting about nothing from the hairdresser, poor quality service and strictly at the agreed time.
Perhaps you have already calculated and thought about everything and decided to cut your hair yourself.
Then we suggest you read the instructions on how to cut your own hair with a clipper. In it we will look step by step from basic haircuts to more complex ones with video, as well as mistakes, rules for choosing a clipper and how to minimize them if you already have a clipper.
Tips will concern cutting your own hair at home and how to prepare for it.
Choosing a hair clipper for yourself
In the article about cutting boys' and men's haircuts with your own hands, haircuts with transitions are discussed, which will allow you to have basic knowledge, but you will have to develop the skills yourself.
We recommend that beginners read the article about haircuts, because... In addition to basic skills, the rules for holding the clipper, movements in different zones and other hairdressing tips necessary for cutting hair are shown separately.
Cutting side bangs is discussed in detail with a video and explanations here.
If you have long hair, then this article will help you cut the ends at home yourself.
When choosing a machine, it is extremely important that it is comfortable and has replaceable attachments or the switch is not where the switch is, because... When cutting your own hair, you will accidentally press the change of attachment and will remove extra centimeters.
Some clippers are so sensitive that you just need to pick it up and change the attachment, which entails removing hair up to 5 mm.
Pay attention to the flexibility of the runners, because if the head is not level, then it is extremely important to regulate the pressure, otherwise the hair will be cut to different lengths.
It is extremely important to start cutting with the largest attachment and gradually move to the smaller one; if you start with the smallest one, it will be difficult to even out any mistakes.
Opinion on choosing a machine from Arsen Decussard
What do you need for a men's haircut at home?
Before you begin the process, prepare the following:
- Actually, a hair clipper. Moreover, it is not at all necessary to buy an expensive professional one. At home, regular household products from the mass market will do. They are produced by almost all companies that produce small appliances: Braun, Rowenta, Philips, Panasonic, etc.
- Hairdresser's scisors. Make sure they are well sharpened. You can check the sharpness like this: cut a piece of cotton wool. You won't be able to do this with dull scissors.
- Fine-tooth comb.
- A cape on the shoulders. You can buy a special one, or you can use available home remedies - a towel, oilcloth, etc.
Haircut rules
Before starting all the manipulations, the step-by-step steps are as follows: prepare the tools, mentally divide the head into zones, prepare the hair, wash it if necessary, dry it, prepare the haircut area, mirrors, choose a haircut and watch the video.
In each zone, different options for setting up the machine are recommended. For example, we cut the temporal area from the face, while driving the clipper both horizontally and at an angle to remove visible straight lines.
Useful videos from the masters:
Hair should be dry; wet hair should only be cut with scissors.
Step-by-step men's haircut, important details from the master:
Useful tips for caring for your device
Before cleaning the device, be sure to unplug it.
- Rinse all used attachments under running water.
- Remove the blades, go over the knife block and body with the cleaning brush that comes with the device.
- Treat the knives with special oil so that they do not wear out longer, do not overheat, and have a smooth operation. Carry out this treatment before the first use, and then after every few sessions.
- Sharpen the blades if you feel that you cannot use the hair clipper as before - it tears the hairs and scratches the skin.
- Store the device in a protective case to prevent it from becoming clogged with dust.
- If you do not use an electrical appliance for a long time, recharge its battery at least once every six months.
What you need to know and prepare
To start cutting, you will need: a clipper with attachments, a comb, mirrors, a cape or sheet, a place where you will put the cut hair, for example, a bowl.
Inspect all the attachments you have in your kit.
In this photo you see a 12 mm nozzle and no nozzle, but in this configuration there were nozzles for 3, 6, 9 mm, the size is indicated on the back of the nozzle. This will allow you to make smooth transitions in your haircut.
Let's look at how to do them further.
Important! After cutting, find a brush in the set and clean the machine; if there is oil, lubricate it, so it will last longer.
Naked, down to zero
Let's look at a basic haircut, bald (bald), because... it is the simplest and does not require special skills. Prepare the area where the haircut will take place. Remove the carpet or rug, and a broom and dustpan can help quickly clean up the mowing area.
An unnecessary long-sleeved jacket or cape will help you greatly, because... hair will fall and prick.
Place the mirror so that you can see the back of your head, because... It won’t be comfortable to cut your hair without seeing what’s going on.
- When everything is ready, turn on the machine and remove most of the hair with a nozzle of 6 mm or more, when you have gone through more than once, only after that you remove without nozzles. Move the machine upwards from the temple of the head, with such lifting movements go through the entire head.
- So pass the head from the temple to the back of the head on one side and repeat on the second. When the main part is ready, remove the upper part, moving from the forehead to the back of the head.
- To make sure there are no streaks left, look in the mirror from behind, or take a second mirror and look at the back and sides of your head while looking at the front.
- Additionally, go behind the ears, moving from the back of the head to the temples so that there is no hair left there. Be careful not to injure yourself; for a better haircut, the ears are slightly bent to see if there is any hair left there.
- Repeat this on the other side.
- Walk carefully along the back and sides of the neck again, inspect the top of the head so that there are no islands of hair.
- The haircut is ready. Using your hands, brush off any remaining hair on your scalp, as well as on your shoulders and body.
- Head shaving with a razor and foam, for those who want perfect smoothness. Apply foam to your head and shave your entire head very carefully with the razor.
It is important to move step by step and not skip stripes so that there are no antennas left, so each subsequent line overlaps the previous one.
It is important to have high-quality lighting if there are any hairs left to cut them off.
We recommend sweeping out all the hair and collecting it, as well as washing your hair and taking a shower to prevent your hair from getting itchy.
The guy cuts his own hair in the video:
Haircut under 0:
A haircut to zero from a master with explanations in video format:
To avoid mistakes, as in the photo, try not to check each area once, and look in a small mirror, but to see what is happening behind and to the side.
Inspect the entire head after the haircut is finished.
The neck and occipital area are usually passed with the sole of the machine and turning it again with the reverse side, but you must be extremely careful not to get hurt.
The area behind the ears and neck are among the most “hard to reach” areas when cutting your hair yourself.
What tools will you need?
The main tool for cutting is a clipper. But you still need to have the following devices on hand:
- Scissors . Stationery supplies are not suitable for haircuts, so you need to buy special hairdressers. They must be sharp. It’s easy to check if it’s ready: cut a piece of cotton wool. If the scissors are dull, then such an operation will not work.
- Comb . The teeth should be frequent, and it is also not recommended to choose a tool with several rows of teeth, since it is extremely inconvenient to use. It is also advisable to avoid buying a wooden comb, since it is too thick and makes work difficult.
- Cape . When cutting, the shoulders are covered with a cloth to prevent hairs from getting on clothes. You can buy a professional oilcloth with a cutout for the head or use any towel you have at home.
- Clamps . With their help, you can hold individual strands to create a fashionable men's clipper haircut.
The speed and quality of the haircut will depend on the correctly selected clipper. They should be described in more detail.
To create men's haircuts at home, you can purchase an average-priced amateur machine. In the store you need to pay attention to several nuances:
- Motor . If you purchase a rotary model, the machine will not vibrate when cutting, and this simplifies the work.
- Nutrition . There are tools that run on battery or mains power. Unprofessional clippers begin to chew hair when the battery is low. Professionals will switch off.
- Nozzles . It is advisable to buy a large number of attachments to increase the range of choice of haircuts with a machine at home. Using devices, you can make your hair more neat.
- Blade coating material . The cutting parts are coated with titanium, chromium-nickel alloys or ceramics. Hairdressers do not recommend using nickel, as it impairs the strength of the device and can also cause allergies.
- Sharpening tools . In order for the machine to work efficiently, the blades must be sharpened periodically. It is difficult to carry out this operation yourself, and therefore it is advisable to look for devices with self-sharpening knives.
- The shape of the blades is important when cutting. It is advisable to purchase cutting parts in the form of the letters X or W. They will be better able to grip the hair and lift it. It is visually difficult to determine this parameter, and therefore it needs to be clarified with the seller.
After choosing the appropriate tools, you can begin the preparatory work.
When starting a haircut, you should remember that the quality of the hairstyle largely depends on the preparation. Before cutting, be sure to wash your hair and dry your hair so that it remains moist. If you ignore this step, sebum will get on the blades, which will lead to their rapid dulling. The curls are dried so that the machine does not slide over them and does not catch the skin. This leads to severe irritation or deep scratches.
How to cut your own hair with a clipper with a men's transition
Separately, we would like to draw attention to men's haircuts with a smooth transition; for beginners, it is recommended to get their haircut for the first time in a hairdresser or barber shop.
This way you will not only see how this happens, but also roughly outline where these transitions will take place.
Men who cut their own hair recommend using several attachments for this, for example 3 for the part from the back of the head to the place where the transition will be, and then using attachment 9 or 12.
The longer the top part, the more noticeable the transition will be and the more difficult it is to make it smooth.
One of the men cutting his hair uses a template to ensure that the transition area is smooth and has a certain shape.
Boxing haircut video
Half-box haircut with explanations of the difference between boxing and half-boxing:
The box is cut to the upper zone with a nozzle 0 or 1. The half-box is cut with a 3 mm nozzle to the middle of the temporal zone.
Half-box haircut
Before cutting, wash your hair and dry it completely; only dry hair is suitable for cutting with a clipper.
A huge plus of the half-box haircut is that it allows you to vary both the upper length and the back of the head.
It will be difficult for beginners to make a neat transition from one length to another, so avoid creating transitions the first time.
For those who have already practiced on themselves and are not doing a half-box haircut for the first time, leave it at their discretion as the top length, for example, like Cristiano Ronaldo, it is elongated, the top part is longer than in the classic version.
As for the occipital part, it can be reduced to -0 mm, i.e. without attachments, or have a length of 3 or 6 mm at your own request.
What you need before you start cutting:
- machine;
- high-quality and bright light;
- at least 2 mirrors, let the large one be behind, and keep the smaller one in front;
- cape or sheet to prevent hair from prickling;
- comb, with fine teeth, if the upper part of the hair should be elongated;
- prepare the area and clear it of any carpets or floor coverings;
- It is recommended to take a broom and dustpan with you too;
- machine or razor if you plan to shave the back of your head.
- Determine how long the entire haircut will be, what the longest strand should be. For example, you chose a 15mm long top. Take a 15 mm nozzle (the length is in mm and the size of the nozzle is written on the back of it), put it on the machine and plug it into the outlet, if it is plugged in.
- Remove hair from the entire head, moving from the forehead to the back of the head, without leaving a single strip. Go through each line at least 2 times. Removed and then cleaned - this will minimize the number of “antennas” or uncut hair. We go through the entire head one by one.
- Remove the main part using the largest nozzle.
We remind you that remove the length gradually, moving from the largest nozzle to the smallest. Pay attention to the lever on the side or if it is a new generation, the divisions may be right on the machine itself. If the knife is pulled out using a lever, another 0.5 mm will be added to the length. - The next step is 9 mm or 6 mm, we go through the temporal zones to the width of the machine, paying special attention to the area behind the ears, to do this we slightly bend the edges of the ears to see if everything has been cut.
- To make the transition between 15 mm and 9 mm or 6, we round up. We do this with the nozzle, moving it upward, moving the machine from the bottom or from the side and up, while making sure that the machine goes tangentially upward. Go through the transition area. The width of the transition is equal to the width of the machine for reference.
- Treat the lowest area with a 3 mm nozzle; its width is equal to the width of the machine. The occipital area should be cut according to your occipital area. Since this part can be of different shapes, for beginners we simply recommend going over it with a 3 mm nozzle.
- For a perfect transition to 0, remove the attachment and go through the bottom. We treat the temporal zone and the back of the head to the bottom bone with it, try not to go higher.
- Treat the neck area to make it look well-groomed. Inspect the haircut from all sides and make sure that there are no irregularities or remnants of uncut hair anywhere.
- The half-box haircut is ready! Congratulations!
If the hair grows in different directions, then go in different directions.
The treatment area runs from the ear to the width of the machine along the head to the back of the head in a curved line.
Particular difficulty can arise when you need to cut the side with your left hand, just do everything slowly and take your time. Your clipper should become your comb or your hand and exactly follow the actions of your hand. Practicing several haircuts will help you get used to and adapt to the mirror image.
Do-it-yourself half-box haircut with explanations in the video:
A haircut from a professional will be very different, because... the master works only with his right hand and sees the work in front of him, you cannot do this on your own, but it is the work of the master that will allow you to understand what bends should be and where.
Pay attention to the movements of the hairdresser in the area of the temples, as well as in creating the transition - this will help you repeat it in your own haircut.
Half-box haircut from the master:
Step-by-step instructions for a man to cut his own hair with a clipper with a transition (video)
Prepare hair and tool. A table or chair will help you put everything at a level comfortable for your hands. Place the machine on it, having first plugged it into the network; we recommend taking an extension cord, because... you need a fairly wide circle of movement around your head.
Use a drape or sheet to cover your shoulders, or undress to shower later.
Hair should be dry; wet hair should only be cut with scissors. It’s up to you to wash your hair or not, but after a haircut we strongly recommend taking a shower and washing your hair, because... the remaining hair will be prickly.
- Position mirrors so that you can see the back of your head and, if necessary, place a mirror on an arm on a chair.
- Feel your head, inspect the haircut at the moment. At the back, where the bone protrudes, this will be the place of transition from the shortest length to the medium one.
- The haircut is divided into several stages, the main ones being one pass with a nozzle of 14, 12 or 9 mm, depending on the desired length.
- The second is from 9.6 or more, each one adjusts its own comfortable length. This part covers the areas above the ears and the back of the head to the bone.
- The third from the very base of the neck to the bone 3 or 0, i.e. without nozzle. We recommend moving from the largest nozzle and the longest to the smallest gradually. It's important not to rush!
- The last stage is the edging, it is quite difficult to do it yourself, so simply the side parts at the back are negated, because cut with a clipper without an attachment.
Why do you need to adjust the machine?
You can start using the device without any settings, but after a while a number of problems may appear. The machine begins to make strange sounds, bite the hair, and cut unevenly and jerkily. This happens because over time the blades lose their sharpness, the space between them becomes clogged with hair clippings and skin particles, and the balancing of the knives is disrupted .
You can find out that the machine needs urgent adjustment by the following signs:
- pulls and chews hair;
- leaves uncut hairs that are noticeable against the general background;
- turns on, but the knives do not move.
If the machine receives an electric shock or does not turn on, it must be turned off and disassembled to identify the malfunction. You can do this yourself or contact a service center.
Classic and simplest haircut with one attachment
Let's consider the option of cutting a haircut using one attachment without transitions; even a beginner who picks up a clipper for the first time will be able to do it.
Prepare everything you need for a haircut: mirrors, clipper, comb, take off clothes, extension cord.
- Choose a nozzle that is 3-6 mm or longer than the final length, the size on the back of the nozzle. This will allow you to correct nuances in case of surprises.
We choose mirror 2, the smaller one will allow you to see how you cut the back of the head. - Step-by-step algorithm: we cut from the lateral temporal zone, move to the occipital zone, then repeat the manipulations with the second temporal zone and cut the front and occipital zone.
During the cutting process, it is important to pass each cut strip 2-3 times at different angles - this will allow you to remove all the hair, even those that grow at an angle.
Don’t forget that if your hand is tired, you can give it a chance to rest by lowering it down and “trotting” slightly. The first haircut will seem endless, because... We have not yet learned to combine the appearance in the mirror and our actions in reality, but this will pass with experience.
When cutting the upper parietal zone, take your time; if you have coarse and thick hair, then with sudden movements you can even cause yourself pain.
When you move to the left side, be prepared to experience discomfort, because... cutting the left side with your left hand, if you are right-handed is quite unusual, you might want to try cutting with your right hand, but even in this case it just takes time to adapt.
It is important to look in the mirror and strictly follow the chosen trajectory of movement.
When you have cut the temples on both sides and the anterior parietal area, move on to the occipital area.
If you only have one mirror, you should navigate by touch, moving from the back of the head through the upper parietal zone.
If there are 2 mirrors, stand in a way that is comfortable for you, preferably with your back to the large mirror and look into the small mirror to observe the haircut from behind.
Examine the haircut carefully with a bright light; the remaining uncut hair behind the ears or on the back of the head may not be noticeable.
Pay special attention to the following areas: behind the ears and at the back of the head. For a better haircut, bend your ear and follow the growth from the temple to the back of the head and vice versa, and also repeat the movements when rising again.
So many movements are needed to cut all the hair!
How to choose a device for home use
- Specialization - for a regular haircut, almost any machine is suitable, but for processing a beard with a mustache or removing nose hairs, you need a trimmer with a narrower blade and special attachments.
- Power type - the device can operate directly from the mains or from a battery, or have both options. If you have to cut hair not only at home, it is better to have different connection options.
- Power – if you have thick or coarse hair, a device with above average power will handle it faster.
- Assortment of attachments in the kit - the more haircut options you plan to do, the more attachments should be included in the kit.
There are usually from one to nine pieces, with hair lengths ranging from half a millimeter to 3 centimeters. The “step” of length adjustment varies for different attachments, so choose solely according to your preferences. - Blade quality – standard knives are made of stainless steel, they are quite reliable and durable. If you plan to use a hair clipper as a professional at home, you should take a closer look at blades with titanium-ceramic coating, as well as self-sharpening options that do not require replacement.
- Working time - standard 45 minutes is enough to process the hair/beard of one or two people. If there are several people, the option of uninterrupted operation for up to 3 hours will help out. Here it is important to consider the charging speed: some models charge in a couple of hours, others require a third of a day.
- Additional features: waterproof for use in the shower, an adapter for different voltage networks, a display to clearly display the remaining charge.
The Polaris catalog of hair clippers has models with all the mentioned characteristics and other interesting options.