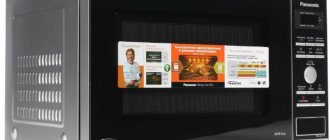
A microwave oven, along with a hood and a dishwasher, has long become an indispensable attribute for any kitchen. But what to do when you want to equip the kitchen in accordance with the needs of a modern person, but the area of the room is designed only for the Soviet minimum? Often, users have to choose between a full-fledged work surface and full kitchen technical equipment.
In order not to share the countertop with the microwave, the oven is hung on the wall. How to hang a microwave - we will consider further.
Requirements for mounts and stands for microwave ovens
The stove can be installed on a stand, which is attached with corners to the wall, or directly on special brackets.
Regardless of the choice of mounting option, there are a number of requirements that must be strictly observed:
- The shelf or bracket must be selected taking into account the size and weight of the equipment. The estimated maximum weight of food and utensils for preparing it must also be taken into account.
- To make the stove convenient to use and to last a long time, it is necessary to maintain certain distances:
- from the floor to the bottom of the oven - at least 85 cm;
- from the top to the other surface - at least 20 cm;
- from the back cover and sides - at least 10 cm (the latter gaps are necessary so that the oven is blown with air from all sides.
- The choice of fastening should correspond to the type of kitchen wall material. For example, attaching a microwave to a wooden surface is not at all suitable for concrete, brick, stone or gas and foam concrete. If the electrical appliance is mounted on a frame wall or plasterboard finish, special fasteners are required.
- If installation takes place in a room with high humidity or temperature fluctuations, metal fasteners must be carefully painted or protected with galvanic coating. All hardware must also have a protective coating, for example galvanized fasteners are suitable.
Option 3: shelf-shelf
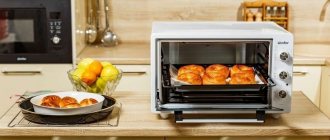
If you have a lot of different appliances in your kitchen, then a shelf with several niches will help solve the problem of using space. For example, you can put a microwave on the top shelf, and a multicooker on the bottom. Or do it as in the photo - put 2 microwaves
A metal shelf-shelf differs from a wooden one in that it looks “lighter”, and therefore can be used in almost any kitchen without causing imbalance. In addition, you can use rails together with it to store tableware. Thus, a metal microwave shelf is one of the best options.
A very original and convenient shelf.
It has many advantages:
- it can be outweighed;
- it can be used to place other things;
- it does not spoil the interior;
- ensures proper ventilation.
To make a shelf-shelf you will need:
- three furniture boards of standard sizes 600x450 mm, which are sold in building materials stores;
- metal rods with a diameter of 22 mm;
- steel flanges for rods – 16 pcs;
- steel corners 200x300 mm.
Manufacturing procedure:
- On the horizontal planes of furniture blanks (boards), mark the places where the flanges are attached, which are spaced from each corner at a distance of 30 by 30 mm.
- Drill holes with a diameter of 22 mm in the middle shelf;
- Attach the flanges to the middle shelf on both sides;
- Four identical sections are cut from the rod - each section should be equal to 650-700 mm;
- Secure the rods with a clamping screw to the flange;
- The shelves are attached to each other;
- corners are attached to the back of the structure;
- The shelf is hung on the corners to the wall with self-tapping screws.
Types of microwave wall mounts
There are two ways to attach a microwave to a wall: by installing a hanging shelf (stand) or using a bracket.
Brackets for microwave oven
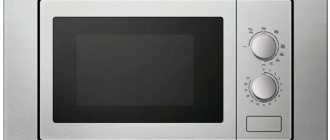
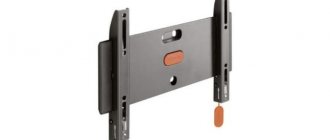
The microwave bracket is a rectangular corner, one side of which is attached to the wall, and a microwave is placed on the other side. The choice of bracket for hanging the stove is based on the following parameters of the device:
- weight, including, in addition to the oven, the weight of food and dishes;
- depth;
- length.
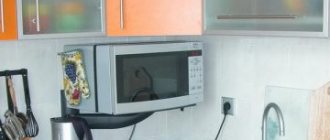
Choosing a location to install the microwave oven bracket
When using a microwave every day, its location should be as convenient as possible. A few tips to ensure the bracket is installed correctly:
- To avoid injury, installed equipment should not interfere with movement around the kitchen.
- In order not to use additional extension cords, it is necessary to provide an outlet next to the microwave. You should think about this even before finishing the walls. Otherwise, you can lay the wiring in the cable channel.
- The door should not block other objects when opening.
- To avoid excessive contamination, choose a location away from the sink and stove.
- To prevent the microwave from overheating, it is necessary to leave free space at the top - up to 10 cm. This will ensure air access to the heating parts.
- The wall and the fastening itself must be reliable.
- If you want to fill a corner and use the space ergonomically, you can place the microwave in the corner.
- You should not hang the stove too high; the device should be accessible to all adult family members.
How the microwave is attached to the bracket
A few tips to securely attach the microwave to the corners:
- The correct bracket is selected, taking into account the weight and size of the equipment.
- The fastener must correspond to the load, and its type is determined by the material of the surface on which the microwave is hung.
- The bracket is installed strictly according to the building level. If the surface has even the slightest slope, during operation the device will gradually slide off the bracket.
According to reviews, the stove slides off the flat horizontal elements of the bracket. This problem can be solved by securing the microwave to the stand with double-sided tape. You can also purchase a bracket with holes through which you can screw self-tapping screws into the soft rubber feet of the microwave.
Advice from professionals
As you can see from the instructions, fixing the bracket to the wall with your own hands is not so difficult. To ensure a high-quality result, you should pay attention to the advice of professionals:
- Before starting work, be sure to check the strength of the wall;
- use only a high-quality tape measure or a centimeter with clear divisions;
- check the building level more often;
- use only durable materials of certified quality - this applies to both the suspension itself and the fastening elements;
- It’s better to check the mark several times and screw the bracket one by one rather than re-drill the holes several times;
- Be sure to follow safety precautions when choosing a place to place a hanging microwave.
This arrangement of the microwave oven will significantly save space, help fit this piece of equipment into any interior and add a stylish twist to your kitchen.
Watch a video about installing a microwave oven on a wall
Making a microwave stand with your own hands
It’s quite easy to make a microwave stand with your own hands. To do this, you will need a small furniture board and a metal corner 4 cm wide. You should measure the dimensions of the stove: depth, height and length. Next, add 5 cm on each side in length and 10 cm on one side in depth to allow air access to the back wall of the oven.
Then you should cut the corner into two parts, taking into account that the height of the bracket should be slightly less than the height of the microwave. In the middle of each corner you need to cut a 90 degree angle with a grinder. Having bent the profile at an angle of 90 degrees, weld the joints. Next, you need to drill holes in the corners for the stand and for mounting to the wall.
All that remains is to connect the bracket to the stand and then attach it to the wall. Now you can hang up the microwave oven. Anyone can make a bracket with their own hands.
Did you manage to solve your problem using the recommendations from the article?
Yes!
45%
No. More answers required. I'll ask in the comments now.
38.54%
Partially. There are still questions. I'll write in the comments now.
16.46%
Voted: 480
Working methods
Let's consider the most used methods of fastening furniture structures to plasterboard structures.
They vary depending on:
- masses;
- dimensions of objects;
- individual characteristics of the room.
First technique
Photos of fasteners
The simplest and most accessible method for attaching cabinets to plasterboard is to use special dowels and butterflies for plasterboard structures as fastenings. Suitable for light weight items - up to 5 kg.
For example, small cabinets, shelves, elements of false fireplaces, etc.
- Fixation using plasterboard dowels. The dowel is screwed into the material using a screwdriver, then the fastening screw is screwed into it.
- Fixation using “butterflies”. It is necessary to first prepare a hole in the place where the fastener is installed, then the fastener is installed into it. When the self-tapping screw is screwed in, the antennae of the butterfly diverge to the sides, thereby ensuring a tight fit of the fastener to the surface of the plasterboard sheet.
Used for fastening cornices, shelves, antennas, chandeliers and other interior items. The butterfly dowel is made from nylon (high-quality polyamide).
The longitudinal ribs of the drywall butterfly reliably protect the fastening system from turning, and the special locking bolt of the dowel effectively protects it from falling into the drilled hole.
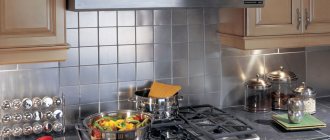
Spectacular shelves on a plasterboard wall
Second technique
Using this technique allows you to fasten objects weighing up to 15 kg.
On a note! Due to its not very high aesthetics, this solution is in limited demand.
Special mounting rails are used for fastening. They are fixed to the surface (and to the supporting metal frame for drywall) in several places using self-tapping screws or anchors. And later cabinets or wall shelves are attached to this bar.
Third technique
How to hang cabinets on drywall if the weight of the furniture is quite large? Or do you need to attach household appliances (microwave oven, heating tank, geyser, etc.) to gypsum board walls? For this, a third, more effective, technique is used.
Extended anchor bolts are used for fixation. With their help, cabinets and other items are fixed directly to the basic foundations of the room.
Installing cabinets does not take much time.
How the work is done:
- Using hammer drills with a long drill, holes are made in wall structures directly through the gypsum board. The depth of the hole should exceed the length of the anchor by about 0.5 cm. Drill very carefully to form a neat (not very wide) hole. The finished hole is cleaned of crumbs and dust.
- Anchor bolts are inserted through the resulting recesses (flush with the drywall), which are clamped with special keys. The length of the anchor bolts should be at least 5 cm greater than the distance between the main wall and the plasterboard sheet. It is most optimal to use bolts with a diameter of 10-12 mm.
- A washer is put on the bolt thread, a loop from a cabinet or shelf, a washer again, and the entire “set” is screwed on with a nut again.
Interesting! This technique has proven itself well with base walls made of durable materials (brick, concrete).
Fourth technique
Fastening various objects to plasterboard walls is possible using spacers.
This mounting option is as follows:
- At the stage of installation of plasterboard structures, spacers are attached in places where fasteners are supposed to be installed. They are mounted so that the plane of the spacers corresponds to the point of attachment of the furniture.
- Next, when the structure is mounted, appropriate marks are made on the drywall.
- How to hang cabinets on drywall next? Quite simple: The furniture fastener is then easily screwed to a secure base.
For your information! This method is very reliable, it only requires preliminary design of all furniture elements at the stage of installation of plasterboard structures.
Work on installing cabinets on a plasterboard wall.