Working hood over preparing dinner
Smells from cooking food will not enter living rooms if the hood above the gas stove is selected in terms of power and installed correctly. There are a large number of these devices on the market today, and they all have different performance characteristics. Today we will try to understand this issue, and also see how to install a hood over a gas stove. Yes, you can do it yourself, since there are no regulatory restrictions on such ventilation for domestic use.
Optimal height values for different units
The installation height of the hood above the tile is determined taking into account two components - the type of hob and the design features of the location of the equipment for a particular kitchen.
It is necessary to understand that the height is never “tied” to the dimensions of the air intake, components or type of device. Distance between hob and hood
The only exception to the rule is kitchens with low ceilings, where it is not possible to maintain the recommended distance between the hob and the hood.
Choosing a built-in hood for the kitchen: rating of the best latest models
How to properly install a hood over a gas stove
1.1
Horizontal solutions
It is possible to determine exactly at what height to install the hood only if you have information about the type of stove used. Based on this, the distance between the inflow and exhaust is selected. This type of equipment is installed taking into account a number of parameters (type of hob, performance of the intake unit, etc.).
The relationship between human height and device installation height
But what distance is considered optimal in terms of safety and efficiency?
The standard for each device is different, but there are accepted standards that are primarily advisory in nature:
- the distance between the hood and the gas stove burners is from 65 to 85 cm;
- The minimum distance from an electric hob is 60 cm, and the maximum is 80 cm.
Minimum distance from the hood to the gas burners
The specified data is valid only for devices fixed strictly horizontally.
Video on installing a horizontal type unit
How to choose the right hood for the kitchen
1.2
Inclined units
Inclined type unit
When installing inclined models, it is extremely important that the distance between the stove and the hood corresponds to the following values:
- from 35 to 45 cm when working with an electric stove;
- from 55 to 65 cm – for gas burners.
In a real kitchen, it is customary to install ventilation units where operation will be not only efficient, but also convenient for the housewife. The distances indicated above are experimentally established values confirmed by years of practice. You can calculate them yourself, you just have to take into account a number of variables:
- kitchen area;
- planning features of the premises;
- approximate area of the cooking surface;
- performance and type of hood;
- growth of family members, housewives.
If you do not maintain the established distance and hang the unit too low, there is a high probability that the device will operate under constant heating conditions. And this is fraught with premature failure of the faithful assistant. In addition, if the hood is installed too low above the electric stove, it will simply be inconvenient to use.
Air conditioner for kitchen
Video on installing an inclined type unit
Choosing a built-in hood for the kitchen: rating of the best latest models
Factors influencing the distance between the stove and the hood
Separately, we should once again dwell on the factors that influence the distance between the installation of the exhaust device and the stove. The height depends on what they will be:
- kitchen size;
- features of its layout;
- hob (type and dimensions);
- power and type of exhaust device;
- the growth of the one who will cook on this stove more than others.
At the same time, it is also important to comply with all installation standards for the ventilation structure specified in the technical data sheet for it. Following all these recommendations will make it possible to use a device designed for air ventilation in the kitchen extremely effectively, and will rid it of unnecessary odors and fatty deposits that spoil the interior.
Following all these recommendations will make it possible to use the device designed for air ventilation in the kitchen extremely effectively, and will rid it of unnecessary odors and fatty deposits that spoil the interior.
Ventilation in the apartment
Diagram of a homemade anti-return box with valve
Installing exhaust ventilation in the kitchen almost always disrupts the standard ventilation of the apartment. To install it, it is often recommended to punch an additional hole for air removal, but this will not solve all problems. The fact is that if you enlarge the window of the ventilation shaft, its cross-section will remain the same, so the quality of air exchange will not improve.
The way out of this situation is quite simple: it is the installation of an additional box with a clapper valve, the device of which is shown in the photo.
As you can see, there are 2 holes on the box. The valve is marked in red. When it is closed (in a horizontal position), air can easily escape through the window, providing natural ventilation to the kitchen.
When pressure arises during fan operation, the valve changes its position and closes the first window, thereby providing ventilation using an exhaust hood.
The main advantage of this connection scheme is the absence of reverse draft and the preservation of natural ventilation when the hood is turned off.
The valve is adjusted using a weak and thin spring. In the diagram it is shown as a broken line. For the valve cover, a lightweight material such as aluminum or plastic is best.
Device installation rules
The hood, which filters the air and returns it back, is easy to install. You can install it above an electric stove yourself.
- It is necessary to draw a horizontal line above the hob at the height of equipment installation - the distance between the gas stove and the hood.
- A vertical line is drawn on the wall in the center of the slab. The standard provides rules for installing the hood exactly above the hob.
- The template from the packaging is applied to the lines, and 4 points are marked - the locations of the mounting bolts. Depending on the model, the distance between them is set as standard 200×200 or 200×100 mm.
- Make holes, hammer in dowels and screw in screws.
- The design without a filter grille and housing is hung on the wall.
- Install the remaining parts of the mechanism.
Spacious kitchen with electric stove
In cases where you purchase a hood with air exhaust into a ventilation pipe or chimney, the structure itself with fans is mounted on the wall in the same way as a model with a circulation method of air purification. Then you need to install the air duct, taking into account the minimum distance from the hood to the gas or electric stove. For normal ventilation, in order to prevent the effect of recirculation, that is, the return of air masses from the ventilation ducts back into the pipe, it is advisable to invite specialists.
Basic requirements for the air duct:
- the cross-section of the pipe is designed to allow air masses to pass through it at maximum equipment performance;
- the safety factor is taken into the formula for a specific design;
- the optimal distance to the outer wall or ventilation duct should be no more than 5 m;
- a maximum of 3 bends are allowed in the duct;
- pipes of different sections are unsuitable for the exhaust structure;
- All turns are made smooth, from radii.
Kitchen with gas stove in a country house
The socket must be grounded and located on the side of the edge of the hood body at a distance of 25 cm. The safest option is to install a switch that can quickly turn off the equipment.
Device installation rules
The operation of the exhaust device also depends on how the rules for its installation are followed:
- the cooking surface of any stove must be the same size as the ventilation device (standard 60-90 cm) - this will make it possible to suck in polluted air;
the hood must be installed correctly, so that the distance from it to the stove does not contradict fire safety standards and corresponds to the type of stove;
The device must be connected to the electrical network in accordance with technical requirements.
Of course, it is better to entrust the installation of exhaust equipment to specialists. But it’s also quite possible to do it yourself.
Arrangement of channels for air exhaust
When installing air exhaust channels, you should avoid a large number of bends, because their excessive presence will impede the outflow of contaminated air. Therefore, it is desirable that the pipes are straight, short and practically without elbows. They are installed so that the sucked air can move from the socket to their thin end.
When laying channels for air outlets, it is also important not to narrow the holes or use additional connections, because this will limit the free movement of the air mass and contribute to excessive load on the hood motor. The cross-section of the exhaust pipe must correspond to the size of the opening of the exhaust unit
Socket location
The exhaust hatch is usually connected through an electrical outlet, which is installed at the top (2-2.5 m from the floor level). Wall-mounted kitchen cabinets, so it exceeds it by 10-20 cm. And from the air duct it should be shifted to the left or right by 15-20 cm.
It is advisable that the outlet be grounded, since during voltage surges it will turn off and prevent the exhaust equipment from malfunctioning. The hood is a guarantee of fresh air and cleanliness of interior items. The main thing is to correctly select and install the device and at the same time maintain the distance between the stove and the hood in the kitchen. This will not only ensure reliable operation of the equipment, but will also create certain conveniences. Buy, install correctly and use it!
Positive Features
Today, world interior designers use hanging hoods to equip kitchen spaces. This popularity of this type of product is due to a number of undeniable advantages. Hanging hoods have the following advantages:
- Power saving. The equipment consumes approximately 4.8 kW per day. Suspended models are the most economical in their class.
- Easy installation. Installation of a suspended hood does not require special technical knowledge and does not take much time. On average, it takes 30 minutes to install the device.
- Low noise level. Even with intensive work at maximum speed, this figure is 40 dB. (for single-motor device).
- Modern devices are equipped with a reusable filtration system. Thanks to this, there is no need to regularly change the filter, while kitchen hoods will effectively absorb excess moisture, grease particles and smoke. It is enough to periodically clean the system. For more thorough cleaning of the air mass, you should choose a device with a carbon filter.
- Easy to use. To start the device, just press one button.
- Space saving. The built-in hood is compact in size, so it does not take up much space.
Despite the fact that a suspended hood has many advantages, its price remains affordable. Today, both budget and more expensive models with advanced capabilities are on sale.
Nuances of device designs and sizes between them
How is the distance determined for combined hobs?
If you own a combination hob, then when choosing a distance you must be guided by the most stringent standard for gas stoves.
That is, leave at least 75 cm between the stove and the lower border of the hood.
How is the distance determined for inclined panels?
One of the common questions of ordinary people is this: how to correctly measure the distance from the surface of the stove to the inclined model of the exhaust hood.
The answer is simple: you need to measure the minimum distance from the lowest point of the exhaust hood to the surface of the stove.
For the lucky owners of inclined models of exhaust hoods installed above the gas panel, the minimum distance, if necessary, can be reduced to 55-65 cm.
Owners of inclined exhaust hoods that are located above electrical equipment can place the lower edge of the product at a distance of at least 35-45 cm.
We have presented the standards that you need to know to properly place a hood in the kitchen. Now you know at what height you should hang your exhaust hood.
We hope that our tips will be useful and you will cope with the task with ease. And your hood will delight you with clean air in the kitchen.
Connecting the hood to electricity
Since kitchen hoods belong to the category of household electrical appliances, there are no problems with their connection, especially since their power consumption rarely exceeds 1000 watts. It is desirable that every electrical device has a grounding connection, although this cannot always be provided for.
Connect the hood via Vago terminal blocks
Grounding or grounding can be done if a major renovation is carried out in an apartment or house. In this case, the task of connecting a hood in the kitchen is greatly simplified. To do this, you should find a point in the lighting panel, in the form of a welded bolt, which is connected to the body of the electrical distribution panel. As a rule, this point is connected to the grounding of the electrical substation. As a grounding conductor, it is permissible to use a single-core or stranded wire with a cross-section of at least 2.5 mm square. It is better to use wire in heat-resistant insulation.
As a rule, nowadays, when purchasing electrical household appliances, some of them are not equipped with a wire and a plug, while there are models with a wire and a plug, and there are models that have a wire but no plug. Such hoods can be connected without a plug, but this is not a very good option. If you have to remove the hood to clean it, then this is not entirely convenient, since it will take a lot of time to disconnect such a hood, and also to connect it. Therefore, it is better to go to the store, buy a plug and connect it to the wires. In this case, to disconnect or connect this device, simply pull out or insert the plug into the outlet. If there is grounding, then you need to buy a plug with grounding pins, and if there is no grounding, then the most ordinary plug will do, but it is better for European sockets, since former Soviet sockets are no longer in demand. The fact is that they are unreliable, and they are designed for domestic plugs, whose contacts are thinner.
Hood above the hob
Hoods above the stoves improve local ventilation and air circulation throughout the room. Built-in ventilation ducts do not cope well with the same task, and kitchen owners are faced with a choice - to use an exhaust device or constantly open the windows, both in summer and in winter. Furniture and decoration will retain their appearance if steam from dishes escapes quickly.
The image shows a classic domed model hood, but with a rounded shape that is rarer for modern times and an air duct going into the ceiling
Ventilation devices come in 2 types according to their mode of action and have more than 10 varieties in structure. Hoods are placed over gas stoves, electric stoves, and mixed-type appliances.
The properties of the air become better due to the fact that the hood eliminates:
- steam;
- gas combustion residues;
- pollution;
- soot;
- smells.
The devices purify the gaseous environment using flow-through (discharge) and recirculation methods. Devices of the 1st type draw in air and remove it from the building. Among the disadvantages, it is worth noting that the systems require ducts, and that the kitchen has to be filled with air from the street.
Recirculating hoods absorb air mass, pump it through filters and release it back. They take a long time to purify the air, and their parts wear out quickly, which is the main disadvantage.
The minimum height for installing the hood in the case of a gas stove is 75-85 cm between the lower edge and the burners; in addition, the exact numbers are indicated in the instructions for the equipment. Devices with lower traction force, about 300 m³/hour, are usually placed at the lower limit of the interval, i.e. at 75 centimeters.
The same arrangement is suitable for systems that do not have a 10-centimeter margin in width on each side of the slab. Hoods for electrical equipment are mounted on average 10 cm lower - 65-75 cm above the hob.
The ideal hood protrudes beyond the stove from the sides and front, has greater depth, width and area than the hob
There is an exception to the general rules for inclined systems. They are mounted above gas stoves at 55-65 cm along the lower edge. 20 cm higher than above electric ones, with which a gap of 35-45 cm is enough.
All types of exhaust systems are placed along the lower edge no higher than 90 cm above the hob surface of any appliance. The island hood is 1.3-1.5 meters wide, and can be raised another 5-10 cm. Failure to comply with the lower installation limit increases the risk of parts breaking and greasy film ignition.
The height of the location above a gas or any other stove is not affected by the material of the hood. For placement within the permissible interval - too.
Island hoods are installed above kitchen islands and peninsulas: appliances are made with rectangular, cylindrical, square, T-shape, as well as in the form of inverted tables and unusual geometric shapes
When choosing a height, three additional factors are taken into account:
- The presence of organized natural ventilation of the supply and exhaust type and the distance to it. The shorter the distance, the higher the device for the stove can be mounted.
- Configuration of the kitchen, furniture and household appliances. We are talking about the placement of the second tier of the set, objects above the hood, the height of the ceilings, as well as the presence, size and features of the stove cover.
- Availability of a stove. A heated oven has a bad effect on the internal parts of the range hood. Above a standard device with a stove, the hood is installed closer to the upper limit of the norm, if nothing prevents this.
Difficulties arise due to the structure of the exhaust device. Hanging telescopic ones are designed to be installed below the bottom of the hanging box, which limits the choice of height. The same applies to built-in models, which “replace” the bottom of the furniture section, but the cabinets for attaching and hiding the air intake are changed if something happens.
Installation of wall hoods at the optimal height is sometimes hindered by pipes and stove covers. Island models are attached to the ceiling, so their height at the lower level is determined by the dimensions.
Anyone involved in cooking should have access to the rear of the exhaust hood; its adjustment panel, which is usually located at the front, can be reached by any adult even at the maximum height
Sockets must not be used between the hob and the bottom of the hood. The power supply point is provided at a level of 2-2.5 meters above the floor, inside wall cabinets or immediately above them.
The socket is removed at least 15 cm from the air duct. The most universal height for a nest is considered to be 200 cm above the floor and 110 cm above the stove or tabletop of the work area.
Types of exhaust systems
According to the principle of operation, exhaust systems are divided into flow-through, which are also called direct-flow, and recirculation. There are also combined models that can function in any of two modes. Let's understand the features of direct-flow and recirculation systems.
In a direct-flow system, apartment air is forcibly drawn in by a pump and pushed out into the ventilation hole. The equipment is equipped with a grease filter, which, when dirty, can be removed from the device and washed from accumulated grease particles. This system, compared to others, is more durable and easier to maintain, and provides good ventilation. However, for its installation it is necessary that the kitchen ventilation hole be located nearby.
The recirculating system also draws in air, passes it through filters, and releases cleaned air back into the kitchen. In such a system, two filters are used - grease and carbon. The grease filter traps oil and fat particles in the same way, and the carbon filter eliminates odors and provides finer air purification. This type of system is not tied to ventilation holes; it can be mounted anywhere. The grease filter is washed periodically, but the carbon filter, made in the form of a removable cassette, is disposable. After a few months of operation, it is replaced with a new one, which increases the cost of operating the system.
Our service center offers its services for repairing household appliances at a competitive price. We repair any breakdowns of modern household appliances. Leave a request and get a 15% discount - Leave a request
In addition to the principle of operation, kitchen hoods differ in the installation method. They can be installed in various ways. We list the types of exhaust systems:
- hanging hoods are attached to wall furniture or to shelves; they are compact (often made in the form of a small box) and low power;
- wall systems, unlike hanging ones, are attached to the wall;
- dome hoods (also known as fireplace hoods) are a variant of wall-mounted devices, but dome hoods have a characteristic shape and, as a rule, are the most productive systems;
- built-in systems are installed inside furniture elements;
- corner ones occupy the corner of the kitchen;
- island systems are placed above stoves, which are located on the “island” in the center of the kitchen;
- telescopic or retractable - if necessary, such systems are pulled out from the kitchen furniture.
In addition to the above types of devices, hoods are divided into regular and inclined. The neck of conventional ones is located parallel to the surface of the plate. In inclined ones, the neck is inclined relative to its surface. It is believed that due to the tilt, the efficiency of the device increases.
What you need to consider when organizing a hood in your home
If you decide to install a hood in your home that exhausts exhaust air outside, you may encounter some legal aspects of this process.
To install a hood, you need to make a hole through which air will escape, and also adjust the outlet of this air. Two questions arise: is it possible to make a through hole in the wall of an apartment building and is it allowed to remove dirty air outside the apartment?
If the diameter of the hole does not exceed 200 mm, then it does not require a permit. Such openings are allowed to be made for ventilation and air conditioning of premises. However, it will not be possible to vent the hood through such a hole - according to the law, this may interfere with the comfort of neighbors, through whose window your exhaust air may escape. Before installing the hood, it is necessary to design the exhaust duct and go through the approval procedure.
The simplest and most convenient option is a hood with an exhaust duct in the wall.
The video shows how to properly organize the exhaust duct:
Where and how should the air duct be routed?
Quite often, especially in apartments, the air ducts from the kitchen hood are connected to the home ventilation system, which ensures natural air circulation. In fact, this is the wrong approach because it makes the hood ineffective due to the fact that most of the grille is blocked by the ductwork.
A significant part of the ventilation grille is closed and ventilation in the apartment will be insufficient
Because of this, natural air circulation will also suffer. Therefore, the most optimal option is when the hood is connected to a separate ventilation duct using the ventilation grille shown in the image above.
How to take it outside
One example of installing a hood in the kitchen with air exhaust through the wall.
It makes sense to choose this option by making a hole in the wall so that the air duct goes outside. Of course, punching a hole in a load-bearing wall, the thickness of which can be half a meter or even more, is quite difficult, but it is possible, especially since in our time such a tool is available.
The air duct is ducted outside and closed from the street with a ventilation grille. All free space between the wall and the air duct is carefully sealed. It can be covered with a solution or foamed with polyurethane foam, which is more relevant in our time.
This is what a non-return or anti-return valve for air ducts looks like
If reverse draft occurs, which happens very often, the ventilation grilles are equipped with a check valve, which closes if the hood is not working. This limits the flow of cold air into the room. This is especially true for the cold season. In the summer, on the contrary, everyone wants as much fresh air as possible in their home. If a check valve is not installed, then foreign odors from the ventilation system will enter the room. As a rule, this applies to ventilation systems of multi-storey buildings.
Exiting a kitchen hood to the street instead of a common house ventilation duct
Providing natural ventilation
Anti-return valve for normal natural ventilation in the kitchen
To prevent the hood from having a negative impact on the natural ventilation process, you can assemble a system using a tee and a check valve. The check valve should be installed in such a way that it closes when the hood is operating and opens under the natural flow of air from the room. This operation is ensured by a weak spring located in the valve itself. The only problem with such a system is its unattractive appearance. But this is not a problem at all if it can be placed inside a wall cabinet, carefully disguised, especially since it does not take up so much space.
Important Installation Points
In different cases, the distance between the hood and the stove can vary significantly. However, each case has its own standard. If we consider such a case as installing a hood over a gas stove, then the distance should vary from 55 to 65 cm - for an inclined type.
The installation of a hood for a gas stove should be approached with greater caution, since here you need to think about the issue of fire safety, which cannot be said about the electric version. For electric ovens the same principle works, but with a different distance - from 35 to 45 cm for an inclined type and from 60 to 65 cm for a straight one
For electric ovens, the same principle works, but with a different distance - from 35 to 45 cm for the inclined type and from 60 to 65 cm for the straight type.
The distance between the electric stove and the inclined hood.
Reliance when calculating the distance is made mainly on three factors - the power of the hood, the configuration of the room and the height of the owner or hostess who will cook in the kitchen. If all factors are met, then the device installed above the stove will properly perform its functions without disturbing the kitchen owners at all. The given distance figures are minimal and under no circumstances can the distance be reduced. However, in certain cases, this figure can be increased if functionality is not affected. However, calculating the distance is not a difficult task; in most cases, the recommended figures are indicated in centimeters in the instructions supplied with the unit.
If you use the services of a specialist, then the issue of the installation height of the hood will not be relevant at all; he will be able to most optimally determine the position based on his own experience, as well as install the entire supporting system - sockets and air ducts.
Make the markings
For a neat and accurate installation, it is very important to make the markings correctly. For wall-mounted hoods, there are sufficient points for drilling mounting holes. Built-in models also require cutting out sockets for the air duct in the bottom of the cabinet.
In both cases, marking is carried out according to the installation template, which usually comes complete with the hood. The marking process is described in detail in the instructions. The sequence of operations is approximately as follows.
Wall models
Frame: @Aleksa Workshop / YouTube
Find the center of the slab and mark a vertical center line from this point. For convenience, stick masking tape on the wall and draw on it with a pencil. Then, at the desired height, draw a horizontal line on which the bottom of the hood will be located.
Attach the stencil with masking tape and use a pencil or awl to mark the points for drilling holes. If the template is not included, use the mounting bracket and make marks on it in the right places. Another option is to use a tape measure to measure the distance to the holes on the body and transfer them to the wall, measuring from the center line.
Built-in models
Frame @M.Video / YouTube
Remove from the wall the cabinet on which the hood will be installed. Remove the bottom and use masking tape to glue the stencil to it. Use an awl to mark the attachment points, as well as the center of the socket for the air duct. Using a compass, measure the radius of the pipe according to the template and draw a circle along which you can then cut out the chipboard.
If there is no stencil for installation, then slide the hood into the cabinet, installing it so that it is flush with the facades, taking into account the thickness of the door. Place the socket on the outlet of the air duct and apply sealant along the contour. Then carefully place the bottom on top so that an imprint remains on the chipboard, and trace the mark with a pencil.
If the air duct runs above the cabinets, then in a similar way it is necessary to mark the cutout for the pipe in the top cover.
The structure of a conventional horizontal hood
From the technical side, the structure of a kitchen hood is extremely simple. Essentially, this is a box with a built-in electric motor, but let's dig deeper to know exactly all the important components of the device. This information may be useful to many during DIY repairs.
Table 1. Structure of the hood
| Detail, photo | Description |
| Powerful electric motor | The heart of the hood is an electric motor, which is connected in series through a shaft to the blowing mechanism. It can be designed like a regular impeller or a turbine, as shown in the photo. With compact sizes, turbines draw air more efficiently, but they create more noise, which must be taken into account when selecting a model. The power of electric motors is small, but you don’t need a lot to spin the blades that move the air - for household appliances it is 100-400 W. Advice! Many, especially Chinese manufacturers, write huge numbers that exceed even the characteristics of products from famous brands, but in fact they do not measure up at all. Of course, manufacturers are being cunning and deliberately inflating the figures. Also, the design of their products is imperfect; it does not allow creating a sufficient air pressure difference to start moving it effectively. In general, be careful. |
| Touch control panel | The hood is controlled using a control panel, which can be implemented in the form of a set of mechanical switches and buttons, or a sensor, being stuffed with electronics. Such models belong to the “premiere” segment; they are more expensive, but much more difficult to maintain and repair. Some hoods are equipped with remote control panels or special sensors that start the device automatically when steam and elevated temperature are captured. There are also models with displays that display the active mode, room temperature or time. When choosing, be guided by your taste preferences and ease of control. |
| Lighting | When buying a hood, do not forget that the power consumption of the device also includes the light bulbs used to illuminate the work area. Usually halogen or LED lamps are used, installed in a housing with a diffuser, flush with the bottom panel of the hood. There are many other solutions, but these are the ones that are common in the budget segment. The backlight turns on automatically when the front panel is pulled into the working position, although there is also a separate toggle switch that can turn off the lighting if it is not currently needed. |
| Front sliding panel | The front panel is a passive part of the structure, which, in addition to the suction unit, is a switch, or rather one of them. The system is designed in such a way that it has contacts that close when the panel is pulled out almost all the way. At the same time, there is also a toggle switch, which can also break the power supply. The panel is also equipped with a grease mesh, which can be easily removed if necessary. It moves on metal runners on balls, so the move is smooth and precise. |
| Grease traps | Aluminum meshes in a plastic frame are grease traps. Air passes through them calmly, but the bulk of the fat is retained in the cells. The filters are held in place by spring latches, making them easy to remove for washing. If necessary, they can be replaced with new ones of suitable size. |
| Outlet pipe | At the top of the hood body you can see the outlet nozzle through which the air drawn in from below is blown out. This part is connected to the ventilation pipes if the hood is flow-through or covered with a decorative trim if it is a circulation hood. Some models of hoods are equipped with false linings so that everything can be neatly hidden. For embedded equipment, such additions are useless. |
| Carbon filter | Circulating hoods are additionally equipped with carbon filters, in which dust, grease, gas combustion products, etc., settle during operation. The element is replaceable, so designs usually provide easy access to them. |
| Power cord | Do not forget that the hood is an electrical appliance. It needs to be powered, which means that at the installation site it is worth providing a separate socket or laying a route from it with extensions, which is not very nice when the device is open, but for a hidden hood this does not matter. |
You can disassemble the hood into parts in a matter of minutes; in fact, everything is hidden right behind the grease traps, so repairing them is quite simple, considering that today’s repair is a simple replacement of a faulty part with a new one.
How does the hood work?
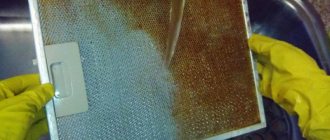
The hood is equipped with removable grease traps that need to be washed and replaced.
The main purpose of an electric hood is to remove combustion products and unpleasant odors from the air, which can spread throughout the house. That is, the air is actually purified. The installation of such equipment is especially important when using gas stoves, since they run on fuel, which, when burned, emits a large amount of harmful substances. Among them are carbon dioxide, nitrogen and other impurities. If there is no hood, they will be removed through a ventilation shaft leading into the room or through an open window, but until this time they will remain in the room for some time.
Find out how to clean grease from a hood, and also read useful recommendations on how to clean it at home in a special article on our portal.
Using a forced action hood allows you to speed up the process of removing combustion products to minimize your contact with them. Being in a small room with poor ventilation while cooking can have a particularly strong impact on your well-being (shafts and passages are often clogged).
Hood with two electric motors
The heroes of our review can purify the air in two ways. The first is the removal of exhaust gases from the room, the second is additional passing through a filter system.
Interesting to know! The hood itself is a very useful and necessary device, but in some cases its use will be ineffective. Such situations are possible in the absence of normal supply ventilation, so it is worth taking care of this during installation.
Optimal height values for different units
The installation height of the hood above the tile is determined taking into account two components - the type of hob and the design features of the location of the equipment for a particular kitchen. It is necessary to understand that the height is never “tied” to the dimensions of the air intake, components or type of device.
The only exception to the rule is kitchens with low ceilings, where it is not possible to maintain the recommended distance between the hob and the hood.
Horizontal solutions
It is possible to determine exactly at what height to install the hood only if you have information about the type of stove used. Based on this, the distance between the inflow and exhaust is selected. This type of equipment is installed taking into account a number of parameters (type of hob, performance of the intake unit, etc.).
The relationship between human height and device installation height
But what distance is considered optimal in terms of safety and efficiency?
The standard for each device is different, but there are accepted standards that are primarily advisory in nature:
- the distance between the hood and the gas stove burners is from 65 to 85 cm;
- The minimum distance from an electric hob is 60 cm, and the maximum is 80 cm.
The specified data is valid only for devices fixed strictly horizontally.
Video on installing a horizontal type unit
Inclined units
Inclined type unit
When installing inclined models, it is extremely important that the distance between the stove and the hood corresponds to the following values:
- from 35 to 45 cm when working with an electric stove;
- from 55 to 65 cm – for gas burners.
In a real kitchen, it is customary to install ventilation units where operation will be not only efficient, but also convenient for the housewife. The distances indicated above are experimentally established values confirmed by years of practice. You can calculate them yourself, you just have to take into account a number of variables:
- kitchen area;
- planning features of the premises;
- approximate area of the cooking surface;
- performance and type of hood;
- growth of family members, housewives.
If you do not maintain the established distance and hang the unit too low, there is a high probability that the device will operate under constant heating conditions. And this is fraught with premature failure of the faithful assistant. In addition, if the hood is installed too low above the electric stove, it will simply be inconvenient to use.
Video on installing an inclined type unit
Based on decades of practical operation, experts have formed their own recommendations regarding the height at which to hang the hood. There are unspoken rules for units placed above the base of a gas burner. They are indicated in the user instructions or installation recommendations that are attached to each model of the exhaust unit.
Here are just a few examples:
- Products from Bosch are traditionally considered to be among the highest quality on the market. The average power of the units is 650 m3/h. It is better to hang a hood of the specified capacity at a distance of 65 cm from the surface of the burners.
- Solutions produced by the Shindo brand are characterized by reliability and availability. For the most part, we are talking about a horizontal device of medium power. The average productivity of the devices is 450-500 m3/h. The kitchen hood is mounted at a height of 75 cm above the electric stove. The device should not be located above the open flame of the burner.
- The products of the domestic brand Saturn cannot boast of high power, but at the same time, a productivity of 240-300 m3/h will be enough for the average housewife. The recommended distance to the hood is 75-80 cm from the burner.
Which products to buy and from which brand is up to you to decide, but in terms of installation height, the units are almost identical. It should be noted that the distance from the surface of the gas stove to the hood is determined according to a number of important requirements:
- ease of use;
- leveling the likelihood of spontaneous combustion (especially if there are tables with other household devices nearby);
- effective intake of dirty air over the stove or stove.
Taking into account the listed requirements, it can be argued that the safest and most acceptable distance from the hob to the hood is within 70-90 cm.
Which one is best to choose?
There are many brands of kitchen hoods on the market - Hansa, Krona, Hephaestus, Elikor and many others. Existing models differ in design, size, operating principle, and installation method. When deciding which hood is best suited for a particular kitchen, we are usually guided by the following criteria:
- type of exhaust system - recirculation, flow (direct-flow) or combined (can operate in both recirculation and direct-flow system modes);
- its appearance, how much it fits into the overall design of the kitchen set;
- the material from which the equipment is made - it affects both the appearance of the device and its durability;
- such technical characteristics as the power of the equipment and the noise level it produces during operation;
- dimensions - it is strongly recommended that the dimensions of the system neck do not exceed the dimensions of the surface of the slab, and in addition, the air ducts must fit into the existing ventilation openings;
- installation method, on which the installation of the hood significantly depends - there are wall-hung, built-in, corner, telescopic, island models, which are attached in different ways.
There are exhaust equipment with push-button, mechanical and touch controls. Different types of controls do not provide any advantages; their choice is a matter of personal preference of the user.
Carrying out measurements and calculations
As you can see, it is quite difficult to take into account all the factors and make an accurate calculation. But you need to try not to regret purchasing a device that cannot cope with the tasks assigned to it.
There are criteria developed by manufacturers:
- A device with a capacity of 200 to 300 cubic meters. m/hour is suitable for those who cook little or have a small kitchen. That is, 1-2 burners are constantly used.
- Hood with a capacity of 300 to 400 cubic meters. m/hour is recommended for families of 3-4 people, or for a medium-sized kitchen, as well as where 2-3 burners are used daily.
- A device with a capacity of 500-600 cubic meters. m/hour will clean the air in a large kitchen and cover the needs of a large family. Such a hood will be indispensable if the stove is actively used every day and all burners are turned on (there may be 5-6 of them).
For approximate indicators, you can use special tables or data from manufacturers.
To quickly calculate productivity, two values are used: kitchen area and ceiling height. These approximate data can be multiplied by the slab coefficient
If the kitchen has non-standard dimensions or its area does not exceed 40 cubic meters. m, then calculate this value for a specific room by simply multiplying the length of the kitchen by its width and the height of the ceilings. The result must be multiplied by 10 or 12
The numbers 10 or 12 are constant coefficients based on sanitary standards. They mean that the air must be cleaned every 5 minutes, that is, 10-12 times per hour. Therefore, productivity exceeds the volume of the kitchen by at least 10-12 times.
Sometimes this coefficient increases due to the frequency of switching on and the characteristics of the stove used. For example, for a gas stove with large burners that are turned on every day, this number can reach 20. For an electric stove, you can take a factor of 15.
If the stove is non-standard and is cooked daily, then to calculate productivity it is worth using additional coefficients for the number of floors, for the stove, for smokers. But you should not purchase a device with a large power reserve
For example, the length and width of the kitchen are 2 and 3 m, respectively, and the ceiling height is 2.5 m.
Therefore, the estimated productivity will be: 2 * 3 * 2.5 * 10 = 150 cubic meters. m/hour.
This figure can be multiplied by the number of storeys factor of 1.3. It meets sanitary standards.
If someone smokes in the kitchen, then another 15% is added to productivity for each smoker of the total number.
The data obtained is correct for enclosed spaces. If the kitchen is not closed by a door, but is separated from other rooms by a passage, then another 30% of the received power should be added.
On our website we have detailed instructions for calculating a kitchen hood.
The next indicator is the height of the cook
It is very important that the hood does not touch your head and does not interfere with reaching distant burners or placing large pots
Therefore, before purchasing and installing, take measurements and simulate the process of working behind the stove. To avoid mistakes when taking measurements, remember that an inclined hood should be measured from the lowest point to the burners.
All straight hoods (dome or built-in) should be measured from the filters to the slab surface.
Experts recommend choosing inclined hoods for electronic, halogen and induction cookers. They do not require much space and do an excellent job of purifying the air.
You should also take into account the length of the hood. Determine how far it will protrude above the hob, how convenient it will be to cook and replace charcoal and grease filters, as well as wash the stove and reach distant burners.
All described factors affecting the distance must be consistent. Otherwise, there is a risk that the hood will not cope with its tasks. Even the most powerful device installed too high will not cope with all the impurities in the air. Or soot that has settled on the bottom of a hood that is installed too low may ignite.
A competent choice of installation height will extend the life of the hood and allow the device to work at full capacity with minimal costs. In the worst case, the device may not cope with its functions or simply burn out.
Installation of air duct for exhaust hood
Types of air ducts for kitchen hoods
Unfortunately, the hood will not be of any use if you do not install an air duct that is designed to remove air contaminated with combustion products to the street. Since the air is at room temperature, there are no special requirements for the structural elements. Basically, 3 types of air ducts are used:
- Corrugated air duct made of round aluminum . Its advantage is that it stretches to the desired length, while easily bending at any angle. Its disadvantage is that, under certain conditions, the operation of the hood can be noisy due to the fact that the surface is ribbed. In addition, such a surface creates additional resistance to air flow, and it is quite difficult to care for such a surface.
- PVC duct, also round in shape . To assemble an air duct of the required configuration, you will have to buy additional elements in the form of adapters, bends, angles and couplings. Since the inner surface of such an air duct is smooth, they operate silently, since they do not present any resistance to the air flow, and they are also easy to maintain. The disadvantage is that such an air duct, in the case of a complex configuration, takes up a lot of space.
- Rectangular plastic air duct . The material of manufacture is the same as in the case of plastic round air ducts. The rectangular section allows you to save space, since such an air duct can be hidden behind drywall, as well as behind other structures if saving space is a priority.
You should also pay attention to the fact that a corrugated air duct will cost less. The only problem is that if such an air duct is left open, it negatively affects the design of the room, which cannot be said about neat plastic structures.
Regardless of the model, the outlet of the hood is round, but this is not a problem, since adapters are sold and connecting such a hood to a rectangular duct will not be difficult.
Duct sizes
Round air ducts are available in three types - with a diameter of 100, 125 and 150 mm. As for rectangular air ducts, their choice is somewhat larger, which is presented in the table below.
Dimensions of flat PVC air ducts for hoods
When the question of choosing the type of air duct is raised, you should focus on the dimensions of the hood outlet. The cross-section of the air duct should not be smaller than this hole, otherwise the hood will not cope with its task and will work ineffectively. This is true for air ducts of any shape and configuration.
Methods for attaching corrugations to the hood and ventilation system
When using aluminum corrugation as an air duct, you need to think about how to secure it to the exhaust outlet pipe, as well as to other elements of the ventilation system. Firstly, you need to make sure that the correct size corrugation is matched to the hood pipe. If this is not done, then it will be difficult to implement it in any case. When the air duct is smaller, there is no question of connection at all, but when the dimensions are larger, this will most likely lead to deformation of the air duct, the appearance of air leaks and, as a result, ineffective operation of the device.
Attaching the corrugation to the grid on the wall
Basically, fastening is carried out using metal or plastic clamps. The best option is metal clamps, which can be easily removed if it is necessary to disconnect the air duct from the hood.
To connect the hood to the ventilation system, you will need a special ventilation grille with holes for natural air circulation when the hood is not working. If the air flow goes directly to the street, then a completely different ventilation grille is installed on the street. The ventilation grilles also have short pipes that allow corrugation to be attached to them. The main thing is to choose the right grille according to the size of the pipe. Fastening is also carried out using clamps.
Attaching the duct to the wall
In addition to air ducts, manufacturers have developed and produced special fastening elements in the form of clamps and latches. Clamps are used for fastening rectangular air ducts, and latches are used for fastening round air ducts. The distance between the fastening elements depends on the configuration of the air ducts, with a distance of about 60 cm considered optimal.
Methods for attaching corrugations
In the case of attaching a ventilation system to the ceiling, the fastening technology is the same, since the latches allow you to hold air ducts laid on any surface and in any plane. The corrugated aluminum air duct is attached exclusively using clamps, and it is necessary to monitor the fastening force, since the air ducts are thin-walled and easily deformed.
Installing a hood with your own hands: recommendations from experts
After a year, the device is cleaned of grease, scale and steam. This is an important step to prevent the device from catching fire during subsequent operation. Now you know how to install a hood in the kitchen yourself, without the help of specialists. There is nothing difficult about this event. The main condition is a responsible attitude at every stage.
By adhering to simple recommendations and safety rules, your home unit in the kitchen will serve you for several years, efficiently purifying oxygen. Believe me, you will succeed!
Consider the design of the duct
Photo: Public domain / Pinterest
To connect the hood to the ventilation duct, use flexible aluminum corrugation or rigid plastic pipes of round or rectangular cross-section.
The first option is cheaper and easier to install, since it allows you to lay the air duct at any angle without the use of additional fittings. The disadvantages of corrugation are an unaesthetic appearance, as well as high noise and a tendency to become overgrown with fat due to the ribbed inner surface.
PVC pipes look much more attractive, are less noisy due to smooth walls, and when choosing a rectangular profile, they are easily hidden under the ceiling. The price for this is a higher price, to which is added the cost of fittings for connections and turns.
Regardless of the material, for the most efficient and quiet operation, the cross-section of the air duct should be the same as that of the outlet vent of the hood, or minimally different from it. As a rule, this is 125–150 mm. Remember that reducing the diameter not only reduces performance, but also dramatically increases noise.
Types and general parameters of suspended hoods
Having studied the models of modern kitchen hoods, you have probably noticed that they may differ in installation principles.
Hanging hoods can be mounted both on the wall and on the ceiling, depending on which part of the room you decide to install the cooking area in.
The difference between a built-in hood and a suspended hood is also clear: most suspended hoods are attached to the ceiling and are not connected to the kitchen furniture, while built-in models will have to be adjusted to fit the dimensions of the set.
Important! One of the main features of wall-hung kitchen hoods is the possibility of installation in almost any area of the kitchen, since such equipment does not require complex communications: many models just need to be connected to an outlet.
The operation of such hoods can be based not only on standard air exhaust into the ventilation duct, but also on the principle of recirculation , in which the air is cleaned directly inside the exhaust structure under the influence of built-in filters. These filters can be aluminum, acrylic, steel, and internal - carbon: they neutralize unpleasant odors in the kitchen.
To find a suitable model, it is important to understand the types of hoods with a hanging mounting system.
Firstly, such hoods may differ in power and method of operation: single- and dual-motor mechanisms are available for sale.
Depending on the installation principles, they may differ in shape. For example, hoods built into furniture most often have a small rectangular shape.
The most popular are flat hanging hoods that save space. Hoods of this type do not have to be attached to the bottom wall of the cabinet: they can be installed independently.
Ceiling hoods for kitchens can also have different shapes. Among modern models, T-shaped exhaust devices are popular. Vertical kitchen hoods can also have a round, cylindrical shape and more complex designs.
Since not all suspended hoods are designed for installation at low heights, pay attention to studying the control mechanisms of such devices. Hoods can operate not only with push-button or touch controls , but also remotely , using a remote control or voice control.
Hoods also differ in their design parameters. Therefore, when planning your kitchen design, calculate in advance the free area for their installation. One of the most compact options - a 45 cm hanging hood - is suitable for both cramped and large kitchens, as it can be quite powerful.
It is more difficult to fit a suspended kitchen hood of 50 cm or more into the work area, especially since the maximum dimensions can exceed 0.9 m.
Remember! When installing a hanging hood in a cabinet, take into account the correspondence of the length and width of the equipment and furniture.
Both wall-mounted kitchen hoods and ceiling models are a fairly convenient and practical option: using this technique, you will not only be able to maintain the integrity of the design, but will also be confident in high-quality air purification in the room.
Attaching a wall or dome model to a wall
Although these two models differ in appearance, they are attached to the wall. They have four holes on the back wall of the case - two on the left, two on the right. Many manufacturers provide their products with a mounting template on which the locations of the fasteners are marked. All you need to do is lean the template against the wall and move the marks. If there is no template, measure the distance between the holes and transfer it to the wall. If you have an assistant, you can ask them to hold it at the selected height and make the marks yourself.
The hood must be attached to the wall through the standard holes in the housing.
Then everything is simple: use a drill to make holes of the appropriate size, insert plastic plugs for the dowels, then hang the hood on the dowel-nails. Naturally, we check that the installed equipment is horizontal.
This method is good if the wall is smooth and nothing interferes. Often there is a gas pipe running next to the stove, which makes it impossible to hang the hood close to the wall. In this case, you can nail wooden blocks to the wall, and attach the hood to the bars. This is a simple option, but not a very good one - the bars become covered with soot and are difficult to wash.
The second option to install the hood behind the pipes is to use a hairpin screw (the second name is a plumbing pin). They have a thread for screwing into the wall, a smooth part, which makes it possible to carry the hood some distance from the wall, and a smaller thread with two nuts, which will be used to secure the body. There are these studs in different sizes, choose which one you need, but all the nuts are made for a bit or an octagonal wrench.
How to install a hood on a wall if a gas pipe is in the way or the wall is uneven
This option for mounting the hood is universal, simple to implement, and reliable. It is also more convenient to clean - the metal is usually stainless, and it is easy to clean it from deposits.
What is needed for installation?
To secure and install the exhaust system you need:
- corrugation - for venting air into the ventilation duct.
Advice: it is better to choose plastic corrugation rather than aluminum. It looks more beautiful and works silently
- clamps (2 pcs.) - to install the corrugation on the hood;
- grill for ventilation shaft;
- screwdriver (for a wooden wall);
- hammer drill or impact drill (for a concrete wall);
- hacksaw and sandpaper (for cutting and processing pipes);
- jigsaw - for making a hole in a cabinet or shelf (if the system is built-in);
- level, tape measure, marker - for marking;
- knife;
- screwdriver;
- sealant (silicone) – for sealing cracks and joints between structural elements.
Be sure to: carry out all work wearing gloves and goggles!
Advantages
Indispensable kitchen workers have many advantages that are unlikely to be appreciated by the prim kitchens of glossy interior magazines, but are noticeable in ordinary kitchens where ordinary people live and work.
- A modest pricing policy allows people with different incomes to buy hoods.
- This type of cleaning units is characterized by accessibility and ease of installation. To install them, you do not need to buy additional tools and equipment or build a complex structure of pipes and air ducts. All you need is a household drill and mounting anchors. With their help, you can hang the hood above the hob or above the table in a few minutes.
- Hanging hoods operate quietly, you can hardly hear them. Single-engine units produce background noise in the region of 40-45 dB and this figure was recorded at maximum load on the device. This indicator is comparable to the soft sound of music, or a quiet conversation between interlocutors at a distance of no more than five meters. Double-motor hoods make a little more noise, however, their sound level indicators are within normal limits. A wide range of products allows you to choose the most suitable hood option for a particular case.
- Well-known manufacturers of hanging hoods, such as Bosch, Krona, equip their products with reusable filters that are easy to clean. They do not need constant replacement, and at the same time they perfectly clean the air from soot, burning, drops of fat, and moisture. Moreover, many models allow the additional installation of carbon filters designed specifically to remove unpleasant kitchen odors.
Installation stages
The entire installation and connection process can be divided into several stages:
- First you need to install the hood in the right place. This involves physically attaching it to a wall or ceiling.
- The second stage is connecting to the power supply. If there is an outlet nearby, there shouldn't be any difficulties. Otherwise, you will have to pull the wire from the nearest source; you can use a carrier (extension cord) as a temporary measure.
- The last stage is relevant only for models with exhaust air discharged into the ventilation system. At this stage, the air duct is connected and discharged into the ventilation duct.
It’s easy to properly hang a hood in the kitchen with your own hands
About choosing the right hood
When making a choice, you should pay special attention to such parameters as device type, size, performance, control methods, operating modes and the presence/absence of filtration.
If you don’t want to pay extra for installing a hood or punching holes in the wall, then the simplest option is a 60 cm suspended kitchen hood.
Advice! Ideally, the size of the hood should be larger than the width of the hob surface. This will ensure the ability to draw in all harmful fumes, and accordingly, will increase the efficiency of the system.
If you are limited in size, then there are 50 cm suspended kitchen hoods. Ideally, with a slab width of 50-60 cm, the size of the hood should be 90 cm.
Ideal ratio between hood and stove size.
Operating mode
When choosing a hood, you should ask the sellers in what mode it can operate. This refers to the filtration mode (like a suspended one) or the exhaust mode, in which the air is removed outside the kitchen.
At the moment, there are a large number of modern hoods that can operate in two modes at once.
It is believed that only exhaust mode can provide 100% air purification. Naturally, because the air is simply removed from the room.
However, as mentioned above, filter devices can also be quite effective. Therefore, when you decide to purchase a filter hood, immediately buy cartridges so that you can change them as needed.
Noise level
Everyone knows that noise levels are measured in decibels. For hoods, a noise threshold of 40 decibels is set, which is comparable to soft music.
Since the housewife spends an impressive amount of time in the kitchen, the noise level is one of the decisive factors when purchasing. Studies have shown that very loud noise produced by a range hood has a depressing effect on people.
Advice! Hoods with two fans make less noise. You should also pay attention to the motor: the more powerful it is, the quieter the device operates. Choose a hood with a performance reserve of 1.5-2 times higher than what your room requires, since the noise from the device operating at full power increases.
Hood efficiency
The hood efficiency must be 100%.
The efficiency of any hood depends on the following factors:
- From the air pressure created by the engine.
- Operating mode.
- Structure and material of filters.
- Performance reserve. For example, the most effective mode allows you to clean the air in extreme conditions (when food burns).
- Hood dimensions. Naturally, a larger hood area provides greater air capture, and accordingly, this parameter plays a key role in operating efficiency.