Gardeners are constantly looking for ways to process their crops as quickly as possible. We recommend that you simply buy a Neptune rotary juicer from the store for 4,400 rubles plus delivery. If there is an inventive spark burning in your chest and there is no shortage of enthusiasm, we will tell you how to make a juicer from a front-loading washing machine. The description was taken from the Internet, revised in accordance with our considerations. We hope to solve the problem a little more advanced. In particular, we will consider in detail the design of the juicer.
Advantages of a homemade juicer
A juicer constructed from an old automatic washing machine or activator-type machine is easy to use. A grater is installed at the bottom of the tank. Raw materials are poured through a wide hole capable of passing a whole apple or other large fruit. It is crushed and the juice is squeezed out.
The advantage of a homemade device is that it allows you to make juice in large volumes. The drum of such a juicer is much more spacious than store-bought equipment . If you add a powerful motor to it, then within an hour you can get up to 20 liters of juice.
Design advantages
If you have an old, unwanted washing machine with a working spinner, consider yourself putting it to good use.
The essence of a standard juicer is that fruits and vegetables are thrown into a special hole. It should be wide enough for a whole apple, pear and other fruits. The fruit then goes into a centrifuge, at the bottom of which there is a grater. After grinding, the juice is squeezed out.
The advantages of a washer as a juicer are that the volume of its drum exceeds the capacity of conventional appliances. And if you use an engine that produces 1500 rpm, then you can quickly and efficiently chop the fruits and get 10-20 liters of juice per hour.
Juicer from an activator type machine
To construct a juicer, you need an Oka washing machine or a Sibir washing machine. Other brands with a spin cycle and an activator installed at the bottom of the tank are also suitable.
Procedure:
- remove the activator and shaft;
- install a new threaded shaft;
- fasten three knives on the shaft with nuts, rotated 60° (all materials must be made of stainless steel);
- install a plug on the drain hole;
- Place a wire mesh up to 0.25 mm thick with a 1.5 mm cell in the centrifuge so that it overlaps the sides of the drum by 4-5 cm;
- close the hole in the rubber cap that comes with the kit with a plug and place it on the bottom of the centrifuge;
- Wash the internal parts of the machine, hoses, and pump with a baking soda solution.
The resulting juicer will work longer than the washing machine programs allow, so the time relay should be turned off or the switch should be blocked after starting.
How to get juice:
Wash fruits or vegetables and place small quantities into the washing tub, in which the knives rotate. Grinding lasts from 20 to 30 minutes, depending on the variety and ripeness of the fruit. The resulting liquid puree is placed in small portions (up to 3 liters) in a centrifuge. If you put more, it will be thrown out during operation. Turn on the juicer and squeeze the juice out of the resulting mass. After a few minutes, remove the mesh with the cake and shake it out.
Advantages of the device:
- up to 12 liters of juice per hour;
- no need to peel and cut berries and fruits;
- constant presence is not required.
Depending on the type of raw material and the duration of grinding, the juice will contain some amount of pulp. To get rid of it, just pass the liquid through a filter or let it settle.
Preparing tools and materials to create a juicer
To build such a device, you will first need an old washing machine, perhaps even one that is out of order. The main thing is that the motor is working and the drive mechanism is in working order.
In addition, you will need: wooden blocks for installing the device, metal mesh, a set of bolts with nuts, rubber plugs, a piece of clean hose for draining the juice and a large container for the finished product.
Tools you will need: a set of screwdrivers, wrenches, welding, an angle grinder with a metal disc, a drill and a hammer. Metal scissors will also come in handy.
Front Loading Juicer
Making your own juicer from a front-loading machine is a little more complicated and takes more time.
Required materials and tools
To make a homemade juicer, you will need:
- Belt-drive front-loading washing machine;
- two metal meshes measuring 300x60 mm;
- bolts and nuts with a diameter of 3 mm;
- juice bowl;
- rubber plugs;
- drain pipe.
The following tools are also required:
- a set of slotted and Phillips screwdrivers;
- set of wrenches;
- Bulgarian;
- welding machine;
- pliers;
- drill;
- hammer;
- metal scissors.
Preparing the washing machine
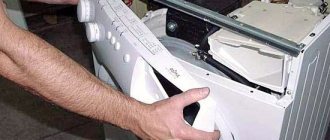
The machine should be placed on its back side on special bars and securely fastened. You must first remove all interfering parts. This is a control module, pump, water intake valve, liquid level sensor, drain filter.
Next you need to disassemble the tank, remove and clean the drum. Necessary:
- remove the drive belt from the pulley;
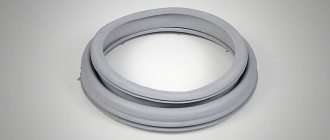
- open the hatch, bend the rubber, remove the clamp, then the cuff;
- Unscrew the fasteners and remove the shock absorbers;
- remove all elements that interfere with removing the tank;
- remove the tank and disassemble it by unscrewing the bolts and releasing the latches. If it is plastic, cut it into two halves;
- clean the tank and drum from rust, scale and other contaminants;
- plug all holes except the drain with rubber plugs;
- weld all small holes and drill a large number of holes of smaller diameter around the perimeter;
- Reassemble the tank, install it in the car body, install shock absorbers and sealing rubber.
Making a juicer
After the body is prepared, there are a few simple steps left to complete.
- The holes on the drum body are very large, which means that instead of juice you will get fruit puree. You need to take the prepared mesh and attach it with screws in a circle inside the drum. If necessary, it can be detached for cleaning.
- The ribs need to be sharpened; they are necessary for grinding raw materials.
- Attach the pipe to the drain hole.
- Install the engine.
How does a juicer work?
Before starting, you need to check the stability of the structure and make sure that the drum rotates evenly and without delays.
Next, wash the fruit and load it inside the machine. You should not fill the drum completely, because... the raw materials will not be crushed, and the structure may be damaged. Firm fruits should fill the drum halfway. Soft materials can fill most of the drum.
Place a container for juice under the pipe. Now you need to start the engine in spin mode. Rotating in the tank, the fruit will break, and the resulting porridge will flow through the pipe into the bowl. The raw materials do not need to be washed or cleaned. In an hour of work you can get up to 12 liters of juice.
Homemade centrifugal juicer
A large harvest can not only please, but also greatly puzzle the summer resident. If you have parts from an old automatic car lying around in your garage and have basic skills in working with metal, then making a juice press at home will not be difficult.
To work you will need:
- rivets;
- bolts;
- centrifuge with tank;
- pulley with belt;
- 1.1 kW motor;
- stainless steel pipe 100 mm;
- pipe 20 cm;
- stainless steel mesh with 1 mm cells;
- 2 mm metal sheet and pieces of tin;
- thin rubber;
- steel corners.
Much depends on the existing tank, its size, and available means. The main purpose of remodeling is to use unnecessary parts. The desire to improve and refine the design can be realized using purchased parts.
Step-by-step instruction:
- Remove the tank from the housing, remove the heating element and all related elements. Descale with vinegar or lemon essence.
- In a tank separated from the centrifuge, rivet all the slots with pieces of sheet metal of a suitable size. Leave a single hole with a diameter equal to the pipe for draining juice.
- Prepare a grater for chopping fruit. Take a sheet of metal and cut out a perfectly even circle with a diameter 20 cm smaller than the bottom of the centrifuge. Cut a gasket from thin rubber, place it between the bottom and the grater, paying special attention to the symmetry of the ring. Strengthen the structure with another circle of metal placed under the future grater.
- Drill 5 mm holes in the steel sheet in 15 mm increments. Use a punch to give the holes the shape of teeth, as on a regular food grater.
- Bolt the grater, metal reinforcement and gasket to the bottom of the centrifuge. The nuts should be on the outside; it is good to reinforce them with washers so that the bolts do not unscrew during rotation.
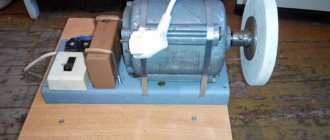
- Screw the pulley with the belt. Install and connect the motor. You can use the original motor if it produces at least 1500 rpm. At lower speeds, you should take any more powerful engine.
- The centrifuge already has holes for filtering the pulp, but they are too large and the juice will be cloudy. To fix this, there are two ways: riveting a stainless fine mesh to the inside of the drum or using a clean filter cloth each time. If you lay out the mesh, then attach it as best as possible to the centrifuge, absolutely motionless, without protruding edges and corners. With fabric everything is simpler; each time before processing fruit you need to soak it in warm water, distribute it over the drum, turn on the device, and the centrifugal force will fix it to the walls.
- Secure a 100 mm pipe above the grater at a distance of 4 cm using bolts and metal corners. It’s better to move the pipe from the center closer to the sides to make it more convenient to get the pulp out without having to disassemble the entire structure.
- To keep the unit stationary during operation, it should be installed on a frame welded from metal corners. If this is not possible, a rubber tire will dampen vibrations and provide relative stability.
- Attach the pipe to the tank to drain the drink.
Video on how to do everything yourself:
Most often, this juicer is used for apples, pears, and carrots. It is better than a simple apple chopper in that it produces absolutely pure juice in a short period of time, without requiring an additional press. When working with grapes, you cannot do without a press and chopping due to the peculiar structure of the berries.
Automatic washing machine and rotary juicer
What you need from a washing machine
Typical domestically produced rotary juicers operate at a maximum of 3000 rpm. The speed is enough to compress the pulp by centrifugal force on the mesh walls of the centrifuge. Fruits and vegetables are thrown inside through a special spout to serve the fruit. It is designed to be large enough to allow whole apples, carrots, and beets to pass through. At the bottom of the horizontal centrifuge there is a grater in the form of a circle. Engaged in grinding fruits to pulp, which is subsequently squeezed out.
The faster the rotation and the larger the radius of the centrifuge, the more intense the process. Typical juicers will not exceed the diameter of a washing machine drum; a motor or gearbox will need 1500 revolutions (see below). This is normal operation during spinning; the mechanical part will not be damaged.
We choose a narrow model of a belt-driven washing machine. Modern direct drive will not suit you. The dimensions of the drum directly depend on the depth of the washing machine. The diameter remains almost unchanged, the height of the walls will be smaller. When we place the mechanism vertically, the low setting will ensure a modest lateral load from possible distortions on the bearings and seals. Consequently, the longer the homemade juicer from the washing machine will last. An apple juicer made with your own hands will require the following sacrifices from the machine:
- Drum.
- Tank (casing).
- Belt pulley.
- Belt.
We remove the mechanical part from the washing machine along with bearings and seals.
The question is, why not use the original motor. Let's answer - if you can set it to 1800 rpm, the option is ideal. The pulley will have to be removed from the original engine.
Press assembly
The next step is to assemble the prepared parts into a single structure. First of all, we pay attention to the drum - it needs to be “modified” and turned into a fruit receptacle. The sequence is:
- we fix the mesh on the surface of the drum (between the previous “blades” and on the back);
- We fix the mesh with screws (it will work like a shredder);
- straighten the fasteners from the rib punches and sharpen their edges (they will become “knives” and will be useful when cutting fruit).
The drum turned into a fruit receptacle. Next, we extend the life of the juicer by improving the shock absorption system. You should additionally secure the tank with two springs, screwing them to the wall of the housing . This will help dampen the vibration emanating from the cylinder due to the action of centrifugal force spreading horizontally. It is worth understanding that the position of the washing machine has been changed, the unit is turned on with the hatch up, which will disrupt the initial balancing. At the “finish” we set up the drive mechanism - we connect the engine to the electrical network. To do this, find a power cord with a socket and connect it to the motor terminals
Washing machine drum press
The design does not require a motor, electricity or complex parts. The bottom line is that a centrifuge is a sieve made of stainless steel - an inert metal ideal for working with tartaric acids.
- Remove the centrifuge from the tank, clean and descale it. Cut off the inner edge.
- Weld a frame and a stand for the press from a metal corner. Drill a hole in the frame for the screw. Weld the nut to turn the screw.
- Make a tray for draining juice from a sheet of metal or find a ready-made option.
- Cut a circle out of metal along the diameter of the tank and weld it to the screw.
By turning the screw, the press lowers and presses on the berries; the liquid comes out through the holes in the tank, collects in a tray and is poured into a suitable container. This allows you to squeeze the juice yourself without effort and in large volumes.
Instructions on how to make a juicer at home
You can make your own juicer from any automatic washing machine - with front or vertical loading. The main thing is that there is a belt drive, since a direct drive model will not work.
If you have a front-loading washer, you will have to place it on its back, with the hatch facing up.
Preparing for work
First, remove from the machine body all the parts that are no longer needed: pump, pressure switch, intake valve, drain filter and control panel.
Pre-prepared drawings and drawings will help make the work easier. This way you can perform all the steps sequentially, referring to the diagram.
Prepare the necessary details:
- two metal meshes measuring 30x6 cm;
- bolts with nuts 3 mm;
- utensils for collecting juice;
- drain pipe;
- rubber plugs.
You will also need tools:
- screwdrivers and wrenches;
- Bulgarian;
- welding machine;
- drill;
- pliers;
- hammer;
- metal scissors.
Before putting the car down, prepare the support bars on which it will be secured.
Prepare the body for refurbishment
How to do it:
To create a juicer at home, it is advisable to take a stainless steel drum. However, a plastic drum will also work.
- All holes in the drum need to be sealed by welding because they are too large.
- Drill many small holes around the perimeter of the drum.
- Now put the tank back together by screwing in the screws. If the tank was non-separable, you need to prepare holes for self-tapping screws in advance.
Place the tank back into the body, return the sealing rubber and shock absorber springs to their place.
Modify the drum
Since to make the juicer yourself you will need most of the parts from the washing machine, it will cost you almost free. But in order for the drum to become a full-fledged chopper for apples and other fruits, it needs to be modified.
Make a grater. The fact is that the holes located on the surface of the drum are too large. They will turn the fruit into puree rather than juice. Therefore, take the prepared mesh strips and install them in a circle between the ribs of the drum. Secure the mesh in place with small screws. If necessary, you can remove the mesh and clean it.
A rib punch, which needs to be further sharpened, will help you chop fruits and vegetables. Don't forget to attach a pipe to the drain hole. The design is ready, all that remains is to connect the motor.
Since the control panel is removed when not needed, you will have to connect an additional switch.
To connect the motor correctly, you need to follow the electrical diagram. We have already described this in other articles, so watch the video on the topic: