Design of the device and how it works
The MK micrometer belongs to the category of measuring instruments designed for high-precision measurements. High measurement accuracy is ensured by the design of the instrument in question. The main components of this measuring device include:
- A bracket or bow having a C-shaped design
- The stem is the measuring part on which the scale is located
- Working part consisting of a heel and a spindle
If you pick up a micrometer for the first time, the question arises of how to use it correctly. After all, although the device has a simple design outwardly, when trying to measure something, many difficulties arise. To make correct measurements with a micrometer, you need to understand its structure and operating principle in detail.
The operation of the meter is to move a movable screw, which is connected to the measuring axis. Moving the screw contributes to its deviation from the zero mark. To identify the dimensions of a part, there is a scale on the stem of the device, the division value of which is 0.5 mm, which depends on the accuracy of the micrometer.
To understand how to use a micrometer, you need to learn how to read the scale of this instrument. As with the caliper scale, taking measurements with a micrometer requires an appropriate approach. For this purpose, the device is equipped with two scales:
- Fixed or main - located on the stem, and is also called circular. The fixed scale has markings, the division pitch of which is 1 mm between large marks and 0.5 mm between large and small
- Movable or rotating (vernier) - fractions of a millimeter are calculated. To clarify the size of the part, you will need to add up the results obtained on the moving and fixed parts
This is interesting! The moving drum has 50 divisions, and one revolution corresponds to a value of 0.5 mm.
At the end of the instrument in question there is a ratchet, which is designed to prevent damage to the part being measured. When the movable spindle comes into contact with the part being measured, the ratchet rotates. This scrolling is a signal that measurements can be taken. Before you learn how to measure with micrometers, you need to understand their types. It is necessary to know the types of micrometers in order to select a tool for the appropriate measuring work.
Types and types of micrometers and how to choose
A micrometer is a universal instrument designed for measuring linear dimensions by the absolute or relative contact method in the area of small sizes with low error, the conversion mechanism of which is a screw-nut micropair.
The micrometer is mainly used to measure external dimensions with high accuracy. In general, it is divided into several main parts and consists of a rigid bracket, on one side of which a fixed heel is mounted, and on the other there is a movable measuring rod. The rod moves by rotating a micrometer screw (hence the name of the instrument). Up to 300 mm are available with a measurement range of 25 mm, more - 100 mm. The high quality of manufacturing of the microscrew allows you to take dimensions with an accuracy of 0.01 mm to 0.001 mm. The most common type is smooth MK micrometers, but in addition, many special types are produced for highly specialized work.
According to GOST 13762-86, storage and transportation of micromeasures is provided at all stages of operation in a special case or case; at the stage of transportation to the place of sale, storage can be carried out in packaging.
To obtain accurate readings, you need to know how to use a micrometer correctly and in what area it will be used - this will help you choose the best option. The fact is that a micrometer is a very precise measuring device, and its incorrect operation will inevitably lead to an increase in measurement error. Firstly, you should only use a micrometer in warm rooms (20±10°C), and if you brought it from the cold, you need to wait some time until the temperature of the instrument is equal to the ambient temperature. Then you need to check the micrometer is set to zero.
In general, GOST 6507-90 stipulates that micrometers can be used at ambient temperatures from 10 to 30 °C and relative air humidity of no more than 80% at a temperature of 25 °C
In models with a measuring range of 0-25 mm, the measuring surfaces are brought together; in other models, you need to use a special setting measure, included in the kit, to set the measuring surfaces to the minimum position (for example, for a range of 25-50 mm, the length of the setting measure will be 25 mm, for 50-75 – 50 mm, etc.). In this position, it is checked whether the micrometer reading device shows zero. If not, calibration needs to be done. To do this, in mechanical models, the included key is used, which allows you to turn the drum and align the zero line; in electronic models everything is simpler - you just need to press the reset button to zero. After setting the micrometer, you can begin measurements.
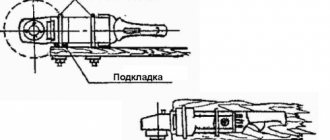
During work, to bring the heels together with the measured size, you need to use a special mechanism provided in the design that normalizes the clamping force - a ratchet or clutch. This allows you to always take measurements with the same force, avoiding over-tightening, which is certainly important to ensure the same readings. Also, during measurements, you need to hold the micrometer by a special insulating plastic pad located on the bracket so that heat from your hands does not affect the values.
According to the method of taking readings, all manufactured micrometers can be divided into the following groups:
Mechanical micrometers
The most common type, dimensions are taken using the vernier drum used in the design. Allows measurements with an accuracy of 0.01 mm. There are scales on the stem of the micrometer head and the drum, which are used to determine the size. As an example, we can cite smooth micrometers MK, models MK-25, MK-50, MK-75, etc.
Electronic micrometers
A modern model that uses an electronic digital display to take measurements. The advantages are increased accuracy, up to 0.001 mm, and ease of use. In addition, they have the functions of setting to zero at any point, converting millimeters to inches, switching between absolute and relative measurements, and outputting data to a computer. The letter “C” is added to the designation of this type, so for smooth electronic micrometers it will be MKTs, and accordingly the models MKTs-25, MKTs-50, MKTs-75, etc.
Pointer micrometers
determined using the dial indicator present in the design. Among the representatives are sheet micrometers ML (models ML-5, ML-10, ML-25) and lever micrometers MR and MRI (models MR-25, MR-50, MR-75, MR-100, MRI-125, MRI- 150, etc.).
As mentioned, a wide variety of micrometers are available. For many types of work there is its own design, different from others. Features include the use of special shapes of brackets and measuring surfaces, additional mechanisms that facilitate work. Here are the main types of micrometers used today:
Smooth micrometers MK, MKTs
Universal type micrometer. The micrometer rod and anvil have smooth measuring surfaces; the reach of the clamp allows you to measure diameters on round surfaces. Available with mechanical (MK) and electronic (MCC) reference systems. Measurement range - 25 mm for models with an upper limit of up to 300 mm (MK-25, MK-50, etc. to MK-300), more - with a range of 100 mm (MK-400, MK-500, etc. .).
Lever micrometers MR, MRI
The design has a lever for heel retraction and a dial indicator for taking readings. Mainly used in mass production, when it is necessary to check the same outer size on a batch of parts. To do this, the micrometer is initially set to the nominal size, and then during operation, the deviation from it is determined using an indicator for each part. MR models are produced with a reading accuracy of 0.001 and 0.002 mm (MR-25-0.001, MR-50-0.002, etc.); MRI models - with an accuracy of 0.01 mm (MRI-25-0.01, MRI-50-0.01, etc.).
Sheet micrometers ML
Used to determine the thickness of sheet and strip material. It can be steel, plastic, glass, PVC film, etc. This type is characterized by a bracket with a long reach, which allows you to measure dimensions at a distance from the edge of the product. The division value is 0.01 mm. ML micrometers produced by KirovInstrument are produced with a pointer dial to simplify readings; for other manufacturers, the size is determined by the lined vernier on the micrometer screw. Models ML-5, ML-10, ML-25, ML-50 are produced.
Pipe micrometers MT
To determine the wall thickness of pipes and other rounded products. The peculiarity of this type is the shape of the fixed heel - it is made with a spherical surface. This reduces the contact patch with the product being measured and prevents the curvature of the surface from affecting the result. Several modifications of pipe micrometers are produced - this can be the “classic” version with a rectangular bracket and a rounded heel pressed into it; or the fixed part can be made in the form of a rod with a thickening at the end, which allows measurements to be taken deeper from the edge of the product. Available with an accuracy of 0.01 mm, models MT-15, MT-25, MT-50.
Gear micrometers MZ
Designed to determine the length of the common normal of gears. The measuring surfaces of the heel and movable rod of this model have wide measuring surfaces, at least 24 mm in diameter, which makes it easier to center them along the chord of the tooth. They are used for teeth with a modulus of 1 mm and have an accuracy of 0.01 mm. Models from MZ-25 to MZ-300 are produced.
Micrometers with MVM/MVU inserts
Allows you to measure the average diameter of threads. There are holes in the heel and the movable rod of the micrometer into which the specially shaped inserts included in the kit are inserted. They are standardly equipped with inserts for metric threads; upon additional order, they can be supplied with inserts for inch and pipe threads. Models are produced from MVM-25 to MVM-350.
Prismatic micrometers
Used to determine the outer diameter of a multi-blade tool. Instead of a fixed heel, an angle bracket with carbide plates is used here, forming a supporting prism. The following modifications are available: – MTI type – for a three-edged tool, prism angle 60° (models from MTI-20 to MTI-80); – MPI type – for a five-blade tool, prism angle 108° (models from MPI-25 to MPI-105); – MSI type – for a seven-blade tool, prism angle 128°34′ (models from MSI-25 to MSI-105).
Micrometers with small measuring surfaces MK-MP
The measuring surfaces are in the form of thin rods with a diameter of 2 mm. Used to measure grooves, recesses, and small parts. An electronic model MKTs-MP is also produced. Measuring ranges 0-25, 25-50, 50-75, 75-100 mm.
Spot micrometers MK-TP
They have an even smaller contact area, 0.3 mm. The measuring surfaces are shaped like pointed cones. The electronic model is designated MKTs-TP. Measuring ranges 0-25, 25-50, 50-75, 75-100 mm.
Micrometers with mechanical slider MKTSM
They differ from smooth MK micrometers by the presence of an additional digital slider that takes readings, which makes it easier to take values. Also, reading can be carried out in the usual way using a scale on the stem and drum. Models are available with ranges from 0-25 to 275-300 mm.
Micrometers for internal measurements (another name is micrometric bore gauges with side jaws)
This type does not have a bracket; instead, the body of the micrometer head has movable and fixed jaws that allow you to take internal measurements. Available in ranges from 5-30 mm to 275-300 mm.
Types of meters and their purpose
The types of measuring devices under consideration are classified according to such criteria as the purpose of the measurements. If there is a need to use the tool in question, the instructions are described in detail in the material. Anyone who is just about to purchase an instrument should know that they are different. For the given technical https://cylinder.com.ua/instrumenty/izmeritelnyy_instrumentological tasks, you will need to select a tool for taking measurements. If the device is not available, then you can buy a micrometer in the Cylinder. In addition to the different manufacturers whose models are presented in the online store, there are also many types of devices in the catalog, and in order to choose, you need to understand their classification.
- Glucose meter One Touch Select Plus (“Van Touch Select Plus”): advantages and disadvantages
What micrometers are there by type of indication?
The indicator or method of identifying instrument readings can be performed in different ways. Depending on the model of the device, they are of the following types:
- Analog ones are the simplest devices that many craftsmen have left over from Soviet times. Today such devices can also be purchased, for example, in the Cylinder online store. They have a simple design, which is the main and immediate advantage. Simplicity is reflected in the durability of the measuring tool. The advantages include the price, starting from 250 hryvnia in the Cylinder. There is also a drawback to analog micrometers - they are difficult to measure, but this can also be overcome if you learn how to operate the device
- Pointer, clock or lever - an improved model of analog devices, which in their design have an additional scale with a pointer indicator. This facilitates the use of the measuring microcontroller, since the readings are displayed on the scale by moving the arrow. Their disadvantage is that it is enough to drop the device for it to fail. Pointer devices are more expensive than analogue ones, so whether such a tool is worth buying depends on preferences
- Digital - these devices are the easiest to learn how to use, since the readings are indicated directly on the display. However, the main advantage of digital meters is not ease of use, but high accuracy, since they allow you to obtain information with an accuracy of hundredths and even thousandths of millimeters. At the same time, they cost 2-3 times more than switches, and also fail if dropped. It is rational to buy digital models only in cases where it is necessary to carry out measurements in large volumes, as well as when it is necessary to obtain results with high accuracy
- Laser - these are the most modern models, the work of which is related to the analysis of the laser beam. Using a special photocell, the difference in beam deflection is calculated, and the finished data is displayed on the display. They are used primarily in control and measurement laboratories, when maximum accuracy of the final information is important. They are practically not used in everyday life, as they are quite expensive and also require careful care.
If on analogue and pointer instruments the time for obtaining results depends on the user himself, since the readings are determined manually, then on digital and laser instruments this happens automatically. The automatic measurement time lasts a few seconds, and after that the user can use the information obtained for his own purposes.
What types of micrometers are there by area of application?
Micrometers belong to the category of highly specialized measuring instruments that have found their application in various fields where high accuracy is important. Depending on the parts that need to be measured, the devices in question are of the following types:
- Smooth - a common mechanical gauge used to determine the dimensions of round and flat parts. Typically used to clarify the exact diameter of a part, as well as its cross-section
- A gear gauge is a type of mechanical micrometer equipped with cone-shaped attachments that can be used to measure the width of a groove or the size of teeth
- Pipe meter is a highly specialized type designed for taking measurements of uneven and bumpy surfaces on pipes
- Thickness gauge - a meter for identifying accurate readings of the thickness of sheet materials
- Universal devices - have the function of replacing attachments, which allows you to use one tool to measure different types of parts. Their main disadvantage is that the ability to change attachments affects the quality of the measurements taken.
- Wire gauges are a highly specialized device, the main purpose of which is to determine the dimensions of wire parts, as well as balls from bearings
- Prismatic device - the instrument got its name due to its specific design in the form of a prism. A device is used to identify the diameter of the blade and knives
- Groove - has a special probe for measuring the depth of the grooves. The probe is recessed into a groove, the size of which must be found out, and the corresponding measurements are taken
- Threaded devices - there are special nozzles that are placed in the design of the threaded connector. One part of the nozzle has a sharp tip, and the second has a groove. The devices allow you to measure metric and inch thread types
- Double-scale micrometer - structurally has the appearance of a double micrometer, which is designed to clarify the dimensions of parts of complex shapes and structures
- Hot rolled gauges are a tool for measuring the thickness of rolled products as they pass through the tongs. The device is equipped with a special wheel, which has special markings
- Internal gauge - used to control the internal diameter of machined parts
Typically, of all types of devices, no more than two are used on the farm. Before using the instrument for measurement purposes, it should be calibrated. We will find out in detail what calibration is, why it is needed and how the meter is checked for accuracy of readings.
Micrometer definition
A micrometer is a device for making high-precision measurements; it is used in industry to make the most accurate measurements. This device has a small measurement error, it is about 2-9 microns.
There are many varieties of the device, which allows you to measure parts of various shapes and sizes with a micrometer. The micrometer has found wide application in industry, especially in the automotive industry, as well as in jewelry.
Micrometer calibration and accuracy
Before each use, the type of tool in question needs to be configured. This setting is due to the fact that the meter should be set for measurement accuracy. To understand whether the device is configured correctly, you will need to perform the following manipulations:
- Remove dirt and remaining parts from the surface of the sponges. For this, an exclusively thin sheet of paper is used, but not sandpaper or stone. The instructions for cleaning the surface of the micrometer jaws are as follows: first you need to place a sheet of paper between the jaws and bring them together, and then carefully and slowly remove it so that it does not tear
- Use reference samples to determine the accuracy of the readings. The reference sample is a rectangular steel piece on which its exact size is indicated. By installing this part between the jaws, the readings reveal a coincidence of measurements
- Checking serviceability - this applies to dial and digital meters. In pointer devices, the pointer may fail, and in digital devices, the battery may run out
After checking the instrument, you can begin measuring procedures. To measure a part with a micrometer, it is not necessary to contact specialists. You need to learn how to use this highly specialized device, especially if it is available on the farm.
Mechanical type micrometer
In most cases, mechanical micrometers are used for measurements. Its device consists of a handle and a recess, which houses the part that needs to be measured. It is a semicircle with a stand on which the micrometer screw is directed.
The handle must be adjusted to close the screw. When they close around the part being measured, they begin to rotate the ratchet for adjustment. After this, you can take readings on the scales that are applied to the drum and stem of the micrometer.
Read here: Instructions on how to use a theodolite - operating principle, device and step-by-step instructions for use
To record measured data or compare it with another part, some micrometers are equipped with a locking mechanism.
Instructions for using the tool - set the device to zero
To carry out the necessary measuring manipulations, the instrument should initially be set to zero. Setting the zero is necessary to obtain the most accurate measurements. Not many people know how to set the micrometer to zero, so here are the instructions:
- Instructions for use of the Accu Chek Active glucometer
- Clean the surface of the feet with a sheet of paper
- Bring the legs of the device all the way
- Tighten the fixing screw
- The marks on the scale must coincide with the zero mark
- If they do not match, then the stem must be adjusted using a special key. This tuning key is included with the tools.
The adjustment is carried out until the marks coincide with the zero mark. Only after this can you begin to carry out measuring manipulations. If the kit does not include a key, then to adjust the zero you will need to unscrew the ratchet fastening, then center the knurl until it aligns with “0”. To fix it in this position, you need to tighten the ratchet. After this, the device is ready for use, and you can move on to the learning stage on how to use a micrometer.
Learning to take measurements with a micrometer correctly step by step instructions
Difficulties during measuring manipulations arise not when setting the zero, but when reading the readings. Everyone can figure out how to fix a part and clarify its dimensions, but calculating the resulting dimensions requires an appropriate approach. Let’s find out in detail how the measurement procedure using a micrometer occurs:
- First, you need to understand that the fixed scale, which has a vertical location, is the main one. The second moving scale is additional, and it is needed in order to determine hundredths of millimeters. Knowing the basics, you can start taking measurements.
- The fixed vertical scale is divided by a straight line (zero line). The values that are below this line are the main ones. The marks above the line are tenths of millimeters, which are indicated after the decimal point.
- The values on the moving scale are hundredths and must be added to the resulting data that is above the zero mark
- Now let's start measuring. After fixing the part to be measured in the jaws of the device, a calculation should be made. First, the integer on the main scale below is found out. To do this, below is an example that will guide you to clarify the size
- From the first diagram you can see that first we specify the integer, which is equal to the value “9”. This means that the part has a thickness of 9 mm. Next, we find out the values after the decimal point, that is, hundredths
- We look at the upper scale of the fixed base. If there are no marks at the top after the whole number at the bottom, then you should immediately proceed to identifying the readings on the moving scale. In the figure this value is 0.36 mm. The result is that the value is 9.36 mm
- If on the fixed scale there is a line at the top after the whole number at the bottom, then 0.5 mm is added to the value. As a result, we get the following value: 9.86 mm
The calculation principle is simple and straightforward. The main thing is to understand the principle of measuring operations. If a pointer device is used instead of an analog instrument, then the principle of measuring manipulations has the following form:
- First, an integer is detected by the reading of the micrometer needle
- Then hundredths of millimeters are determined using a vernier scale
However, the easiest to use is a digital or electronic meter. It shows the results automatically after placing the part between the jaws. A digital micrometer allows you to calculate not only hundredths, but also thousandths of millimeters.
This is interesting! Pointer instruments have a regulator with which the needle is set to zero.
Example of using a micrometer
So let's look at micrometer measurement using a typical and common example. Let's say you need to measure a drill bit for metal. Even though the drill size is indicated on the shank of the part, there are always errors during production, so we need to determine how small or high it is.
First of all, it is necessary to move the end ends of the micrometer apart. This must be done by rotating the drum. Having spread the ends to the required sizes, little by little you begin to clamp the drill into the device. In this case, it is necessary to clamp not with a drum, but with a ratchet. As soon as you hear three clicks, stop and watch the readings.
Pay attention to the stationary part of the scale. It will indicate the rough size, since the division price here is 1 mm, so we look at the number of whole millimeters of the part (in our case, the drill). Let's say it's about 4 mm. Now, pay attention to the upper scale. It indicates a value of, for example, 0.5 mm. In this case, the marks on this scale are located between the marks on the lower scale. This is necessary so that it is convenient to look at values of 0.5 millimeters. So, for example, we get 4.5 mm.
Now, all that remains is to add up the value indicated on the reel. So, it will show us the value of hundredths of a millimeter. Let's say it points to a value of 17. That means we still have an extra 0.17 mm, so we add that value to 4.5 mm to get the exact value of 4.67 mm. The manufacturer indicates a value of 4.7 mm, so the error was 0.03 mm.
About the care of the measuring instrument
Devices differ not only in the indication of readings and the scope of their application, but also in such criteria as errors or accuracy, division value (division pitch), and also the size of the microscope. These are indirect parameters that must be taken into account at the stage of selecting a measuring device. The error affects the accuracy of the final readings, so the larger the value, the less accurate the result. The scale division value affects the principle of calculating measurements. Above is an example in which an MC is used that has a main scale of 1 mm and a vernier scale of 0.1 mm. The size of the tool affects the ability to measure the relevant parts, i.e. small or large.
Knowing the features, types and principles of measurements, the question of how to properly care for the instrument remains open. Its service life directly depends on the quality of operation and storage. It is recommended to lubricate the internal moving part of the MK with machine oil or grease. At the beginning of measuring operations, the sponges should be wiped and the device should be set to zero. It should be stored under the following conditions:
- How to use a tonometer correctly - step-by-step instructions
- Store in the special container with which the tools are supplied.
- It should be kept in a room with low humidity to prevent corrosion processes.
- Do not allow the device to fall, as it may be damaged.
Having considered the features of storing and operating a micrometer, it remains to decide where to buy micrometers. There are many options for this - go to a store or visit a catalog of online stores.
Where can I buy micrometers from manufacturers
If you prefer to buy from online stores, then there are many types of micrometer models in Cylinder. By visiting the Cylinder website, you can not only buy a micrometer at prices from manufacturers, but also learn how to use this difficult meter. The online store catalog is expanding every day, which allows customers to choose products from a large number.
It is necessary to mention several times the advantages that customers receive when purchasing micrometers and other products in the Cylinder online store:
- Prices - looking for prices in Ukraine lower than in Cylinder is simply useless
- Quality - we cooperate only with proven and reliable manufacturers and suppliers who provide a guarantee for their products
- Efficiency - we deliver orders quickly. On the day of order we form and send the parcel
- Opportunities - delivery is carried out by popular transport companies in Ukraine
- Comfort - the site has bonus programs, with which every purchase will become even more profitable and economical
Without a doubt, it is better to buy a micrometer in a Cylinder, so when choosing, you need to familiarize yourself with the technical parameters of the instrument. With a reliable measuring instrument, you can perform any measurement without any difficulty.
I got a micrometer several years ago, but rarely used it. The next time I used it, I caught myself thinking that the micrometer’s zero was set somehow crookedly. I went to the Internet... Ultimately, it ended with the fact that the micrometer, under the onslaught of the heroic force, became unusable, and the secret of how to set the zero on a Chinese-designed micrometer was carried away micrometer into the garbage chute abyss. But it’s bad to live without a micrometer, so a new micrometer was purchased, which, ironically, also had its zero zero. I dreamed about this ideal.
A new series has begun on how to set zero on a 0-25 micrometer! First, a video tutorial on working with a micrometer was found on youtube.com. Unfortunately, the engineers of Chinese thought optimized the device of Soviet engineers and the old tips for setting zero are not applicable. The despair and hopelessness of the situation, aggravated by thoughts about With the fall of my native currency, they began to persuade me to buy an expensive micrometer, but with a guaranteed zero setting. With this thought in mind, I continued my search and came across a thread on one of the forums https://www.chipmaker.ru/topic/57464/ where an unfortunate person like me bought a Kraftool micrometer, but it’s impossible to set it to zero. From there I realized that I needed to approach it outside the box and, using the advice, I set up my Kraftool micrometer, suspiciously similar to the micrometer from Matrix and similar Chinese products. So... At the Mitinsky radio market I purchased a LEGIONER set from Kraftool for 1000 rubles. At the same time, the seller had a very vague idea about setting up this device. Nevertheless, without losing hope, a piece of paper worth 1000 rubles (still in demand among sellers) was exchanged for a micrometer.
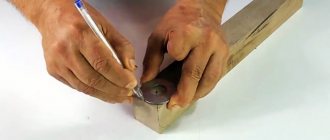
Micrometer set Kraftool M-0-25-0.01 disassembled: In order to disassemble the micrometer, you need to put the instructions aside and get creative.1. First of all, use the wrench from the kit to unscrew the friction head (ratchet). 2. Then unscrew the micrometric screw all the way.3. Using a special key, we try to move the stem with the scale. To do this, there is a special hole in the stem (No. 2 in the figure below):
Holes for servicing the micrometer We insert the key into this hole and try to turn the stem in any direction. It is fixed exclusively by a locking ring (No. 2 in the figure according to the complete set) and is held in place solely due to the force of friction. If it is not possible to move it, then we tighten the conical nut as much as possible and try to repeat the operation of moving the stem. As soon as this is successful, the stem can be easily scrolled further using a key or, if you apply additional effort, it is completely removed. Thus, the entire adjustment of these wonderful Chinese micrometers consists of turning the stem with the scale to the desired position. The entire “explosion diagram” of a 0-25 micrometer looks like this: Explosion diagram of a 0- micrometer 25 Micrometer with zero set.
There are times when it is necessary to accurately measure a small part: a cut from a wire, or, for example, the diameter of a drill. A regular ruler or caliper will not work here. In this case, a micrometer is used to take measurements. The device allows you to determine the size of a part with an accuracy of a thousandth of a millimeter. And if calipers are familiar to many craftsmen, not everyone knows how to use a micrometer, the instructions for use of which are not always clear. The device will be useful for both a novice craftsman and an experienced carpenter. Today in the Seti.guru review we will tell you what a micrometer measures, how to work with it, and also get acquainted with the purpose of devices for different purposes.
The required part is clamped in a kind of vice. Readings are taken by combining the risks using a combination of numbers on the scales and the true size is calculated.
Micrometer - what is it: a little about the history of the device
The operation of the device is based on a simple but effective mechanism - a screw pair. All measurements are carried out using the contact method. The part is clamped with a vice, and the rotated screw in the nut, the pitch width of which varies depending on the type of device, moves along the axis.
Important! The length of the working screw is usually no more than 25 mm, and micrometers are produced in various standard sizes corresponding to the range of measured lengths.
By the way, a screw pair for precise sizing was used back in the sixteenth century. In those distant times, it was included in the design of sights for guns, as well as geodetic instruments. The patent for the micrometer was received by the Frenchman Palmer in 1848. But it was not widely used. Only 19 years later, American engineers Lusnan Sharpe and Joseph Brown paid attention to the device and organized mass production of micrometers.
How does a micrometer work and what does it consist of?
Micrometer structure: 1 - heel, 2 - screw, 3 - stem scale, 4 - drum, 5 - bracket, 6 - clamping device, 7 - ratchet.
The device of a micrometer is very simple. All micrometer mechanisms are located on the bracket (5), and the heel (2) is attached to it. It acts as a stop during measurements. At the opposite end of the bracket, the stem (3) is rigidly fixed; it is a hollow cylinder. A scale is marked on the stem; its division is usually 0.5 mm. Inside the stem there is a screw pair and a fastening mechanism (6). The smooth part of the micrometer screw extends from the stem into the measuring area and ends in a flat measuring surface. The opposite part of the micrometer screw is rigidly connected to the drum (4). The drum has a scale that allows you to count hundredths or thousandths of a millimeter.
Important! For household measurements, micrometers are most often used, the unit of measurement of which on the drum is 0.01 mm.
A ratchet (7) is located at the outer end of the drum. It limits the torque applied by the human hand when rotating the screw, which helps avoid deformation of the part during measurements. The ratchet is also used during the preliminary adjustment of the element (we will talk about this in more detail below).
The principle of operation and purpose of the micrometer
The design of this tool consists of several main parts - a bracket, as well as a micrometric screw and nut. Also, the design of the micrometer has a pressed heel. As a result of the arrangement of these parts, a device is obtained with which accurate measurements can be taken.
Thus, the part that is being measured is covered by the end surfaces of the screw and the pressed heel. In order to limit the measuring force, modern models of micrometers are equipped with ratchets, therefore, during close contact of the surface of the part and the device, the ratchet rotates with a bang. So, after three clicks of the ratchet, you no longer need to turn the microscrew. Now - you should look at what the device shows. Thus, one of the scales of the device indicates the main size of the part, and the second scale located on the drum will indicate fractions of the sizes.
Here, it is also worth mentioning the propeller pitch. The most common steps are considered to be 0.5 and 1 mm. As for the division of the scale, in most cases, the drum contains from 50 to 100 divisions, with the help of which you can recognize the reading of 0.01 mm. This parameter is the most common, but there are also micrometers that have a reading of 0.005, as well as 0.002 and 0.001 mm.
Working principle of a micrometer
Micrometers may differ slightly in design, but the principle of operation is the same - the part is placed between the stationary heel of the device, after which it is secured with a screw that rotates in a threaded bushing.
When the device is firmly fixed, you will hear a corresponding click of the drum. Now you need to take measurements. As we have already found out, the micrometer has two scales - a fixed one on the stem (in mechanical structures, the division value is usually 1 mm), then we look at the data on the rotating drum scale (these divisions show fractions of a millimeter). There are 50 divisions on the drum, the microscrew pitch is 0.5 mm. A full revolution of the drum gives us a movement of the microscrew by 0.5 mm. Thus, by adding the dimensions from two scales, we obtain the exact size of the part.
Important! When working with the tool, special attention should be paid to the tightening force of the screw. Exceeding the permissible limit can lead to damage to the thread of the device or deformation of the measured object.
Types of micrometers
Let's consider the types of micrometers intended for both professional and domestic purposes.
According to display option
Based on the method of taking measurements, several types of micrometers can be distinguished, each of which has its own pros and cons.
Mechanical analogue, with static measurement scale
This is exactly the kind of device that can be found in an ordinary workshop.
For measurements, the part is placed in a measuring vice. The handle with the micrometer screw is rotated until it touches the part, then the mater takes readings according to the marks on the scales.
Analog micrometer for outdoor measurements
A huge advantage of a mechanical device is that it is not afraid of falls. After such an emergency, you only need to reconfigure the device. The downside is the relatively large measurement step.
Mechanical analog, lever
Lever micrometer SHAN MP-50.
The operating principle is the same as the previous model - but it is much more convenient to use. The value of the measured quantity is displayed on a dial indicator. This is useful when mass measurements are being made.
Mechanical digital
Digital mechanical micrometer LCD Electronic
Measurements are made using the same micrometer screw, but the readings are displayed on a liquid crystal display in real time. For this purpose, a precise displacement sensor is built into the mechanism.
Laser micrometers
Mitutoyo Digital Laser Micrometer
Measurements are made using the laser beam intersection method. With the help of optics, the beam turns into a plane. The receiving photocell analyzes the decrease in beam width and displays the data.
The advantages of such micrometers are undeniable:
However, there are also significant disadvantages:
By area of application
Micrometers are used to control accuracy in many areas. There are several types of devices, depending on the area of application.
Smooth micrometer
Smooth micrometer BMI
This is one of the most commonly used devices. They measure flat and round surfaces - the dimensions of parts and sections.
Micrometer - toothometer
Vogel M3 gear micrometer
Determines the linear dimensions of gear teeth and gears. Has special conical nozzles. As a rule, the kit includes a standard length measure.
Pipe micrometer
Pipe micrometer MT-50
They measure the thickness of walls in pipes. It is used at the stage of checking production quality, as well as wall wear. Moreover, special attachments help measure the thickness of even curved and uneven sides. The probe touches the wall pointwise due to its shape.
Sheet micrometer
Sheet micrometer ML-10
Allows you to accurately measure the thickness of sheet, film and roll products. The feed screw is set to a small scale range, so the measurement accuracy is very high.
There are two types of such devices:
- With flat attachments , for measuring narrow workpieces.
- With elongated jaws - for taking measurements of large area products, at a distance from the edge.
Micrometer with extended jaws Mitutoy series 118
Universal micrometer
High-precision universal micrometer K-6
The ability to change heads allows you to measure a wide variety of parts. However, due to the extra connecting nodes, the instrument error suffers.
Wire micrometer
Wire micrometer MP - 10
A highly specialized device used to measure the diameter of wire and balls in bearings. Due to this, the design is more compact.
Prismatic micrometer
MSI Prismatic Micrometer
Used to measure the diameter of a multi-edge tool. The support is made in the form of a prism.
Groove micrometer
Micrometer for measuring internal grooves
Sometimes you can find another name - depth gauge. With its help it is easy to measure the depth of recesses, grooves, defects in relation to the reference plane. The micrometer is mounted on the surface using a base plate, and the depth is measured using a probe.
Thread micrometer
Micrometer with attachments for measuring threads.
The scale can be either metric or inch. The kit includes special attachments for various types of threads.
Dual scale micrometer
Limit two-scale micrometer
Sets the maximum external dimensions of one workpiece. Used to calculate dimensions.
Micrometer for hot rolling
Micrometer for hot rolling.
With its help, you can measure the thickness of the product directly during production. A special calibrated wheel is used as a meter.
Micrometer - bore gauge
Helps measure internal diameters of products. Used to control the quality of manufacturing parts.
Micrometric bore gauge
Let us add that each group has its own pros and cons. For example, even a laser micrometer purchased from an unknown manufacturer can give false readings. When purchasing, be sure to check the accuracy of the device.
Main varieties
Depending on the length of the movable spindle (screw), micrometers are classified according to standard sizes. The instrumentation industry produces devices for measuring the size of parts in the ranges:
- from 0 to 25 mm,
- from 25 to 50 mm,
- from 50 to 75 mm,
- up to 500−600 mm.
A number of measuring instruments are additionally equipped with setting gauges to allow the device to be set to the “zero” position.
Micrometers have different types (according to GOST 6507–90) depending on their purpose and design (hand-held and tabletop).
The following types of measuring micrometers are widely used::
- smooth - designed to measure external dimensions;
- sheet - for the thickness of tapes and sheets, equipped with a dial;
- pipe - for the thickness of the pipe walls;
- wire - for wire thickness;
- micrometer heads - for measuring movement;
- Gear gauges - measure the normals of cylindrical gears, which is important for quality control during their production.
Read also: How to properly weld gate hinges video
In addition to those shown in GOST, other types of tools are used:
- lever micrometers - the operating principle of the device is based on the mechanism of measuring linear quantities using the method of comparisons and evaluations (MRI model);
- prismatic micrometers - for measuring the outer diameter of a tool with many blades (MTI, MPI, MSI series);
- micrometric bore gauges - for measuring the internal parameters of various parts (NM, NMI);
- groove;
- thread measuring;
- universal and others.
Electronic instrument
For high-speed measurements, instruments are designed with an electronic “digital” display, the value of the measurements taken is displayed on a separate display (for example, a modified micrometer MK - MKTs).
Modern micrometers with digital display have a number of specific advantages:
- The internal electronic filling of the device and digital display greatly facilitates the work associated with measurement and saves time spent on reading results. The indicator board of the electronic micrometer displays all received measurement data, and, as a rule, there are no problems with data acquisition.
- The tangible advantage of digital devices (GOST 6507−90) is the price of scale divisions of 0.001 mm and small values of the permissible error limit.
- Models of electronic micrometers facilitate the implementation of not only absolute, but also relative measurements.
- It is possible to set the device to zero from any position in the measurement range. This property is useful for technical control, product grading, and complex measurements.
- Sorting and quality control of parts can be really speeded up if the permissible limit values of the measured values are stored in the micrometer’s memory. Modern progressive models of micrometers have such functionality.
- The latest modifications of the devices have connectors that allow you to display statistical measurement data using a computer. This function is useful when analyzing a series of measurements and for maintaining test records.
- The versatility of the digital device when using is also a plus; it makes it possible to use both the metric and English measurement systems.
A noticeable disadvantage of digital measuring devices is unreliability in operation. All digital equipment requires special care. The mechanical model of the micrometer will not suffer much damage if dropped, although this will affect its ability to work in the future. With digital analogue, there is a risk of immediate loss of operation, repair costs or even replacement of the device.
An inexpensive digital micrometer from an unknown manufacturer may be subject to measurement errors. Such devices actually do not comply with GOST; however, often digital models manufactured in accordance with the standard have frequent malfunctions. The tool requires replacement after the warranty period has expired.
Laser micrometer
The laser micrometer is the latest universal measuring tool. The main difference between the device and mechanical analogues is the need for an autonomous power source.
The micrometer is used for non-contact measurements of linear quantities, determination of gaps, width, thickness, internal diameters in technological objects. Using a laser device, the levels of bulk substances are measured and the position of the object is monitored.
Due to its high cost, laser pressure gauges are not yet in great demand in private circles.
As one of the most high-precision instruments, the device has found its application in many areas of modern industry and construction. Electronic support makes such a device quite fragile and expensive and places increased demands on its careful operation.
How to Adjust a Micrometer and Check Calibration Accuracy
During operation, the micrometer scale periodically gets lost. Therefore, it is advisable to calibrate the device before each use. To do this, you need to completely tighten the screw and see if the zero mark on the drum coincides with the horizontal mark on the stem. If necessary, you can repair the micrometer yourself.
If these marks do not match, then you should twist the stem using a special key that is included in the kit.
To check the measurement accuracy of a micrometer with a measurement range of 25 - 50 mm, 50 - 75 mm and more, corresponding standards (gauge gauges) are used, the size of which is known to hundredths of a millimeter. The standard, which has a clean end surface, must be clamped without distortions between the measuring surfaces of the device using a ratchet force of several clicks. The obtained value is compared with the known one, and if necessary, the micrometer is adjusted.
Top 5 best micrometers of 2021
When choosing a reliable and convenient micrometer, it is useful to familiarize yourself with the rating of the most popular models. They are in demand due to their high accuracy, reliability and moderate cost.
Matrix 317255
An inexpensive device made in Germany and assembled in China, it is designed for measurements in the range of 0-25 mm. The error is only 2 microns, the device is optimal for repairmen, modelers and car mechanics. Made of high-quality enameled steel, equipped with thermal insulating linings on the bracket. The heel and tip of the screw are carbide and do not wear out even with frequent use of the device.
You can buy a Matrix micrometer from 840 rubles
Fit 19909
The purpose of a micrometer with an error of 0.01 mm is to use it in a home workshop or in production where laboratory accuracy is not required. Measures thickness within 0-25 mm, features reliable assembly and corrosion resistance. The drum and ratchet are covered with anti-slip grooves. The kit includes a calibration key and a plastic case.
Important! Among the disadvantages, the scales on the stem and drum are too pale; in order to distinguish the readings, you have to strain your eyes.
The average price of a Fit micrometer starts from 900 rubles
Shan MK-25 123738
A tool from the middle price category with a range of 0-25 mm has high accuracy, the error is only 2 microns. Equipped with carbide measuring surfaces with excellent alignment, the scale of the device is clear and clearly visible.
You can buy Shan MK-25 from 2500 rubles
CHEEZ MK-25 0.01
The Russian device of the first class of accuracy takes measurements of 0-25 mm, guaranteeing a low error. The ratchet and drum are covered with deep notches that prevent slipping of hands, and thermal insulating gaskets are provided on the bracket. The description of the micrometer indicates that the heel and screw mechanism are made of stainless steel, and the working surfaces are coated with carbide coating for a perfect fit.
You can buy a CHIZ micrometer from 2000 rubles
Micromar 40 EWRI 4157101
One of the top German-made devices belongs to the professional category. It has a range of 25-50 mm, the degree of accuracy is 0.001 mm. Made of high quality steel with anti-corrosion coating.
The device supports wide customization of measurement parameters and displays results, including in inches. The main feature of the device is the presence of a Wi-Fi module, thanks to which data can be transferred directly to a computer through a special application.
Micromar 40 EWRI is expensive, from 28,000 rubles
Setting the micrometer to zero
Let us consider in detail how to adjust the micrometer to the zero mark, with a working range of 0-25:
| Illustration | Description of action |
| Before selecting the gap to zero, it is necessary to clean the working surface of the heel and screw jaws. To do this, unscrew the screw a little, take a piece of glossy paper (a fragment of a magazine cover or postcard will do). We clamp the fastener together with it and pull out the piece of paper. This way we will clean our working tools from possible dust, debris and dirt. | |
| We bring the heel and the screw together and tighten the fixing screw. This is necessary in order to fix our device at the zero mark in the future. | |
| Using a special wrench, loosen the drum and remove it. Our task is to return the drum to the position that would correspond to the zero mark. | |
| For precise adjustment, the end of the drum must stop clearly at the zero mark of the stem. And the zero mark of the drum scale should stop opposite the longitudinal stroke. |
How to measure with a micrometer
Working with a micrometer requires high precision and accuracy. Before starting measurements, let us once again recall the main points of handling the device.
Basic rules for using a micrometer
A micrometer, like any other device, requires careful and correct handling. To improve the measurement accuracy of the device, the following points must be taken into account.
- If the device has a holder, which is most often attached to a bracket, it must be firmly fixed.
- Be sure to wipe (this has been discussed more than once today) the surface of the heel and screw jaws.
- Zero readings are verified. If the display is incorrect, this device must be reconfigured.
- Do not use excessive force when fixing a part with a ratchet! The surface of the clamping mechanisms is made of high-strength materials, so if pressed excessively, they can damage the part being measured.
- It is better to store the micrometer in a special case or bag.
Electronic and laser devices are very sensitive to mechanical damage. It is better to store them in special cases.
How to measure with a micrometer correctly
Let's look at an example of how to use a micrometer:
| Illustration | Description of action |
| To control measurements we use fishing line. The manufacturer claims a thickness of 0.28 mm. | |
| Before starting the measuring process, you should unscrew the screw so that the distance is slightly larger than the fishing line by rotating the drum. In this case, you should not use a ratchet! The fishing line may simply be flattened. | |
| Using the upper part of the stem scale, we determine the number of full mm. Moreover, if on the lower half the last visible mark is to the right, then we add another 0.5 to the resulting value (this is why the lower half of the scale is offset relative to the upper). | |
| As we see, the manufacturer cheated with the data. The line exceeds the declared value by 0.02 mm. Total diameter 0.30 mm. Do not forget that for correct calculation, to the number shown by the cylinder, we add the value from the drum scale, the division value of which is 0.01 mm. |
Description and action
The device on the modern market is represented by many types and models, which do not differ significantly in operating principle and operating rules. The only exceptions are electronic and laser devices.
The name of the instrument indicates the dimensional value within which the device is able to determine the size of the part with reliable accuracy. One micron is a very small parameter; in practice, an accuracy of 50 microns is more often used - this is a value whose value can affect the result of assembly work or part settings.
Read also: How to check the ignition coil without a multimeter
Methods of measuring with a micrometer - absolute and relative . In the first option, the device connector is attached directly to the surface of the part. Fastening clamps are adjusted in accordance with the geometry of the part being measured. Readings in microns are taken according to measuring scales.
The relative method is based on data taken when measuring objects that are in close proximity to the desired object of measurement. Subsequently, with their help, the required parameters of this object are established in an indirect mathematical way.