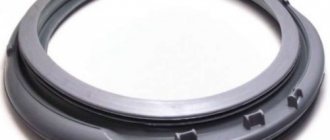
You can entrust the replacement of the hatch cuff in your washing machine either to professionals in this field or completely independently. This part of the washing machine has a sealing function, sealing the loading hatch with the body, preventing unwanted water leakage.
This part fails due to temporary wear, lack of proper maintenance of the product, its incorrect installation and careless handling. To replace the hatch cuff in a washing machine with your own hands, you will need a few tools and a new cuff. The main thing is to be patient, because repairs can take a lot of time.
What causes damage to the cuffs (hatch seals)
The causes of cuff damage can be different:
- Natural temporary wear and tear during operation of the washing machine. This is the rarest reason for replacing the cuff; this part is made of high-quality rubber, taking into account all possible impacts on it in the future during operation.
- Due to poor-quality water and detergents used, lack of prevention to remove scale and other deposits in the washing machine. Hard water and powders that do not meet the requirements negatively affect the elasticity of the cuff; it becomes hard. During operation of the washing machine, water leaks are often observed along the outer part of the body due to poor sealing of the hatch with the cuff. It’s even worse when, due to the loss of elasticity of the polymer, cracks begin to appear, damaging the rubber. For the same reason, other rubber parts of machines - oil seals, hoses and gaskets - fail prematurely.
- To prevent scale and other deposits, special products will be required.
- When loading laundry incorrectly and inattentively. When loading laundry, the user is often guided only by the maximum permissible weight of things, but not by their total volume. When washing, a large volume of laundry rubs against the rubber, and if there are metal objects on it, it can tear it. Frequent failure of the cuff is associated with the presence of foreign objects (chewing gum, keys, coins, etc.) in the pockets of loaded laundry. It is not uncommon for a part of an object to become undesirably clamped between the hatch and the cuff; at the very first rotation of the drum, the rubber breaks and the seal with the hatch is lost.
- If the washing machine is installed incorrectly, namely the exact level.
Tilt of the machine when installing it forward or backward will result in either rubbing or stretching of the cuff. Very often, it is for this reason that this breakdown occurs in narrow washing machines, where there is less space for the free movement of parts moving during operation.
After discovering damage to the rubber, many users wonder how to seal the cuff of the washing machine hatch and what glue to use for this.
At the same time, repairing the cuff is practically impossible, since it is difficult to glue due to the properties of rubber.
As a rule, after damage to the hatch cuff, only installing a new part will help. But if the owner of the machine set himself the task of doing without replacing the part, removed it, found something to seal the damaged rubber part of the cuff with, then it turns out that he repaired it practically without cost.
What is the purpose of replacing rubber?
Sometimes a Samsung washing machine refuses to work due to minor breakdowns, and this does not mean that you should contact a service center for help every time. To ensure that the laundry washing machine does not have interruptions and fully performs all the specified functions, it is recommended that from time to time you replace or clean the rubber gasket designed to ensure tightness during operation. Such actions are performed in certain cases:
- the rubber band is removed for the purpose of cleaning the space underneath it and checking the drainage area for dirt accumulation;
- The rubber band is replaced after a certain operational period, when it has lost all its properties and does not fulfill the task of sealing the unit.
It is possible to determine whether the element needs to be replaced or cleaned through inspection - if integrity is damaged, there is visible contamination or an unpleasant odor is detected, appropriate measures are immediately taken. In addition, a clear sign of failure will be water flowing out from under the hatch during the washing process.
Removing the hatch cuff
How to remove a rubber band from a washing machine tub depends on the individuality of the washing machine and the way you load laundry into it.
But in general it consists of several stages:
- Removal from the washing machine body.
- Removal from tank.
But these stages in each model may differ in the course of the entire process due to technical design, and therefore, in order to replace the hatch cuff of a washing machine of a certain model, an individual approach will be required.
Many manufacturers of washing machines have included in their design a removable front part of the housing, which makes it easier to replace the cuff if it fails.
But most washing machines do not have such privileges, and replacing the cuff of the washing machine hatch with your own hands in such models is much more difficult, up to and including removing the tank from the outside.
How do you know when the cuff needs to be changed?
If you discover a leak under the hatch or body of the Indesit washing machine, you should first inspect the sealing collar. If there are defects on its outer part, water will begin to seep out from under the door. If the inside of the gasket is damaged, water will collect under the SMA housing.
There can be several reasons for damage to the seal:
wear. The rubber band rubs against the drum during the washing process and is also constantly exposed to thermal effects. After some time, the cuff may crack. It is through these cracks that water will begin to flow out; improper care. If you do not wipe the gasket after each wash, over time it will develop mold, which will eat into the upper layers of the elastic. Such a cuff will no longer be able to ensure the tightness of the system; influences from outside. Foreign objects caught in the drum (coins, paper clips, nails forgotten in pockets) damage the rubber gasket during the washing process
Also, the condition of the cuff may worsen due to popping noises when the hatch is closed carelessly.
If you properly care for the elastic and avoid mechanical stress on it, the cuff will last for years. But there is nothing complicated about replacing the seal; you can actually do it yourself, at home.
How to dismantle the first clamp
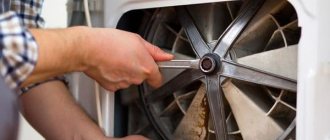
Before removing the rubber band from the body of the machine, pay attention to how it is secured there, namely with what kind of clamp, usually a metal wire, the ends of which are connected with a spring.
But there can also be a plastic clamp in the form of a ring with latches.
In the plastic clamp, release the latch and separate the ends of the fasteners. In a metal one, you need to put the spring on with a minus screwdriver and pull the clamp towards you gradually along the entire circumference until completely removed. The leading edge of the cuff is then removed from the front of the machine body.
Carrying out work to remove the cuff
The algorithm of all actions is as follows.
Removing the clamp
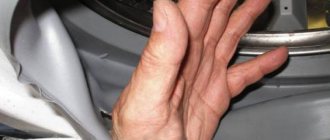
The damaged cuff is removed in two stages. First you need to disconnect the outer spring type clamp. To do this, you will have to use a thin screwdriver to slightly pull out the sealing element, pry the clamp near the steel spring and carefully pull it towards you. In most models of cars from the Samsung company, the clamp is metal, equipped with an insert in the form of a dense spring, which needs to be slightly stretched and at the same time the rings must be removed without causing damage to the entire structure. There are machines with rings made of plastic material. They are held in place with convenient and easy-to-open latches.
Having taken out the outer clamp, remove the sealing collar of the loading hatch from the outer part of the machine body, wrap the rubber band into the drum so that it does not interfere with us.
Removing the rubber band and internal clamp
It is necessary to free the elastic from the other clamp holding it from the inside. For this:
- unscrew a couple of bolts and remove the top panel of the machine,
- loosen the steel ring using the tension bolt. It is unscrewed until the ring is removed without much effort,
- The drum sealing rubber is removed along with the ring.
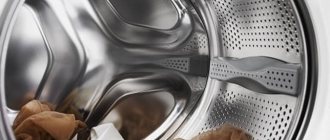
If the cuff is taken out for preventive cleaning, it is thoroughly washed using disinfectants. The space itself that appears after the recess is also cleaned, each recess of the drum, previously covered with an elastic band. As a rule, scale accumulates in such places, which can be removed with detergents.
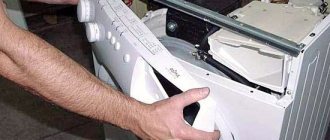
Removing the front panel of a Samsung washing machine
To replace the rubber of the hatch of a Samsung car, you will have to dismantle the front part of the device to provide free access to the inside of the drum, where the cuff is fixed. To do this, use a screwdriver to unscrew the mounting screws on the front panel of the case. The three located below can be easily removed, and the upper part is secured with screws hidden by the control panel - it will have to be disconnected and put aside.
An additional bolt is located under the detergent dispenser tray. Once all the fasteners are unscrewed, the front panel is removed, revealing the drum before your eyes.
Some craftsmen remove the rubber seal for subsequent replacement without dismantling the front cover of the machine, which reduces the time required to complete repair work. But installing a cuff on a Samsung washing machine from the inside will be much more difficult.
How to put on a new cuff
At this stage, the sequence of actions must be followed exactly to avoid problems with seal failure and fluid leakage. The final stage of repair looks like this:
- the cuff is inserted simultaneously with the internal clamp into the body of the machine, put on the drum protrusion located inside,
- The gasket and clamp are carefully tucked in a circle,
- we check that the inner fastening ring holding the elastic is tucked along the recess to its entire length, after which you can tighten the tension screw all the way,
- the outer part of the elastic is inserted along the front side of the machine,
- Once you finish putting on the elastic, install the outer clamp.
Having put on and secured the rubber band for the doors, we proceed to install the front panel and top cover of the Samsung washing machine. The elements are applied one by one to their original places and secured with screws. Replacing the cuff on a Samsung machine is complete, perform a test wash to check the quality of work.
Removing the second inner (second) clamp
Having removed the first clamp, we move on to the second. The next stage will take a different amount of time depending on the design of your machine, the presence or absence of a removable front wall of the body, the need to gradually remove other parts and the possible removal of the entire tank from the body of the machine.
The second clamp on the machine body can be a wire clamp with a spring, a wire clamp with a clamping screw or a self-tapping screw; spring clamps are also often found. Having good access to the clamps, their dismantling does not take much time and labor. Then you need to remove the rubber band from the washing machine drum. Pay attention to the marks on it and the tank; if there are no marks, make your own with a marker, then replace the rubber band on the washing machine with a new one.
Installing a new cuff
Before replacing the rubber band in the washing machine with a new one, you need to inspect and thoroughly clean the seating areas on the body and tank.
When installing the cuff, the place where it is installed on the tank can be lubricated with liquid soap to make the task easier.
We begin installing the seal from the place of the mark, subsequently holding it to prevent spontaneous removal. After this, we check whether the cuff is correctly fixed; there should be an equal gap around the entire circumference between it and the drum.
Installing the front (front) outer clamp
If replacing the cuff was accompanied by removing the front part of the body, then put it in place. Then we install the outer clamp in place. The plastic one should be in an open state, closing its ends directly into the installation groove.
The wire should be in an assembled state, starting from the junction of the spring with the bent edge of the wire, gradually seating it in the groove.
After installing the cuff of the washing machine with your own hands, you need to check the tightness of the connections. To do this, close the hatch and turn on the washing mode for wool, delicate fabrics or rinsing. After a few minutes of work, drain the water and tilt the machine back towards the wall. There should not be a drop of water under the car.
We also use additional lighting to inspect the internal parts of the washing machine for leaks. If there are no leaks, then you managed to change the rubber band in the washing machine yourself, without the help of a specialist.
Here is the approximate time required to replace the cuff:
| Sequence of stages | Approximate time spent |
| Removing the front clamp (and removing the rubber from the body) | 1-5 minutes |
| Removing the inner clamp (and cuff from the tank) | 5-15 minutes (without removing the front part of the case and with removal, respectively) |
| Installation of a new part (with preparation of the seat) | 3-5 minutes |
| Installation of the internal clamp | 5—15 minutes (without mounting the front wall of the case and mounting, respectively) |
| Installation of the front clamp (with preliminary installation of rubber on the body) | 1-5 minutes |
We dismantle the internal clamp and elastic band
Next, you should release the sealing collar from the second metal clamp, which holds the rubber band from the inside of the unit. To do this, you need to perform the following algorithm of actions:
- remove the top cover of the SMA body by unscrewing the two bolts that hold it in place (they are located on the back side of the washer, along the edges at the top);
- loosen the steel ring by unscrewing the tension bolt securing the inner clamp. The bolt is not unscrewed completely, but so that the ring can be pulled out freely;
- After loosening the clamp, pull the sealing collar along with the ring through the hatch door of the machine.
All actions must be carried out very carefully so as not to damage the internal parts of the SMA with the tool, and if you only need to clean the seal and reinstall it, it is important not to tear the rubber band.
If the gasket was removed from the housing for cleaning, wash its surface thoroughly using various disinfectants. Do not forget to clean the space opened after the excavation, as well as all the recesses on the previously closed surface of the drum. Usually scale deposits accumulate at the place where the cuff is installed; special detergents will help to deal with it.