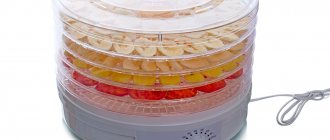
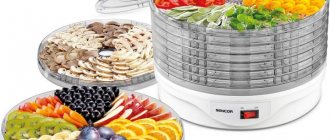
General structure of the dryer
The principle of operation of the dryer is the effect of increased air flow on crushed fruits.
As a result, metabolic processes in the fruits are activated, moisture leaves, and they dry out faster. There are three types of dryers, each of which has its own device. The design of a standard dryer consists of 4 main parts:
- fan;
- housings;
- tray for fruits and vegetables;
- electric motor.
The operation of a solar dryer is based on the penetration of rays through a transparent material and heating of a sheet mounted on the back wall. This contributes to an increase in the temperature inside the device, when the indicator can reach 50°C. Fruits and vegetables dry out when exposed to such conditions. Thanks to good ventilation, moisture is removed outside, which prevents the formation of mold on the fruit. A cold air flow penetrates from the bottom side of the structure, heats it up in the body and exits through the top hole.
This dryer consists of:
- wooden case;
- trays for crushed fruits;
- transparent polycarbonate cover.
The infrared dryer is a multifunctional, convenient device. It can be rolled up. This will make storing the device much easier. If necessary, it can also be easily transported. The potential of such a device is 58°C, which allows you to obtain high-quality dried fruits. This device will also successfully cope with the function of a heater.
The structural elements of such a dryer are as follows:
- infrared film;
- case from a box;
- transformer;
- wiring.
There may be doubts about the feasibility of making a dryer. After all, if the fruits are placed in an ordinary attic, after a certain period of time they will reach the required state. This option does not require effort or financial investment. But it also has a drawback. Vegetables and fruits in this case will attract insects. It is impossible to prevent this situation from occurring, since constant contact with air is necessary for the fruit to dry completely. Accordingly, they cannot be placed in sealed packaging.
Of course, you can treat fruits with a special compound so that insects lose interest in them. But the taste properties of the fruit change. In addition, after such processing, fruits retain chemical components in their structure, and they can no longer be called completely safe.
Important! A dryer is the most acceptable way to stockpile supplies to enrich your diet with vitamins for the winter.
General device design
It should be noted that today gardeners use three types of dryers, which are based on different drying principles.
- Using air flow movement. In principle, the structure of this device is a box, inside of which grids are laid one above the other, and chopped fruits or vegetables are placed on them. One or two holes are made on the side of the box into which fans are inserted. With their help, airflow occurs.
- Using the sun. This is a chamber in the form of a box, installed at an angle so that the sun's rays always fall on the pallets where fruits and vegetables are placed. The front part of the device is often covered with glass or mesh. Experts recommend not using a metal body in this type of dryer. It becomes very hot under the influence of sunlight and begins to emit a lot of thermal energy, which negatively affects the quality of dried fruits.
- Dryer with infrared heating element. In principle, this is all the same as the solar variety. Only instead of sun rays (free), ultraviolet rays are used here, which are emitted, for example, by a special film connected to a transformer. A very effective design that dries quickly and efficiently. But of all those described above, it is the most expensive. True, one of the advantages is the fact that the design of the dryer itself can be simplified to a minimum. There is no need for a drawer or chamber, you just need to install mesh shelves and direct the UV rays from the heating element onto them.
Use of air flow movement for drying
Features of drying devices
To ensure the above conditions and the desired result, a homemade drying unit must meet certain technical requirements:
- the temperature inside it should be maintained at no more than 70°C, this will ensure maximum dehydration, but will not allow overdrying;
- The volume of the chamber should be calculated not only from the number of products intended for preparation, it is necessary to take into account part of the space for free air circulation ;
- the design of the device should allow you to adjust the drying time; if you assemble it yourself, this can be achieved by simply moving the baking sheets closer to the source of heat or air flow.
If necessary and if possible, the device can be equipped with heaters and thermostats, electric fans, and other equipment that will make its use more efficient and comfortable.
Types of dryers
Drying ovens can use solar and electrical energy to maintain the desired temperature during the dewatering process.
Devices that use solar energy are easy to manufacture, economical and reliable in operation. To make a drying cabinet with your own hands, no special training or skills are required.
Devices for drying products that use electrical energy and automatic devices to maintain the desired temperature should be classified as highly complex.
Such drying cabinets may not differ in their design. The cabinet is usually made of wood. Ventilation slots are installed in the upper part to remove moisture. The size of the cabinet is selected arbitrarily at the request of the author.
Required tools and materials
For construction you will need professional tools
There are several options for making the structure. To get a regular dryer, you need to prepare:
- materials for the body. This could be plywood sheets measuring 60 cm x 80 cm or an old refrigerator;
- metal mesh;
- trays;
- fan with motor or 2 incandescent lamps with a power of 150 W;
- self-tapping screws
For an infrared dryer you will need:
- electrical cable with switch and plug;
- film 100 cm x 50 cm, intended for heated floors;
- bitumen and PVC insulation;
- 2 terminals, 2 grommets, 2 clamps;
- soldering iron;
- metal bar.
The solar dryer is made using materials and tools such as:
- wooden beams;
- a metal sheet;
- mosquito net;
- black paint;
- polycarbonate or glass;
- lining or plywood;
- brush;
- self-tapping screws;
- level.
Materials
It is necessary that steel or wooden materials be used for the manufacture of the structure. Thus, it will be possible to practice it for more than one year. The frame must be stable. In order for the device to be of high quality, it must be secured with durable components (screws). The top of the base is covered with a thin material (chiffon) so that the fish can dry in the fresh air. Due to the free movement of air inside the structure, the products will dry much faster.
Types of drying chambers
Do-it-yourself dryers are classified in the same way as their factory-made counterparts. First of all, they need to be divided into devices that use solar energy and electrical devices equipped with shades and fans . The first ones are different
- simplicity of design;
- require a minimum of special knowledge and experience during assembly;
- economical in terms of materials required for assembly and subsequent operation.
Despite the variety of such devices, their design is generally the same. This is a cabinet of different sizes, usually made of wood, with ventilation holes, glass walls around the perimeter or on one side to allow heat to enter. Their counterparts using electricity have a more complex device. According to the principle of operation, they are divided into conventional electric dryers using convective or infrared heating methods and dehydrators, which provide a function for precise temperature adjustment, which leads to complete dehydration of the product.
Convective
In this option, drying occurs with a directed flow of heated air. The design provides a shadow that can be located above, below or in a horizontal plane.
The easiest way to make such a device is to assemble a chamber, install a heater and a fan heater in it. However, the quality of processing becomes a victim of design simplicity. The fruits are dried from the outside, retaining moisture in the core. They are not suitable for long-term storage because they quickly become moldy and pose a risk of botulism infection. This disadvantage can be minimized by longer drying times, but this leads to the loss of a significant part of the beneficial properties and increases energy consumption.
Infrared
These devices use infrared radiation, the effect of which is as close as possible to that of the sun. The effect occurs more evenly, vitamins and microelements are better preserved. Drying results are better suited for long shelf life.
A serious advantage in favor of this variety is low energy consumption. But here there is a higher risk of making mistakes, drying out the products and losing their beneficial properties.
It is more difficult to assemble such a device; you will have to select a suitable infrared emitter and choose a scheme for its correct placement.
Dehydrator
Translated into human language, installations of this type are called a dehydrator. The design of these devices is designed for maximum moisture removal. Despite the fact that the same term is often used to refer to conventional dryers, the difference between them lies in the presence of a thermostat that controls the temperature.
Thanks to such design improvements, drying occurs under optimal conditions in a tolerably short time. This device is better than others for drying beef, pork or fish . Result: maximum free from moisture, evenly dried, able to retain consumer properties until the next harvest and longer. But to assemble a dehydrator with your own hands, you cannot do it with improvised means; you will need additional equipment.
Infrared dryer
The second method of making a dehydrator is even simpler. Here, instead of a fan heater, you will need infrared film.
This is exactly what is used for electric heated floors.
Moreover, in this case you don’t even need to build a bulky cabinet. It is enough to make long shelves. But first things first.
Heating infrared film is a roll material and is sold by the meter. The width can be different - 50,80,100 cm.
Since we are planning to make a unit for serious volumes, and not an analogue of a small saucepan, then choose a width closer to 100cm.
What power should I choose? For good performance, buy models with a power of 220W per 1m2. With an average shelf size of 20*100cm, one tier will consume about 55W/hour or 1.32kW per day.
Multiply this power by the number of shelves and get the energy consumption of your dryer.
Next, this film will need to be cut in strictly defined places (where the scissors icon is).
Thermal insulation of the drying cabinet
The inside of the entire cabinet and the door itself are covered with reflective foil material.
For example, this type is used for sauna cladding. It can withstand high temperatures and is absolutely harmless when heated to no more than 45C.
Attach it to staples from a construction stapler, or better yet, to self-tapping screws with a wide head.
Without this reflector, heat will be quickly transferred to the wooden walls. Firstly, it will delay the whole process. And secondly, if you used chipboard or fiberboard when assembling the frame, they will heat up, which will ultimately lead to food poisoning.
Also, do not line the walls with mirrored sheet metal.
Tin is primarily a metal. It will heat up and transfer all the heat to the wooden body. The thermal efficiency of such a dryer will drop sharply.
And from such heating, the body will gradually deform and wide cracks will form.
Manufacturing of drying trays
Inside the cabinet, homemade nets are placed on the guides.
They are also assembled from wooden planks connected with construction angles.
Just don’t glue the pieces of wood together!
When heated, the glue will release toxic fumes. Therefore, only corners or a stapler.
It is better to choose a metal mesh made from food-grade stainless steel on which the products will be placed. It will not release any chemicals when heated.
Beekeepers filter honey through this. The only problem is to find it.
Many people advise not to bother and take the reinforcing material that goes under the plaster. It supposedly contains only fiberglass and nothing more.
However, do not forget that there is also a binding element - an epoxy compound. It is also not recommended to use a mosquito net.
It contains plastic and toxic paint. With such trays, after just a few years of abundant absorption of “healthy” dried fruits, oncology will definitely await you.
You shoot the mesh onto the bar with a stapler along the entire perimeter.
Such pallets are made in just a few hours. For the above cabinet sizes, the optimal number of nets inside is 4 pcs.
The dimensions of the mesh tray should be 5 cm narrower than the depth of the cabinet.
This is necessary so that warm air can circulate freely from both the back and front.
It is better to place the pallets themselves in such a way that the first is located close to the door, and the second to the back wall, etc.
With such a checkerboard layout, the warm flow will consistently blow tier after tier.
The tray is pushed in or placed on guide bars. They are made either wood or aluminum.
In this case, aluminum releases heat faster after heating. However, the question of its environmental friendliness and toxicity always remains open. Wood is still safer.
Dryer installation
By following simple rules, you can quickly make a drying chamber.
Homemade dryer from an old refrigerator
A homemade dryer can be made from an old refrigerator. This will make a good dehydrator for fruits and vegetables.
Manufacturing algorithm
The process of manufacturing a drying installation from a refrigerator occurs according to the following scheme.
- Carefully dismantle the compressor, radiator and freezer so as not to damage the tubes and avoid leakage of the working substance (refrigerant).
- Remove the inner lining and insulation, leaving the rubber seal on the door.
- A fan is installed in the place where the compressor was installed.
- A hole is made on top (on the roof) of the refrigerator for a pipe (a two-meter piece with a diameter of 100 mm is enough) or an aluminum corrugation 3 m long, which is secured with glue.
- A hook is attached to the door to securely fix it.
- Attach wooden slats to the side walls of the refrigerator box with self-tapping screws or bolts approximately 10-20 cm apart, so that shelves can then be placed on them.
- If there are any holes left, they are sealed.
- To speed up the drying process, place a hood on the pipe or corrugation.
The final design is shown in the photo below.
Nuances of creating a design
The inner lining and insulation are removed because plastic and foam decompose when heated, releasing harmful substances.
When dismantling the insulation, you should wear gloves and a respirator to protect against glass wool (if it served as insulation).
Since the remaining tin cabinet is not particularly rigid, its degree may need to be increased by installing spacers or a galvanized inner casing.
To blow food, it is allowed to use a regular 18 W hood fan with a diameter of 125 mm, only installed to force air inside. Installing a fan heater will significantly speed up the entire process, increasing the productivity of the installation. Instead, you can attach one or two electric heating elements to the back wall with a total power of up to two kW - then the device will work like an electric dryer. In this case, a second exhaust fan should be installed in the upper part of the box.
The created unit can be used all year round. But if a regular fan is installed, then painting the case black, as well as placing the device in the sun in the warm season, helps to increase the temperature inside, which speeds up the entire process of drying food.
In order for the created dryer to work effectively, it is necessary to ensure good airflow of the product laid on the sheets. This is achieved by leaving a gap of 2 cm between the frame and the door on one side, and the back wall of the box on the other.
When using a refrigerator with conventional fans without installing heating elements, it is enough to remove only the compressor with freezer and radiator. Thus, the grooves for installing shelves on them remain, but if necessary, you need to add more. The following can be used as shelves:
- grates intended for grilling, but with cut off handles;
- metal sheets with holes drilled in them;
- meshes with different cell sizes;
- old mesh refrigerator shelves;
- lattice structures made of wire or wooden slats.
It’s easy to come up with a variety of options for creating shelves for vegetables and other products yourself and make them from scrap materials.
If the compressor is in working order and the cooler circulation system is not damaged, then these spare parts can be useful for creating a freezer with your own hands.
Creating a dryer from a refrigerator takes several hours if you have the necessary parts and tools. The design can be improved in various ways, by equipping it, for example, with temperature sensors and a simple automation system, or by experimenting with the location of the fans. To protect against insects from entering the dryer, the ventilation holes should be covered with a mosquito net or gauze folded in 2 or 3 layers.
Dehydrator from a homemade cabinet
A dehydrator can be made from a homemade cabinet in a manner similar to the previous one. Only instead of a refrigerator there is a plywood cabinet. For this you will need the following materials:
- plywood or chipboard, fiberboard;
- wooden slats;
- metal corners and screws;
- aluminium foil;
- electric heater;
- 2 fans;
It is better to use a fan heater instead of a separate heating element. The other fan will be a regular one, working for exhaust.
The cabinet must be arranged in such a way as to ensure unobstructed air circulation. It is collected in this order.
- Make a frame from bars of the required size.
- The box is sheathed on the sides, top, bottom and back with plywood, fiberboard or chipboard.
- Install a front door made of similar materials with many holes on the hinges, approximately as shown in the photo below.
- The inside of the cabinet is covered with foil.
- Install the shelf holders and the baking trays themselves.
- A fan heater is mounted in the lower rear part, and a regular fan in the upper part.
The fans can be connected in parallel and turned on with a switch. The structure can also be additionally equipped with light bulbs indicating the operation of the installation. The fan heater is equipped with a built-in thermostat. It will automatically turn on the heating element. If necessary, you can turn off one spiral to reduce the power of the installation.
heating element or heater
What causes the temperature to rise, where does it come from and how does the heating occur? Everything is very simple - a floor-mounted wind blower room heater is used as a heating element and a fan at the same time.
Try not to use open heating elements for this. Firstly, it is a fire hazard. And secondly, you will have a problem installing them on the wooden base of the box while maintaining the permissible distances.
You'll have to think hard about what to lay them on or how to secure them. For example, someone “figured out” to put asbestos under the tile heating element.
Once again - ASBESTOS! In the fruit drying box! Don't ever do this.
There are no problems with the wind blower. Just place it on the bottom of the cabinet, and on the back wall to allow fresh air to flow in, use a jigsaw to cut a hole the size of the fan.
The hole must be made, otherwise the heater will simply overheat itself and catch fire.
Through the same “hole” the power wires with a plug are output.
Connecting wires and temperature sensor
If you are not familiar with electrical circuits, you can adjust the heat and temperature using the built-in thermostat on the heater itself by turning the knob to the minimum and maximum positions.
But it can be made much more convenient and functional. Buy an external temperature sensor and an external thermostat at your local electronics store or in China.
Drill two holes approximately in the middle of the back wall and insert control sensors there.
The wires are soldered in place of the heater's built-in thermostat, and a digital thermometer is brought out.
You set the drying temperature yourself depending on the product - vegetables, fruits, meat, fish, etc.
For plants and berries, such a fan in the first position optimally increases the temperature to 40C. At the same time, try to open the cabinet door as little as possible.
For other products, switch the heating to position II.
A remote thermostat with wires is good, but not everyone can figure out the connection diagram. If you have problems with this, but you still want to control the drying in this way, use a socket thermostat.
You insert it into the nearest socket, place the sensor inside the cabinet and program the upper and lower temperature thresholds.
In this case, the fan heater plug is simply stuck into the thermostat itself. It looks like a socket-in-socket design.
You don't need to do anything fancy with the electrical circuit. The temperature inside the dryer reached 40C, the fan turned off. It cooled down to 38C - it turned on.
If you want to automate all this and set the specified drying time so as not to spoil the food, timer sockets (mechanical or electronic) are at your service.
This is especially important when drying fish, when the technology requires a certain pause after continuous operation of the unit for many hours.
How to make a regular dryer for vegetables and fruits
An excellent DIY drying rack can be made from an old cabinet, bedside table, or you can use a wooden box. An important condition is to choose the sizes. Additionally, you will need a temperature sensor and a fan heater. For trays you will need a stainless steel mesh, a lath, metal corners or small nails.
Frame drawing
If you have a suitable bedside table, manufacturing becomes much easier. Craftsmen sometimes adapt the body of an old refrigerator, stove, stove, without even removing the glass.
The process becomes more complicated when creating a cabinet with your own hands from boards. But in this case it is easy to implement any ideas and choose the required size. You can use a drawing of any cabinet or bedside table as a basis. Just substitute your sizes. We think in advance about the number of trays for any vegetables, as well as ginger, apples, apricots, pears and other fruits.
Dryer assembly
Assembling a vegetable dryer with your own hands from scratch is more difficult. We'll have to make one with a door. The situation is simpler with an unnecessary cabinet. The main task is to distribute the “filling”.
Instructions for assembling the dryer with your own hands:
The distance between the trays should not be less than 15 cm. The air between pieces of fruit or prepared vegetables should circulate, and the hand should be easy to pass for stirring and turning over the products.
Which heating element or fan heater to use
To increase the temperature inside the structure, we do not recommend using a regular heating element. Wood-burning cabinets are rare these days. If there is an accidental fire, there will be no fire, as is the case with firewood. Materials begin to smolder and release harmful substances.
It is better to take a heater with a fan or a fan heater. They are often called wind blowers. There are models in small sizes. Another option is to use a small electric hotplate. The advantage of this method is that it is easy to regulate the temperature by setting different modes.
Ventilation and release of moist air
Warm, moist air must escape somewhere from the cabinet during the heating process. To do this, a hole (d-100mm) is cut from the top and a plastic pipe is inserted there.
If you want to do without plastic and pipes, make not one, but three holes of a smaller diameter (35mm) around the perimeter.
It is only advisable not to leave all these holes open, but to install some kind of protective grille or mesh there to prevent flies and insects.
But still, as operating experience shows, with one hole in the form of a pipe it is possible to maintain a more stable temperature regime than with three.
All dampness, smell and steam will go outside through this hood. During the drying process, do not forget to swap the trays, because the bottom row dries much faster due to the close proximity of the fan heater.
With a large harvest, processing it with a relatively small factory dryer is a very non-trivial and tedious task. And with the help of such a large cabinet you will do it quickly and with pleasure.
How to make a solar dryer for vegetables and fruits
The simplest homemade fruit dryer works without a fan or heater. It is located outside. For manufacturing you will need nets and wooden slats.
Frame drawing
The frame is a closed mesh cabinet on legs. All sides are covered with mesh. It is advisable to use food grade stainless steel. The number of trays is arbitrary. It is important that the air circulates freely.
We make sizes at our discretion. More often they make large cabinets with their own hands so that at least a bucket of processed vegetables and fruits ready for drying can fit at a time. This results in a lightweight design. You can always move it to another place. Some products are dried in the sun. For greenery and medicinal herbs, choose canopies and shady places.
We recommend screwing small wheels to the legs of the mobile dryer. They are sold in furniture stores.
Assembling a solar dryer
In addition to slats and homemade meshes, you will need metal corners and bolts. We do not recommend joining parts with glue. When heated by the sun, an unpleasant odor may appear. We prepare small furniture canopies for the door. We immediately look for the latch. Or paired magnets.
Solar dryer assembly instructions:
It’s even easier to make something like a shelf with your own hands from ordinary boxes for vegetables, herbs or fruits. You can lay out the food and take it out into the sun. Or wrap the sides with film and install a fan heater underneath.
Options for DIY electric dryers
Homemade electric dryers differ from each other only in the materials from which they are made. In the selection of available materials, the creativity of do-it-yourselfers knows no bounds. Here are a few examples of amateur electric dryers that have proven themselves to work.
Dryer from an old refrigerator
Old Soviet refrigerators such as “Saratov” or “ZIL” usually live out their lives in dachas. Nothing lasts forever, they eventually fail and the best option would be to make an electric fruit dryer out of them with your own hands.
- As a component of the dryer, you only need the refrigerator body. Therefore, the compressor, refrigeration radiator and freezer should be carefully removed. It is important not to damage the housing to maintain tightness.
- When heated, plastic sheathing and thermal insulation will be a source of harmful substances and unpleasant odors. It is necessary to remove them, leaving only the rubber band as a door seal.
- To organize airflow, install a household fan in place of the compressor. Install heating elements in the lower part of the refrigerator, where air flows from the fan will pass.
- The shelves are made of metal mesh stretched over a frame of wooden slats. The air flow from the fan should pass freely through the mesh cells. The size of the shelves is larger than the original ones from the refrigerator by the thickness of the heat-insulating layer.
- To install shelves, secure wooden slats or aluminum and stainless steel corners to the side walls of the refrigerator. The distance between them should create the possibility of good airflow of dried vegetables and fruits, while making maximum use of the space of the refrigerator body.
- Exhaust ventilation is placed on the top wall. A section of sewer pipe is inserted into the hole, in which the exhaust fan is located.
- It is important to ensure the housing is sealed. In addition to the door seal, the fastening of the door to the body should be equipped with additional clamping loops.
- Covering the inner surface of the body with aluminum foil will significantly increase the service life of the electric dryer.
Electric dryer from a homemade cabinet
A wooden cabinet is used as a body for the dryer. Since kitchen furniture is made mainly from fiberboard and chipboard, it is not recommended to use this industrial option for drying vegetables and fruits. These composite materials contain harmful substances such as adhesives. It is impossible to guarantee protection using thermal insulation.
The option of making it from birch, oak and similar wood will create the necessary conditions for obtaining a high-quality dried product.
- We decide on the size of the cabinet. We make blanks from boards. The box is fastened with self-tapping screws.
- A hinged door is attached to the finished box. To create an airtight interior, it must be tightly closed, for example, with latches, as shown in the image:
- To prevent heat from being transferred to the wooden walls, the entire internal surface, including the door, is lined with reflective material in the form of foil. It is absolutely harmless when exposed to elevated temperatures. It is better to fasten the foil using self-tapping screws with a large head.
- Support strips are installed inside the wooden frame covered with foil. They can be made from wood or as shown in the image from aluminum angle.
- To make shelves for vegetables and fruits, it is better to use a mesh made of food-grade stainless steel. Other options, for example, reinforcing mesh for plaster or mosquito net, contain materials that, at elevated temperatures, release harmful substances that accumulate on dried products. The mesh is placed on a frame made of wooden planks connected to each other by building corners.
The size of the shelf along the depth of the case should guarantee a gap (about 5 cm). By staggering the shelves as shown in the image,
the air circulation process improves - it passes freely along both (back and front) walls. - The choice of heating elements is quite wide: from conventional heating elements to industrial floor-mounted household fan heaters. The best option is when air supply and heating are combined in one device in accordance with all the conditions of electrical safety rules.
In a wooden case, problems arise in installing heating elements. In addition to choosing a stand (in no case asbestos), you need to secure the heating tubes well. - For a specific type of vegetable, fruit or berry, there is its own optimal drying mode. Therefore, temperature adjustment is mandatory. You can purchase a temperature sensor and thermostat without any problems at a specialized electronics store. You can connect the thermostat via a power supply, and connect the temperature sensor to a digital thermometer.
- Humid air can be removed through a plastic pipe inserted into a hole in the upper wall of the wooden case. The temperature of the exiting air flow will no longer be so high as to heat the plastic until it releases harmful substances.
- The dehydration process in a wooden case requires periodically changing the shelves in order to obtain uniform drying of all products. Those located closer to the heat source lose more moisture than shelves on the upper tiers.
How to make the simplest version of an electric dryer
Not everyone has the ability to work with wood or it is not possible to find food-grade stainless steel mesh. In this case, there is a dryer option, which is called for the lazy. The following materials and components are used in production:
- household fan heater;
- fruit storage boxes;
- stretch film.
The order of work is as follows.
- A seat for the fan heater is made in one of the boxes. It is securely fixed in it.
It is placed on top of the same box in order to organize free space for air intake. - The required number of boxes is built in a similar height as the first two. The column of boxes is wrapped in 6–8 layers of stretch film (except for the bottom one). Next, cut the film with a knife along the borders of contact between the boxes.
- Organize access (you can cut out windows in the box) to the regulators of the fan heater operating modes. After loading the prepared boxes, the required mode is set and a simple do-it-yourself fruit and vegetable dryer performs its assigned function. To combat insects, cover the top drawer with gauze.
It is important to choose the right plastic from which the boxes are made. In some hot countries, where temperatures are below 40 °C, a special polymer material is used that allows fruits to be stored at high temperatures for a long time without harming them. For the above design of the electric dryer, these are the boxes that are used.
Do-it-yourself dehydrator for meat and fish
A dryer for meat and fish can be easily made from a plastic container. For this you will need:
- fan;
- plastic container equipped with a lid;
- steel rods with a cross section of 5 mm or studs with threads, washers and nuts;
- pipe cut or coupling.
The entire process of making a dehydrator for drying fish, meat and drying other products from a plastic container is demonstrated in the video:
It’s easy to assemble a dehydrator for fish, meat, vegetables, fruits and other products from scrap materials: plywood, boxes, a refrigerator. Various working old fans are suitable for blowing. In each case, you will, of course, need to think over a way to secure them, but the economic costs will be reduced. In small installations, you can use a fan from a computer, having previously provided the required supply voltage. If you automate the dryer, then in terms of functionality it will be able to compete with factory analogues. When drying meat and fish, it is imperative to prevent flies from entering the interior of the installation so that they do not spoil the products.
Do-it-yourself electric dryer for fruits and vegetables
To do this, you need to make an electric dryer body, buy a fan, a heating element, a temperature sensor (thermostat), a time relay, and two chimney draft regulators.
Tips: Before you start building a dryer with a power consumption greater than 3 kW, ask your local power company about the maximum power they can provide you.
Fan
For our purposes, household smoke exhausters for boilers are best suited.
Smoke exhausters for domestic boilers
Their distinctive feature is that they can pass through air at temperatures up to 150°C without damaging the electric motor. An ordinary axial fan is not suitable for these purposes. It is not able to work at a temperature of 50°C for a long time. The diameter of smoke exhausters starts from 150 mm. An electric heating element with an open spiral must be placed in the pipe coming from the smoke exhauster.
Tips: you can buy a fan for snail-type boilers with a capacity of at least 50 times the volume of the drying chamber.
Electric heating element for dryer
For maximum heat extraction, the heating element must have an open coil. The power is calculated based on the permissible rated power for the house and is equal to 3 kW minus the power of the smoke exhaust fan and household appliances. If this norm is exceeded, the automation will work and turn off the lights in the house.
Electric heater with open coil
When choosing an electric heater, consider its dimensions. It must fit into a pipe that is connected to a smoke exhauster or fan that supplies air to the drying chamber.
Smooth thermostat
Thermostats with smooth temperature control from 0 to 300°C are a standard part of all household electric furnaces. It must be connected in series to the electrical circuit with heating elements and a fan. When the required temperature is reached, it will automatically turn off the heating and fan.
Time relay
In order to fully automate a homemade dryer, you need to buy an electronic two-channel time relay with weekly programming.
There are many options for designing and programming time relays and everyone can choose the right one for themselves.
By connecting a fan and heating element to the time relay, you can adjust its operation experimentally. To do this, you need to set the turn-on time of the heating element and fan.
Chimney draft regulator
Draft regulators are installed in stainless steel chimneys. This automatic device consists of a precisely fitted valve on an axle. To ensure that it is always closed or open, a small weight is installed on one side.
Install these two valves in the inlet and outlet openings of the dryer. When the fan is turned off, they will close the inlet and outlet of warm air under the weight of the load.
Traction regulator
The use of these valves will allow you to automate air intake and supply without the use of actuators and expensive controllers.
For particularly advanced handymen, we recommend purchasing a programmable controller. This equipment is more complex, but it allows you to automate all drying processes, connecting humidity sensors, temperature sensors, motors, gate valves and other actuators. They are widely used for lumber drying kilns.
What types of dryers are there?
There can be many reasons for making your own dryers of different volumes and power for vegetables and fruits: you are not satisfied with the performance, high price, high energy intensity, and others.
There are three options for making do-it-yourself dryers for vegetables, fish or fruits:
- electric;
- on wood;
- solar.
We will not consider other options for making homemade products, such as sublimation, UHF, infrared radiation, or using a vacuum due to the complexity of manufacturing.
Homemade drying cabinet
Of the three options presented above, only electric can operate in automatic mode.
Wood and solar require human presence and adjustment can only be made using slide valves to regulate the inflow and removal of air.
Let's look at making a dryer with a capacity of 50 to 100 kg of wet product weight at home, based on the fact that the home craftsman plans to sell some of the dried products.
Energy intensity
A factory dryer with automation for processing dried apricots consumes about 1.6 kWh of electricity per 5 kg of raw product and dries for 36 hours.
Based on the average data, a handyman should take into account that a homemade dryer for processing 50 kilograms of a raw apricot product will consume 16 kW of electricity, and for 100 kg 32 kW. Using simple mathematical operations, you can find out the future costs of preparing 1 kilogram of fruit.
For household consumers, a maximum power consumption of 3 kW/h is provided. Accordingly, 16 kW can be taken from the line in 3 hours, and 32 kW in 6 hours of continuous operation. But you won’t be able to dry foods with a high water content in 3 or 6 hours.
Conclusions: in domestic conditions, building a dryer with a capacity of more than 50 kg of dry product is not problematic if there are no restrictions on energy consumption. Accordingly, if someone decides to build a 100 kg dryer, he will have to increase the drying time by 1.5 times. And then 100 kilograms of raw product will have to be dried for 3-4 days with an increase in electricity consumption to 32 kW.
Advantages and disadvantages of such a dryer
Each type of dryer presented has its strengths and weaknesses. Simple designs require constant attention and participation from users. At night or in inclement weather, the pallets are moved indoors. The product has to be constantly mixed by hand, and the degree of its readiness is determined “by eye” or “by tooth”.
But any improvement of the product will provide the same functionality as industrial designs. In closed-type dryers with forced air flow and heating, barometers are installed to indicate the temperature and humidity inside the drying chamber.
Some craftsmen use homemade vibrators, for example, from old washing machine drain pumps. This device allows you to shake the contents of the pallets from time to time, mixing it. An indispensable condition is the presence in the design of a cable or cord that connects all the pallets with the vibrator.
If we take into account the positive aspects of self-made designs, the percentage of quality dominance will be significantly higher than that of factory-made dryers.
Rules for using a homemade dryer
Speaking about the rules, it should be noted that they are more focused on the general conditions for preparing fruits of various types, their individual properties, and drying features. These rules include:
- fruit picking time for perfect drying;
- methods of cleaning and cutting fruits;
- temperature and humidity regimes at different stages of dehydration;
- optimal drying time and degree of product readiness.
Operating rules also have a common basis with industrial products:
- fire safety, which mainly concerns structures with electrical equipment;
- safety from electric shock (mostly applies to hand-made dryers);
- sanitary rules providing for timely cleaning, disinfection of pallets, drying before the next loading.
It is not recommended to overload the pallets or lay the fruits in several layers. This will not only cause the destruction of the structure, but will also create conditions for the proliferation of fermentation and rotting bacteria, leading to damage to all products.
Types of dryers
There are a huge number of varieties of dryers, which are classified according to:
- models;
- dimensional characteristics;
- spaciousness;
- manufacturing material.
Among the main most popular types it is worth highlighting:
- frame type;
- folding;
- stationary;
- suspension;
- intended for drying fish;
- universal type (can be used not only for drying fish, but also berries, mushrooms, herbs).
Despite the slight differences in designs, they are united by the presence of mesh (gauze) walls that do not disturb the passage of air masses and prevent the deposition of fly larvae on the fish. The presence of a door (for loading and unloading products) makes the placement process very simple.
Factory models
Of the factory modifications, two options can be distinguished. The first is structurally implemented in the form of a tall cabinet made of steel tubes covered with mesh. Similar samples are produced by various companies under the Kedr and Mitek trademarks. Another interesting example is the two-level IdeaFisher ECO-2 installation. This collapsible design is also small in size and easily portable. Moreover, depending on the conditions, it functions both suspended and placed on the floor or table.
Homemade dryers
Among the mass of devices for drying fish, the following homemade designs should be noted:
- frame;
- foldable;
- stationary;
- hanging;
- electric dryer;
- with fan;
- mobile (portable).
But that's not all that homegrown masters are capable of.
First of all, it is necessary to clarify where exactly the drying will take place. If under a canopy, awning or in the attic of an individual house, there are no difficulties with the dimensions. If in one of the living rooms, on a loggia or balcony of a multi-storey building, then the parameters of the future equipment for the dryer must be planned, starting from the possibility of placing it in these rooms for drying and further maintenance. In addition, it is necessary to take into account the size and quantity of fish caught during the previous fishing trip. Or balance these conditions for future catches. If the area is very small, you need to analyze modifications of folding and hanging dryers.
After establishing the required dimensions, you need to decide on the choice of manufacturing materials.