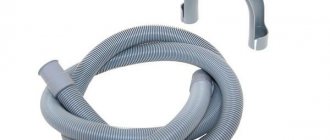
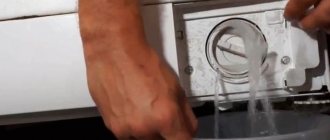
Cleaning the drain hose
You should also consider how to clean the drain hose in your washing machine.
If you think that this is simply a matter of disconnecting the hose and rinsing it with water, then it is not quite as simple as it seems. After all, the connection point is inside the machine, and you still need to get to it. And here again, you will first have to remember the instructions that came with your washing machine, since the designs are different for all brands and models. The drain pipe can be cleaned without removing it. Stores sell special substances that dissolve debris accumulated in hoses and pipes; the seller will help you choose what you need. You can prepare such a solution at home, pour 200 grams of baking soda into the drum and turn on the machine (without laundry) to wash at 90 degrees. But if this option does not work, you will still have to disassemble the machine.
The main thing for any machine is that before starting work, unplug it, turn off the taps, drain the water and disconnect the end of the hose from the sewer.
Now prepare your screwdrivers and choose how to access the hose in your machine: through the bottom panel, back cover, front or side panel.
How to clean the drain hose of an LG, Samsung or Indesit washing machine
: remove the bottom panel, disconnect the filter, lay the machine on its side and disconnect the hose from the pump, and then from the body of the machine.
If your option is the back cover, unfasten the drain hose from the body and unscrew the water supply hose from the valve, unscrew the bolts and remove the top and back covers, remove the drain hose.
If you have Bosch or Siemens
, then remove the clamp and rubber band from the front of the case, the powder tray, remove the bottom panel and unscrew the bolts, remove the door lock and the front cover, unclench the clamps and pull out the hose.
If the machine is top-loading, remove the side panel, loosen the clamps and pull out the hose.
Now let's move on to cleaning the hose. To do this, use a special non-metallic cable with a brush at the end. First, clean the hose on one side, then on the other and rinse it under running water. After completing the procedure, the machine must be reassembled in the reverse order. To check, turn on the machine without laundry (you can add citric acid to prevent scale) for washing at 60 degrees.
Finding the problematic part
It is impossible to get to the pump on Bosch washing machines through the bottom. There is only one way - remove the front panel, and only then remove the pump. The procedure is more complicated, but if you follow the instructions it will not take much time. The algorithm is like this:
- unhook the technical hatch door from the body;
- remove the powder receptacle (pull the tray towards you until it stops, then press the special “tab” and pull it out completely);
- Unscrew the screws hidden under the tray;
- unscrew all the fasteners holding the dashboard and remove it;
- open the hatch, feel the outer clamp on the cuff, loosen it and remove it;
- tuck the edge of the rubber seal into the drum (there is no need to tighten the cuff completely - putting it back in place will be problematic);
- disconnect UBL from the machine;
- loosen all the bolts securing the end panel;
- disconnect the front wall from the housing.
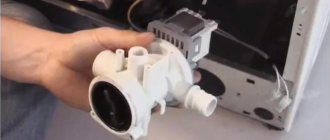
After removing the end, all the “insides” of the machine will open before your eyes. All that remains is to find the pump in the lower part of the body, under the drum. The pump is a metal “washer” with blades mounted on a snail stand. To remove the part completely, just disconnect the connected wiring and pipes, and then unscrew the holding bolt and pull it out of the seat.
Where to look for a drain pump
To clean the pump, you still need to find it inside the housing. To do this, prepare a screwdriver, a wrench, a basin with low walls (to drain water into it) and a rag.
The easiest way to find where the pump is located in a washing machine is in machines from the brands Indesit, Beko, LG, Samsung, Whirlpool, Ardo, Ariston and Candy.
In Bosh, AEG and Siemens machines
you need to disassemble the front of the machine. Necessary actions:
- Take out the powder tray and unscrew the screw.
- Open the door in the bottom panel of the machine, unscrew the screw and remove the panel.
- Unscrew the screws, remove the clamp and disconnect the cuff.
- Release the clamps and remove the housing front.
- Unscrew the screw, place a basin and drain the water, remove the pipe and disconnect the wires.
If it's Zanussi:
- Unscrew the clamps and disconnect the drain hose.
- Unscrew the screws and remove the back wall of the machine.
- Disconnect the wire terminals and unscrew the drain pump.
- Disconnect the pipes. Everything is ready for cleaning.
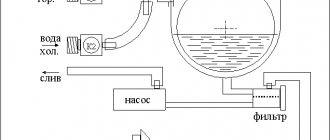
First you need to understand how the drainage system works.
From the drum, the liquid enters a special pipe (a thick rubber pipe), it is connected to a filter that traps most of the debris, then the water enters the pump, which drives it through the drain hose into the sewer. Anything can become clogged, but most often you have to clean the filter, so check it before removing the pump. First, you need to disassemble the pump; to do this, unscrew the screws, you will get two parts - a “snail” and a pump. Initially, it is worth inspecting and, if necessary, cleaning the pump impeller, then check the “snail”. Reassemble everything and check the machine on rinse and drain.
If nothing works, you will most likely have to change the pump.
So, for example, how to clean the pump in an LG washing machine
:
- Unplug the machine from the outlet and check if there is any water in the powder tray.
- At the bottom of the machine, find a special panel and open it with a flat-head screwdriver.
- Unscrew the screw and disconnect the filter from the housing.
- Tilt the machine back and place a basin, open the filter lid and drain the water.
- Unscrew counterclockwise and clean the filter. After this, you can check whether this contamination may have caused the breakdown; turn on the machine in the “drain” mode, you should hear the pump blades operating.
- By gently pressing and turning the pump counterclockwise, you can reach it from the bottom of the machine (it would be better to lay it on its side, if possible).
- Disconnect the wires and pipes, loosen the clamps. Everything is ready, you can clean it.
How to get to the pump?
The process of removing the unit depends on the design of the washer. Take a basin for draining water and a simple set of tools:
- wrench;
- screwdrivers - Phillips and flat.
Before disassembling, be sure to familiarize yourself with the structure of the device; it is important to determine the exact location of the unit you are interested in. The procedure depends on the design features of a particular model.
Through the bottom
- There should be a panel or door at the bottom through which you can reach the pump. Open it by prying it open with a screwdriver. Find the screw that secures the drain filter and unscrew it.
- Tilt the device and let the remaining water pour into the basin prepared in advance. Turn the filter device clockwise: this will allow all the liquid to drain out.
- Now twist the filter clockwise and, pressing it into the housing, remove it through the bottom.
- Disconnect the hose, wires and clamps - now you can remove the pump.
Important! All actions to disassemble the washing machine must be carried out after disconnecting it from the power supply and turning off the water supply tap.
Through the façade
- Take out the detergent container and unscrew the screw located at the bottom.
- At the bottom, remove the panel to access the filter. Unscrew the second screw and remove the front panel.
- Having found an internal panel under the front panel, screwed with self-tapping screws, unscrew them too. Disconnect the cuff, remove the clamp from the hatch and release the clamps. Having reached the desired unit, drain the water, disconnect the hose and other elements.
Through the back wall
- Unscrew the clamps that secure the drain hose and disconnect it. Unscrew the screws securing the back wall and remove it.
- Disconnect the wires and unscrew the pump.
When the unit is removed, begin cleaning it.
Prevention and Maintenance
Long service life and trouble-free operation are possible only if proper operating conditions and regular maintenance of the pump are observed. Maintenance means periodic inspection and cleaning of the pump. Inspection for abnormalities in operation should be carried out at least once a quarter, that is, twice during the heating season. It is advisable to perform cleaning every two to three years, depending on the quality of the water and the conditions in which the pump operates.
During the entire period of operation, it is advisable to periodically check the operation of the pump:
- Connections are checked for leaks. If identified, gaskets and seals (tow, FUM tape, etc.) are replaced.
- The presence and condition of grounding is visually checked.
- The sound of a running engine should not be accompanied by clangs, knocks, or extraneous sounds.
- The engine should not vibrate much.
- The pressure in the line is checked and its compliance with the nominal one.
- The housing must be clean and dry. If this is not the case, then you should carry out external cleaning, check the electronic unit for flooding and eliminate the reason why the pump is wet.
Approximately every two to three years, it is advisable to clean the pump, including all its elements. This only applies to models that can be disassembled. There are pumps with a pressed or solid, welded casing that does not require repair or disassembly. Such units fail and are then replaced with a new assembly. It is advisable to entrust this work to a service center. However, if you have the skills and tools, you can do everything yourself
Required:
- hex wrench;
- slotted screwdriver (flat) 4 and 8 mm;
- Phillips screwdriver.
Before disassembling the pump, drain the water from the system or drain a separate area in which the pump is involved, dismantle it and then begin disassembly.
Procedure:
- Using a hex wrench or Phillips screwdriver, unscrew 4-6 bolts around the perimeter of the engine housing at the junction with the shell of the pump part.
- Remove the shell, leaving the impeller on the rotor shaft along with the engine.
- Locate four drainage holes around the perimeter. Using a narrow slotted screwdriver, pry the jacket of the engine compartment under the impeller little by little around the perimeter. As a result, the shaft with the rotor and impeller will come out of the grooves and stator shell. You can help yourself by unscrewing the protective plug on the outside of the pump, inserting a screwdriver into the slot at the end of the shaft and lightly knocking the shaft out of the support bearing.
The analysis is now complete. Now you should clean the surface of the rotor, impeller and the inner surface of the shell from plaque and scale, if any, without damaging the surface of the parts. It is not permissible to use a coarse abrasive. It is better to use a brush with hard polymer bristles. Cleaning products containing a weak solution of hydrochloric acid can help. As a last resort, the finest sandpaper is used - “zero”.
For wet rotor pumps, it is important to check the cleanliness of the channel inside the shaft and the drainage holes located in the protective jacket separating the area of the pump part and the motor. The fluid enters the rotor precisely through these holes and then returns through the internal channel; if they are clogged, engine cooling suffers.
For pumps with dry rotor
Waterproofing the support bearing is important. If a leak is detected from the pump block to the stator block, then all gaskets and seals inside the device should be completely replaced.
The condition of the bearings on which the shaft rests is checked. If they are already quite broken, they will need to be replaced, which is extremely difficult to do at home; you will have to contact a service center.
All seals and gaskets inside the pump should be checked for wear and replaced with new ones if necessary. Once all elements have been cleaned and checked, reassembly is carried out in reverse order.
Sanitizing your pump at home
- It is recommended to wash and sanitize the pump at home by replacing an empty bottle with a full one every 6 months (in dusty rooms and when used by a large number of people, it can be done more often, once every 3 months)
- Wash your hands thoroughly before cleaning and sanitizing your pump.
- Remove the pump from the bottle, remove the filler tap and water pipes from it and disconnect them. Unscrew the pump pressure cup
- Wash all external and internal surfaces of the water pipes and filler tap with any dish soap using a brush under running water. Clean the pump faucet and tubes with a special cable or a napkin placed on a regular pencil. Flush the pump pump. The water temperature must be at least 30 degrees.
- Rinse all parts of the pump thoroughly with water. The water temperature must be at least 40 degrees.
- Prepare a disinfectant: at home, mix 2 liters of water with 250g of citric acid (or 1.5 liters of water and a 3% solution of hydrogen peroxide (a ready-made solution can be bought at a pharmacy). You can take a solution of 3% table vinegar).
- A disinfectant purchased in a store must be approved for this type of treatment, have instructions for its use and a document confirming its safety.
- Pour peroxide or citric acid (or another purchased product) into an enamel or glass large bowl. If necessary, add citric acid if the bowl is larger.
- Place all parts of the pump in a container so that all water openings are immersed in a solution with a disinfectant: fill tap, pump water pipes, pump. The disinfection time is determined in accordance with the instructions for use of the disinfectant. At home, leave for 30 minutes.
- If there are parts that were not immersed in the solution, for example, the outer surfaces of the pressure cup, wipe them with a clean cloth soaked in a disinfectant solution.
- Rinse the filler tap, pump, pressure cup and water pipes under running water (the duration of rinsing is determined in accordance with the instructions for use of the disinfectant).
- Immerse the tubes and faucet in a container of hot boiled water. Rinse the pump with warm boiled water, since the plastic in it is quite thin.
- Rinse with the bottled water you drink - the straws, the pump spout inside and outside, the water hole inside the pump, the pump.
- Dry the pump (Since the environment is dry, evaporation of water is harmful to bacteria. And wipe the parts that can be wiped dry.)
- We assemble the pump pump, put on the pressure cup, insert the tap and pump tubes. Let's check.
- For pumps used in dusty rooms, it is recommended to replace the air filter as it becomes dirty (can be ordered from us).
Modern circulation pumps require virtually no maintenance, and if a heating circulation pump needs to be repaired, it is better to entrust this task to a specialist from the service center. However, in order to prevent equipment breakdown, you can take some measures that will help prevent such an unpleasant event.
Maintenance of circulation pumps
Pump malfunctions and ways to eliminate them
The design of a circulation pump with a “wet” type rotor is based on a modular principle. Modules can be configured in different configurations. It all depends on the power and size of the pump.
Any repair work can only be carried out if the power is completely turned off and the area has been drained.
Malfunctions of the heating circulation pump:
- The pump turns on, sounds are heard, but the shaft does not rotate. Why is the heating pump noisy and why do other “symptoms” appear? The reason may be oxidation of the shaft after a long period of inactivity of the device. If the pump is blocked, the device must not be left on. It is necessary to drain the water and all the screws that connect the pump housing with the electric motor must be unscrewed. Next, we remove the engine itself, and its impeller is turned manually. If the pump is of low power, the shaft can be unlocked by turning it with a screwdriver. For this purpose, there is a special notch at the end of the shaft.
- A foreign object has blocked the wheel. How to disassemble a heating circulation pump? We dismantle the pump motor using the above method. To prevent blocking from happening again, a mesh type filter must be installed in front of the pump.
- There are problems with the power supply. It is necessary to check the voltage in accordance with that indicated in the technical data sheet of the device. You should also check if all phases are present and if everything is connected correctly in the terminal box.
- The circulation pump does not make sounds (the heating circulation pump does not hum) and does not turn on. There is also no supply voltage. The fuse may be damaged. In this case, the fuse will need to be replaced. If nothing has changed after replacement, then the reason may be in the motor winding. Most likely it burned out.
- The pump turns on, but after a while it turns off. The cause may be deposits that have formed between the rotor and the stator jacket. It will be necessary to dismantle the electric motor and clean the stator jacket from scale.
- When the pump is turned on, a sharp noise occurs. Why is the heating pump humming and how to de-air the heating circulation pump? It is necessary to release the air and install an automatic air vent at the top point of the pump piping unit.
- The pump vibrates. The cause may be bearing wear. Typically this problem is accompanied by a characteristic noise. To eliminate the problem, the bearing will need to be replaced.
- The water pressure and its supply are lower than those indicated in the circulation pump passport. This malfunction is typical for three-phase type pumps if they were connected incorrectly.
- After the pump has been started, the external protection of the electric motor is activated. Most likely, the problems occur in the electrical part of the engine.
- It is necessary to check if there are phases in the terminal box. You also need to check if the fuse contacts are dirty. You can also check what the phase resistance to grounding is.
If you know how to clean the drain pump in a washing machine, this useful functional device will serve faithfully for many years. Once you hear an unusual buzzing sound during the washing process or discover that water does not drain through the hose, you should first think about the possibility of cleaning the pump. In any case, it will have to be removed for evaluation; sometimes the element simply fails. Even a person who is far from understanding the operation of a washing machine is able to carry out a manipulation that housewives usually try to entrust to professionals.
Signs of a clogged pump
If you notice that the drum begins to slowly fill with water, it means that the drain filter in the washing machine is partially clogged.
Another sign of a malfunction is the presence of extraneous noise, buzzing and humming that the device makes when pumping water or while rinsing. In addition, dirty water does not drain and remains in the drum.
Important! There are a number of reasons when water will not come out of the machine, if the drain hose is squashed in any area, or the laundry blocks the drain passage at the bottom of the tank.
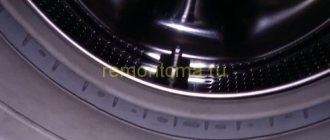
Where is the drain filter in the washing machine?
First, let's figure out where to look for the node we need. Everyone's cars are different, both in brand and model. They also differ in the type of laundry loading. But with all the variety of types of equipment, its manufacturers install filters at the bottom of the washing machine next to the pump.
Since this is an internal part of the machine, it is closed from the outside with a hatch or removable panel.
To make it easier for you to understand your washing machine, we have put together a photo table with the location of the filter for the main brands of SMA.
| For LG washing machines, the pump filter is located at the bottom left behind the hatch. | |
| For machines of the Indesit and Ariston brands, look for the filter behind the lower removable panel on the right. | |
| For Candy washing machines, the drain filter is located on the left side behind the hatch. | |
| For Bosch and Siemens cars, the unit is located on the right behind the hatch or decorative strip. | |
| In the Electrolux or Zanussi brands, the filter is located at the bottom right and covered with a plastic hatch. | |
| In Samsung washing machines, look for the filter in the lower right corner behind the plastic panel or behind the hatch. | |
| On top-loading washers, such as the Whirlpool, the part is located at the bottom left. | |
| In the Atlant washing machine, the filter is hidden behind the hatch at the bottom right. | |
| In Electrolux and Zanussi washing machines with vertical (top) loading, the drain filter is built into the edge of the machine drum and is removed from inside the drum. |
Cleaning the water intake pump filter
Any preventative work on the Atlant washing machine involves certain actions. To begin with, the unit is disconnected from the power supply, then the flow of water into the device is cut off. These are the basic operating rules that protect against electric shock and flooding.
The pump filters of the Atlant washing machine are located in the water intake hose and in the pipe of the electronic valve. These designs are designed to retain mechanical impurities that can penetrate into the machine from the water supply network - sand, metal particles. Debris in the liquid, settling on the mesh, interferes with normal water intake.
The algorithm of actions is as follows:
- the nuts are turned against the direction of movement of the clock hand, the filling hose is disconnected from the liquid intake valve and the pipe located on the valve,
- pump filters are removed using tweezers or pliers,
- cleaning is best done with a brush, holding the element under the tap,
- all elements are installed in their places.
Please note that the filling system screens must be cleaned annually.
Causes of clogging and their prevention
The formation of a blockage in the drain system of the machine is indicated by the fact that the water has either stopped draining completely or is draining, but very slowly; during draining, a noise resembling a buzzing sound is heard, and most importantly, when you try to start “rinsing” or “spin”, the washing machine turns off .
What is the cause of the blockage? Dirt and debris from the water supply or clothing, as well as low-quality powders that, instead of dissolving in the water, clog the pump. Therefore, there are two types of blockages: mechanical (from debris) and natural (from the smallest particles of clothing accumulated on the filter). A natural blockage forms in the drain system in any case, albeit slowly, so if you never clean the drain system of your machine, it will definitely clog at the most inopportune moment.
In order to reduce the number of “cleanings” of the drainage system in the future, it is enough to remember simple rules:
- It is better to wash clothes with loose “decorations” in special bags.
- Do not use low-quality washing powder.
- Once a month it is worth cleaning the drain system of the machine.
- Before each wash, check everything, even the smallest pockets of your clothes, for forgotten items, garbage or papers.
- Fasten zippers and buttons before washing.
And remember, your washing machine also needs care, and then it will serve you well for a very long time.
Attention, TODAY only!
It is recommended to clean the filter and completely drain the water at least 2-3 times a year.
If this procedure is carried out regularly, then damage to the drain pump can be avoided for a long time. Sometimes there are cases when cleaning the filter becomes necessary, for example:
If the washing machine does not drain water or the spin cycle fails;
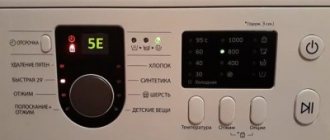
If the display shows the message “Clean the pump”;
For this:
1. Disconnect the washing machine from the electrical outlet.
2. Open the bottom panel or the cover on the panel that covers the filter.
Or so
3. Prepare a container and place it under the filter on the right side.
4. Open the filter slightly. Do not remove completely. Gently turn the filter counterclockwise until water begins to flow out.
5. Wait until all the water has completely drained out, unscrew the filter completely and remove it.
or so
6
You can carefully tilt the machine forward to allow the remaining water to drain completely.. 7
Clean the compartment where the filter was located and the filter itself.
7. Clean the compartment where the filter was located and the filter itself.
8.Check that the drain pump impeller rotates freely.
9.Place the filter in place and screw it clockwise until it stops.
10.Reinstall the bottom panel (or panel cover) into place.
11.Plug in the washing machine.
If you have a model with an emergency drain hose, then remove the base (or panel) as described above. Then remove the emergency drain hose and place the water container at such a distance that the hose can reach it. Remove the cap from the hose and allow the water to drain into
capacity. Cleaning the filter should be done as described above. Then install the plug on the hose and install it in place at the base of the machine.
Despite the fact that the washing machine is a “helper” in maintaining cleanliness, it itself also needs care and cleaning. If one day while washing, you hear an incomprehensible buzzing noise coming from the machine that you have not heard before, and the machine does not drain the waste water, this means that it urgently needs to be cleaned. Most likely, the drain pump is clogged, or in the worst case, the pump fails. That's why we decided to tell you how to clean the drain pump in a washing machine on your own, without the help of a professional.
Step by Step Actions
The procedure for cleaning the catch filter in a washing machine is simple and does not require great skills or special tools.
Tools and equipment
You need to prepare in advance and have simple equipment and tools on hand:
- A flat-head screwdriver (minus), a rounded cutlery knife, or a coin.
- Pliers or pliers.
- A low but wide reservoir for draining water.
- A rag.
- Flashlight.
On forums, some users share videos of their experience using a regular plastic garbage bag instead of a container, draining so that not a single drop remains on the floor.
Preparing for cleaning
In order to clean the filter assembly, you will need to perform some preparatory work common to all washing machines:
turn off the water to the machine;- disconnect the device from the power supply;
- using a screwdriver or other device, carefully pry and open the cover of the hatch in which the debris catcher is installed;
- Using the handle on the lid, turn it 45-60o counterclockwise and drain the remaining water in the system.
After this, you can completely unscrew and remove the debris catcher from the snail niche.
Troubleshooting Possible Problems
Often at this stage it becomes difficult to unscrew the drain filter. The causes of the problem may be:
- Irregularity of preventive cleaning of the unit.
- Scale formation on threads.
- Blocking of the catcher by foreign objects.
In these cases, there are simple methods that can help solve the stuck filter problem:
- tilt the washer slightly away from you and tap the filter cover with a gloved hand;
- try using pliers or pliers to unscrew the part.
To avoid breaking the plastic handle on the lid, clamp it with pliers and turn it carefully, without excessive force.
If you still cannot unlock the filter or it unscrews but cannot be removed from the niche, then there is another, more complicated method - dismantling the drain pump.
If there is no relevant experience, then the work of removing the snail with the pump should be entrusted to a specialist.
Process
The step-by-step cleaning procedure looks like this:
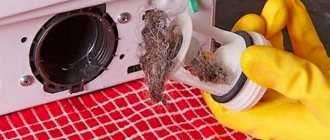
Remove all foreign objects and deposits from the filter niche and wipe it clean.- Use a flashlight to make sure the snail is completely cleaned.
- Use a rag, toothbrush or sponge to remove heavy dirt and scale from the filter itself.
- Wash the part well under running hot water.
- Put the filter in place.
To make it easier to remove mold or scale, you can use citric acid or soda dissolved in equal parts of water.
Example on a Samsung Diamond washing machine
More specific instructions for cleaning the drain filter can be seen using the example of a Samsung Diamond washing machine. The devices may have an emergency drain.
If you are forced to stop washing due to problems with water drainage, you must:
- Lift and open the cover of the hatch behind which the filter is located.
- Remove from hook and pull out drain tube.
- Remove the plug from the hose.
- Drain the water.
- Place the plug and secure the drainage tube in place.
For preventive cleaning of the Diamond washing machine filter, before removing it, the remaining water in the drain system is also pre-drained according to the emergency drain scheme given above.
The further procedure and sequence of actions for servicing the garbage trap are the same as for most automatic washing machines.
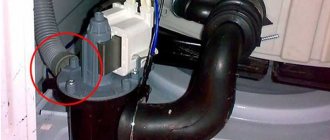
How to get the pump
This is done quite simply. Most machines have a special compartment for the pump at the bottom of the machine. The pump is hidden behind a small rectangular panel, which can be removed by unscrewing the fasteners and prying it off with a screwdriver. Next, you need to find the self-tapping screw that holds the part inside the housing. It is usually located on the right side of the pump.
The next step is to prepare a container into which you can drain the water. This container will need to be placed under the washing machine, having first tilted the device. Only after this is it recommended to remove the pump, because water may leak from it.
To remove it, you need to push the part into the body of the machine and remove the pump through the bottom. You must first disconnect all wires and hoses.
Please note that not all models have the ability to shoot details like this. For detailed information, please see the instructions for your device.
Cleaning the pump
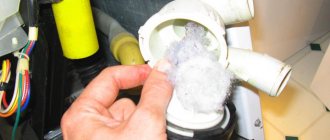
When the pump is in your hands, you can start cleaning. First you need to disconnect the impeller, which is attached to several self-tapping screws. It is in this part that a lot of dirt can accumulate, so cleaning starts from here. Then you can clean the snail, getting rid of all the blockages accumulated in it. Subsequently, everything must be collected and installed in its original place.
Assembly occurs in the reverse order, after which you will need to check the functionality of the machine. If everything is connected correctly, then the cleaning can be considered complete.
For your washing machine to work well, it needs periodic cleaning. When the user constantly uses the washing machine without caring about maintenance, sooner or later it will fail. If you hear a buzzing sound from the machine during the wash cycle and the water does not drain for a long time, the drain pump is clogged or faulty.
In this article we will look at where the pump is located in various models, how to check and clean it.
You can determine that the pump is clogged by external signs
Pay attention to these symptoms:
- Water drains poorly and slowly from the tank.
- When pumping water, noise and buzzing noises are heard. The pump tries to drain the water, but to no avail.
Why is the pump clogged, what contributes to this:
- Dirt and debris coming from a water pipe.
- Debris that gets into the water from clothes. These are buttons, coins, threads, hair.
- Bad detergents that do not dissolve during washing and clog the pump.
If the drain path in the SMA has never been cleaned, then it is not surprising that the pump is clogged. Let's look at how to fix the situation yourself and clean the car.
Indesit washing machine pump design
What is a drainage system?
Used water from the drum flows through a short pipe to the drain pump. After receiving a signal from the electronics, the pump pumps water into the drain pipe and then it goes into the sewer. As soon as the tank is empty of water, the drain pump turns off.
This entire system is attached to the cochlea, the so-called distributor, which is shaped like it. A huge load affects the pump, especially in spin mode. A filter is included in the drain system and it plays a huge role in the washing process. Water from the tank enters the filter, which is a grate through which large debris should not leak through: coins, pins, buttons, etc. This is what saves the pump from premature failure due to blockage.
Filter clogged
The most common cause of blockage is a problem with the drainage system. To remove it, you just need to clean the pump, drain filter and volute. How to do it?
The washing machine is cut off.- At the bottom there is a small door behind which there is a drain filter. Before you start unscrewing it, you need to place a low container or tilt the machine back and place a basin, for example. The liquid that spills out usually has a volume of at least 1 liter.
- The filter is unscrewed counterclockwise.
- The stage of cleaning and rinsing under strong pressure of running water.
- Reassembly and running a test wash.
What if the drain still doesn't work after that? So let's move on to the pump.
Pump damage
The rule for turning off the power and shutting off the water is mandatory!
Before you get to the pump and check its functionality, you will need to get inside the washing machine. Armed with a wrench and screwdrivers, you will first need to study the instructions for the equipment. This is done in order to find out where the pump is located for the Indesit washing machine and other models, since its location is different depending on the model.
Repair
It is best to take a broken circulation pump to a specialized service center, especially if it is still under warranty. Most of the models currently on the market, unfortunately, are non-separable or partially disassembled, so if problems arise with its internal spare parts, entire units or the pump assembly must be replaced. If the warranty period has already expired, and the design of the pump allows you to disassemble it and get to all the main components, then, if you have the appropriate skills, you can carry out the repair yourself.
Having determined the cause of the malfunction from the table above, it is enough to disassemble the pump, as indicated in the paragraph on prevention and maintenance, and replace the faulty part.
The main elements in the pump control unit are:
- 1-5 microfarad capacitor;
- terminal block for connection;
- speed controller.
Due to the small capacitance of the capacitor, you can check it using a multimeter, which has a built-in C-meter with a limit of up to 20 µF
If the readings deviate significantly from the nominal value, the capacitor should be replaced; it is important to maintain the polarity of the connection and be sure to have its voltage tolerance. For a conventional single-phase motor, capacitors with a tolerance of up to 450 V are used
The speed controller assembly is replaced with a new one. It is enough to disconnect it from the terminals, remembering the position of each pin and connect a new one.
The terminal block must be perfectly clean, dry and without signs of obvious overheating or burnt. If the above problems exist, then it should be replaced with a new one, the same or similar in the number of connections.
Popular models of circulation pumps are from the manufacturers Wilo, Ggrundfos, Dab. Not least due to their reliability. You can expect these pumps to break down within the warranty period only if the recommended operating conditions are violated. However, during the post-warranty period, Wilo often has problems with support bearings. Only replacing them helps.
Ggrundfos and Dab can “please” the impeller to become overgrown with scale for high-temperature heating systems, as well as silting of the stator cup. It is better to prevent these problems by installing a good filter and preparing the water. Otherwise, breakdowns are often justified by external problems.
Prevention measures
The reasons why washing machines become clogged, be it Whirlpool, LG, Bosch or any other brand, are garbage, hard or dirty water, and low-quality detergents. To reduce the risk of pump clogging, it is recommended:
- Use only special washing powders for washing - for washing in SMA.
- Wash things in washing bags to prevent small parts from getting into the drum and tub: buttons, locks, etc.
- At the entrance to the machine, you need to install a cleaning filter so that perfectly clean water, free of impurities and rust, flows into the machine.
- The user, having noticed a decrease in the performance of the device, must disassemble the device in a timely manner in order to clean the filtering devices and pump.
- Carefully check pockets of clothing before loading into the drum.
- Clothes that are too dirty should be soaked before washing to remove large fractions of dirt.
- Use anti-scale agents when washing.
- When the wash is finished, check the drainage of water from the tank - it should pour out completely.
If you try, you can complete the task of cleaning the water pump yourself, without the help of a specialist.
It is important to follow the instructions and follow the procedure. Timely cleaning of blockages will prevent pump breakdown and extend the life of your machine.
Increased demands are placed on the technical and operational characteristics of pumps. They must operate smoothly in the most adverse conditions. Therefore, manufacturers strive to minimize the number of moving, rubbing parts. The devices can withstand loads with dignity, work for years, and sometimes decades, without repair or replacement, but they all need cleaning. All parts of the devices are tightly fitted to each other and “stick” during operation, so disassembly may be difficult. How to properly disassemble and clean the pump?
Surface pumps are easier to disassemble than submersible pumps, because... their cases are not so sealed
Preventive measures
You can protect your washing machine from breakdowns, especially from clogging of the pump (drain sediment). To do this, you need to adhere to the following recommendations:
- Carefully check the pockets of items before washing for the presence of foreign objects (for example, small money, metal or plastic objects). These parts can damage the inside of the pump or block the drain hose.
- Soften washing water. Synthetic products (Kalgon, Uplon, Kupava) and special filters will help with this. The former remove plaque formed by small particles of salts and metals (components of hard water), and filters prevent these particles from penetrating inside the washing machine.
- Do not overload the device (load the amount of dirty laundry into the drum as recommended by the manufacturer).
Regular cleaning of the filter, which is located between the pump and the drain hose, will also help protect the machine from such damage. By following these rules, you can protect the device from damage.
Why did the blockage happen?
During the operation of the SMA, alarming signs may appear:
- Water drainage is unusually slow.
- A buzzing sound is heard when pumping. The efforts of a device that wears out do not lead to results.
The diagnosis is clear - the pump is clogged. Causes of clogging:
- Debris and contaminants that come with water from water pipes.
- Debris and small objects that fall into the drum along with clothes placed in the wash.
- Poor-quality detergents - they clog the drain if they do not dissolve completely.
It happens that owners of automatic washing machines never clean the drain when using them. But no matter how “smart” and efficient the machine is, no matter what famous brand it represents - “Samsun G”, “Ariston”, “Electrolux” or “Indesit”, they all need regular cleaning of all components that come into contact with water. Cleaning the drain assembly is difficult because you still need to get to it.
How to disassemble and clean a submersible pump
About once every two years you need to remove the pump from the working fluid, disassemble and clean it. If worn parts are found during inspection, they are replaced without waiting for interruptions in operation.
Work order
The pump is cleaned in the following order:
- Removal from the well or reservoir where the device is installed. The device can only be lifted by the cable, never by the pipe.
- Visual inspection. The pump is inspected to ensure that there are no signs of rust on the body, cracks or chips that may appear during operation or lifting itself. If everything is in order, the shaft is smoothly turned by hand. It should move without jamming. If rotation is difficult, you need to disassemble and check the ball bearing assembly.
- Checking the oil level and condition of the oil seal. If necessary, add new oil. The oil seal must allow oil to pass through well to prevent dry operation of the device. This is fraught with damage. If the oil seal is worn out, it is replaced.
- Cleaning the impeller (for centrifugal equipment). This node is often clogged with silt. To clean it, you need to remove the cover and rinse the work area with water. At the same time, the condition of the check valve is monitored. If it has lost its seal, it will have to be replaced.
Before cleaning, the device should be removed from the well and the water should be drained.
Washing the work area
To disassemble the device, remove the coarse filter mesh. It can be secured either with two screws or with a spring clip. When the mesh is removed, unscrew the bolts of the flange connection and divide the pump into two parts - upper and lower. The washing process itself is simple: pour water from a hose into the inlet and rotate the working shaft. To rotate the shaft, you can use a 12mm wrench. Gas and open-end wrenches are suitable.
After washing, check the shaft movement again. If it is light and smooth, the device can be assembled and installed in place. If there are difficulties, it is necessary to rinse the work area again. The real trouble is when the water pours out of the pump is already clean, but the shaft is stuck and does not rotate. Most likely the impeller is broken. In this case, there is no need to try to repair the device. It should be taken to the workshop. “Amateur performance” will only hurt.
Preventative cleaning of pumping equipment should be carried out regularly. While preventative maintenance once every two years is sufficient for a well pump, drainage and fecal pumps need it more often, because... devices work with contaminated liquids and wastewater. If any damage is found, it is better to take it to the experts. It's more reliable.
Modern circulation pumps require virtually no maintenance, and if a heating circulation pump needs to be repaired, it is better to entrust this task to a specialist from the service center. However, in order to prevent equipment breakdown, you can take some measures that will help prevent such an unpleasant event.
Removing the part from dirt
Practice shows that most often the pump is clogged due to a blocked impeller. Hair, lint and threads are constantly wound around it, which makes it difficult for the wheel to move and leads to the mechanism stopping. Therefore, the first step is to clean the pump blades of all adhering debris.
If after cleaning the blades do not rotate more freely, then it is necessary to continue “cleaning” the pump. To do this, unscrew all the screws on the body and disassemble the pump into two parts. Then we clean off all the accumulated dirt from both halves and put it back together. Then we check whether the impeller rotates well.
Some Bosch models are equipped with non-separable pumps that cannot be cleaned or repaired.
Often the impeller is not blocked, but, on the contrary, falls off the shaft or dangles. In this case, you cannot try to “reanimate” its blades with glue or sealant - this is unreliable and dangerous. It’s better not to risk it and replace the pump completely, especially since the cost of a pump for Bosch washing machines is low.
How to clean the pump in a washing machine
The main task when cleaning the pump is to improve the operation of the impeller.
You can get to it by removing several screws and part of the pump housing. When in good condition, the impeller rotates. Accordingly, it wraps various elements of things around its body. It must be cleaned of accumulated debris (hairs, threads, wool). All actions must be carried out carefully.
Now you can assemble the pump and install it where you got it from. All manipulations are performed in reverse order.
You need to check the washing machine and start washing in standard mode. The absence of uncharacteristic sounds and the drainage of water without interference indicates that everything was done correctly and the part is working properly.
If the actions taken did not lead to the desired result, then the pump will have to be replaced.