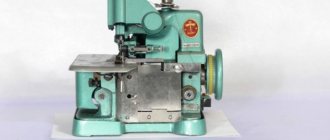
The heart of any sewing machine is the shuttle device. The ease of working with equipment, its reliability and performance depend on it. The design of the shuttles differs from each other (vertical, horizontal, pendulum), they have their pros and cons, which will be discussed in the article. The choice of this element determines what the sewing machine will be capable of.
Description of the shuttle device
In order for the element to remain operational, it needs care
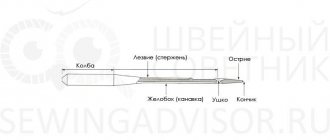
The hook used for a sewing machine is an element that directly interacts with the needle. And the more “accurate” it is, the better the quality of the sewing work. A properly functioning device will not cause skipped stitches, broken threads (upper, lower) or looping.
In order for the element to remain operational, it needs care. For example, if scratches, mechanical damage, rust, dust or oily stains appear on the surface of the shuttle, all this will affect the ability of the thread to slide. This causes the top buckle to be pulled out, causing weak stitch tension.
In stores that deal with sewing equipment and related accessories, you can find a variety of equipment. The shuttles produced differ in design and functions assigned to them.
Sewing shuttle - the main unit of a sewing machine
The quality of the sewing machine’s operation depends on the condition and settings of the interaction between the needle and the shuttle. First of all, the absence of skipped stitches in the line, breakage of the upper and lower threads, looping of the thread from below, etc.
The surface of the sewing hook must be in perfect condition. Free from roughness and nicks, rust, dirt, and traces of oil. The cut loop of the upper thread (above the eye of the needle) is grabbed by the nose of the shuttle and pulled further to form a stitch. The loop expands with the walls of the shuttle, goes around the shuttle and leaves its walls, forming a shuttle stitch. Any nick or rust stain can affect the thread's glide, resulting in "extra" stretched top thread and a loose stitch. As a result, the thread “loops” on the bottom side of the stitch, and in some cases the top thread breaks.
Principle of operation
The rotation speed can reach 900 rpm, which depends on the equipment settings
The design of the sewing equipment determines what type of shuttle mechanism it contains. Traditional - vertical, which is a cap with a bobbin.
It works like this: a bobbin with thread is fixed in a groove, when the sewing machine starts, the shuttle moves vertically and horizontally, while pulling the thread along with it. Here the lever and the body of the sewing equipment are rigidly connected, so the mechanism is characterized by high reliability.
A vertical type rotary shuttle works differently: the bobbin case, together with the bobbin, moves around its axis.
The rotation speed can reach 900 rpm, which depends on the equipment settings. The good thing about the device is that it can be quickly set up and at the same time has a convenient location to the needle shaft.
The most widespread is the horizontal mechanism, which forms a stitch only after two full revolutions of the shuttle.
There is a built-in bobbin case, so the user is able to quickly “charge” the consumable by simply inserting a spool of thread into the case. The parts of the horizontal device are automatically lubricated, and it is characterized by its quiet, silent operation.
Possible problems and their solutions
If you can’t adjust the tension, what should you do?
- The tension is too weak, no matter how you tighten the levers. Check the tensioner springs. It may happen that they are worn out and can no longer press the washers together to hold the thread. Needs renovation.
- The fiber breaks and frays. The material of the upper tensioner plates could deteriorate and slightly rust if the problem is in the upper tension, and the bobbin and hook cap if the lower one breaks. Damage also occurs on the thread guide, in the eye of the needle. It is useful to look at its entire path and find out what is wrong there.
- If the reel or bobbin was wound by hand, then uneven winding also leads to tension surges. Try tuning on a different coil.
- Inconsistency between work speed and tension. If you set the tensioner correctly, but the machine cannot maintain the desired speed (this happens for various reasons), breaks from overtension occur. This requires repair or replacement of the entire device.
These are the most common reasons, after which everything usually works as normal.
Device types
There are several types of shuttle mechanisms, each of which is good for working with certain tissues. Knowing which shuttle is installed in the equipment will make it easier to use. This is also a key parameter by which sewing equipment is selected.
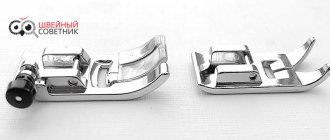
Horizontal
Horizontal shuttle
Found in most sewing machines sold at an average price. The device is equipped with a rotation mechanism - two full turns form a stitch. There is no separate bobbin case; the bobbin sits directly in the device, which makes threading the lower thread easier.
Advantages:
- the plate with the needle is hidden by a transparent window through which the color of the thread wound over the bobbin and its quantity are visible (it is more convenient for the user to determine when it needs to be replaced);
- it works quietly, looks and is designed simply (no stitches are skipped, needles and threads do not get tangled);
- The machine does not require oil lubrication.
On many sewing machines with a horizontal shuttle, you can adjust the stitches: width - up to 7 mm, length - up to 4.5 mm.
Flaws:
- It is difficult to adjust the bobbin thread. The nut is located on the device itself, which is plastic, so it only works with standard threads;
- The mechanism cannot be modified (only replaced with a new one).
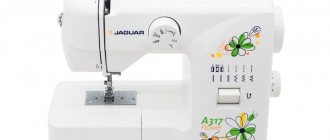
Brother sewing equipment is equipped with a horizontal shuttle mechanism.
Vertical
Vertical shuttle
The classic type of shuttle mechanism (pictured), which was installed in old Soviet cars. Such a shuttle is still found today - in almost all cheap models, as it is convenient, simple and reliable.
It works like this: a bobbin with thread, installed in a cap, is placed in a groove and, when you press the lever, it swings like a pendulum, up and down, drawing the thread with it. The lever is rigidly connected to the body of the equipment, which reduces the likelihood of the shuttle breaking. In this case, the machine can be threaded with any thread, the mechanism will not jam.
The vertical device has two disadvantages: it is noisy and imposes restrictions on the sewing speed. The swinging vertical mechanism is found in machines from Brother and Janome.
The advantage of working with such a shuttle is that the machine is capable of performing many operations, and serious skills are not required.
The swinging vertical mechanism is the choice of creative people who, in addition to sewing, do quilting, embroidery, or create decorations.
Rocking
Swing shuttle
This is a type of mechanism that also uses a bobbin case with a bobbin. The peculiarity of the system is that it rotates around its axis, which is why its second name is “rotational”. The advantage of the solution is the rotation speed, which reaches 1000 rpm. There are other advantages:
- easy to set up and can be fixed “on the needle” without much difficulty. During sewing, stitches are not skipped, the thread does not break, or get tangled. A good machine with a swinging shuttle can work with almost any type of fabric;
- reliability, quiet operation;
- increasing the technical capabilities of the machine: increasing the stitch width to 9 mm, length – up to 6 mm.
Machines with a rotary mechanism are chosen by those who prefer to sew a lot, with virtually no interruptions during breaks.
Its malfunction. gaps on the widest zigzag.
In recent years, many imported sewing machines have appeared.
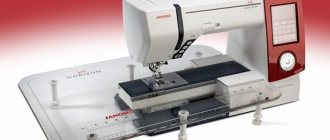
HOW TO CLEAN YOUR JANOME SEWING MACHINE.
The owner of this car did not ask for help. Help her set up a machine that is not described on my website.
I agreed. And he offered her this option.
She took a photo for me, and I took a photo for her. Based on these photos, a description and procedure for setting up the machine.
In photo 1, car. Janome 1143. Front view.
Photo 2, Janome 1143, rear view.
Photo 3, Janome 1143, view from the front.
Photo 4, Janome 1143, is viewed from the flywheel side.
Photo 5, Janome 1143, top view.
Photo 6, Janome 1143, bottom view.
The difficulty for her was to open the car body.
- Use the tip of a screwdriver to pry off this cover.
- Unscrew the screw under the cover.
- Remove the cover.
In photo 7, Janome 1143, front part.
Photo 8, screw and cap. stub.
In photo 9, access to the front mechanism.
Photo 10, front view.
- Needle plate.
- Screw, fastening the foot.
- Needle holder, with needle thread guide.
- Needle bar.
- Screw for fastening the needle bar to the driver.
- Light bulb socket with minion socket.
- Leash. connects the needle bar to the crank.
- Thread take-up.
In photo 11, another unexpected situation. Hex screw.
In photo 12, the owner had to buy a set of hexagons.
- Pencil case.
- Needle plate.
- Bobbin case.
- Pressure ring.
- Shuttle.
The Janome 1143 shuttle is similar to the shuttle from the Chaika machine. And from the words of the hostess:. “Yes, I sewed on it”!
In photo 14, checking the gap at the exit from the shuttle. for the top thread.
Photo 15, First check. Positions of the shuttle nose, with the needle in the lower position:
- The needle is on the left prick.
- Needle in position. dropped to the lowest point zero (0).
- The nose of the shuttle did not fit into the body by 1.1.5 mm.
At a rate of 1.1.3 mm, for the Chaika machine. This is normal for now.
In photo 16, gaps do not match
It should be like this: The gap is 0.5 mm; The gap is 1.5 mm. This is ideal.
And here we have it: the gap is approximately 1.5 mm, and the gap is 0.1 mm. requested a new photo.
By clicking on these blue inscriptions. you will end up in these articles:
In photo 17, the gaps are clearly visible:
- The gap is 0.5 mm.
- The gap is 1.5 mm.
- The gap between the end of the buffer spring and the vertical flange of the shuttle is 0.3 mm.
In photo 18, the gap is almost two times smaller than the gap
In photo 19, insert the key into the screw with an internal hexagon.
Switch the stitch control knob to the widest zigzag. And we pierce the needle, in the left corner, of the needle plate. called. Left thrust!
In photo 22, right and left injections, without a needle plate.
Now we will make right and left injections, without a needle plate.
In photo 23, the nose of the shuttle has crossed the flat of the needle. The location on the needle is shown by the red line.
The control knob was placed on a straight line.
In photo 24, the place where the nose of the shuttle intersects the flats of the needle.
Again, we switched the stitch control knob to the widest zigzag.
Here you can see the tip of the nose. shuttle, passes 0.5 mm lower. top of the hole.
Holding the needle bar from falling sharply down, slightly loosen the screw. on the needle holder clamp!
(Insert a key into the hexagon of the screw. Loosen the screw.)
Photo 26 shows the direction of loosening the screw.
We need to lower the needle bar, with the needle inserted into it, 1 mm down. But so that the needle bar does not rotate around its axis.
In practice it is done like this.
- On the table on which we will make the settings, we place a blanket folded 4-8 times.
- We place the machine on the back wall.
- The needle is on the right prick.
- Place your right hand on the flywheel. When we begin to put pressure on the key ourselves, it will begin to turn. Therefore, with our right hand, we slow him down!
- With your left hand, pull the key towards you.
- We set the weakened needle bar with the needle so that the tip of the tip, the nose of the shuttle, at the entrance to the flat of the needle, is 0.5 mm higher than the top of the needle hole. On the right injection!
- We tighten the screw.
- Let's check. Pictured 27
In photo 27, red lines show the trajectories of movement of the nose, the shuttle, 0.1 mm from the surface of the needle flat.
- Shuttle.
- bobbin case,
- needle plate,
- paw,
- Cover.
.-.-
Good evening, it's me again. You've probably already given up on this whole idea, but I'll give it one more try))). I keep tormenting websites and all sorts of books in order to at least get my bearings in the terms. It seems to me (or maybe it just seems) that I understood what gaps you were talking about. If I understood correctly from this picture, I tried to photograph them, but it seems to me that they are very difficult to see in order to measure them. Should I measure them myself? Do you do this with a simple ruler or a caliper?
Good afternoon I'll send a photo after adjustment. While the battery was charging, I couldn’t stand it and tried to sew it with a double stitch, it didn’t let anything through, so I can now sew. Because I sew mostly knitwear, I had to hem it with two parallel lines, and it didn’t always come out straight. Thank you very much. ps by the way, somewhere on the website (or maybe on yours, I don’t remember) that the needle bar can rise after hitting the needle plate. And I remembered that I stopped sewing with a double stitch right after the blow. In general, I learned a lot of useful things from your site. Thank you!
Photo 28, Left injection after adjustment.
Red line. The intersection of the shuttle nose and the needle is shown.
In photo 29, the needle is in the center of the needle plate.
The red line shows the intersection of the shuttle nose and the needle.
Photo 30 shows the right injection. The red line shows the intersection of the shuttle nose and the needle.
Add a comment
Here is my Email: [email protected] where you can ask any questions about sewing machines.
Janome Juno 523. Eliminating shuttle knock.
Dear visitor, if you want to help develop the site, please disable the AdBlock extension!
Which type is better to choose
Rotating vertical shuttle
When buying a sewing machine, it is worth understanding that the shuttle installed in it depends on its cost:
- economy class appliances – vertical;
- middle class, cars with functions – horizontal;
- industrial or professional models used for intensive work - swinging.
If you read the reviews, users praise the type of shuttle mechanism they are used to working with. To purchase a suitable machine, take into account your own specialization:
- pendulum, rotational type is suitable for those who have little experience in sewing. Such machine models do not have a set of functions, but their shuttle is simple to use, reliable and durable. Equipment with such a system is taken for rare use;
- horizontal should be chosen by those who want to create a small number of things from different fabrics, without finding fault with the sewing speed. Sewing machines with such a mechanism have good functionality, and their price starts at 8,000 rubles;
- a rotating vertical mechanism is the choice of professionals and studio employees who value stitch selection, quality and comfort.
A “home” option when you want to sew for yourself is a horizontal shuttle. If you properly monitor the condition of your sewing machine, it will remain operational for a long time.
Checking and adjusting the upper thread tension
Before setting up, a test seam is usually performed. If the thread plexus is located on the front side, then the upper one is overtightened. And if it clearly goes to the wrong side, then it needs to be tightened. Ideally, the threads are intertwined inside the fabric.
The upper thread tension control is usually located somewhere on the arm of the machine. You can find it exactly using the instructions. If you don’t have it at hand, then inspect the case for a regulator with numbers. Typically this is a round pen with number divisions.
READ How to install thread in a sewing machine
The lower the number, the lower the tension. If you twist towards larger numbers, it will grow.
- turn the lever half a notch;
- make a test stitch;
- If you are not satisfied with the result, then repeat the process until the seam is perfect.
It is necessary that as a result the thread stops sagging or tightening.
General recommendations
A few tips will help save time and effort.
- If you have already established tension performance specifications for different types of fabric and fibers, write them down. So, by changing the product and working conditions, you can instantly adjust the work and not be distracted by searching for the desired tension parameters.
- Before you start sewing, pull the ends behind the presser foot. This way they will not get into the seam and form sloppy weaves with the working parts of the threads.
- When you set up the tensioner, use a solid color fabric and two threads that contrast in color to it and to each other. For example, brown matter, red and green threads. This will help you instantly understand what the problem is, rather than trying to see “white on white” where and how the seam is intertwined.
Problems with the pedal
The steps described above will help you figure out how to set up a manual sewing machine and are sufficient to work with any model of electric machine. The only difference between the settings of a manual and an electromechanical machine lies in the foot pedal. If the device begins to react to pressing the pedal with a sharp start or does not respond to pressure, the problem may lie in the speed controller. The foot pedal should be disassembled and the mechanism cleaned. If after cleaning and assembly the problem cannot be eliminated, the regulator or the entire pedal will need to be replaced.
Presser foot pressure
To work with thin or thick fabrics, some models of sewing machines provide the ability to change the presser foot pressure. The thinner the fabric, the lower the presser foot pressure is set. Depending on the model of the machine, to adjust it you need to use the regulator on the left side of the case or turn the screw at the top.
Thread tension
When the sewing machine is set up correctly, the threads intertwine throughout the fabric and form a neat seam that is identical on both sides. If knots are visible on one side or the other of the fabric, one of the threads is not tensioned enough or, on the contrary, too tight. The thread tension needs to be adjusted.
READ How to close a gas pipe in an apartment
If the stitching shows knots on the right side of the fabric, the top thread needs to be loosened. If the knots are located on the wrong side, the thread needs to be pulled tighter. To mechanically adjust the tension of the upper thread, a corresponding regulator is located on the body. Electronically controlled sewing machine models can adjust thread tension automatically.
In rare cases, adjusting the upper thread does not solve the problem and you have to adjust the tension of the lower thread. The setup process is different for machines with vertical and horizontal shuttle types. To determine the tension of the bobbin thread in a machine with a vertical shuttle, you need to thread the bobbin into the bobbin case and lift it by the tip of the thread. The mechanism should smoothly move down a few centimeters. A quick drop of the cap indicates insufficient tension.
If the knot is tightly held on the thread and does not fall down, the thread needs to be loosened. There is a screw on the bobbin case for adjustment. It should be rotated with extreme caution, no more than half a turn. We advise you to remember the original position of the adjustment screw in order to restore the setting if necessary.
The horizontal hook does not have a bobbin case, so it is configured somewhat differently. The adjustment screw is located directly on the shuttle and can be difficult to access. On some models, the needle plate must be removed to access the adjustment screw. The manufacturer's instructions for the desired model will tell you how to adjust the tension of the lower thread in the horizontal shuttle in a specific machine.
Stitch options
Most often, seam parameters are adjusted. The required settings for the type, length and width of the stitch will depend on the selected material and the task at hand. Straight stitch or zigzag for thin and thick fabrics differ in their parameters. The thinner the fabric, the shorter the straight stitch should be. A wide zigzag can tighten thin fabric, while a too narrow zigzag will not allow for quality processing of thick material.
In addition to the stitch width and length, also pay attention to the thread and needle for the selected fabric. After adjusting your stitching, be sure to make a test stitch on a separate piece of fabric.
Setting the sewing machine hook
The appearance of gaps in the stitching may indicate inaccurate adjustment of the sewing machine hook. The check is carried out with the foot and needle plate removed. Raise the needle from the lower position by 1.8-2mm. In this position, the nose of the shuttle should be located with a gap of 0.15-0.25 mm from the eye of the needle at a distance of 1.1-2 mm above the eye. You can determine the malfunction yourself, but for precise adjustment you need to contact a specialist who knows how to adjust the gap between the hook and the needle.
Checking and tensioning the bobbin thread
According to tuning experts, you should start adjusting the tension from the bottom thread. If everything is in order with it, then adjusting the top one will not be difficult. But if there is something wrong with the lower thread, then you can turn the adjuster for the upper thread as much as you like - the result will not be ideal.
How to determine if the bobbin thread tension in your sewing machine has been adjusted:
- insert the bobbin into the hook . you need to put it on and assemble it;
- now take him by the thread so that he hangs on it like a ball on a string;
- if the shuttle hangs and does not unwind, then shake it slightly;
- the tension is correct if, when shaking, the thread unwinds several Washing machines, but does not continue to unwind chaotically;
- if the thread does not come out even a centimeter or seems to be just a couple of Washing machine, then you need to loosen the tension on the bottom thread, it is too big and pulls;
- if the thread is wound out more than necessary, then you need to increase the tension of the lower thread, it is bad and weak.
The tension of the lower thread is adjusted using a small screw on the shuttle, sometimes there are two. You need to turn them just a little, a couple of degrees. It is recommended to do this carefully, holding the shuttle over a piece of paper so that the screw, if it falls out, does not fly far.
Once the bottom tension is adjusted, you can move on to the top tension. It is worth repeating the procedure with each new type or diameter of thread. With an embroidery machine, you also need to start from the bottom.
If you have a machine with a fixed lower horizontal hook, and you cannot directly check the tension on it using a test with unwinding from the bobbin, then do the opposite: first adjust the upper tension, and then the lower one.
What is a bobbin
A sewing machine bobbin is a miniature bobbin on which thread is wound to create the bottom stitch. Accordingly, the thread used in it is called the bottom thread. The winding process is performed automatically by the device itself. To do this, you just need to fix the bobbin on top of the sewing machine. Next, the bobbin is inserted into a special compartment - a bobbin case, which is placed on a horizontal or vertical shuttle.
Bobbins were even used on old Podolsk machines from the Kalinin plant
The bobbin and bobbin case are one of the main parts of a sewing machine. They must always be in good condition. The surface of the cap must be smooth, because even a small flaw can distort the stitching and lead to incorrect operation: from skipping stitches to breaking the bottom thread.
Important! During sewing, the upper thread pulls the lower thread, located in the bobbin case. After they intertwine, a stitch is formed. Thread tension depends on the weight of the bobbin, as well as the material of manufacture. Plastic will move faster than metal.
It is worth saying that sewing bobbins, like bobbin cases, differ significantly from each other. For almost every machine, only those bobbins and caps that are produced by the equipment manufacturer are suitable. Bobbins differ not only in their radius and width, but also in the material they are made of. Usually they make metal and transparent plastic parts.
You might be interested in this: Making a pattern and sewing pockets for a locker in a kindergarten
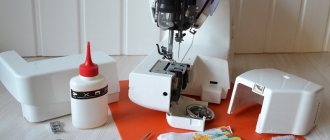
The sewing machine should be charged before use.
Metal bobbin
Such elements are designed for several types of shuttles: vertical swinging and vertical double running. Naturally, a metal bobbin is heavier than a plastic element, but at the same time it will have increased strength and wear resistance.
For your information! Metal parts of this type are considered the most reliable. They are common not only in household sewing machines, but also in production units of the “economy” or “premium” class.
The metal part is reliable
Plastic bobbin
A plastic bobbin is most often used by Japanese sewing devices with a horizontal hook. Typically, machines with a horizontally oriented shuttle have transparent needle plates through which the threads are visible. The bobbin in such devices is also made plastic and transparent. The advantage of such a part is its weight, and the disadvantage is its strength.
Through the plastic you can always see how much thread is left before you have to refill