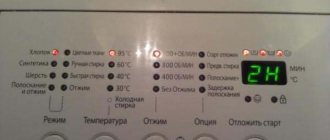
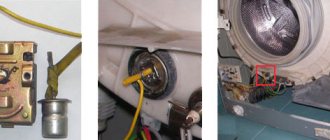
Washing machine display
If a problem is detected, the washing machine stops working and immediately displays an error message. Signaling methods depend on the specific model, rather, on its age. Most new models are equipped with a display with a segment indicator on which one or another code is displayed.
Most old cars also have a built-in diagnostic system, only the results of its operation are communicated to the user in a different way, by turning on the lamps on the display panel. If you look at the documentation for the machine, you can easily find a table there that allows you to clearly determine the type of error and identify the faulty unit.
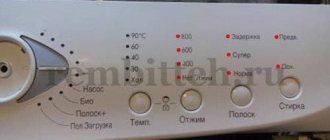
Washing machines without a display use a lack of water supply indicator and a number of operating mode indicators to display the error code:
- prewash;
- wash;
- rinsing;
- stop;
- spin
In addition to them, indicators are used to indicate an open hatch and a dirty drain filter. Combinations of these lamps with the “Service” lamp make it possible to clearly identify a breakdown.
It doesn’t matter how exactly the device signals an error, as soon as this occurs, you need to immediately take measures to correct the situation. It is important to understand that ignoring even a seemingly insignificant error may lead to the need to replace a number of expensive device components in the near future.
Whirlpool washing machine malfunctions, service test and determination of error codes
This video will show you how to run diagnostic mode on Whirlpool washing machine and identify fault codes on Whirlpool AWO/D & AWD series washing machines.
The test may not work on models sold outside of Europe, especially on models sold in the US. We work for Whirlpool, but this video may be suitable for Bauknecht, Fisher & Paykel, Ignis, Ikea, Laden, Maytag, Neutral & Philips washing machine models. We are considering the test mode of the Whirlpool washing machine AWO / D & AWD series. Description of faults and error codes of the form FOO, FDL, FDU, FH, FA, FP, F5, F6, F7, F8, F11, F12 Hello, welcome. In this video, I will show you how to enter diagnostic mode on Whirlpool washing machines. This is suitable for the AWO and AWO/D series. Fault codes are usually displayed as a series of flashing lights, you can get an explanation on the website or the error code is shown directly on your digital display. Now, to enter test mode you must turn the selector to the drain position at 11:00, and you must press the reset button four times within five seconds to enter test mode, as you can see here on the screen. I'll show you quickly again because it doesn't always work out the first time. Place the selector in the off position, in the drain position, and you have 5 seconds to press the reset button four times. After the machine has entered test mode, you will see the lights at the top flashing alternately. Now, firstly, the correct operation of the door lock is being checked and water will be filled, where each water fill valve will be checked separately. Opening the first valve will fill the right tray compartment, then the next valve will open and start filling the left compartment, then both supply valves will turn on and you will see water being supplied to all three compartments, including the A/C compartment in the middle. The next step of the test will be to check the motor rotation to the right and left, and also check the NTC sensor and heater, but I will show you this after two rotations of the drum. So, first it will rotate clockwise and then counterclockwise. I show the corresponding error codes on the screen. The ammeter reading tells you that the heater is drawing a normal amount of current. As you can see the drum is spinning, the heating element is drawing just over 7 amps, and the NTC sensor circuit will also be tested. If you want more information about any of these components and how to test them, just go to the site and you will find the video guide you need on how to test each individual component. The machine will then begin a drain cycle. When an error code appears, the machine is not always able to drain the water. At FP or F 00, if there is a possibility that there is a problem with the wiring or board, but if the machine has drained the water and gone through this step, then the full test will now be on the engine at maximum rpm. Now, when the engine is running, the error code can be caused by worn carbon brushes, or a faulty control module, there may be a malfunction of the thermal protection in the engine, usually all this is caused by F6, but there are other error codes related to the operation of the engine. Just visit our website, they are all described there. But this machine passed the test perfectly and you can see that the engine draws just over 1.5 amps at full speed. Now that we have gone through the test mode, if you find that you are in need of a replacement part for your washing machine, then you will need to copy the full model name from the service plate, which can usually be found on the inside of the door or on the back of the machine , like on these Whirlpool machines. Sometimes you will need a 12-digit number, which usually starts with 12NC. I will show you a picture, some spare parts will require both of these numbers to order, they cannot be listed on the website because it depends on the serial number. If you cannot find a component on the site, then as I said, use the chat or send a request to us by email, indicating the full model of the 12-digit number, and we will help you find the component for your device, and as I said before , on the site you can find out about all the error codes for your Whirlpool machine. You should also take a look at the frequently asked questions section, and some specific questions at the request of customers. Please support our site by subscribing to the channel, it helps us make these free videos for you, and remember that you can always support the site if you just click on the button to buy Paul a beer. Thank you very much for watching this video, I hope we helped you fix your car. Thank you for watching! _ Source
Service test
The Whirlpool washing machine automatically tests the main components and assemblies, however, the diagnostic program can be forced to start. This can be useful if questions arise regarding the operation of the machine (the device takes too long to draw water at normal pressure in the system, the drain is too noisy, etc.).
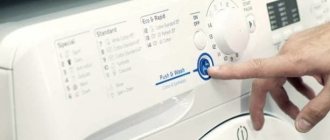
The classic washing machine test is started using the following sequence of actions:
- Launching the "Drain" program.
- Cancel the program.
- Selecting the “Drain” program without starting.
- Five presses of the soak button.
As a result of these actions, the device will begin a test wash. During the test, the drum will be filled, rotation will begin, water will be heated, drained, and spinned. If you need to skip a step, you just need to press the soak button once.
As soon as the program runs on the display (for machines without a display, a combination on the display panel), an error code corresponding to the detected malfunction will be displayed.
Basic codes
If your Whirlpool washing machine suddenly stops working, be sure to pay attention to the dashboard. Using LEDs, the machine will indicate the error code and significantly narrow the range of possible problems. To restore the unit, you will have to figure out what failure occurred in the system and carry out the repair yourself or with the help of a technician.
You need to count the light bulbs from left to right, and very carefully so as not to confuse the serial number of the LED.
Let's look at the main fault codes for Whirlpool washing machines and the LEDs corresponding to each error.
If repairs to the main control unit are required, it is better to contact specialists so as not to damage the equipment even more.
To clean the powder tray, remove it by pressing on the plastic tab located in the rinse aid compartment.
As you can see, the same error can indicate different failures. Therefore, it is necessary to carefully understand the problem and conduct additional diagnostics of the equipment. The explanation of the fault codes is presented in the instructions for the Whirlpool washing machine.
List of the most common breakdowns
Since a modern washing machine is a complex device, it consists of a number of components and assemblies, the list of potential breakdowns is extremely extensive. Among other things, there are a number of specific malfunctions that occur most often:
- blockages in the drain tract;
- jamming or breakdown of the pump;
- leaking tank seals;
- wear of electric motor brushes;
- belt breakage (in belt-driven machines);
- bearing wear;
- failure of the heater or thermostat;
- various failures of the control module.
Another common problem that is typical for both vertical loading machines and traditional front-loaders is the entry of foreign objects into the tank. Despite the apparent insignificance of the incident, in most cases, to solve the problem you will have to almost completely disassemble the washing machine.
Common faults and solutions
An automatic washing machine is a complex device; it consists of many components and assemblies, each of which can fail. The list of possible malfunctions of Whirlpool washing machines is very extensive; a complete repair manual will contain several volumes. The most common problems include the following: non-functional drainage, heating problems, wear or breakage of the cuff.
Water does not drain from the drum
Perhaps the most common problem that owners of Whirlpool washing machines may encounter. The machine stops and instead of draining the water, it displays an error message. There may be several reasons for a non-functional drain:
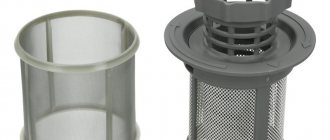
Washing machine drain filter
- clog in the drain pipe,
- the drain filter does not allow water to pass through,
- sewer is clogged,
- the pump does not work.
Before you begin repairing a Whirlpool washing machine with problems with the drainage system, you must remove the water from the drum. Especially for such situations, the manufacturer has provided an emergency drain. Removing water is simple; to do this, you just need to remove the plug, not forgetting to first replace the water container.
Once the water has been removed, you can proceed directly to the repair. The machine moves away for ease of operation. The hose is checked for contamination and kinks.
After the hose, check the cleanliness of the drain filter. It catches threads, scraps, and buttons, which can cause a blockage. It must be removed and washed. It is also a good idea to clean out the sewer using a flexible cable or bent wire.
If the filter is clean, there is no blockage inside the hose, and the machine still does not drain water, you should check the drain pipe and pump. To do this, it is necessary to partially disassemble the machine.
- The device is disconnected from the network, water supply and sewerage.
- The detergent tray is removed.
- The car is placed on its side.
- The bolts holding the bottom are unscrewed.
Having gained access to the pump contacts, the resistance of the windings is measured using a multimeter. If the device shows a break, replacement is necessary. The old pump is removed, the drain pipe is cleaned of dirt and scale. Having replaced the pump, the machine is assembled, connected to communications, and the drain operation is checked.
The heating element is faulty
If any program stops when trying to heat water, and the display shows a heating system error message, one of the most likely causes is a non-working heating element. It is basically impossible to repair a burnt-out heater; the only possible solution is replacement. In Whirlpool washing machines, changing the heating element is quite simple; you can do this procedure yourself.
- The machine is disconnected from the network and water supply.
- The device rotates or moves away from the wall for ease of operation.
- Use a screwdriver to unscrew the back cover.
- The bracket blocking access to the heater is removed.
Behind the bracket are the heating element leads and the contact pad. To check the heater it is not necessary to remove it, just disconnect the wires going to it.
To check the functionality of the heater, use a multimeter in resistance measurement mode. A non-working heating element will show infinite resistance, a working heating element will show several tens of Ohms, depending on the model.
A burnt heating element must be replaced. Perhaps the only difficulty that may arise during its replacement is rust. The screw that secures the heater can become so rusty that it is impossible to do without using special tools, for example, WD-40.
The old heater is removed, a new one is installed in its place, the rubber gasket should be replaced along with it, otherwise leaks are possible due to aging of the rubber.
Replacing the cuff
This is another common problem that is easy to deal with on your own. It manifests itself in the fact that during washing, water seeps through the cuff, the seal of the loading hatch of the machine. The reason for this phenomenon is the loss of elasticity of the cuff or its incorrect installation during the repair process.
Replacing the cuff is easy, you just need to follow a series of simple steps.
- Open the hatch all the way.
- Use a screwdriver to pry off the plastic holder
- Unscrew the fixing bolt, thereby releasing the cuff.
- Pull the cuff towards you.
- Carefully insert the new one. It is not recommended to use sharp objects to avoid damaging the thin rubber.
- Put on the clamp and tighten the bolt.
The cuff is a simple part, but the safety of washing depends on its quality. The right choice is an original part made in Italy or Slovakia. By buying a cheap fake, you will be able to save a little, but it is quite possible that you will soon have to disassemble the car again.
Reset error
The appearance of an error message is not always a sign of a serious accident. The reason for such a situation could be, for example, a failure caused by a voltage drop. If the error appears for the first time, there is no need to panic; first, you should try to reset the error. A few simple steps will restore the device's functionality or eliminate the possibility of an accidental system failure.
To reset the error you need to do the following:
- disconnect the washing machine from the network (unplug the plug from the socket)
- keep it switched off for at least 15 minutes;
- turn it on again and try to continue washing.
If there was a failure, the machine will continue to work normally, otherwise you will have to study the instructions, figure out what this error means and look for a way to solve the problem.
Prevention measures
To prevent code F06 from appearing on the display, it is recommended to follow simple preventive measures:
- The washing machine should not be overloaded.
- If the network voltage is unstable, it is advisable to use a voltage stabilizer.
- If uncharacteristic noise and knocking occurs during operation of the device, an analysis should be carried out to find out the cause.
- The device should not be constantly placed in a room with high humidity, as this promotes corrosion and breakdowns.
- The washing machine must be protected from children's pranks and pet mischief.
- Do not allow moisture to get on the control board and other important components.
- Do not spin shoes in the washing machine after washing.
- The device must be installed according to the rules, stable. Increased vibrations are harmful to the washing machine.
- The washing machine needs to be cleaned regularly.
Fault codes
The machine signals all detected faults using error codes. Most often this is a letter of the Latin alphabet and two numbers after it.
e01
If the washing machine indicator displays error e01, on some FDL or FDU models, this means that the loading hatch is open. The reason for the message to appear may be either a truly open hatch or a faulty lock. To determine what exactly is causing the error, just open the door and close it again, trying to press it harder. If the message disappears, do not worry, otherwise you will have to disassemble the car and change the blocker.
f01 (FH)
This message indicates that the machine cannot draw water normally. There are several reasons for the error to occur. This could be a simple lack of pressure in the water supply, contamination of the filter mesh, a bend or violation of the integrity of the hose, a broken valve, or improper operation of the pressure switch. To eliminate the breakdown, you should make sure that there is water in the water supply, remove and clean the inlet filter, and possibly replace the sensor or valve.
f02
The “AquaStop” sensor has triggered – the water supply has stopped. This happens if the machine detects a leak in the pan or the inlet valve is blocked. First of all, you should make sure there are no leaks, then check the functionality of the valve.
f03
A common situation is that after a wash or rinse cycle, instead of draining the water and continuing to operate, the machine displays error message f03 (e03, FP). Any of these codes indicates problems that have arisen in the drainage system. The reason may be: blockage of the drain tract, clogged filter, pump failure.
Eliminating the error should begin by checking the drain hose and sewer for blockages, then check and, if necessary, clean the drain filter. If there is no result, you need to test the drain pump.
f06
It often happens, especially during spinning, that the engine does not reach the required speed or does not work at all, and error f06 appears on the display. The reason for this situation is a malfunction of the tachogenerator. This device is attached to the motor shaft and controls its speed. Frequent breakdowns include a spring washer flying out of its socket or damaged wiring.
f07
This error is a signal of a malfunction in the engine control system. Possible causes include a broken wiring or failure of the control triac.
f08
The appearance of error f08 (f04, f05, f12) on the washing machine display clearly indicates an unsuccessful attempt to heat the water. Most often, the culprit for this is the heating element - heating element. Sometimes the cause of this error is a non-working thermostat or controller.
To correct the situation, you will have to partially disassemble the device, check the components that regulate the temperature and provide heating, and replace the burnt-out heater or controller. On some washing machines, this error may “appear” as e05 , but this does not change its essence.
f09
If the system detects too high a water level in the tank, it signals this with error code f09. A situation is possible when the water actually overflows the tank and there is an error at its normal level. In the first case, the problem is caused by a malfunction of the inlet valve; it does not close; in the second, the water level sensor (pressostat) is broken. The valve will have to be removed, checked for clogging, and the control solenoids will have to be checked. If the sensor is at fault, it will most likely need to be replaced.
f10
A message with this code (or its analogues: f15, f26, f27, e06) indicates a problem with the electric motor. The engine does not work normally in a number of cases. First of all, the reason may be in itself (short circuit or break in the winding), but this does not happen often. Basically, the problem is a violation of the integrity of the wiring or burnout of the triac. It is also worth checking the functionality of the temperature sensor; it can block the engine from starting.
f11
Power supply problems can cause error f11 or f19. Typically, these errors occur when the voltage drops below a critical level. It is worth noting that new cars are more demanding on power supply parameters; in small towns where the voltage often “jumps” it is better to connect the car through a stabilizer.
f13
Water is slowly poured into the tank. There can be several reasons for this error to appear, most often their source is outside the machine - lack of pressure in the water supply or a clogged hose. If the pressure is really small, there is nothing left to do but postpone the wash. Next, you should pay attention to the cleanliness of the hose, the intake filter mesh and the detergent tray. Many people do not pay attention to this, but the tray can become clogged, especially if low-quality powder is used.
f14
This message indicates problems with the control board. There are a great many of them. For example, failure of electronic circuit components, open circuit or failure in a storage device. This error is unlikely to be corrected on your own; you will have to re-flash the controller, and perhaps change the entire board.
f16
Failure of the control system, which can be caused by a violation of the integrity of the wiring inside the machine or failure of the controller. To solve the problem, it is worth disassembling the car, ringing the conductors, and cleaning the oxidized contacts. If this does not help, you need to change the control module board.
f16 (Fod)
Excessive foaming can cause serious damage to your washing machine. The appearance of this error signals exactly this - the powder used creates too much foam. The solution is simple - just change the detergent and you can continue washing.
f22
The cause of this error can be a number of malfunctions. It can occur if water flows slowly into the tank or it cannot be heated. Accordingly, when receiving this message, you need to check the intake valve, intake filter mesh, wiring condition and heater.
f23
The essence of error f23 can be described as follows: the system cannot “understand” whether the tank is full or not. With a high degree of probability, the culprit in this situation is the water level sensor (pressure switch). In rare cases, the cause may be damage to the wiring going to it or a violation of the integrity of the tube. To get rid of the error, you need to make sure that the wiring is intact, and if necessary, change the sensor.
f31
This error appears only on new machines, for example, the Whirlpool AWE series, its essence is that the device cannot update the software via the Internet. The reason may be a lack of network connection or incorrect settings.
Special codes
In addition to the main one, there is an additional list of error codes issued by the Whirlpool technique. It is also presented in the user manual. Let's figure out what malfunctions and malfunctions in the equipment we are talking about.
If the Whirlpool machine is leaking due to a “cracked” tank, it is more advisable to refuse to repair the unit and think about purchasing a new washing machine.
Deciphering errors will help narrow down the range of possible breakdowns. This will make it easier to bring the machine back to “life.” Depending on the complexity of the upcoming repair, you should decide whether to do the work yourself or call a service center.
Interesting:
If you decide to start repairing it yourself, you should start inspecting the equipment. Code F23 is not the simplest. To understand how to deal with the problem, you should diagnose the internal parts of the SMA. To eliminate the error, you will have to dismantle several elements of the washing machine. If you doubt whether you can cope with the upcoming work, it is better to call an AMS repair specialist for help.
The first step is to check the pressure switch. The water level sensor is located under the top cover of the Whirlpool washing machine, on one of the walls. What to do after gaining access to the pressure switch?
If the pressure switch needs to be replaced, select its complete analogue in the store to avoid difficulties in the process of connecting the element.
If the water level sensor has completely passed the test and there is no need to repair it, you should inspect the heating element of the washing machine. The heater is located at the bottom of the tank body, behind the rear wall. It is not always possible to determine the breakdown of an element during a visual inspection. The heating element is tested with a multimeter, and the resistance of the heater is measured. The faulty element should be replaced with a new one.
The most difficult error to resolve is if it is caused by damage to the control module. To repair the main control unit, you must have a certain amount of knowledge and skills. To diagnose the control board you will need special tools.
Perhaps the problem is a failed resistor, an algorithm failure, etc. If you have little knowledge of connecting electronic circuits, it is better not to attempt repairs yourself, but to invite a specialist.
The principle of repairing a Whirlpool washing machine is practically no different from other brands. At the moment, SMs are produced, with vertical and horizontal loading, in the territory of the former Soviet Union, vertical ones are more common, but now more and more machines with horizontal loading are being repaired. Here it should be noted that both types have the same weak points, first of all we are talking about the control unit, which really does not like voltage drops.
As for the module, it is better not to repair this spare part yourself, but rather give it to a specialist. So, let’s put aside everything that has to do with brains and start talking about what you can do yourself. Next, I will list the error codes of Whirlpool washing machines and will immediately give a full explanation of how to repair this or that malfunction.
Correcting washing machine errors
The appearance of any of the above errors on the washing machine screen should be a signal to the owner. Even if an error appears and disappears, this does not mean that everything is normal; you need to look for the cause before the problem gets worse. What to do is up to the owner to decide; you can call a mechanic, take the car to a workshop, or take on the work yourself.
Of course, you can disassemble the device yourself only if you have the appropriate knowledge and skills, and the warranty period for the device has expired. Repairing a car is a complicated matter, but it should be noted that doing the work yourself is a good way to save money, because you will only have to pay for the parts that are out of order.
The vast majority of malfunctions can only be eliminated by partially or completely disassembling the device; before starting work, you should carefully study the instructions for the machine and watch a video of disassembling a specific model. It would also be a good idea to arm yourself with a camera or phone with a camera. Photographic recording of each action will significantly facilitate subsequent assembly and will allow you to avoid gross mistakes.
Error codes
| Code | What does it mean | Reasons for the error | What to do |
| F01 (FH) | Problem with water getting inside the unit | The pressure in the water supply pipes is too low, which is why water does not flow at all or comes in less quantity than required. | Check the water pressure in the pipes. |
| There is a blockage in the filling valve screen or the water tap is not fully unscrewed. | Make sure the tap is turned off completely and the filter is not clogged. | ||
| The sensor that determines the water level has stopped functioning. | Check the operation of the pressure switch and solenoid valve, as well as the drain pump. | ||
| The contacts of the pressure switch, fill valve or drain pump are broken. | Clean the contacts of the pressure switch, fill valve or drain pump. | ||
| The controller is malfunctioning. | Evaluate the operation of the controller by checking its circuit and contacts. | ||
| F02 (FA) | Activating AquaStop | The electrovalve responsible for filling water into the device is blocked. | Repair or replace the solenoid valve with a new part. |
| The operation of the electrical controller is disrupted. | Correct the controller defect or replace it. | ||
| There is a water leak. | Check the machine components for leaks, eliminate leaks and replace damaged parts. | ||
| F03 (FP) | Problem with water drainage | Water does not drain from the machine due to a breakdown or debris in the drainage tract. | Inspect the drainage path, checking its permeability, then remove contamination or repair damaged elements. |
| The pump that pumps water out of the device has broken down. | Clean the pump filter and check its contacts, and if repair is not possible, replace it with a new pump. | ||
| Parts on the electrical controller board have burned out. | Once you have confirmed the problem with the controller, replace the controller itself or those parts that have burned out. | ||
| F04 | Water heating problem | The water does not heat up to the required temperature due to a breakdown of the heating element associated with the formation of scale on the surface of the heater. | Inspect the heater, descale it, or replace the heating element with a new part. |
| The temperature sensor control circuit is damaged. | Check the temperature sensor control circuit by replacing damaged parts or repairing the break. | ||
| There is a break in the temperature sensor or it is damaged due to a short circuit. | Assess the performance of the temperature sensor and replace it if damage is detected. | ||
| F05 | Water heating problem | The temperature sensor is malfunctioning. | Check the electrical circuit of the temperature sensor. If necessary, replace damaged wires and seal contacts. If the sensor itself is faulty, you will have to replace it with a new one. |
| F06 | No signal from the tachogenerator | The tachogenerator assembly in which the spring washer is located is faulty. | Reinstall the slipped washer in its place. |
| The connection between the control panel and the tacho is broken (the circuit is damaged). | Repair the electrical circuit between the engine control board and the tacho. | ||
| F07 | Problem with the motor control board | The electronic controller does not work. | Repair the controller or replace it completely. |
| A triac or thyristor has burned out on the control board. | Replace any burnt parts on the control board. | ||
| F08 | Problem with heating element | The heater burned out or there was a break in its wiring. | Replace the heating element with a new one or repair its wiring, and also check the contacts. |
| The protective pressure switch has broken. | Replace the damaged pressure switch. | ||
| The electrical controller is faulty. | Replace the damaged controller or repair the board by replacing burnt-out elements. | ||
| The thermistor is damaged. | Resolder the thermistor or seal the contacts in the electrical circuit of the temperature sensor. | ||
| F09 | Problem with water filling | There is a malfunction of the sensor that controls the water level. | Repair the sensor hydraulic system or replace the pressure switch. |
| The water inlet valve is broken or blocked. | Replace the fill valve with a working part. | ||
| The controller has malfunctioned. | Check the controller, resolder the burnt parts of its board, and if this is not possible, replace the controller with a new one. | ||
| F10 | Motor problem | The engine does not turn on due to a burnt-out triac on the control board. | Inspect the control board and replace parts that are burnt out. |
| The temperature sensor in the engine module has failed. | Replace the temperature sensor, and if it cannot be repaired, install a new control unit. If this does not help, you will have to replace the electric motor itself. | ||
| F11 | Communication problem | The supply voltage is below the required level. | Check the voltage and take measures to restore normal parameters of the apartment’s electrical network. |
| F12 | Water heating problem | The water no longer heats up due to the failure of the heating element or the breakdown of the pressure switch. | Replace the faulty heating element or pressure switch. |
| There is a break in the wires connecting the heating element and the controller. | After checking the wires of the circuit connecting the controller and the heating element, eliminate any identified defects, and also seal the clamps. | ||
| The water heating relay has malfunctioned (sticking has occurred). | If inspection confirms a problem with the heating relay, it should be replaced with a new one. | ||
| The temperature sensor has failed. | After confirming that the temperature sensor is damaged, repair the control board by replacing the thermistor on it. | ||
| F13 | Problem with water filling | Water is not poured into the tank due to insufficient pressure in the water supply. | Check the water pressure in the water supply. |
| The detergent container is clogged. | Clean the detergent reservoir. | ||
| Water fills up too slowly due to a clogged strainer in the filling device. | Clean the strainer in the fill valve. | ||
| F14 | Problem with the control system | The control board started working with errors. |
An error has occurred in the microprocessor.
Related article: Entrance door threshold: functions and types
Some troubleshooting tips
Often Whirlpool washing machine errors appear spontaneously, seemingly for no apparent reason, but many of them, in particular those related to poor drain performance, can be the result of careless handling of the device. The occurrence of a number of malfunctions can be prevented; to do this, it is worth using a few tips.
- All models of Whirlpool washing machines have a drain filter. This simple device is designed to protect the drainage path from debris, threads, and scraps of fabric. To ensure that drainage errors occur as rarely as possible, you should regularly remove and clean the filter. The frequency of cleaning is indicated in the instructions for each specific model; in any case, the procedure must be performed at least two to three times a year.
- Caked detergent can clog the ducts inside the machine, causing the program to stop unexpectedly. It's easy to avoid this. You just need to periodically remove the powder tray and rinse it with running water.
- It is worth inspecting and, if necessary, cleaning the intake filter at least twice a year. This is a mesh located at the entrance to the car. The frequency of cleaning largely depends on the condition of the plumbing and the quality of water in the system. A dirty mesh can cause water to flow slowly into the drum or stop completely.
- After each wash, when the laundry has already been removed, you should not immediately close the door; you should leave it ajar so that the “insides” of the machine dry out.
- Washing with hot water helps clean the inside of the machine. It is useful to sometimes run a wash program at 95 degrees with a small amount of detergent added. This will remove dirt accumulated in the drum and pipes.
- It is important to monitor the condition of the drain hose. This is one of the weakest points of the car. You can accidentally step on it, place a heavy piece of furniture, or bend it too much. Kinks and blockages are a common cause of faulty drainage.
- The condition of the inlet hose is equally important. The appearance of kinks and cracks is unacceptable; such a hose must be replaced immediately.
- To avoid leaks during washing, you need to regularly monitor the condition of the hatch cuff. It must be soft, elastic and always intact. To increase the service life of the cuff, it is recommended to wipe it with a damp cloth after washing.
In order for the machine to serve for a long time and have an attractive appearance, its surface must be periodically cleaned. A damp cloth is suitable for this. If serious contamination occurs, you can use cleaning products, but they should not contain abrasive particles, otherwise the panels may be scratched, which will affect the appearance of the device.
The appearance of errors on the washing machine display is not a reason to panic, it is a signal to the owner, a reminder that the device requires care. If you keep the machine clean, periodically clean it and do not allow water to stagnate inside, errors will rarely occur, and the machine will last a long time.
Possible faults requiring repair
Thanks to our extensive experience in repairing Whirlpool washing machines, we have collected popular breakdowns that lead to error 06.
| Signs | Breaking | Repair or replacement | Cost* (work only) |
| The whirlpool does not rotate the drum, the error occurs immediately when turned on. | Tacho sensor. This unit is located on the engine rotor and is responsible for determining the rotation speed. The sensor probably burned out or its magnet unscrewed and fell under the washing machine. | The technician inspects the unit and, if the sensor is burned out, replaces it with a new one. If the magnet has just come loose, the technician screws it back on. |
- replaces burnt-out radioelements with new ones;
- solders burnt tracks;
- Replaces the board completely in case of major damage.
- if the wiring is damaged, twist it or change the entire cable;
- if the contacts are burnt out / oxidized, solder them or change the entire contact group completely.
*Prices are given only for the work of the master. Spare parts are paid extra.
Whirlpool showed code F06 and it’s impossible to wash things? To resolve the problem as quickly as possible, call RemBytTech:
The technician will arrive quickly: within 24 hours from the receipt of the application, he will repair your Whirlpool right at home, issue a receipt detailing the work performed, the spare parts used and a warranty period of up to 2 years.
Let's check the thermistor
If the heating element has been fully tested and has proven that it copes with its functions perfectly, it’s time to check the thermistor. Just, it is located between the contacts of the heater. To remove the temperature sensor, perform the following manipulations:
- remove the chip with wiring from the heater contacts;
- slightly loosen the nut that holds the heating element;
- Carefully remove the thermostat from the housing.
The temperature sensor is a small metal cylinder. After the thermistor is removed from the washer body, you need to check the resistance in it using a tester.
- switch the multimeter to resistance determination mode;
- hook the probes of the device to the contacts of the temperature sensor. For example, if the temperature is 200°C, the resistance should be displayed on the screen, the value of which will be 6000 Ohms;
- lower the thermistor into warm water, watch the numbers change on the device screen. If the temperature sensor is working properly, the resistance will decrease, so at 50°C it will be about 1350 Ohms.
When the temperature sensor fails, the old part should be replaced. The thermostat cannot be repaired. If the element is fully operational, we continue the diagnostics further.