The tension of the lower thread, the quality and thickness of this thread, the correctness of threading the bobbin into the bobbin case, all this affects the quality of the stitch of the sewing machine. In this article, you will learn important nuances of the correct operation of the most important component of a sewing machine - the bobbin case and bobbin.
Video on how to wind thread onto a bobbin using a sewing machine winder.
Which bobbin should you choose for your sewing machine?
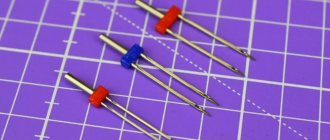
As the stitch is being formed, the upper thread pulls the bobbin thread out of the bobbin case. Both threads are intertwined inside the pieces being sewn, and a stitch is formed, from which a stitch is formed. An important factor influencing the uniform and smooth pulling of the lower thread is its weight and the material from which the bobbin is cast. By the way, do not confuse the bobbin with the bobbin case, the bobbins are shown in this photo, and the bobbin case is the device where the bobbin is inserted. Naturally, a plastic bobbin will slide much easier inside the bobbin case, ensuring uniform and smooth pulling of the thread, and its weight will be noticeably lower compared to a metal one.
Also, not all bobbins are interchangeable. This photo shows three types of bobbins. The one on the far left is for most household sewing machines. The bobbin in the center is used in an old-style household Japanese sewing machine called Brother. The rightmost bobbin is for industrial sewing machines such as the 1022 class sewing machine. When purchasing a new bobbin, always take a sample with you.
How to properly thread a standard sewing machine
It is not difficult to figure out how to insert thread into a sewing machine if the work is carried out on a modern electrical or electromechanical device.
Example of threading on the Minerva model
The most popular company currently is Minerva. There are many models that differ in complexity of arrangement, functional aspects, and number of operations. But there is one thing in common between them - the principle of threading.
Note! Another popular company is Veritas. The principle of threading is completely identical to Minerva.
The advantage of modern sewing devices is the presence of an electrical principle of operation, so the procedure for winding the bobbin and further actions. The standard filling pattern can be used in other similar models of modern production.
Installing the bobbin
The most important step is loading the bobbin. The principle of winding the thread and fixing the element (using the example of Minerva) is done as follows:
The structure of the mechanism for fixing the bobbin
- You need to remove the removable work table. To do this, the plastic plate must be moved to the left and completely removed. On a certain model, the principle of removing the table may vary.
- The housing has a plastic door. Open the compartment. Behind it you can see the bobbin mechanism, which needs to be removed. Pre-raise the needle using the handwheel. To do this, just pull the “setting pin” towards you.
- Remove the bobbin itself from the mechanism. Install the tool onto the top pin. Pull the “yarn” from the spool to the bobbin, using special winders to hold it. Thread the thread through the hole in the bobbin to secure it completely.
- Press the pedal, having previously set the “Idling” mode. The bobbin will automatically wind the thread. You can use a flywheel, but this winding principle will take a long time, since it is done manually.
You may be interested in this: Pattern and instructions for sewing chair covers with your own hands
Fixing and filling the bobbin
You need to correctly install the bobbin into the mechanism and the machine itself. Insert the device into the mechanism so that the thread is positioned clockwise relative to the slot. Then the bobbin element is placed in place, while you need to hold the “working finger”. On most machines, the principle of installing the bobbin is in accordance with such a mechanism.
Upper threading
The sewing mechanism of any model of device is designed in such a way that 2 threads are involved in the work - upper and lower. The easiest way is to place the top one. Arrangement algorithm:
- Fix the coil on a special pin.
- Pull the thread, using the tips, pull the thread through the fasteners on the body of the device.
- It is imperative to thread the thread through the fasteners, which are responsible for the tension force of the thread and the hole, which is responsible for the compensation spring.
- Near the foot, insert the yarn into the thread guide.
- Next, pass it through the guide hook and only then thread it into the eye of the needle.
The principle of threading the upper thread
At this stage, the arrangement of the upper mechanism is completed. You can insert the yarn into the needle manually, aiming at the eye, or use an automatic needle threader - a special mechanism for inserting material for sewing into the eye of the needle. Located on the left side of the presser foot and adjustable using a lever.
Threading the bobbin thread
After installing the bobbin mechanism, the yarn is put into operation. The main thing is to insert the bobbin correctly and position the sewing mechanism in it. Next, the thread is pulled up under the foot.
Threading the bobbin thread
Turn off the device and use the side wheel to lower the needle. In this case, you should hold the tip of the thread threaded into the eye of the needle. Making one scroll, the top yarn catches the bottom one. By pulling the top tip, you can pull out the material that comes out of the bobbin.
Checking the correct threading
The correct yarn threading option is checked in several stages. First, the location of the threads. The lower one should lie under the shoulder blade, and the upper one should be located between the teeth of the shoulder blade.
We also check the quality of the stitching. You need to take a small piece of fabric. Sew textiles using several types of stitches. If the thread breaks or is difficult to pass, then you need to adjust the fastening responsible for the tension of the material.
Checking the thread quality
The check is quite simple; the procedure will not take much time and will provide complete information about the settings of the device.
You may be interested in this: How to sew a beautiful headband yourself
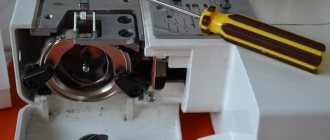
The bobbin is inserted into the bobbin case
The bobbin case is the most important part of the sewing machine, which should always be in perfect condition. The surface of the bobbin case should be mirror-like, at least clean, without rusty or oxidized areas. The slightest notch on the surface of the bobbin case or a chip in the wall will lead to the appearance of many stitch defects, ranging from looping stitches and skipped stitches to thread breakage.
Please note that bobbin cases do not always have a “tail”. In addition, when purchasing a new cap, keep in mind that this tail may be turned in the other direction.
Tips for caring for your machine
Many people mistakenly believe that a sewing machine does not require special attention to care, and that even in poor condition it will be able to perform its main function - sewing. This is far from true. The sewing machine will last you much longer and will sew much faster and quieter if you follow simple rules for caring for it.
- Periodically lubricate the internal parts with the special oil that comes with the device. The frequency of the procedure is once every six months.
- Choose threads and needles wisely. Make sure the needle matches the type of fabric you are working with.
- Clean the internal mechanisms using a special brush.
It is worth considering the fact that when working with types of fabrics such as knitwear, fur and wool, the above procedures should be carried out a little more often than usual.
Adjusting the bobbin thread tension
Regardless of the type of sewing hook, each one has an adjustment screw. The best way to unscrew it is with a small flat screwdriver, which is included in the tool kit of any sewing machine.
It is necessary to adjust the tension of the lower thread as little as possible, since the slots of the screwdriver can “break” the screw slot and nicks will appear, which will cause thread breakage and other defects. You should also not unscrew this screw more than half a turn, since the screw may pop out and get lost.
You can check the correct tension of the lower thread as follows. Insert the bobbin into the bobbin case, pull the thread from the case and pull it as shown in the photo. When twitching, the thread should come out jerkily under the spring of the bobbin case.
Looper threading
The third pin is the upper looper. The thread descending from the clamping device through a special groove must be brought out to the panel with holders (hooks). Clinging to one of them, she is led to the upper looper. Then they are secured in the holder again and passed into the hole of the large hook.
The fourth pin is the lower looper. The thread is also lowered to the panel with the holder, attached to it, then the overlock handwheel is turned so as to open the looper stand, the thread is hooked onto two hooks and passed into the looper hole. Then press the foot of the unit to start work. The first few stitches should be done with a handwheel, and after that you can add speed.
If you know the basic aspects of how sewing devices work, none of the models will cause you any difficulty with the question of how to thread a sewing machine and overlocker. Everything is quite simple. The main thing is to just study all the elements of the unit and pay close attention to the refueling process.
How to improve bobbin glide inside the case
If you have an old sewing machine or your sewing machine has been sitting in the closet unused for years, the inside (bottom and walls) of the bobbin case will become rusty or oxidized. As a result, the machine will constantly tear the thread, sew with gaps, etc. To correct this defect, you can cut out a spacer from a plastic office folder and place it on the bottom of the bobbin case.
Trace the outline of the bobbin with a simple pencil and cut out the outer outline of the gasket with scissors.
The inner hole of the gasket is cut out with miniature manicure scissors.
By the way, instead of plastic, you can cut the gasket out of tissue paper, tracing paper, etc. To improve the sliding of the bobbin, it is recommended to oil the paper gasket.
The gasket should fit freely, without effort, onto the bottom of the bobbin case.
Adviсe
- Most sewing machines have a similar threading process. If you think that the sewing machine you are using is different from the standard ones, try to find instructions for sewing machines similar to yours, or just try to guess the correct threading option yourself.
- Look for the sewing machine threading diagram on its body. In many cases, sewing machine manufacturers print guide lines and arrows on them that must be followed.
- Refer to your sewing machine's manual if you have one. Some manufacturers now make this information available online, so you can do a quick online search of your sewing machine model to get more specific instructions just for it.
Preparing the machine for a shift
First you need to prepare the machine. Let's look at this process step by step:
- It is very important to raise the needle to the highest position. To do this, rotate the flywheel towards you. It is also advisable to turn off the power to the machine by turning off the main control button. If necessary, move the presser foot lever up
- Next, remove the bobbin case. To do this, you need to open the lid and move the valve. Then pull the bobbin lock towards you and gradually, as it loosens, remove the entire product.
IMPORTANT! Many devices have a special threading drawing, which shows the path of movement of the thread from the spool, as well as the subsequent threading of the bobbin.
Main characteristics
“Podolsk” is a common model, despite the fact that electronic and electrochemical machines are gaining popularity today. As a rule, “Podolsk” is a simple and old model with a manual or foot drive. It has a swinging shuttle, a large number of operations, semi-automatic buttonhole processing, overlock stitching, blind and elastic stitching, and a sleeve platform.
Equipped with a reverse button and high-quality lighting. Supplied with paws for sewing in zippers and buttons. It has a warranty period and a long service life, so setting up the Podolsk sewing machine is practically not required. Supplemented with a compartment for an accessory and a soft case.
The sewing machine has a screw for adjusting the presser foot. There is also a front cover, adjusting nut, thread guide washer, thread cutter washer, presser foot rod and screw and much more. These parts can be adjusted and lubricated for more efficient operation as desired.