The meaning and design of the pressure switch
Since the operation of the parts in the machine is controlled by the main module, it needs to send a signal to stop the intake of water, as well as close the inlet valve. But how does the module know that the accumulated volume is enough? Let's figure out what the purpose is and how the pressure switch works in a washing machine. This element controls the amount of water collected in the SMA. Each separate mode - washing or rinsing - requires a different amount of water.
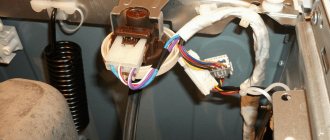
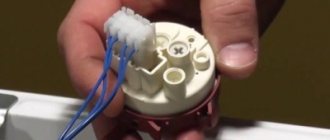
Let's consider the principle of operation of the pressure switch in a washing machine. This is a round part that has a plastic body; connected to it are: a hose through which pressure passes, and wiring. Inside the relay housing there is a thin membrane and a switch. The pressure in the tank depends on the amount of water collected. Air under pressure passes through the hose, acts on the membrane, and it bends, closing the switch. Using wiring, the module receives a signal to stop water intake. These are the design and operation of the pressure switch.
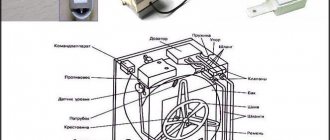
Many users do not know where the pressure switch is located in the washing machine. Some people think it should be located inside the tank. In fact, the device is located at the top of the SM body, near the side wall.
Signs of a malfunctioning pressure switch
If problems occur with the water level sensor, you can visually identify them using the following indicators:
- uncontrolled (a lot or a little) collection of water into the tank or, conversely, draining it, this threatens to flood the room;
- characteristic burning smell;
- weak spinning of laundry or the machine’s refusal to perform this function at all;
- Even in the absence of water, equipment can turn on the water heating and start washing, which usually leads to overheating and combustion of the heating element.
Self-diagnosis of the performance of the pressure switch
If there are signs of a breakdown of the water level sensor, it is advisable to make sure that it is not working, since perhaps the reason is not in it, but in other parts.
To check the sensor, you will have to remove it. Where is the pressure switch located in the washing machine? Inside the car, to get to the part you will have to :
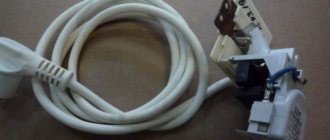
Remove the top cover of the equipment by sliding it backwards. To do this, you need to unscrew the bolts on the rear panel.- The pressure switch in the washing machine is attached to the side wall and held on by screws. Disconnect the wires and hose leading to the fitting from the part. The hose is attached thanks to a clamp that can be extended or unscrewed.
- Now you can unscrew the screws and remove the sensor.
When inspecting the part, special attention should be paid to the tube . If external damage or blockage is noticeable, carry out the appropriate work: if it is damaged, it is replaced, and if it is blocked, it is cleaned. There are times when the hose comes off and this is a malfunction of the entire unit. It's enough to just put it back in place. If there are signs of oxidation or dirt on the connectors, be sure to clean them.
After the measures taken, the performance of the part is determined.
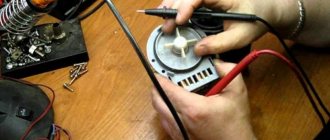
How to check the pressure switch on a washing machine?
To do this, put a small hose, about 10 cm, on the inlet fitting and blow into it, while you need to bring the unit to your ear and listen for a click when the pressure sensor on the self-resetting contacts is triggered. The number of clicks depends on the version of the pressure switch.
If this number is zero, the sensor is inoperative.
A more reliable way to check is to use an ohmmeter. It is connected to the block connector in the sockets. The device will show data that will differ from each other when the circuit is closed or opened.
Each equipment has instructions in which the item is stated and a diagram of the washing machine press is drawn.
Setting the washing machine pressure switch
The volume of water used when washing clothes is adjusted in the water level switch. This happens thanks to the adjusting screws - central and peripheral.
The central screw is needed to establish the contact connection.
The peripheral controls their rupture.
There are models of washing machines that have more than one sensor. And there are a lot of programs in a washing machine, which means using different volumes of water.
Take, for example, gentle and regular washing. The difference in liquid volume is approximately half. Therefore, adjusting the alarm is a delicate matter and is usually performed at the factory by specially trained people. In this case, the position of the adjusting screws is usually fixed with varnish or paint. If the adjustment is shifted, the entire washing program may be disrupted. Therefore, it is difficult to set up and determine how much water the washing machine will need for a certain mode.
Replacing the pressure switch
When diagnostics reveal a breakdown of the water level sensor and a replacement with a new part is required, you can handle this matter yourself.
The part is not expensive and you can buy a pressure switch for a washing machine without any problems. Why aren't we talking about repairs?
Because repairing the pressure switch of a washing machine is a pointless undertaking. When disassembling its body, the internal parts usually break.
Which sensor should I buy? Exactly the same. The same model, the same type and name, with the same characteristics, focused on the volume of the loading drum and the model of the machine.
Original parts will definitely fit, you don’t need to rack your brains with them and their service life is much longer and of better quality.
Before installation, it would be good to check its functionality and, if everything is in order, install it in place of the old pressure switch.
After repair, the machine is checked in several washing modes.
Typical faults
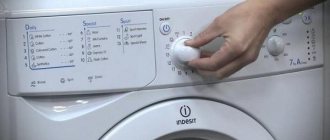
Without disassembling the washing machine, how can the user guess that the level relay is broken? Main features:
- When a vehicle with a self-diagnosis system detects a problem, it immediately displays an error code on the display. The user reads and decrypts the code, which makes it possible to understand which part has failed.
- The washing process starts, but you see that there is no water in the drum. In this case, the machine turns on the heating element, which can lead to fire and malfunction of the heater.
- The amount of collected water exceeds the permissible level. Continuous supply of water is possible. There are situations when the level does not reach the minimum value.
- Poorly wrung laundry. If the pressure switch malfunctions, it is possible that the water does not completely leave the tank, so the spin cycle is poor.
Such problems may also indicate a breakdown of other components, such as the control module or inlet valve. It is even possible that the system is connected incorrectly to the sewer system. Therefore, to be sure, it is important to know how to check the relay (pressure switch) in a washing machine.
Step-by-step work before checking the pressure switch
Even a beginner can handle this kind of work, so do the following:
- Follow safety precautions. Unplug your SMA by unplugging it from the outlet.
- Tighten the inlet valve, which is responsible for the water supply.
- To check the water level sensor, you need to remove the top panel in the washing machine.
- After unscrewing the screws at the back, slide the cover forward. Be careful when doing this as the edges may be sharp.
- Putting the panel aside, find the device.
Prepare a tube with a diameter equal to the pressure switch fitting. Remove the pressure hose by releasing the clamp. Place the tube on the fitting and blow lightly. If the sensor is working properly, then the contacts will work and you will hear one or three clicks.
Check the device for damage. Check its hose for blockages. If it is clogged, clean the hole under the pressure of water from the tap.
When you are convinced that everything is in order outwardly, the last way to check is a multimeter. Set the tester to resistance mode and connect the tester probes to the relay contacts. When the contacts are triggered, the values must change. If they remain at the same level, it means the sensor is faulty. To find out exactly which contacts to connect the tester to, you will need an electrical diagram of the device.
Principle of operation
To find out where this sensor is located in the washing machine, you will have to remove the top cover of the unit.
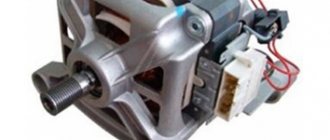
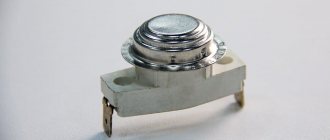
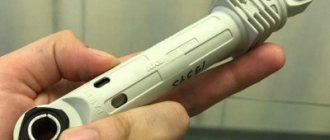
The pressure switch looks like a flat corrugated washer, to which wires are connected on both sides, and at the end there is a plastic tube. There are washing machines with an oval sensor that has only two contacts - a wire and a tube. The sensor is essentially a pneumatic relay, which is triggered by air pressure created in a tube connected to the tank of the washing unit. The water flowing into the drum creates a certain pressure, the air begins to press harder on the relay membrane, which closes or opens the contacts, allowing current to pass through the wiring and transmit the necessary command to the control unit.
If there is no signal to start the operation, or there is a lack of continuity in the circuit, the control unit stops the program, sending an alarm signal to the display panel. Eg:
- LG gives PE signal;
- SMA Ariston and Indesit signal with codes F04 and F05, respectively;
- SMA from Bosch will tell you about the problem with code F26;
- Electrolux has several versions for this case - E11 - E 12; E21 – E22;
- Kandy – F03.
If the water control sensor begins to work incorrectly, certain malfunctions may appear in the future:
- water will overflow in the tank, the device will constantly draw and drain liquid;
- there will be insufficient water for washing, which will deteriorate the quality of the washing machine;
- the water after washing will not drain completely; after spinning, the laundry will remain damp;
- the program will start without water, after which the water heating element will overheat and fail.
Let's look at how the pressure switch of a washing machine works. To operate, the sensor uses air pressure that is generated in a high-pressure tank. When the tank is filled with water, a certain amount of air is retained in this container. The more water the tank is filled with, the more important the air pressure in the tank becomes. Since the container communicates with the level switch through a tube, pressure acts on the sensor membrane.
Operating principle of the pressure switch
When a certain water level in the tank is reached (depending on the washing mode), one of the switches is activated. The water level sensor in the automatic washing machine gives a command to shut off the water supply valves. After this command, the flow of water into the tank stops and the machine starts washing. If the wash cycle is changed, the pressure sensor may command water to be added to the tank and then shut off the water supply again.
You can find out where the pressure switch of an LG, Samsung, Indesit or Bosch Maxx 4 washing machine is located by removing the top panel of the unit. The pressure switch looks like a flat plastic (monochrome or multi-colored) corrugated washer, to which wires with connectors fit on both planes, and a plastic tube at the end.
Options for pressure switches
The water level sensor is essentially a pneumatic relay, triggered by air pressure filling a tube connected to the tank of the machine. Depending on the pressure created by the water flowing into the drum, the air pressure on the internal membrane of the relay increases. The membrane, in turn, closes and opens certain contacts, passing current through the connected wires and triggering the corresponding command in the electronic control unit.
The absence of a “response” from the relay to the started operation or the absence of continuity in the control circuit in electronically controlled units causes the washing program to stop and an error signal appears on the dashboard indicator.
Water level sensor
Pressostat error codes depending on the manufacturer and model of the equipment:
- LG – PE;
- Ariston (Indesit) – F04 (F05);
- Electrolux – E11-E12; E21-E22;
- Bosch (Maxx 4) – F26 (F19);
- Samsung – E7 (E2; E3).
The operating principle of the water level switch of a washing machine is based on the effect of pressure on a special membrane (diaphragm). When water is drawn into the tank of the washing unit, water fills the compression chamber and pressure corresponding to the level of the collected water is injected into the sensor housing through a special tube.
When pressure is applied to the membrane, the contacts close and open, as a result of which a signal about incoming water is sent to the control module. There are several types of pressure switch: pneumatic (mechanical) or with an oscillating circuit (electronic), in this case the mechanical principle will be described. They are also divided into single-chamber and double-chamber.
Double-chamber pressure sensors are specially developed for washing machines with small and large loads. When the load is low, one membrane is activated and water is supplied in a minimum amount. When the drum is heavily loaded, the second membrane is activated, the contacts close and the control processor gives a command to supply the maximum amount of water.
As a rule, the membrane installed inside the sensor is made of rubber or elastic polymer and is designed for repeated on and off cycles. The operating principle of the pressure switch combines the sequential influence of air pressure on the mechanical part, above which the electrical contacts are located, and a direct electrical impulse on the control processor of the washing unit.
We suggest you read: How and how to quickly wash brilliant green from the skin of your hands and face
Self-adjustment of the pressure switch
Sometimes, instead of replacing a part, you can make adjustments or adjust the pressure switch in your washing machine. How to proceed:
- It is important to know how much water a given washing machine model requires to complete each program. Based on their number, there are from one to three screws on the sensor.
- In accordance with the required amount of water during the mode, you need to tighten the screws.
Knowing how to set up and adjust the pressure switch, you don’t have to buy a new part. But calculating the correct tuning coordinates is quite difficult, since such work is carried out by specialists at the factory. If you decide to replace the relay, read the next paragraph.
DIY washing machine pressure switch repair
Water sensors are calibrated by professionals at manufacturing plants. The adjustment is made using highly sensitive ohmmeters. It is highly not recommended to repair the device at home. The adjusting screws are equipped with seals, which are strictly not recommended to be damaged or removed.
Even simply turning the seal 180 degrees with a screwdriver, which is then “blocked” by the same turn in the opposite direction, will cause the factory settings to fail. You cannot be sure that the machine will work just as smoothly after such manipulations.
Read more ► Washing machine pump: what is it for, how to remove and replace it yourself, do-it-yourself repairs
It has been noticed that the slightest manipulations with the device in question lead to disruption of the functioning of the heating element. If a broken pressure switch has a decisive influence on the occurrence of failures, you need to replace the broken device with a new one.
Replacing the pressure switch
First, buy a new device. You can take your sensor and go to the store with it, but usually, to purchase the appropriate part, you just need to tell the seller the car model. If you did not completely remove the relay when checking, do this:
- Disconnect all wires (take photos or label connections).
- Remove the bolts that secure the device to the housing.
How to connect a pressure switch? Repeat all steps in reverse order:
- Screw it into place using bolts.
- Then connect the hose, securing the clamp.
- Connect the wiring according to the markings.
Great! The work is completed successfully - you can launch your SM and check its operation. A video on the topic will help you: