Sewing machine diagram
The user can only see the outside of the machine and its working parts, which are located outside the device. However, inside there is a complex mechanism that only professionals can understand.
The main part of any model, even the most modern, is considered to be the shuttle. It is made from high-quality wood, its main task is to transfer cross-fibers in the fabric production procedure. The basic parts that no unit can do without include the following components:
- Flywheel;
- Sleeve;
- Winder;
- Platform;
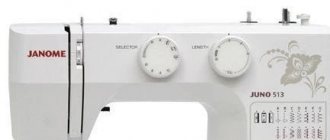
- A wheel that regulates the required type of stitching;
- Sleeve stand;
- Reverse stroke (receiver);
- Needle holder;
- Needle plate;
- Paw;
- Handle for raising and lowering the presser foot.
Sewing machine device
These elements are related to the external part of the device, so the basic workflow seems quite easy. A complex internal system powers the shuttle using many additional parts. The shuttle device allows you to create unusual stitches of various shapes, while manipulations are carried out quickly and efficiently.
Differences between different types of sewing machines
A wide range of modern models makes it possible to choose the optimal specimen that will satisfy individual needs. Among the huge range of models there are different types of sewing machines:
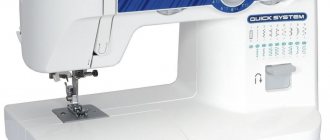
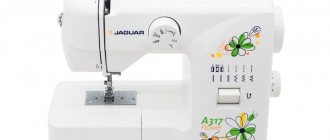
- with manual drive - used at home, due to mechanical control they are easy to operate. The manual drive allows you to process different fabrics, even leather and jeans. Such devices rarely require repairs and are durable and reliable;
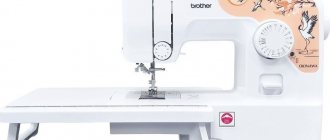
- electromechanical - designed with an electric drive, the device is controlled manually and activated using a switch. Such units are divided into two types: vertical and horizontal. The first models are cheap, there is quite a strong vibration, and the stitch width is limited. Horizontal ones have advantages - the device does not resonate, so there is no tangling of the thread. Electrical appliances are intended for small jobs, repairing things;
- electronic - intended for professional purposes. The built-in display with a microprocessor transmits commands to the screen. Such models do an excellent job with all types of fabrics, even corduroy and guipure. The control is carried out by a pedal and a lifting lever. With independent machine control, the sewing comes out of high quality;
- Overlock - used for finishing the edges of fabrics with loose weaves. The main part of the models has knives for removing excess allowance. This option significantly saves time during the sewing process. There is no shuttle in such devices; its options are provided by special loopers. The display provides recommendations for the correct installation of threads;
- embroidery - such a machine is necessary for creating masterpieces. A computer program allows you to decorate fabric with embroidery using different techniques. When uploading files, you should select the required hoop size, and then thread the threads of the required colors. The procedure itself does not require human supervision, it is carried out independently;
- flat-seam is an industrial device with household modifications.
The most suitable option for processing elastic types of fabrics. The stitch is done in a special way to prevent stretching of the material. This type can be used for knitwear, polyester, stretch. Manual machine Electromechanical model Electronic overlock machine Embroidery machine Flat stitch model
The structure of the machine
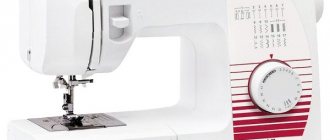
Standard household sewing machines are designed in a very basic way. The first picture shows a schematic representation of a machine model with the simplest parameters and a minimum set of functions. The structure of a sewing machine of this type is:
- flywheel;
- winder;
- spool holder;
- thread guide;
- thread tightener;
- presser foot;
- needle;
- fabric motor plate;
- retractable table;
- reverse key;
- regulators of thread tension, stitch length, stitch switching lever.
Also, most sewing machines are equipped with a second thread holder, additional replacement presser feet and a set of the most used needles. The pedal that powers the device's motor is included as standard.
Main components and mechanisms of a sewing machine
The electric drive is considered to be an important component of the device; it is from this element that speed indicators, productivity and power come. He should not be overloaded with constant work for a long time. The electric drive belt is externally thin and weak, but it drives the entire working system. This part must be protected from sewing rough materials (jeans, leather, etc.). There are teeth on the inner surface of the belt; if it breaks, it is difficult to find a worthy replacement with a certain pitch.
The electric drive of a sewing machine is one of its most important components.
For smooth operation of the device, you need to monitor the belt tension; over time, it weakens, which affects the decrease in speed. For these reasons, an increased noise level appears.
Healthy! When disassembling the device yourself, you must press your finger on the belt in the place indicated by the arrow. If it is easily pressed, then the tension should be increased. The main thing is not to overdo it, otherwise a too-tight strap can lead to a tight ride. This action will adversely affect the device and increase wear on the motor bushings.
Fundamental mechanisms that you need to know when sewing:
- Stitch length handle - sets the required length;
- Presser foot lock - controls the raising and lowering of this part;
- Top thread tension knob - optimal adjustment of the tension level is carried out;
- A table (retractable), a compartment for accessories - such components are found in some models; most modern devices do not have them;
- Regulator for selecting stitch varieties - available in different versions, including computer-controlled ones, where adjustment is made using the display;
- Reverse - allows you to make stitches in reverse order;
- Flywheel - drives the engine and stops it;
- Flywheel freewheel switch - designed to switch bobbin and stitch winding levels;
- Stitch type selection knob - allows you to select the desired stitch pattern;
- Connector for connecting the pedal to the device;
- Pedal - controls the sewing speed and the entire process;
- Stitch width regulator - necessary to control the step width.
The operation of the device itself is quite complex, but sewing using household appliances is much easier and faster.
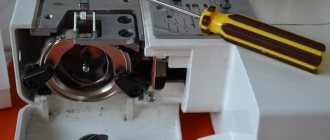
How to adjust the tension of the electric drive belt
The electric drive is secured with two screws (D). If they are loosened, the drive can be moved slightly and the belt tensioned. But the main adjustment must be made with screws (K) securing the electric motor together with the frame to the machine frame. Loosen these screws with a spanner or a heavy-duty Phillips screwdriver and adjust the tension by moving the engine relative to this mount. After adjustment, rotate the machine shaft several times and check the belt tension again.
Pay attention to the engine pulley. Just like a belt, its working surface has teeth. When replacing a drive, you need to buy a motor of the exact same model that is installed on your machine, so that not only the mount is suitable, but also the pitch of the teeth. In some cases, the pulley can be removed and replaced with a new engine, but this will require a special wrench. For more information on how to replace the electric drive of a modern model electric sewing machine, read the article How to disassemble a sewing machine and replace the electric drive.
Terms used in part names
To work with a household device at home, you need to know the following terms:
- screw - made with a thread on the base, on the head there is a groove for the hole:
- bolt - made in the form of a part with a tetrahedral head, there is a cut thread;
- shaft - a round axis, used to secure parts, assemblies, mechanisms, transmitting movement;
- bushing - a cylindrical part with an internal hole that secures shafts and axles;
- crank - attached to the edge of the rotating element into which the connecting rod fastening part is inserted;
- rack - located under the foot, has teeth, is designed to move the material forward;
- thread take-up - an elongated wire located on the front side of the unit, pulls out the thread when a stitch is formed;
- needle plate - has a hole for the needle to pass to the shuttle;
- needle bar - holds the needle and moves it.
Design and principle of operation of a sewing machine
Shuttle mechanism operation
The bobbin, which is inserted into the space provided for it, cooperates with the shuttle. The main part is positioned according to the required profile. The movement occurs due to the connecting rod connection, which sets the proper trajectory. The working procedure of the connecting rod is controlled through the panel. The rotation of the flywheel sets the needle in motion, moving up and down. On the rise there is a sharp grip - this is the bow element of the shuttle.
Shuttle device
Bobbin
The part located behind the panel under the needle. The metal component is needed to supply the threads that are wound onto it before starting the process from the main spool. The thread is threaded through the hole provided for this purpose, after which the bobbin is attached to the body. The action of the flywheel rotates the bobbin element and winds the threads onto the main axis.
Bobbins for different sewing machines
Device for drawing matter
This procedure is carried out as follows:
- Initial actions. The main shaft runs through the center, connecting to the flywheel axis through a connecting rod;
- Next step. The broaching mechanism begins manipulation with the synchronous rotation of two rods placed on the sides.
The key-shaped part moves back and forth in the direction of the material flow. A cam located on the second axis performs the lifting and lowering function. During the movement of all mechanisms, the key drives the broaching teeth. Receiving impulsive signs, the teeth go through steps when scrolling in place.
Main parts and components of a sewing machine
Thread tension
The screw placed above the needle holder creates the proper tension on the upper thread so that the seam is of high quality. Near the needle holder there is an eyelet that moves during sewing; it resists weakening and sagging of the thread.
Mini version
Our review would be incomplete if we did not talk about mini manual sewing devices. The structure of such a unit is very simple. Outwardly, it resembles an office stapler. The lower part is equipped with a plate along which the fabric slides, and the lower thread fed from the bobbin is also captured there. The bobbin itself, which in a conventional sewing machine is located in the shuttle mechanism, is attached to the side; next to it, a bobbin is installed on a special pin that feeds the thread to the needle. To prevent the coils from falling off, they need to be secured with plugs. This type of small household appliance runs on batteries.