Household appliances help automate routine household work. Among the variety of technical innovations, drying machines are gaining popularity. Depending on the installation methods, manufacturers offer various modifications. After choosing a model, you only need to correctly connect the dryer to the ventilation, sewerage and electrical systems. Installing a dryer is a simple process, so you can do it yourself.
Types of dryers
These machines are divided into several types:
- Drying cabinet.
- Drum drying.
The drying cabinet is quite difficult to use. Washed items will need to be hung by hand in a specially designated place. Excess moisture is removed using fans that supply warm air to the drying chamber. Electric or air heaters are used for heating. There is no point in connecting such a dryer to the sewer. All you have to do is use the spin mode and then transfer the items to the drying cabinet.
The design of the drum dryer, as well as the principle of its operation, resembles a drying cabinet. The difference is the presence of a special drum that speeds up drying. Thanks to rotation, hot air penetrates the fabric much faster. In addition, after using the drum machine, the need for ironing is reduced.
Such a device uses special programs that provide rotation mode, so things stop wrinkling. The drum dryer does not require a sewer connection. It is needed only if it is not possible to load wrung out items and manually drain unnecessary water from the tank.
Dryer placement
There are different ways to install a dryer. First of all, you need to proceed from the characteristics of a specific model, the amount of electrical equipment and the layout of the house. Most often, the dryer is installed in one of the following ways:
- on or above the washing machine;
- next to the washing machine;
- in a separate place (niche, closet, corner, etc.);
- under the tabletop.
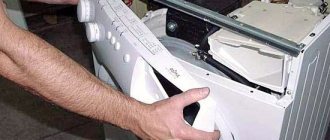
In most cases, the dryer is located on top of the washing machine. Naturally, this option is only relevant for horizontal-loading washing machines. If things are loaded into the washing machine vertically, it is not recommended to install a drying unit above it, since this option will be inconvenient to use.
The key advantage of being positioned on the washing machine is that it saves space. Most units are equipped with special mounts for installation above the washing machine.
You need to use suitable fasteners; you can’t just put the car on top. If you simply place a dryer on top of a washing machine, both units may fail because they are not designed to withstand external vibration. Moreover, due to vibration during the washing process, the dryer may simply fall and break.
There are 2 options for mounting the drying unit:
- Fastening elements included in the delivery kit.
- On a specially mounted shelf. To install the latter, you can use available materials.
Naturally, the easiest way is to install the equipment nearby. However, in most modern apartments this is impossible to do due to limited space. This option is suitable only for the most spacious bathrooms.
Installation above the washing machine
When installing a dryer above a washing machine, you need to consider the following points:
First of all, it is important to correctly position the washing machine above which the drying unit will be installed. A special stand is installed on the washing machine to place the dryer. It is advisable to lay a rubber lining between the units. This will minimize vibration and, accordingly, reduce the degree of negative impact of one device on another. After installing the pad, you should install the dryer stand. The dryer should be placed on a securely fixed stand. All grooves, fasteners, etc.
you need to glue, paint over, cover up or perform other actions based on the parts used for installation.
Only after high-quality, reliable and correct installation can you begin to operate the equipment. While devices are not secured, they cannot be turned on.
Installing a dryer near the washing machine, in a niche or corner, is much easier. In this case, there is usually no need to use additional fasteners. However, each case has its own installation features. Including, you need to take into account the features of the layout and decoration of the room.
Drying types
Drying things can be done in different ways. They are divided into several technological groups, which are used in various drying ovens.
Condenser
The air heats up together with the water. Then it condenses using special elements mounted inside the device. Condensate accumulates in special tanks. This liquid no longer touches things. It is removed manually or through a connected sewer.
Important! The collected condensate is not suitable for watering indoor plants, as it may contain harmful substances left over from the washing powder.
Ventilation
Thanks to the heated air, the “humidity” is quickly removed from the car. In principle, this is the simplest type of drying. But for this you need to have good ventilation near the device. Otherwise, the surrounding area will be filled with excess moisture.
The industry also produces models equipped with additional parts. Infrared lamps are installed in the drying cabinet for disinfecting laundry. Thanks to the air ionizer, things become safe for human health. The listed elements are considered secondary. They only make the dryer more comfortable.
Design features of electric heated towel rails
The modern heated towel rail has a number of distinctive properties:
- The use of the latest technologies makes it absolutely safe, although it uses a high voltage of 220V for connection. The electric heated towel rail has excellent dielectric materials in its design; advanced technologies for isolating electric current were used in its manufacture. All this guarantees the absence of inducing currents on the housing and good heat transfer from the heater; the device has a high overall efficiency.
- The electric heated towel rail is highly reliable and has a long service life. Due to the fact that the design of the thermostat uses high-quality heating materials with an electrical automation and control circuit that is simplified in terms of repair. Therefore, this device can be used all year round.
- Installation of an electric towel rail eliminates the use of special tools: a soldering iron, welding machine, grinder; you can get by with an electric drill, mounting dowels of the “quick installation” variety. The fastening procedure will take a short amount of time; it can be carried out by anyone who is familiar with the operation of the drill.
- The device of any heated towel rail does not require the construction of special communications and can be connected to a regular outlet. Due to its complete independence, installation of an electric heated towel rail is possible anywhere. Many of its designs have special fastenings that help maintain the relative mobility of the device.
- Heated towel rails (thermostats) are available in a wide range, so you just need to choose a device based on design, power and construction. This electrical device does not require much space, fits perfectly into various bathroom interiors, and can be connected in a convenient place.
- The heating of the case has a maximum temperature of approximately 70°C. This is quite enough to fully heat the room and quickly dry the towels even in the cold season. In this case, the possibility of serious burns when touching it is completely eliminated. An electric heated towel rail has a minimum operating temperature of approximately 30°C. The towels will be in such a comfortable heated state without strongly heating the entire room.
By design, electric heated towel rails are divided into 2 types:
- Cable. Their scheme does not provide for the use of filler. The heating element is a special heated cable, so the location and connection of the heated towel rail can be anywhere. This type of heated towel rail almost instantly enters working condition, but since it does not have a thermal capacity, it cools quickly.
- Oily. The design of these heated towel rails assumes that the coolant in them will be an oil filler, which transfers heat from the heating element throughout the device and has a relative dependence on its location in space. This heated towel rail does not have any air in its heating element that could cause a blockage. Its design assumes the circulation movement of the oil filler; therefore, it is not recommended to install the heated towel rail at an angle deviating from the position indicated in the instructions. Electric oil heated towel rails have smooth, gentle heating and cooling.
Regardless of the design of the electric heated towel rail, installation and price will be different. They are:
- sexual;
- ceiling;
- wall
To connect and increase the electrical safety of oil-filled heaters, additional grounding is used.
Dryer connection technology
You can do this work yourself, but only if you have experience in performing such operations.
Note! Before connecting the dryer to an existing sewer or connecting the power supply, carefully consider the installation method.
A professional master will do this work quickly and efficiently with a certain guarantee. To prevent the machine from breaking down in the future, the technician will advise you on how best to operate the machine and what operations can lead to breakdown.
Of course, calling a specialist guarantees good work, but will require additional financial expenses. Do-it-yourself installation is possible if you are familiar with construction and plumbing work. To connect the dryer to the sewer, use a special drainage system. To supply power, a socket is mounted next to the device (you can use a carrier).
Installation of an electric heated towel rail
Not everyone has the opportunity to install a water heated towel rail in their bathroom, so purchasing an electric device would be an excellent solution. It has some advantages:
- simple installation;
- ability to change the heated temperature;
- independence from hot water supply.
It is quite easy to install the “ladder” electric heated towel rail model yourself. There is absolutely no need to carry out welding work by wedging into the hot water supply system. When installing, you just need to mount the device in any convenient place on the wall and connect the heated towel rail to the electrical network.
The heated towel rail connection diagram provides for the presence of excellent electrical wiring in the house. This device is equipped with a heating element, which has quite high power and creates an additional large load on the network. There are generally no sockets in bathrooms, because 220 V voltage and high humidity are unacceptable. To connect a heated towel rail, you can drill a hole through the wall and run the power cable into another room.
There is another option. Install a socket protected from moisture by connecting it to the lamp. The outlet should be sealed into the wall, preferably not adjacent to rooms that are not heated to avoid the formation of condensation.
Electrically, the heated towel rail has the second class of protection and is equipped with a thermostat on a heating element. This allows you to set the desired heating temperature yourself; the connection diagram provides for automatic shutdown when overheating.
Tools required for connection
To connect the dryer, you must have:
- Knife. Useful for cutting drainage to the appropriate length. Sometimes this part is included in the device kit. If it is missing, it can be purchased separately by cutting it to the required length. When purchasing, be sure to check the quality of the drainage pipe. Bends, cracks and tears are not allowed.
- Clamps for fixing drainage. Not included with the cabinet. They can be purchased at a specialized hardware store. These parts are made of a metal strap that can be tightened using a locking mechanism.
- Screwdriver. A necessary tool for working with clamps. She tightens the drainage clamp, creating a tight connection.
Such a small set of tools is enough to install and connect the dryer yourself.
How the machine is connected
The sequence of actions will be determined by the installation method.
When placed vertically
In most cases, the dryer is installed in a vertical column with a washing machine. To do this, it is recommended to choose models of the same width. In this case, the entire structure made of technology will be more stable.
Before starting installation, you must purchase fastening elements with special caps (adapter frames).
Action plan:
- Install fasteners on the lower unit (washing machine).
- Unscrew the legs on the dryer and install it in the caps.
- Level the equipment using a building level. To do this, place it first on the front of the machine (the edges should point to the left and right sides, respectively), then on the back, then on the sides, adjust the height and level of inclination.
When placed horizontally
This installation method will ensure maximum stability of the equipment. To install in the right place, you just need to unscrew the legs to the desired length and level them.
Do I need to connect to a sewer?
When developing drying units, engineers and technologists decided to create machines that have the possibility of such a connection. However, each owner decides for himself whether to make such a connection or do without it. If there is no connection to the sewer, you will have to constantly monitor the level of the water container (if available). The liquid is drained manually.
Connecting the sewerage system to the dryer is done to make it more comfortable to use. Now you won’t need to think about the moisture present in wet laundry; it will all be removed through the sewer. Of course, if there is an opportunity to connect a sewer, be sure to take advantage of it.
Household appliances Dryer