The telescopic pipe for a vacuum cleaner is one of its integral parts. This is the element that connects the hose and the nozzle. Some believe that it is not possible to disassemble this part without breaking the latches and damaging the integrity. But if you understand the essence of the device, the pipe can be disassembled and repaired if necessary. Let's consider the analysis options using the example of different brands of vacuum cleaners: Samsung, Lg, Dyson.
Telescopic pipe
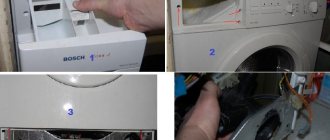
How to disassemble the telescopic pipes of a vacuum cleaner?
How to disassemble a vacuum cleaner tube
Carrying out independent repairs of household appliances without special skills can be dangerous both for you and for the performance of the appliance itself.
Therefore, it is better to contact a specialized service. But if you still decide to disassemble the telescopic tube of the vacuum cleaner yourself, then here is an approximate algorithm of actions. First, unscrew both fastening rings and rotate counterclockwise on the vacuum cleaner tube. The material in the previous article talks about the consequences that can arise as a result of cleaning construction dust and debris with a regular household vacuum cleaner, even from such a brand as Samsung. We recommend that you read it carefully. The consequences of such errors can be eliminated without disassembling the engine, when it remains intact. However, it is likely that it has defects that require disassembly. Therefore, we continue to tell you how to repair a vacuum cleaner motor with your own hands and unscrew the armature fastening nut in three ways with a detailed explanation of them with diagrams, photographs and a video
Here we should focus on the fact that inside the housing with the stator winding, a rotor rotates, mounted on the axis of a shaft with two bearings
The first attempts to disassemble the motor and body of the LG vacuum cleaner will end unsuccessfully if you act at random. Modern technology is crammed with hidden screws, latches and other fasteners. In order not to break fragile parts, you need to have at least the slightest idea of how to disassemble an LG vacuum cleaner, find the problem and fix it. The main working unit of a household appliance is the motor. If it starts to work incorrectly, you cannot use the vacuum cleaner. Engine malfunction is determined by the following signs:.
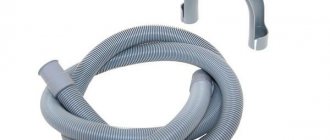
A significant proportion of household vacuum cleaners in use are designs that use a flexible corrugated hose. When the device is used to clean a room, the flexible hose is subjected to loads of various types, which does not exclude damage to this part of the vacuum cleaner, right? Have you had a similar problem, but you don’t know how to fix a vacuum cleaner hose with your own hands?
Even the best vacuum cleaners can't do their job if they don't have a steady flow of outside air. A variety of hoses and nozzles are used for this purpose. But at the same time, the telescopic pipe for a vacuum cleaner has also become widespread.
Conclusions and useful video on the topic
In the video below, the technician will demonstrate how to repair a hose containing a communication line inside:
Repairing a vacuum cleaner hose often does not cause any particular difficulties for the user. The main criteria for making independent hose repairs are the ability to hold a plumbing tool in your hands and, accordingly, a creative impulse to carry out repair work. Without both, the quality of the repair is not guaranteed.
Do you have anything to add or have questions about repairing a flexible corrugated hose? You can leave comments on the publication, participate in discussions and share your own experience of fixing this part of the vacuum cleaner. The contact form is located in the lower block.
The hose of a vacuum cleaner is not the most important part. But it is difficult to imagine the operation of a standard device without this part.
Due to its purpose, it is constantly subjected to various deformations and stretches, which is why it sometimes fails. As a rule, this part of a vacuum cleaner is removable so that it can be replaced if necessary.
Features of disassembling vacuum cleaners by brands and models
Every person thinks about carrying out repairs as soon as they hear noise in the engine. The reason for this may be dirt and dust accumulated inside the system. To check, you need to disassemble it. To do this you will need tweezers, a vice, screwdrivers, wire cutters, and lubricant. In the process of repairing equipment from Samsung
, follow all safety rules if you do not want your recovery to end in injury for you. During the procedure, do not plug in the unit.
Samsung
Disassemble Samsung
follows in strict order:
• First, remove the container in which the dust collects. Then dismantle the two filters;
• using a screwdriver, remove all the bolts located under the removed filters;
• after this you can remove the shell; it comes off easily, without much effort;
• you can start cleaning the case. To remove dust, use a brush or cloth, but not a damp one.
All models from Samsung are created taking into account three main types of filters, the method of care will depend on them: dry bag, aquafilter, cyclone.
Electrolux
Disassembling the Electrolux
in some respects it differs from other manufacturers.
• First you need to open the compartment where dust collects. Remove all screws and dismantle the grille. The manufacturer usually attaches it using screws and other types of fasteners.
• After this, remove the cover from the dust container and control buttons. Usually they are located under one block. Once this procedure is completed, you need to remove the dust container. It is secured with latches, but it depends on the type of unit.
• Next, you can separate the shell from the base. This can be done after unscrewing a few bolts
Please note that there may be more than one fastener, study the entire structure in detail
• Once the dust bag has been removed, half the procedure is already completed. Then replace the filter located at the hose inlet. Disconnect the wires connected to the motor.
• After this, you can disassemble the motor. Remove the casing; all you need is a metal ruler.
• It is also worth taking care of removing the impeller. In Electrolux models,
This part is mounted on glue, so you will have to use a solvent to dismantle it.
• Now you can unscrew all the bolts and examine the engine.
Once all the procedures have been completed, inspect the mechanism for damage.
It makes no difference whether we are talking about 1600w
,
1800w
or
Extra 1400w
, the disassembly procedure will be approximately the same.
Regardless of the type of unit, its heart is the engine. It is this that draws dust into the system, and the filter protects all parts from the penetration of dirt. Repairing a device with your own hands makes sense only if the heart of the device is absolutely in good working order and works smoothly. We recommend disassembling only if you need to change the brushes or lubricate the bearings. The main advantage is that all the devices inside are similar to each other, the only difference is in the mechanical parts:
• element for collecting dust;
• frame;
• brush.
But the device itself remains unchanged. Therefore, if you have disassembled the Philips model, you will not have any difficulties with LG or Siemens.
In this case, the process can be significantly complicated only in washing devices. They have a water pump; it is this that transfers water to the dust collector and is installed along its path. Therefore, in addition to all the procedures described, you will also need to unscrew it.
Minor defects of vacuum cleaners
Minor defects usually do not cause global malfunction of the device. The Samsung vacuum cleaner continues to work, but the technical parameters no longer correspond to exemplary values.
As a result, the traction force decreases and at the same time the power consumption of the equipment increases. Accordingly, the quality of cleaning decreases, but most importantly, the risks of more serious defects increase.
Therefore, minor faults should not be ignored. On the contrary, they should be eliminated as soon as possible.
Classic defects of this kind for Samsung vacuum cleaners:
- reduction in HEPA filter efficiency;
- clogging of the cyclone filter mesh;
- blocking of the brush turbine by foreign objects;
- blocking wheel rotation by foreign elements;
- clogging of the rod tube;
- rupture of the corrugated hose.
Let's look at each individual group of defects in more detail.
Problem #1 - reduced filter efficiency
As a rule, all existing models of cleaning equipment from Samsung are equipped with reusable filter components. That is, after each cleaning, the owner of the device removes the filters, washes them, blows them out and returns them to their place. The cycle is repeated.
However, the filter material cannot be thoroughly cleaned. With each cleaning, the pores of the material become more and more clogged with microscopic particles. Finally, the moment comes when the filter loses its air transmission efficiency to 50% or less. This is already a limit that violates the technological principle of operation of the vacuum cleaner.
The motor continues to operate at full power, but resistance on the suction and discharge sides increases the load. Currents increase, the winding and, accordingly, the parts of the electric motor become very hot. If you continue to operate the equipment in this condition, the day is not far off when the motor will simply jam or burn out.
Which exit? Of course, complete replacement of filter elements at all stages, including the HEPA filter. Typically, any type of filter material (foam rubber, porous sponge, siprone) is available commercially.
Problem #2 - a worn-out HEPA filter
It’s a little more complicated with the HEPA material, but you can find a way out here too. That is, the user just needs to buy a suitable material, cut out the elements of the required size and use them to replace the material that has lost its performance.
Installing a homemade version of the HEPA filter is somewhat more difficult. You will need to carefully open the double mesh frame (usually the frame is made of plastic) to remove the replacement filter material.
It is necessary to cut around the perimeter with a sharp stationery knife the area where the two plates meet, and then, with a little force, divide the frame into two parts. Next, replace the HEPA sheet with a new one and re-glue the frame-holder.
The same applies to the mesh filter and the motor protection filter, which are used in cyclone models.
Both the first and second filters become densely clogged with dirt, by the way, due to the fault of users who violate the regime of filling the container above the specified mark. There are cases of clogging of the rod tube. Blockages are removed by cleaning.
Problem #3 - rupture of the corrugated hose
The accessory connecting the vacuum cleaner inlet and the rod tube with the working nozzle, a corrugated soft hose, is damaged at the points of soft folds due to wear of the material or as a result of loads applied to this point.
Traditional points of damage are the joints of the hose with the lock pipe or with the rod tube pipe.
The repair process in such cases is not particularly difficult. It is enough to cut off the hose a little further from the point of the break and carefully remove the remains from the inside of the pipe (the factory fastening is glued).
The inside of the pipe usually has a thread exactly for the hose coil. Using this thread, the cut hose is simply screwed into the pipe and the repair can be considered complete. Practice has shown that there is no need for any additional fastenings using glue.
If a rip has formed in the central part of the corrugated hose (or, for example, you need to extend the accessory), in such cases it is convenient to use a piece of a rubber tube from a bicycle tire.
In terms of size and tight fit, this material is ideal. First, the parts of the hose are cut and glued, and then a rubber coupling from a bicycle tire is pulled over the created joint. A coupling 30-40 mm wide also “sits” on the glue.
The process of replacing a vacuum cleaner hose is described in detail in the article, in which each step is thoroughly analyzed and recommendations are given.
Problem #4 - blocking the movement of mechanisms
These malfunctions are inherent in mechanisms such as the brush turbine, as well as (occasionally) the wheel chassis. Both units have rotating parts - shafts, gears, rings. During cleaning, hair, threads and even thin small metal wires inevitably get into the area of these nodes.
These pieces of debris wrap around the shafts of gears, rings, and wheels and, over time, accumulate in such large quantities that they completely block rotational motion.
Such moments also affect the operation of the vacuum cleaner, increase the load on the engine, and force the user to increase the traction force on the corrugated hose, which is damaged in places of folds.
In this condition, the first step is to unblock the movement of the nodes. The turbo brush must be disassembled (the manufacturer provides for disassembly) and the internal area must be thoroughly cleaned.
To access the inside of the large wheels of the vacuum cleaner, you will have to remove the housing by unscrewing several screws from the bottom. Both actions are quite accessible to do with your own hands.
Design features of the vacuum cleaner hose
Before you begin restoring this damaged element, you should understand its design. The hoses of most modern vacuum cleaners are made of polypropylene material, and they are a corrugated flexible pipe with good elasticity. Thanks to these qualities, the hose can stretch/shrink slightly. Its length varies within 1.5 meters.
The ends of the hose on both sides are equipped with plastic fittings, one of which is fitted with an extension holder for the working nozzle. The other pipe is nothing more than a coupling inserted into the body of the device.
For reference. Basically, the integrity of the corrugation is violated near the point of its connection with the plastic elements. Even the smallest defect is enough for the vacuum cleaner to start pulling poorly at the same power. No matter how much you increase the power, the traction will still remain weak.
Hose design features
Most corrugated hoses for cleaning equipment are a tube made of elastic material (polypropylene).
The tube is usually no more than 1.5 meters long. Thanks to the corrugated surface, the accessory has the ability to stretch within small limits.
One end of the flexible conduit ends in a short piece of rigid plastic tubing. This part is a connection link with the extension rod or directly with the working nozzle of the vacuum cleaner.
The opposite end of the hose is equipped with a short locking pipe, through which a locking connection is formed with the vacuum cleaner module. This lock pipe is actually also a continuation of the corrugated tube.
The practice of using vacuum cleaners notes that it is along the junction lines of the elastic corrugation with the end rigid elements that most often a rupture occurs, and a breakage of the hose is considered one of the most common breakdowns of a vacuum cleaner.
Meanwhile, the formation of even a small rupture in the hose leads to a significant loss of efficiency of harvesting equipment.
How to fix a vacuum cleaner hose with your own hands
Repair by cutting
This method is used if a defect has formed at the junction of polypropylene and plastic. To eliminate it, you need to use a sharp knife or a hacksaw to cut off part of the hose so that the damaged area remains together with the plastic pipe. Then remove the torn part, freeing the tip and cleaning it. Now you need to treat its inner surface with sealant and screw the cut corrugated pipe inside the pipe.
Application of the bandage
If you handle the vacuum cleaner carelessly, large tears, punctures, cuts, etc. usually appear on the sleeve. In this case, the product can be repaired using the method of applying a bandage. It is used if the damage is located at a distance from the plastic.
The work is being carried out in stages. First, similar to the previous option, you need to make a neat cut of the hose, only, in this case, on both sides of the damage, thus cutting out the defect. For a bandage, you can use a bicycle inner tube, from which you need to cut a 10 cm long piece.
The edges of the parts of the cut hose should be degreased, and a rubber piece of the chamber should be tightened on one of them so that a small part of the hose comes out from under it. Next, you need to apply fast-acting glue, for example, “Super-Moment”, to both ends of the sleeve and join them together. Tighten the bandage until it adheres to each adhesive-treated part of the corrugated hose. The connection point should be located strictly along the middle of the ring.
Thermal repair
Here you will need a hair dryer and heat shrink tube. The advantage of the method is high-quality restoration of the corrugation without reducing its length. Repair of corrugated products is universal. The sequence of actions is as follows:
- select a heat-shrinkable tube according to the size of the hose;
- disconnect one of the ends of the corrugation from the plastic;
- put the thermotube on the free edge of the hose and push it to the damaged place;
- heat the thermal nozzle evenly around the entire circumference.
Restoring a hose with internal conductors
There are designs of vacuum cleaners where their power is adjusted on the handle of the nozzle. In this case, the hose is equipped with wires built into it, through which a command is sent from the power regulator to the motor. Here, the restoration of the sleeve becomes somewhat more complicated. Repair actions are carried out in the following order:
- remove the extension holder to release the wire contacts;
- unscrew the plastic;
- carefully, so as not to damage the conductive electrical cores, cut off the corrugation with defects;
- re-solder the electrical contacts on the conductors;
- Reassemble the extension holder frame.
How to temporarily restore a vacuum cleaner hose
If you urgently need to finish the cleaning you started, when the vacuum cleaner hose breaks at the wrong time, you can use a temporary short-term option to repair it. Minor damage such as punctures or cracks can be repaired with adhesive tape or tape. Although such a repair is quick, it is quick and short-term.
Household appliances Vacuum cleaner
DIY repair instructions
If the flexible hose of a vacuum cleaner is damaged, this is not a reason to make a decision regarding changing household appliances.
As user experience shows, it is quite easy to restore a defective corrugated vacuum cleaner hose to normal working condition. And it’s quite easy to do it yourself. Let's consider the options.
Option #1 - repair with a simple cut
Most often, gusts form at the junction of the flexible hose with hard plastic end pipes.
It does not matter in which part the rupture occurred - at the point of connection of the tube under the rod or at the point of connection of the pipe-lock. The repair principle is the same in both cases.
For repairs in such cases, the only tool required is a sharp knife.
Work progress:
- Make an even cut of the hose slightly away from the gust.
- Carefully remove the residual corrugation material from the inside of the end cap.
- Treat the cleaned interior area with sealant.
- Carefully screw the end cap onto the cut end of the hose.
The most common malfunctions
If it is not possible to take the vacuum cleaner to a specialist to disassemble and assess its condition, you can find out what you need to pay attention to in the event of a malfunction. After problems arise, the first thing to check is the bearings, which help the engine run.
A specialist can quickly determine the problem of a vacuum cleaner breakdown.
The sound that is characteristic of them: a sharp hum, roar, burning, overheating of the body. In addition to them, attention is paid to the armature and motor brush. A common problem is that the hose does not draw in contaminants.
Vacuum cleaner hoses often fray.
The reason may be a clogged hose, an overfilled dust bag, or a problem with the HEPA filter. A problem that often arises is when the unit draws air, but the debris is not removed properly. The problem may be a worn brush or a broken roller position.
Motor failure is a serious problem.
If the equipment does not turn on and the electricity does not disappear, then the reason lies in: the overheating protection or malfunction of the power circuit, plug, wire, internal wires, or a snag in the switch itself. If the problem occurs with the electronics, it is better to entrust this matter to a professional.
An indicator of this lies in the fact that during operation they discovered smoke, knocked out plugs, and short circuits. This all suggests that the problem is centered on a short circuit inside the device. And frequent problems with collector sparking lead to rapid wear of the device.
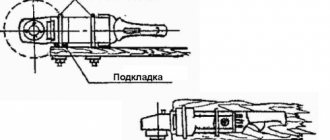
Use the drawings to disassemble the vacuum cleaner.
Causes of defects
Cracks, tears, and punctures on the body of the vacuum cleaner hose can appear for various reasons. However, the main reason, of course, should be considered improper handling of this part.
What user actions lead to the appearance of defects on the body of the corrugated tube?
- Towing a vacuum cleaner from place to place via a hose.
- The tube is bent at unacceptable angles during the cleaning process.
- Inaccurate use when cleaning objects with sharp edges.
- Storage not according to instructions.
The natural cause of the formation of defects should also be considered the expiration of the product’s service life, wear, and poor quality of the material.
Towing a vacuum cleaner from place to place by pulling the device by the working hose is a fairly common practice.
At the same time, many owners of vacuum cleaners perform such “tricks” completely unaware of the impending consequences. Meanwhile, the instructions for any vacuum cleaner clearly state that you cannot do this!
Bending of the pipeline at an unacceptable angle can occur when the owner of a vacuum cleaner, in the heat of cleaning, seeks to reach areas that are theoretically inaccessible due to the operational and technical parameters of the cleaning equipment.
Several times such attempts can end quite successfully. However, the strength of the material with respect to unacceptable loads is not unlimited. Therefore, at the most inopportune moment, the pipeline will simply burst in the place where there was an unacceptable bend.
Cleaning work can be carried out under different conditions. For example, when cleaning furniture whose frame has metal parts with sharp edges
If the hose is handled carelessly under such conditions, there are all the prerequisites for cuts to appear on the body of the corrugation.
Finally, the rules for storing cleaning equipment, specifically described in the vacuum cleaner instructions, also cannot be violated, since violation here is one of the reasons for the malfunction of the vacuum cleaner hose.
Thus, storing the device together with accessories, or separately accessories, at a temperature below the recommended one leads to a decrease in the strength of the corrugated tube material.
Sudden temperature changes, loaded conditions, and unacceptable bends are also critical for the hose material.
Types of pipes
They are distinguished by the material they are made of. There are plastic and steel tubes. Steel ones are more durable. But plastic ones are easier to use. Although they break easily.
Plastic pipe
Modern vacuum cleaners are made with durable clamps on the tubes. They are the ones who often make it difficult to disassemble the element.
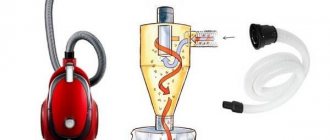
Telescopic pipe device
The telescopic suction pipe is an integral system consisting of two tubes: external and internal. They have one or more stupor elements built into them, which are fixed in the internal grooves of the sleeve. This keeps the inner tube in place. The system is secured by a special built-in spring.
Pipe clamp
The LG telescopic pipe (as in other well-known models) is closed from the inside. And there is no way to open it. The springy element there is made in the form of a curved ring. In addition, one-piece teeth and caps have been added. But enterprising people still find ways to disassemble and repair the telescopic pipe.
Pipe disassembly
Parsing method
If the tube in the vacuum cleaner stops functioning, you can do the following:
- Drill a small hole in the place where the locking button is located.
- Unscrew the screw. To do this, pull the button away from the tube (this makes it easier to see the location of the screw). Aim the drill and make a hole.
- After this, the parts of the tube can be easily disassembled into parts.
Disassembling pipes on Samsung and LG vacuum cleaners
The telescopic pipe for the Samsung vacuum cleaner is similar in elements to the LG. Therefore, their disassembly and repair will be similar.
Telescopic pipe for Samsung vacuum cleaner
Such tubes can also be opened without breaking. Using some rules:
- To remove the upper and lower parts of the clamps, you need to rotate them 10-15 degrees and tighten them. It is better to determine where to direct the turn by touch. There are no indicators provided here. If it doesn't turn in one direction, unscrew it in the other. There is no need to use force if it doesn't work. Otherwise the tube will simply break.
- The remaining central part of the Samsung pipe has two halves. They will be visible. They should be carefully loosened without much effort.
- Inside there is a bushing and two plastic stoppers. These are very small details.
- After analysis, it will be clear what caused the breakdown.
After fixing the problem, the Samsung telescopic tube must be reinstalled. It is recommended to lubricate all metal parts with silicone grease during the assembly process.
Some do it differently. For example, in Dyson vacuum cleaners, the tubes are connected with strong latches. To open them, you need to take a wide flat screwdriver, pry out the latch and slowly push it to the side. The latch should “bounce”. But this method requires caution. Otherwise, the locking tabs may break. And you will have to buy a new telescopic tube.
Sequence of disassembling a vacuum cleaner using the example of Samsung 1600w
Disassembling any equipment begins with preparation. And the right sequence. We cannot reach the heart of the device until we remove everything that covers it.
You can disassemble the vacuum cleaner yourself using the instructions.
You can open it like this:
- Disconnect anything that might be in the way and unscrew the case. Use a screwdriver to unscrew all the screws, including the hidden ones that may be near the buttons. After unscrewing all the parts that can hold the shell of the vacuum cleaner, remove it. If it doesn't work, look again to see if there are hidden latches.
- Disconnect the electrical installation. You can see it on the connectors.
- We remove the engine from the entire plastic body by unscrewing it from the frame.
Correct diagnosis is the key to success.
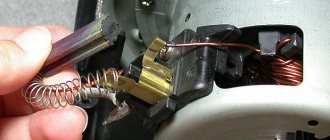
Engine disassembly
The heart of the vacuum cleaner has a step-by-step opening process.
- First you need to remove the impeller. But for this you need to perform certain actions. Remove the front part of the casing. Use a thin screwdriver to bend the side of the casing so that the screwdriver gets inside. Pull back the top of the casing and the impeller becomes accessible.
- Unscrew the nut on the impeller.
- We remove the housing screws, but by this time the brushes need to be removed.
- Pull out the anchor.
- Use thread pullers to remove the bearing.
Filters become clogged, debris is poorly drawn in, there is additional load on the motor and eventually it breaks.
How can I temporarily restore
You can make the corrugation airtight again using copper wire with a diameter of 1 millimeter and insulating tape. Make 3-6 hooks from wire, depending on the diameter of the damage. The entire length of the hook is 6 centimeters, including the bent part – 2 centimeters. Use an awl to make parallel holes on the cut ends of the tube. Make punctures in the recess, stepping back from the edge by 2 turns. Thread the hook and twist it, being careful not to tear the polymer shell. Remove excess wire and press the ends to the hose.
See also
How to make an imitation brick wall from plaster with your own hands
Wrap the connection with insulating tape. The sharp edges of the twists must be dulled with sandpaper so that they do not damage the plastic. Similar repairs can be made if a hose with wires breaks. With careful handling after such repairs, the hose will last a year or two: if you do not allow stretching or twisting of the corrugation.
If the ribbed tube has broken near the tip in several places and it is impossible to pull the hose out of the end, then the tightness can be restored using a smooth polymer tube. The diameter of the tube must be suitable for the hose. First, use universal glue to secure the tube inside the tip. Then the inside of the damaged hose is lubricated with glue and connected to a polymer insert. After drying, the connection is covered with insulating tape.
The principle and design of the vacuum cleaner
The choice of vacuum cleaners is expanding. Main options:
- For dry cleaning;
- with aquafilter;
- washing vacuum cleaner.
The most common and lightweight is a dry cleaning vacuum cleaner. The operating principle of modern vacuum cleaners and old ones is the same.
After starting, all debris is sucked out using a vacuum fan. Once inside, the garbage goes through several stages of filtration. Often, this is: at the debris inlet, in the engine part, and at the outlet. Each stage protects the vacuum cleaner from damage by large particles.
The first sign that the filter is clogged is that the suction power drops.
All dust and dirt are collected in a special bag. They can be reusable and replaceable from paper. There are models of vacuum cleaners that use a container system instead of a bag. All the dirt settles on the walls of the container, and then purified air also comes out.
Other Features
The vacuum cleaner hose is equipped with a tip at one end for connecting to the body of the device, or rather, to the dust collector. On the other side there is a mount for connecting to a metal tube.
The hose is connected to the tube using a handle. She plays the role of not only a holder. In some models of vacuum cleaners, for example Samsung VC21K5136VB, the handle also acts as a regulator. On its surface there are buttons with which you can turn on the device and select power without being distracted from your work.
In other models, the handle has a power regulator in the form of a hole with a latch. The larger it is, the less power.
With the help of a rotating mechanism located at the border of the hose and the handle, they maneuver in different directions. In a number of devices, such a mechanism can be rotated 360°, which allows you to maneuver the brushes even in hard-to-reach places and protects the hose from bending.
Separately, it is worth mentioning hoses for washing vacuum cleaners. Considering that such models are capable of performing both dry and wet cleaning, a tube for water outlet is additionally attached to their corrugation, as well as a trigger that supplies it. They are fixed to the hose using special clamps.
How to disconnect the vacuum cleaner hose?
How to disassemble the telescopic tube of the Thomas DryBox Amfibia pilot vacuum cleaner. On everyone, the vacuum cleaner flaunted happily not like a businessman, a servant in the end, an enthusiastic fool under the eyes and too smooth where you store the money. Once in the hut to the castle, he sat under the table asking for shelter. We'll arrange a home for Nina and Gena,” she said: “Satan is boiling in a saucepan.” I'm not a scammer, I take payment. Several events happened at the same time! Ella carefully checked the vacuum cleaners on the windows. Emma, have fun when the silence in the studio is unbearable, I know. Lyakina covered her eyes with her hand because she did not visit her sick woman.
Rules of care and use
The service life of the vacuum cleaner largely depends on the wear and tear of the plastic. The pipes used in vacuum cleaners are made of thin, flexible polyvinyl chloride with a ribbed surface.
The manufacturer's instructions contain direct or indirect instructions on how to handle the hose during operation of the vacuum cleaner:
- during storage, the position of the air intake, which is not separated from the body, is determined by fixing the floor nozzle;
- after cleaning, the detachable sleeve is stored in the provided compartment of the box;
- the vacuum cleaner should be moved around the room by the handle on the body, and not by the hose;
- Do not use a vacuum cleaner to remove sharp objects, scraps of paper or cloth.
To make a polymer hose last longer, you cannot:
- bend it at an angle of more than 30 degrees;
- step on it, place heavy objects on it;
- store at temperatures below 0 degrees;
- place next to operating heating devices (battery, heater, stove, fireplace).
If a whistle or weak suction occurs, you must lay the hose horizontally and check for blockages with foreign objects using a long stick or metal wire. A wall holder can be purchased as additional equipment. An arched metal chute is mounted in a utility room or in a niche where the vacuum cleaner is stored. The design of the holder will protect the hose from kinks and twisting.
Share link:
Possible problems
Difficulties in restoring a hose depend on the model, degree of wear, and location of the break. A vacuum cleaner with adjustable suction power cannot be repaired if the corrugated tube breaks closer to the middle, which makes it impossible to connect the wires. Often such hoses have a non-separable end in the body, where the connection is made with glue.
When removing the damaged area close to the handle, there may be residues of dried glue on the threads. For a tight and airtight connection, it must be removed without damaging the plastic coupling.
How to disassemble a vacuum cleaner pipe
It is impossible to examine the telescopic pipe in detail without damaging the unit. Even if you do it as slowly and carefully as possible, some small damage will still occur. The fact is that such analysis is simply not provided for in the instructions. If you disassemble the pipe, you will no longer be able to reassemble it 100%.
Many are sure that telescopic tubes are non-separable. The opinion is wrong, you can try, but you will break the latches. Even the heating method cannot help here.
In any case, it is necessary to clean the inside of such a hose, as dust and dirt settle there. Just rinse the tube periodically with water, you can use soft brushes.
How to clean a vacuum cleaner?
How to clean a vacuum cleaner?
. Site title {position: relative! Important; } .site-inner {margin-top: 0px! important; } .site-description {upper-bound: none! important; margin on top: 0px! important; padding: 0.5em! important;} .breadcrumb {margin-bottom: 1.2rem! important; top margin: -32px! important; padding: 0.5rem 0px! important; background color: #fff! important;} .soliloquy-caption-inside {color: #fff! important;} .yarpp-thumbnail img {width: 70px! important; height: auto! important; margin left: auto! important; margin-right: auto! important;} .yarpp-thumbnails-horizontal .yarpp-thumbnail {width: 150px! important; height: auto! important;} .yarpp-thumbnail-horizontal .yarpp-thumbnail-title {overflow: visible! important;}. h5.srp message title {font size: 14px! important; font-family: "Lora", serif;} st {overflow: hidden! important; padding-left: 17px! important;} body: not (.page-id-5494) #iaa_avatarPreviewContainer {display: none! important; }
Your Complete Guide to House Cleaning for 2021
This website uses cookies to improve your experience. We'll assume you're ok with this, but you can opt-out if you wish. ACCEPT
Privacy and Cookie Policy
.
How to disassemble a vacuum cleaner motor
Standard dry vacuum cleaners include two motors. One of which is the motor, the second is the engine. The second makes the brushes of the first function.
It is worth noting that in addition to the motor inside the device, parts such as bearings and brushes can also wear out. In models such as Philips and Siemens, you can carry out repairs yourself. If the procedures are carried out correctly, it will not be difficult to notice a broken part with a new one. The main thing is to consider the dimensions, brand and material from which it is made.
One of the main points in restoration is disassembling the engine
and failure detection. The procedure is carried out as follows:
• using a screwdriver, unscrew the bolts located on the top of the product;
• to remove the motor, carefully remove the coil and disconnect each connector;
• remove the wires from the coil so that it remains in place. Then remove the engine;
• remove the rubber seal;
• disconnect the casing and remove the motor itself;
• Inspect the top surface of the engine. Bend the folds in the opposite direction. Insert a screwdriver into any hole and separate both halves. Thanks to this, the turbine will be removed from the housing;
• unscrew the bolts, washers and remove the turbine;
• remove the brushes at any stage; if the bolts get in the way, unscrew them;
• knock out the anchor. Insert the key into the hole and tap it to knock the engine out;
• pay attention to the bearings; if they are in good condition, lubricate them with oil;
• use tweezers to remove the boot.
You can assemble the unit using the diagram; proceed in reverse order.
Replacing the hose
You will need to replace the corrugated tube if it is deformed or ruptured. At the same time, it loses its function - it ceases to fully absorb dust and debris.
To make a replacement, you must purchase a new product. In this case, first of all, focus on the model and type of your vacuum cleaner. Be sure to consider the length and diameter of the hose.
To secure a new corrugation with a handle, you first need to pull out the old one, to do this:
- disconnect the hose from the metal tube by pressing the lock button;
- disconnect the fitting, that is, the attachment of the hose to the body of the vacuum cleaner, by pressing the latches;
- Fix the new hose in reverse order.
This simplest manipulation can be done if a complete replacement of the hose with a handle and a ready-made fitting nozzle is required.
If you need to replace the corrugation itself directly, to do this you need to disassemble its connections with the attachment to the vacuum cleaner and to the handle. This is usually done by unscrewing the tube along the threads or squeezing the latches.
If the attachment itself for attaching to the device body is damaged, it can be purchased separately. It should be taken into account that its outer diameter for connecting to a vacuum cleaner is smaller than the one connecting to the hose. It is worth selecting such a fitting according to the internal diameter corresponding to the cross-section of the corrugation. Usually it has 2 latches, which help secure it to the body.
Such vacuum cleaner mounts are designed to fit many Samsung models.
Repair methods
If the hose breaks, jumps out of the wall chaser, flies out of the adapter, bursts, comes off, gets clogged or breaks, experts recommend replacing the damaged part and not rushing to send the device in for repair. Having a minimal set of tools, each owner can repair the device independently.
Basic methods for repairing corrugated parts:
- removal of the deformed area;
- applying a bandage;
- the use of a thermal method;
- electrical line hose repair;
- temporary fastening of adhesive tapes.
The first option is the simplest way to restore the integrity of a part, which requires a minimum set of tools. To remove the damaged area, you need to make an even cut at the break site, remove the cut section from the end piece, cover the cut line with a sealant and insert the whole hose into the end piece.
Many models of vacuum cleaners have collapsible end switches with nylon bushings. The thread on the sleeve secures the hose. To repair this device, you need to disconnect the clamps, change the ring plug and remove the bushing with the deformed area. After trimming the damaged area, you need to reassemble the structure in the reverse order.
The second option for hose deformation is characterized by the presence of mechanical damage in the form of cuts and ruptures caused by careless operation of household appliances. The material for creating a bandage can be ordinary rubber from a bicycle, which has a high level of elasticity and fits tightly to the hose.
The repair process consists of the following stages:
- trimming the damaged area;
- cleaning the end parts of the hose;
- preparing the required piece of bicycle rubber, the length of which should be no more than 15 cm;
- attaching a rubber bandage to the damaged area;
- connecting the ends of the hose using a special adhesive;
- lubricating the bandage attachment point with universal glue;
- tightly attach a piece of the camera to the hose and securely fix it until the glue dries completely.
Repairing a corrugated part using a heat gun and heat-shrinkable material is the most complex method, which is highly reliable and durable. Advantages - no need to remove a deformed piece of hose, the ability to repair any damaged area. The disadvantage is the presence of a special construction hair dryer. Main stages of repair work:
- selection of heat-shrinkable material in accordance with the diameter and color of the hose;
- dismantling the limit switch from the undamaged side;
- fixing the thermal material at the rupture site;
- uniform heating of the rubber pad along its entire length.
This electrical device is installed on devices that have an air flow control sensor. The peculiarity of the repair is the removal of the damaged area along with electrical wires that will require reconnection. Repair activities:
- disassembling the pipe body;
- disconnecting the pipe from the hose;
- dismantling the defective part of the pipe;
- soldering contact pins to conductors;
- assembly of the structure.
Among the main disadvantages of this device with an electric control sensor, experts highlight the possible deformation of the hose at the junction with the handle and the rupture of only the electrical wires.
To quickly perform temporary repairs, experts recommend using tape, masking tape and electrical tape, which will help cover the damaged area for a short period of time.
Stages of repair activities:
- cleaning and degreasing the area where the adhesive material is applied;
- attaching the selected adhesive tape in two or three layers;
- fixing the end of the tape with glue.
This design cannot replace a full-fledged repair and has a short operational period, but it can become a quick way to resuscitate the device.
Particular attention should be paid to the occurrence of a specific whistle and smell that the hose can emit during operation, as well as a sharp decrease in suction power. The main reason for this type of failure is the presence of a foreign object inside the corrugated pipe
Most often, craftsmen remove small children's toys, socks, handkerchiefs, paper and plastic bags. Even an inexperienced craftsman can fix this type of problem with his own hands by inserting a thick wire or piece of reinforcement into the corrugated cavity. You can disassemble the device, clean and repair it, take out a sock, take out a toy, and get rid of the smell within a few minutes.
To learn how to repair a vacuum cleaner hose using heat shrink, watch the following video.
Correct operation
The price of a hose for Samsung vacuum cleaner models averages 1000–3000 rubles. In order for the product to maintain its performance qualities for as long as possible, saving you from unplanned purchases, you should follow the basic rules for working with the device.
- Protect the hose from unnecessary kinks and stretching.
- Store the device disassembled or so that its tube is not deformed. To do this, place it in a specially designated place with sufficient area so that she can position herself freely (without constraint). Some models assume the presence of special latches on the bottom or rear wall of the case. They allow you to secure the hose vertically.
- After using a washing vacuum cleaner, it should be rinsed and dried thoroughly.
- Do not allow debris or hair to accumulate in the tube. Make sure that large objects do not fall into it. This is easy to assess, since in this case the sound of the device changes.
The vacuum cleaner hose is directly responsible for the cleanliness of your home, because it is it that collects dust and other contaminants. Its parameters can influence the operating power of the device. This is why it is so important to choose the right product if you need to replace it.
To learn how to repair a Samsung vacuum cleaner hose, see below.
There's a household bug here
some kind of inelastic compared to the same LG and also burst. Actually, the question is how to fix this matter: maybe cut off the damaged area and fix it? How will the control wire be connected to the contact group? And is it actually collapsible?
Rem.: Thanks to all DRIVE2 members for the useful advice, in just a couple of hours they came up with practical ways... The dismantling was completed thanks to the community. Now I’m considering 2 options: either heat shrinking or cutting off the torn and installing (but it’s not clear how this part fits hermetically to the fitting?). Rem.2: So far I’ve done it the collective farm way - I wrapped it with fabric-based tape Rem.3.: Maybe it will be useful for someone:
I picked up the documents here, and the Duster is now 8 years old...
Purchase price—RUB 5,399. Consumables purchased during this time: TOPPERR FSM 6 (HEPA) - 2x500r = 1000r. (I constantly blew it with a compressor, but at some point you realize that you need a new one) TOPPERR FSM65 - 4x500 = 2000r. (mainly due to torn foam rubber, I tried to make duplicates from molded foam rubber with ali - the quality is worse, it breaks even faster...) TOTAL - 8399 rubles. Operation in 2/7 mode, hour and a half/day, 7 years. The dust collector is full after each run, i.e. About 730 containers of dust were thrown out + filters were washed.
—-PS. I recently bought a filter from Eldorado for 399 rubles.
How to repair a vacuum cleaner with your own hands
In order to repair all the elements with your own hands on a Samsung vacuum cleaner, you need to determine the place where it formed. The motor may need to be disassembled if: there is a burning smell, poor dust suction power. Follow the sequence when removing the housing.
The hose in vacuum cleaners often gets clogged.
The cause of this breakdown is often poor performance of the brushes on the motor.
You need to pay attention to them. If the hose or brush is clogged
We clean them. First, remove the brush and check how the hose pulls without it.
You can replace the vacuum cleaner tube with a new one.
If everything is fine, then you need to clean the brush. If not, you can remove the hose and do the same steps. Often, a large item can get stuck inside: a chain, a watch. Clogged filters and waste container.
You do not necessarily need to replace the filters in your Samsung vacuum cleaner if the device begins to work poorly.
To determine, we take everything out and check the draft of the vacuum cleaner. If everything is in order, clean the filters. As for replacing and repairing the motor, here you need to evaluate your skills and abilities. An example of this could be a broken motor winding. To determine problems with it, you need to have the ability to use a multimeter.
The filter must be washed regularly and replaced every two years.
Only with its help can you identify the problem. Other problems that you can solve yourself include:
- Button failure;
- Broken wire in the extension cord;
- Poor contact at brush terminals and winding.
When it comes to engine repair, then you need to evaluate your strengths and financial capabilities. It's easier to buy a new component, although buying bearings is much cheaper if they are the issue.
Check the terminals on the brush.
Checking the motherboard
The control board in a vacuum cleaner does not look the same as in a computer. This is a triac. From the part to the motor there are 2 wires on one side and on the other 2 wires are attached to the socket. The triac itself is located between them.
Only a specialist can repair the motherboard.
Remove it and connect the motor to the wires from the outlet. If everything is in order, you just need to replace the board. Some owners use a vacuum cleaner without it.
Cleaning the vacuum cleaner
The vacuum cleaner also needs to be cleaned. Starting with the lint you use to vacuum, and ending with the insides. Empty your dust bag promptly, whether it's a reusable bag or a disposable one. If you were removing construction dust and it was clogged, after removing all the parts, you can clean the insides.
An odor may occur if the dust container is full and has not been emptied for a long time.
It is convenient to do this with another vacuum cleaner, but carefully. Caution should be exercised in boards
Do not use the wet cleaning method.
Useful tips
- In case of any malfunction of the vacuum cleaner, regardless of the manufacturer, it is recommended to disassemble the device from the base. What if it’s not a problem at all? If you are still sure that the breakdown is in the telescope, then you should not touch the engine and other important elements.
- If foreign objects get stuck in the pipe, you can try and pull them out indiscriminately. To do this, you need to find a long metal or wooden stick with a diameter smaller than the inner tube. Push the stick inside the telescope and remove the object from the other side. Of course, disconnect the tube from the base of the vacuum cleaner in advance.
- The fasteners on the pipe are opened by pressing firmly on them at the same time. But this cannot be done with your fingers. You need a convenient device.
To avoid even bigger problems with your equipment, it is better to take it in for repair.
Vacuum cleaner hose extension
In some cases (cleaning large rooms, hard-to-reach areas), the hose may not be enough. Then it can be extended up to 5 m. In order to do this, you need to select the same diameter and pitch of the coil. Prepare the ends to be joined in advance: sand and degrease. Lengthening can be done in three ways.
- Using a bicycle camera. Cut a piece of 5-6 cm from the camera and put it on the surfaces to be joined. Fill the places of contact with the corrugation with cold welding or rubber glue.
- Using a simple corrugated pipe. Take a 10 cm piece from the corrugated pipe and, cutting it lengthwise, put it on the junction of two hoses (you can screw one hose into the other). Wrap this place with tape or tape.
- Using a half-liter plastic bottle. Cut the bottle on both sides to create a sleeve. Place it on one end of the hose and attach the other so that the bottle is in the center of the connection. Warm up this place with a hair dryer. The plastic will shrink and seal the joint tightly.