Samsung robot vacuum cleaner
This vacuum cleaner cleans laminate, tile, and carpet. In this case, the debris ends up in the center of the self-cleaning brush, then immediately goes into the dust collector. The automatic system detects the type of surface and regulates the dust suction power. The filter does not become clogged with debris. The vacuum cleaner can be controlled remotely using an application on a smartphone (set the time, cleaning route). It is recommended to clean the side brushes of the robot vacuum cleaner once a week, otherwise their motors may burn out. If you need to disassemble the brushes, it should be done in this order:
- Unscrew the 4 screws on the bottom cover;
- find the side brushes, pull and remove them from the shaft.
Serious damage to Samsung vacuum cleaners
Repairing serious defects usually requires the intervention of certified technicians. However, here too some of the faults can be repaired yourself. For example, the owner can easily replace a damaged power switch himself.
No. 1 - power button and power cable
A faulty power switch prevents the device from being turned on, or the operating mode is not locked when turned on. In the first case, the reaction when the button is activated is zero.
In the second case, the vacuum cleaner starts when the button is pressed, but immediately turns off when the user releases the button.
A defective vacuum cleaner power button is the reason for the device’s inoperability. This malfunction is one of the most common in practice, but it can be eliminated quite easily compared to others.
The functionality of the power switch can be easily checked with a tester - an electromechanical device. A non-working button does not create contact between the terminals in any position.
A non-latching button creates contact only in the pressed position. By connecting the tester probes to the button terminals, you can check the functionality of all positions.
Checking the network button for turning on the vacuum cleaner using an electronic tester. One probe is connected to the contact of the power plug, the second the repairman touches the terminals of the button. In this way, the button and cable are tested simultaneously
Along with the network switching, the power cable of the vacuum cleaner may also be faulty. The power cord is checked with the same tester.
Checking the power cord also involves testing the power outlets that the owner uses when turning on the vacuum cleaner.
No. 2 - air suction power regulator
Many Samsung models are equipped with a suction power control module. Essentially, this module is a regulator of the rotation speed of the electric motor shaft installed inside the vacuum cleaner. The module is an electronic circuit (relatively simple) based on thyristors.
The motor speed control module is also a suction power regulator. The faulty component of the module is often the thyristor switch, which is located on the bottom left of the board
A module malfunction—usually a thyristor failure—results in either the inability to start the vacuum cleaner or a complete inability to regulate the performance of the device. In any case, it is necessary to disassemble the vacuum cleaner, remove the control module and replace failed components.
Here it is quite problematic to work with your own hands without certain skills, for example, the ability to distinguish a resistor from a capacitor or the ability to hold a soldering iron in your hands. However, if desired, these qualities of an electronics engineer are not difficult to master.
No. 3 - electric motor of a household vacuum cleaner
A complex malfunction, of course, is considered to be the failure of the electric motor of the vacuum cleaner. As a rule, the designs of modern household appliances produced under the Samsung brand use axial-type motors with a rotation speed of up to 20,000 rpm.
The electric motor of a Samsung vacuum cleaner is a design part that requires a special approach in case of repair. It is possible to replace the motor with a new one, but this option costs almost half the cost of the harvesting machine itself
Rotation at such a high frequency is accompanied by significant loads on the support bearings. Therefore, one of the common malfunctions of Samsung vacuum cleaners is defective bearings. This is usually accompanied by increased operating noise of the device, sometimes very loud.
The job of replacing vacuum cleaner bearings with your own hands is difficult, but quite doable. However, initially you will have to disassemble the entire contents of the structure of the harvesting equipment in order to get to the motor.
Of course, during the process of disassembling the vacuum cleaner, it is recommended to record the sequence of installation of parts, writing it down on paper, or you can take pictures with a smartphone.
The electric motor of the vacuum cleaner is completely disassembled. To achieve such a result, the repairman will have to work hard and also study some of the intricacies of the work.
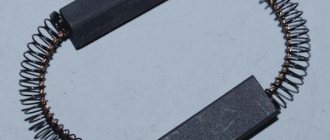
On a dismantled engine, you will need to remove the contact brushes and impeller casing. This process is relatively simple.
Contact brushes are usually secured with one screw and can be easily removed from their mounting niches. On the impeller casing (outer half), you need to carefully bend the four rolling points and, using some force, pull off the casing.
The most difficult process is unscrewing the nut that secures the impeller to the motor shaft.
Craftsmen with experience in repairing vacuum cleaners use different methods for these purposes:
- clamp the engine manifold with wooden blocks;
- wrap an insulated wire around the collector;
- cut a groove along the end of the shaft.
As a result, the impeller can be removed. Next - a “matter of technology” - the shaft is removed by traction force, and the defective bearings are replaced. Then reassemble in reverse order.
Electrical defects in motors - breakage, winding short circuit between turns, commutator burnout - are relatively rare phenomena, but they also occur. In such cases, the electric motor is usually replaced with a different (new) copy.
Washing vacuum cleaner Bork
A special feature of the Bork washing vacuum cleaner is the presence of a high-speed separator that cleans not only surrounding objects, but also the air. Small dust particles are absorbed and fall into the water. When the separator rotates quickly, they become heavier and settle to the bottom. At the same time, the surrounding air becomes clean and humidified. A washing vacuum cleaner can do:
- dry cleaning of floors, carpets, furniture, clothes, indoor plants;
- cleaning up liquids;
- eliminating blockages in pipes;
- ionization, humidification and aromatization of air;
- vacuuming or aromatizing things when preparing them for storage.
The brush of the washing vacuum cleaner may break due to improper use of the device. To prevent this from happening, the following rules must be followed:
- pour water into the tank up to the mark;
- after cleaning, be sure to rinse the tank, wipe it and store it separately from the vacuum cleaner;
- Do not use water to wash parquet.
If the brush of a Bork vacuum cleaner breaks, it must be disassembled. This operation is performed in the following order:
- Turn the brush upside down.
- Unscrew the 2 outer bolts, 2 central bolts, 2 located near the wheels.
- Using a thin screwdriver, pry and pull out the axle on rollers that holds the fasteners of the top cover.
- Unscrew 2 more bolts located near the large wheels.
- Turn over.
- Press the middle button and remove the top cover.
- Unscrew the 2 bolts located near the air intakes and pull out the upper part.
- Take a good look, determine the cause of the breakdown and clean all the parts.
- Carry out repairs.
- Reassemble in reverse order.
Vacuum cleaner motor design
General layout
This issue is discussed in more detail in the article on the commutator motor.
Here we should focus on the fact that inside a housing with a stator winding, a rotor rotates, mounted on a shaft axis with two bearings.
It contains:
- magnetic core;
- winding connected to the collector assembly with plates.
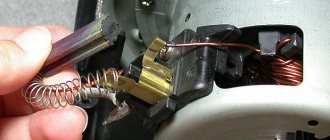
Electrical contact for the passage of current through the armature winding is created by brushes pressed against the plates by the force of a compressed spring.
The fan impeller always rotates in one direction. Therefore, to secure it, a threaded nut is used, screwed in the direction opposite to rotation. When the vacuum cleaner is operating, it is additionally fixed by inertia forces, but cannot be unscrewed.
The same principle is used in bicycle pedals: they use two types of threads in different directions: right and left winding for their side.
Disassembly sequence
To repair the electric motor of a vacuum cleaner, you must first:
- remove the brushes from the body;
- unscrew the fixing nut with the left-hand thread so as not to damage the windings on the stator and rotor and preserve the design of the commutator mechanism, leaving it in good condition;
- remove the armature and assess the condition of the bearings, conductors and windings.
I had to perform all these steps to disassemble the electric motor of a Samsung vacuum cleaner. I show them with photographs.
Cleaning the brush
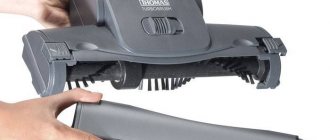
The Samsung robot vacuum cleaner has a turbo brush and side brushes. To clean the turbo brush you need:
- Turn the vacuum cleaner upside down.
- Pull out the bearings.
- Clean the turbo brush from wound debris, using scissors and tweezers if necessary.
The side brushes should be cleaned in this order:
- Turn the vacuum cleaner over in the same way.
- Unscrew the screw using a Phillips screwdriver.
- Remove the brushes from the shaft and clean with a dry cloth.
- Wipe the axle.
- Assemble the vacuum cleaner.
Expert opinion
Nikolai Petrovich
Subpage for an expert
You can clean the side brushes with another soft-bristled brush (for example, a toothbrush). To restore their shape, you need to immerse them in hot water for a while.
The easiest way to clean
Initially, it is important to understand that without disassembling the brush, performing high-quality cleaning becomes impossible. In any case, if you have a suitable screwdriver, the cleaning procedure will take no more than a few minutes.
To make it easier to understand the turbo brush cleaning method, it will be divided into separate stages:
- removing the brush from the vacuum cleaner tube;
- partial disassembly to remove the rotating part;
- cutting through accumulated debris (often hair and fur);
- removal of pollutant.
It is necessary to cut the debris, because otherwise it will not be possible to clean the brush perfectly.
Many people try to clean the vacuum cleaner brush with another brush or an old comb. This method is less effective, as it requires more time to obtain exactly the same positive result.
Repair
Let's look at the main breakdowns and how to fix them.
| Breaking | Remedy |
| The turning mechanism does not hold due to abrasion of the rotating surface | Connect the turning mechanism to the brush. Using a drill, make 2 holes on both sides, thread the wire, secure and bend. The mechanism will hold tight. |
| The connection between the brush and the nozzle is loose and sucks in air due to a broken O-ring | Open the connection, remove the broken ring. Cut strips from the batting and wrap them around the broken ring. Air will not be sucked in. Strengthen the connection with plastic: cut thin strips, bend them in the shape of a V, insert into the holes and strengthen the connection. |
| The rollers are worn out | Remove the cotter pin that connects the brush to the extension. Restore the rollers: cut a strip from a plastic bottle, wrap it around the damaged roller, fill it with epoxy resin, and sand it. Make a new cotter pin from a metal rod, place rollers on it, and secure the sides of the rod with epoxy resin. |
The brush of a vacuum cleaner is one of its most worn components. Sometimes the reason for poor operation of the vacuum cleaner lies in a malfunction of the nozzle, which you can fix with your own hands. To do this, you need to be able to properly disassemble the brush and determine the cause of the breakdown. If repairs are carried out correctly, the brush can last for a long time.
You will find more interesting information on this topic in the “ Repair ” section of our portal.
How to disassemble a vacuum cleaner brush
For the system to work effectively, every part must be cleaned, and the brush is no exception. It comes into direct contact with the debris deposited on the bristles. It is necessary to separate the brush from the hose; if there are additional blades and nozzles, also remove them. Remove hair and fur by hand and rinse the element in water. If there is a large amount of lint, cut it off with scissors.
Some models have stubble that is hidden. Remove it by pressing the button and clean it. Rinse the parts completely and wipe dry. Do not assemble the device until completely dry.
Useful video
A vacuum cleaner is a necessary thing in the household. But it’s not cheap, so to avoid breakdowns it needs to be kept clean and in good working order. Then order in the house is ensured.
The vacuum cleaner brush is one of the most important components of a vacuum cleaner. If the vacuum cleaner begins to work poorly, then one of the reasons for this may be its breakdown. Some faults can be fixed at home using improvised means, without resorting to the help of a service center and, thus, saving money. From this article you will learn about the structure of the vacuum cleaner brush and the features of repairing it yourself.
Cordless vacuum cleaner and battery problems
The battery pack wears out quite quickly and must be replaced after just two or three years. This is normal and there is nothing supernatural in this process. Externally, the need to replace the battery manifests itself as charging the vacuum cleaner for too long, loss of power, rapid discharge, and a decrease in battery capacity. Replacing it is very simple, literally in three steps: open the case, remove the battery and put a new one in its place. Please note that if you notice the above symptoms during the warranty period, you are required to replace the battery free of charge at a service center.
Features of disassembling vacuum cleaners by brands and models
Every person thinks about carrying out repairs as soon as they hear noise in the engine. The reason for this may be dirt and dust accumulated inside the system. To check, you need to disassemble it. To do this you will need tweezers, a vice, screwdrivers, wire cutters, and lubricant. In the process of repairing equipment from Samsung
, follow all safety rules if you do not want your recovery to end in injury for you. During the procedure, do not plug in the unit.
Samsung
Disassemble Samsung
follows in strict order:
• First, remove the container in which the dust collects. Then dismantle the two filters;
• using a screwdriver, remove all the bolts located under the removed filters;
• after this you can remove the shell; it comes off easily, without much effort;
• you can start cleaning the case. To remove dust, use a brush or cloth, but not a damp one.
All models from Samsung are created taking into account three main types of filters, the method of care will depend on them: dry bag, aquafilter, cyclone.
Electrolux
Disassembling the Electrolux
in some respects it differs from other manufacturers.
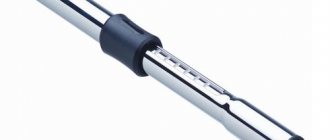
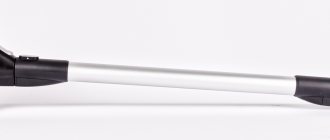
How to disassemble a vacuum cleaner pipe
It is impossible to examine the telescopic pipe in detail without damaging the unit. Even if you do it as slowly and carefully as possible, some small damage will still occur. The fact is that such analysis is simply not provided for in the instructions. If you disassemble the pipe, you will no longer be able to reassemble it 100%.
Many are sure that telescopic tubes are non-separable. The opinion is wrong, you can try, but you will break the latches. Even the heating method cannot help here.
In any case, it is necessary to clean the inside of such a hose, as dust and dirt settle there. Just rinse the tube periodically with water, you can use soft brushes.