Situations often arise when owners have to urgently do something about the washing machine. For example, you need to find out what is broken, and without disassembling it it is almost impossible to do this. But many people disassemble the car incorrectly, and, consequently, subsequently reassemble it just as incorrectly, which may well cause more serious malfunctions.
Today we will find out how to disassemble washing machines of the German brand Bosch, which are of good quality (like other German equipment), but are very expensive.
Where to begin
Despite the fact that we want to get down to business as soon as possible, we must note that the best place to start is by preparing all those tools that may be required during the disassembly and subsequent assembly process. Their list is quite small.
During the work you may need the following tools:
- wrenches and wrenches of different sizes,
- a hammer or several hammers (small, medium and large, depending on the model of the machine and the nature of the breakdown),
- several screwdrivers with Phillips and straight slots (in the washing machine there may be parts screwed with screws of different threads and diameters),
- pliers
Malfunctions of vertical washing machines
For washing machines with vertical loading, be it Ardo, Indesit or a device of another brand, the following malfunctions are typical:
- The drum hatch opens spontaneously during the washing process.
- Corrosion of a metal block.
- Imbalance of the main driving element during washing.
- Bearing deformation.
To fix these problems, the washing machine will need to be disassembled. This process is labor-intensive and time-consuming. If you do not have confidence in your own abilities, it is recommended not to do the work yourself, but to turn to specialists. This will prevent you from aggravating the situation with careless erroneous actions.
We start by removing the top panel
In general, all washing machines are designed approximately the same, so the disassembly sequence we are describing now can be useful for owners of most modern machines. However, the main hero of our material is the Bosch brand, or more precisely, the washing machines it produces.
We recommend starting disassembly by removing the top cover, because, firstly, this is one of the simplest operations, and secondly, the top cover gives access to many important parts of the washing machine hidden inside, for example, the control panel.
So, first the top panel is removed. To do this, simply unscrew a few screws that hold it and slide it, and then completely remove the cover.
Let's start to disassemble
Before you start manipulating the machine, it would be useful to find out how a vertical washing machine works. This will help you better navigate inside the case and clearly understand the name of this or that part. Disassembly of vertical stands of famous brands, such as Bosh, Whirlpool and other companies, is carried out in the same way. Of course, there may be small differences, but the basic algorithm of the actions performed will remain unchanged.
- Unscrew the fasteners located on the sides, then pry the main control panel with a screwdriver and carefully disconnect it.
- Tilt the panel slightly to the side and take a photo of how the wiring is connected. After this, you can disconnect and remove the unit.
- Dismantle the board; to do this, remove the remaining wires and unscrew the bolts.
- Unfasten the fill valve; to do this, slightly loosen the clamps and disconnect the rubber pipes, turn off the power and press on the special holes. These manipulations will allow you to squeeze out the part.
- Unscrew the screws holding the side panels. Move them a little to the bottom and carefully remove.
- Unscrew the bolts holding the front wall and move the panel to the side.
Thanks to the actions taken, you will have free access to the drive belt, electric motor, drain pump, and pressure switch.
In most cases, at this stage you can replace the damaged part yourself and put the vertical machine back together. In very rare cases, when the latch responsible for holding the door after closing fails, you will have to disassemble the machine further:
- lift the cover, unscrew the screws that hold it in place, and remove the part;
- The top cover of the washer will be secured with several bolts located under the sealing collar. It is necessary to unscrew the fasteners and remove the cover.
This will give you easy access to the MCA cuff and door lock. Please note that the vertical tank, unlike front-loading machines, cannot be removed from the housing. Therefore, when replacing drum or oil seal bearings, it is necessary to remove the counterweights and springs and replace the parts.
The disassembly of the vertical washing machine is completed, as you can see, doing the work yourself is not so difficult. When the failed elements of the machine are replaced, it is necessary to reassemble the machine in the reverse order. If photographs were taken during the work, it is better to rely on photographs as a guide. Carefully ensure that the wiring is connected correctly; incorrectly connected wires can cause a short circuit in the network.
We remove what we usually use to manage
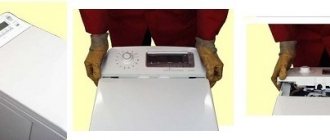
Now things are back to normal again. At the third stage, we dismantle the control panel - the part where all the buttons, indicators and display are located. It is important to be careful not to yank the control panel too much from side to side: we don't just want to disassemble the washing machine and forget about it.
Our goal is to return the assistant of German origin to her ability to work. But before removing the control panel, you need to remove the detergent tray - in Bosch washing machines, the screw holding the panel is hidden behind it. Only after all the screws have been removed can you try to lift the control panel with a slight movement.
Again, everything must be done carefully so as not to damage the wires and contacts. If the panel gives in, then it is enough to hang it on a special hook built into the side of the washing machine for such cases and forget about it until assembly.
In general, you can also disconnect the control panel from all communications, but this is usually only required if the fault affects the control panel itself. There are plenty of detailed instructions on how to disable the control panel on the Internet.
Diagnostics
Most modern models of Bosch washing machines, for example the Maxx 5-6-7 series, are equipped with a self-diagnosis system, which greatly simplifies the identification of faults. In order to establish the nature of the breakdown, it is not necessary to contact the service center; it is enough to perform a few manipulations, and your machine itself will “tell” what the problem is. So, let's start performing the service test:
- Close the sunroof, move the program selector to the “Off” position.
- Pause for 2-3 seconds, move the switch to “Spin” (clockwise).
- When the Start LED flashes, press and hold the Mode Speed button. Watch "Start" - it should start flashing again.
- Turn the switch to "Drain" (clockwise).
- Release “Revolution Mode” (you didn’t forget to hold this position, did you?).
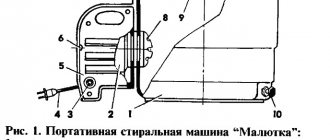
- Next, put the switch in the position corresponding to testing any component of the washing machine (3 – motor, 4 – drain pump, 5 – tubular electric heater (TEH), 8 – main wash water inlet valve, 14, 15 – quick automatic test). Below is a diagram of the switch and the location of the numbers that correspond to the position of its handle.
Here is a schematic image of the switch and an explanation of the positions of its handle
Some models differ in the numbering of commands: for example, in the Bosch Logixx 8 washing machine, the engine is checked in the 4th position (by the way, in this washing machine you can carry out quick diagnostics by setting the switch to number 3). When the test is completed, an error code will appear on the display, which the instructions will help you decipher. In older models without a display, the error can be recognized by the glow of the LEDs, after which you can begin to repair the Bosch washing machine.
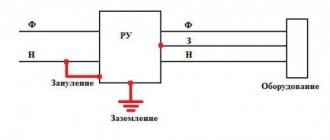
The photo shows the control panel of the Bosch Logixx 8 washing machine; Diagnostics of breakdowns in it is carried out according to the Bosch Maxx principle, only the numbering of commands is slightly different
It is somewhat more difficult for owners of older generation models - they will have to determine the breakdown based on its symptoms.
Signs of malfunctions and their causes
Devices from earlier years, for example Bosch WFT 2830 or Bosch WFF 1201, cannot independently diagnose problems, so the user will have to do this based on their characteristic symptoms:
- Water is collected slowly or not at all . This occurs due to the accumulation of debris in the inlet filter or a malfunction of the fill valve. The culprit of the breakdown may also be the water level sensor - pressure switch;
- the water doesn't drain well . The problem most often lies in a clogged drain filter, failure of the drain pump or pressure switch;
- the water does not heat up . The heating element is almost always to blame for this. The heating element burns out for two reasons - natural wear or scale formation. Sometimes there is no heating due to problems with the control board or a malfunction of the temperature sensor;
- The drum does not spin . A belt drive transmits torque from the engine to the drum. If the belt falls off or breaks, the drum will not move. A more serious option is engine failure;
- loud noise during spin cycle . The reason usually lies in the destruction of the bearings.
In the photo Bosch Maxx 4 WFC 2060 is a model equipped with a self-diagnosis function
Any of the listed problems can be caused by a failure of the control module (electronic controller). Unfortunately, it is very difficult to repair this unit yourself; it is better not to try. Contact a service that provides repair services for Bosch washing machines at home. Specialists will resolder the board or replace it with a new one.
Removing the front panel
After dismantling the control panel, it is the turn of the front panel to separate from the body in order to allow the owner or technician to repair the breakdown. In order to remove the panel itself, you first need to disconnect the cuff - the gray part directly behind the door, but in front of the tank.
Usually, in order to disconnect it, it is enough to find and loosen the spring holding it. In Bosch washing machines, this small part is most often hidden somewhere near the door lock. When the spring is found, the cuff can be removed and tucked inside the tank - this way it will not get lost in the bustle of work.
After this, you need to unscrew all the screws on the front panel in order to actually remove it. In addition, you also need to remove the door lock. Simply pry it with a screwdriver and pull it out, and then, if possible, disconnect it from the wires. Now the front panel can be safely removed.
Eliminating problems
Disassembling the drum
The tank in the washing machine consists of 2 halves. Some tanks are fastened together, while others are soldered.
To disconnect the tank, you just need to unscrew the mounting bolts.
At this stage, the oil seal becomes accessible and if it needs to be replaced, you can remove it using a screwdriver or pliers.
It's more difficult with a bearing. It will have to be knocked out using a metal tube and a hammer. I think there is no point in talking about accuracy, and that’s understandable.
You can also replace the crosspiece, again, if necessary.
Important! Before replacing a new part with an old one, the installation site is treated with lubricant. If the tank is not dismountable, it is more difficult to carry out repairs on your own; you may need the help of a professional
If the tank is not dismountable, it is more difficult to carry out repairs on your own; you may need the help of a professional.
Changing the bearing
In what cases is it necessary to replace a part and how to remove a bearing from a washing machine drum?
For example, if a puddle has formed under the machine and there is a strong hum and vibration during operation. Why did this happen? There is a high probability that water got into the bearing and caused it to fail. In general, the service life of this part is not short, from 7 to 11 years, but sometimes trouble happens and you have to replace it ahead of time.
Troubleshooting shock absorbers
Shock absorbers are responsible for the smooth operation of the drum during washing and spinning. There should be no knocking.
How to check their serviceability?
Just. Open the car hatch and pull the drum towards you. Now let go. What happened?
If the drum, like a swing, swings from side to side and does not fall into place, this is a sure sign of the need to replace the part. Moreover, the shock absorber must be replaced in pairs.
To do this, you don’t have to disassemble the car, as is the case with bearings, but this is true only in LG, Veko, Ardo models. It is enough from the bottom, unscrew the fasteners and change the parts. But with the rest of the models you will have to tinker.
- – The top cover is removed and the dispenser is removed.
- – The control unit is disconnected.
- – Remove the rubber seal with the clamp.
- – The front part of the machine body is removed.
- - Details change.
Removing the foreign object
What does foreign object mean? It can be:
- coins, even rhinestones,
- buttons and other clothing items.
If you do not reach and free the drum from these things, the consequences can be tragic, including jamming and breakage.
What other problems can you solve on your own?
Changing the cuff
There are many reasons for cuff failure. This could be: wear due to long-term use, due to mold, due to cracks and tears, due to limescale, etc.
If there is water left under the machine after washing, check the cuff. After all, this is a dangerous business. The power supply may short out or the machine may fail completely.
What is needed to replace the cuff and how to remove the rubber from the drum of the washing machine?
Firstly, you need a new cuff, which must match the old one 100 percent, otherwise an incomplete fit may occur.
To replace an old rubber band with a new one, you need:
- Remove the front panel of the machine, remove the powder compartment, remove the front of the machine.
- Remove the cuff. In the usual version, the cuff is screwed to the tank with two metal clamps. You just need to pry the spring of the clamp and pull.
- After the first clamp is removed, you can remove the top of the rubber band, which ensures its correct location in the tank. The cuff will be released without any problems and can be removed after removing the second clamp.
- When installing a new rubber band, use the marks on the rim of the hatch as a guide.
- Before installation, it is necessary to carry out cleaning work on the rim of the hatch, at least with just a soap solution.
- The cuff is pulled over the hatch. If the top is pulled, the bottom is held in place; if it's down, then vice versa.
- Next, all the parts are assembled in reverse order.
All that remains is to check the work done by running the wash without laundry. If there are no leaks, everything went well and you did it!
Remove the last part of the case that needs to be removed - the back panel
Removing the back panel is just as easy as removing the top and bottom covers - you just need to unscrew a few screws and then actually remove the panel. Too simple compared to what needs to be done. The body of the washing machine has been dismantled, now you can begin the main part of disassembly - removing the insides.
We turn off the thermal electric heater - the most important “organ” of the machine
We gained access to the most important parts of the Bosch washing machine. The first one we turn off is the thermal electric heater (TEH), so as not to damage the wires: replacing the heating element will be very expensive, so nothing can be messed up or broken. To be sure, all the wires can be photographed.
The heater can be found somewhere in the tank area, since it is responsible for the temperature of the water in the washing machine tank. There will be no heating element - the washing machine will either refuse to wash at all, or will only wash with cold water. However, the heating element must be turned off during complete disassembly as we indicated: by sequentially disconnecting the wiring, having previously recorded the order.
Troubleshooting the most common problems
The most common breakdowns that occur with vertical washing machines from Ariston, Zanussi and other brands are all kinds of leaks, as well as bearing deformation.
Repairing leaks
To eliminate most problems that cause leaks in a vertical washing machine, it is not necessary to completely disassemble the body. To find out where the water is leaking from, you need to:
- Unscrew the drain filter, check how tightly it is installed and what condition the seal is in. If necessary, this unit must be cleaned; over the years of operation, a large amount of dirt accumulates in it.
- The next thing to check is the rubber seal on the washing machine lid. Over several years of service, it could become deformed. As a result, water flows under the rubber band, gets under the car, accumulates under the control panel, and flows into the sunroof locking device. This type of problem leads to serious damage, so the leak should be fixed as quickly as possible. There is no need to completely change the seal; just find the deformed area and place a small piece of rubber under it.
For further work, you will need to remove the side panels of the washing machine to gain access to the internal components.
- Check the tightness of the hose connection to the fill valve. If drops of water are detected, it is necessary to remove the tube, inspect it for integrity, treat it with silicone and install it in its original place, tightening the clamps further. In the same way, it is necessary to check and treat the drain pipe and hose, as well as the tank pipe.
- Next, you need to inspect the rubber cuff, check its integrity and make sure that it is securely held by the clamp.
- The leak may be in the tank itself. If its halves are held together with screws, you need to tighten them; you can try soldering small holes.
Replacing bearings
Unlike front-loading washing machines, top-loading equipment does not require removing the tank from the housing to replace bearings. Here you need to do the following:
- Remove side panels.
- Remove the linings on the sides of the drum, behind which there are calipers with bearings.
- The first thing you need to do is replace the bearing and oil seal on the side where there is no pulley. Classic right-hand carving.
- Then you need to remove the belt, pulley and grounding block, and then replace the oil seal and bearing. In this case, the thread will be left-handed.
When installing a new bearing, the seat must be thoroughly lubricated.
Turn off the engine
After the heating element, you can begin to turn off another, perhaps the most important part of the washing machine - the engine. Without it, any car, including high-quality ones like Bosch, is just a big basin in a metal box.
Turning off the engine is carried out according to the same scheme as turning off the heater, so we will not describe it again - all this is already in the previous paragraph.
More: Ariston washing machine repair
We finish everything by removing the tank
If all the steps described above have been completed, you can complete the work by removing the tank. To do this, just unscrew the shock absorbers and counterweights, and then try to pull the tank out of the body. If it comes out safely, you can congratulate yourself: you have managed to disassemble the Bosch washing machine yourself!
So, we have described the process of disassembling a Bosch washing machine. Of course, it is not advisable to repair high-quality equipment yourself; it is preferable to entrust all the work to a specialist, but it is still worth knowing what to do in a pinch.
Remember that you perform all the actions described here only at your own peril and risk. No one is responsible for possible damage if you deviate from the instructions. We hope that our material was useful to you.
We bring in a new car
It is much more difficult for one person to move a washing machine just bought in a store. The machine cannot be disassembled, otherwise the warranty will no longer apply to it. It will be easier for users living in houses equipped with an elevator. But what should a person whose apartment is on the 5th floor of a high-rise building without a lift do?
To preserve your own health, it is better to hire loaders, but if lifting yourself is a matter of principle, purchase a crutch cart, which will be useful in the future on the farm. It will make it easier to lift the machine to the floor.
Be sure to make sure the design is secure. Place the washing machine on the cart, secure the machine firmly with a belt, tilt the washing machine towards you and carefully drag it along the steps to the desired floor. Even if you choose this method of lifting the equipment, you will have to make some effort, but the load on the body will be an order of magnitude less than when carrying the device with your bare hands.