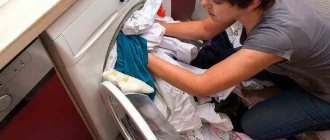
If water flows out of the drum during washing, it means that the cuff for the washing machine is broken - that same silicone gasket between the door and the drum, or the “Elastic band” looks durable, but can easily wear out or tear. We'll look at what to do about it in this article.
The article is relevant for most models of washing machines, for example: Ardo / Ardo, Beko / Beko / Veko, Bosch Classixx, Logixx, Maxx / Bosch Classics, Logix, Max; Candy Aquamatic / Candy Aquamatic, Gorenje / Gorenje, Electrolux EWS / Electrolux, Euronova / Euronova, Haier / Haer, Hotpoint Ariston MVC, ARSL, Margherita / Hotpoint Ariston Margherita, Indesit WISN, WISL / Indesit, LG / Eldzhi, Miele / Miele, Samsung Eco Bubble, Diamond, Diamond, Smeg, Whirlpool, Vestel, Zanussi ZWQ, Atlant, Vyatka, Katyusha, including automatic models, with vertical and front loading.
A little theory
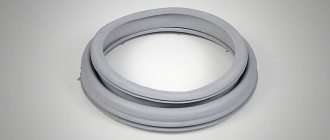
The cuff is a rubber gasket that is installed on the body of the “washing machine” and seals the hatch, preventing liquid from flowing out during washing.
At first, the parts were made of dense and flexible rubber. Now the rubber has been replaced with its closest “relative” - silicone. This has its advantages: silicone is more resistant to high temperatures and does not tan, turning into “wood” after many years of use. And it is easier to withstand severe deformation during repairs and dismantling.
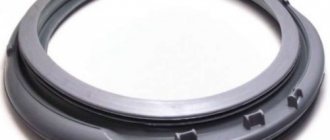
The shape of the waterproof gasket may change depending on the functions of the washing machine: for example, if the machine has drying and aquaspray programs, the “elastic” becomes perforated. It is impossible to talk about all the features of the part within the framework of this article.
This is an article from a series about repairing washing machines. Review of the main machine breakdowns and solutions:
We fix 15 main problems with washing machines with our own hands
The rubber band in the washing machine is broken, how to fix it?
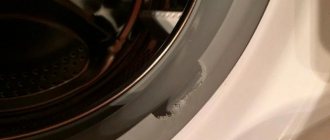
Of course, the first is determination by the eye, i.e. visually. Look carefully at the cuff itself; if you find a hole or puncture in the elastic band of the washing machine, you have found the reason for the appearance of a puddle of water on the floor, i.e. The cuff tore. The second is the nature of the leak. Those. water may appear from below under the washing machine or leak from the hatch during washing or rinsing.
More details: stiralnihremont.ru
Repairing automatic washing machines can put a big dent in your wallet - some types of repair work are extremely expensive.
In this regard, many people strive to repair their equipment themselves, without resorting to the help of specialists. Most faults can be easily fixed at home and do not require the use of special equipment.
The exception is electronic components, the repair of which requires special tools and knowledge. But every user can change the rubber band on a washing machine.
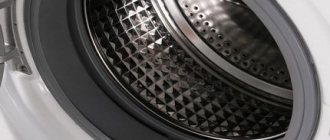
The cuff for the washing machine is used as a seal for the loading hatch. Its task is to prevent the hatch from leaking during operation of the machine. Consequently, its importance cannot be overestimated.
Even small metal objects (coins, bra wires, etc.) or metal objects on clothing that fall into the internal compartment of the machine during washing can damage the elastic band on the washing machine.
Causes of damage: briefly
Wear and time
After each wash, the shelf life of machine parts decreases. The sealing rubber deforms, stretches or shrinks (depending on the material and how often the equipment is used), becomes less airtight, small cracks appear on it, and then large holes.
Mechanical damage during washing
Damage may appear:
- when loading or unloading things carelessly;
- due to sharp objects in pockets. When the drum rotates, they can even become a coin or piece of paper, so check your clothes carefully, turning out your pockets while still “dry”;
- from friction of hard objects or parts: in some Indesit and Ariston models, the drum touches the cuff and rubs against it.
Powder quality
The most common cause of seal rupture is cheap or low-quality washing powder. Aggressive chemical components in the inexpensive powder spoil the cuff material, making it “compressed,” porous and therefore fragile.
Mold and dirt
Fungi and mold appear due to poor ventilation and care of the machine. Reasons: installation in a very humid place, improperly connected drain to the sewer, constantly closed door (due to which moisture does not evaporate after washing). The fungus appears as dark spots, complemented by an unpleasant odor from the machine.
Fold back the side after any wash and see how much moisture, and sometimes debris, remains in the gaps. Ideally, after each use, wipe the “bins” with a soft cloth.
Why does the cuff get damaged?
The cuff is a rubber product, damage to which can be caused by the following factors:
- physical wear of the material, which occurs due to the presence of vibration loads during drum operation;
- rotting of the cuff due to the appearance of mold in the folds;
- mechanical impact with a sharp object during rotation.
It often happens that some factors overlap with others. With poor maintenance, namely lack of proper care after washing, mold may appear between the folds and rust may appear on metal elements.
DIY instructions for repairing holes in the cuff
Important! This is a temporary repair option: the patch we install will not last long due to frequent contact with water. Only new and original spare parts are durable!
To start
To repair the cuff and patch the hole, first unplug the washing machine and turn off the water supply.
Prepare:
- flat head screwdriver;
- a piece of thin elastic band (larger than the hole formed on the drum);
- scissors;
- surface degreasing agent (alcohol or gasoline will do);
- glue suitable for rubber (“Moment” is great);
- cotton pad or piece of cotton wool.
Dismantling: remove the clamps
First, let's pull out the front clamp. It can be attached to the front wall in three ways:
- latches;
- spring;
- on the screw.
If the tie is attached to a screw, unscrew it and pry the clamp with a screwdriver. For plastic clamps on a spring, you need to hold the spring at one end, pull it back and loosen it. Then pull the clamp towards you and remove it with a screwdriver.
To remove the second tie, unscrew the front panel of the machine. As soon as you see the clamp, unscrew the screw that holds it, pry the spring with a screwdriver and pull it off.
It happens that the rubber band comes off or flies off the mounting connectors in the case, then you need to check the spring and fastening, this is most likely the problem.
Looking for a hole
The cuff is in your hands, now you need to find the “hole”. Carefully inspect the rubber for holes.
If the hole or cut is significant, then there is no point in repairing it - it’s easier to buy a new one. To purchase a suitable one and not make a mistake with your choice, take the old elastic band and, based on it, select an analogue or identical model.
Putting on a patch
- Prepare the material for gluing. Fold it in several layers, gluing them together. The patch should be 1.5-2 cm longer and wider than the hole on each side.
- Degrease the sizing area: wet a cotton wool or rag with alcohol or any other impregnation, then thoroughly wipe the area with the hole.
- Apply glue to the elastic and patch. Glue them: “join” them with each other, press them and hold them in this state for a while so that the glue grips better. We recommend reading the instructions on the packaging, as there are some nuances.
- Leave the seal in its natural position for a day - sometimes it is enough to spread it on the floor.
Installation: install back
Place the inner clamp correctly. If it is screw-type, then put it on the cuff and tighten it. Stretch the spring version over the entire area of the opening, the plastic version with latches - insert into the grooves and snap into place. Take the front clamp and do the same with it.
Checking the tightness
To check the sealed part, run a quick wash. If the water no longer flows, everything is done correctly.
Repair process
For quick and high-quality repairs, you should prepare in advance and lay out all the tools and devices that may be needed at the most crucial moment:
- Thin rubber.
- Scissors.
- Alcohol/gasoline for degreasing.
- Glue "Moment".
- A soft cloth that you no longer need or cotton wool.
In order for the machine to serve you as long as possible without unexpected surprises after such repairs, adhere to the following algorithm of actions .
- First, prepare the patch itself . If it is rubber, then you should carefully trim it to the size of the patch. If you use a condom or medical gloves as a patch, first glue each layer, and then simply cut out the part to the required size. The patch itself should be about 2 cm larger than the hole on all sides.
- In the area with the hole in the cuff of the washing machine hatch, degrease it using gasoline or alcohol . The cuff with the glued patch should be straightened until completely dry.
- Next, apply a thin layer of glue to the surfaces to be glued . Perform the following steps according to the instructions given with the glue. There may be two options. You will either need to connect the parts right away, or wait a while for the glue to “set” and then glue.
- For the glued surface, ensure the most natural position, and then fix it until the glue dries .
- Leave the part to dry for a day . The machine cannot be used during this time.
And that’s it, consider that the home repair of the washing machine cuff is over. But you shouldn’t be sure that no more problems will arise.
After the glue has completely dried, you can start assembling. When the installation of the parts in their places is completed, perform a test wash to check the effectiveness of your own repairs. If you did everything correctly, problems should not arise and your machine will work for some time without any leaks.
What to do if the cuff is covered with mold
If you feel signs of mold (stains are visible, there is an odor), the cuff must be washed and cleaned. Remove the rubber band. Wash it in a large container of water with detergent and bleach. Wipe the drum and door thoroughly with a sponge soaked in a chlorine-containing solution. Once all the components are dry, return the rubber to its place.
Important! The fungus can grow quite deeply in the rubber - most likely, even after cleaning, the cuff will still have to be changed.
Why do seals deteriorate?
The cause of the cuff damage must be known in order to make the right decision about the advisability of gluing it together. The information will also be useful during the further operation of the washing machine - in order to prevent similar breakdowns in the future. The most common damage to seals:
- Cut, puncture, breakthrough with a hard object. The culprit may be small items forgotten in pockets (nails, coins, keys, paper clips), as well as parts of the clothing itself (for example, loose bra underwires). Seal the damage and check the laundry carefully before loading.
- Wiping. It happens that something is broken in the design of the machine, and the cuff constantly rubs against another part, for example, against a drum. Gradually, through holes are rubbed through it. In this case, it makes sense to glue the seal only after eliminating the cause of friction.
- Cracks due to vibration. They occur if the washing machine tub vibrates very strongly during the spin cycle. You can seal the cuff, but you will have to get rid of the vibration, and this is a more serious problem than a leak near the hatch.
- "Incurable" cracks.
The latter arise for several reasons:
- natural aging of the part (silicone also has a service life);
- exposure to oils or solvents (perhaps oily technical clothing was often washed in the machine);
- initially low quality of the material (this can happen if you previously replaced the “original” washer seal with a cheap, non-original part).
In any of these cases, gluing the cuff is pointless. After all, the material of the part itself is damaged, which means it will crack again and again, each time in a new place.
Glue or change the cuff?
The problem has appeared, water and foam are oozing from under the manhole cover, something needs to be done! On this score, experts speak quite unequivocally - change it. Of course, replacing a broken part is always safer than repairing it. In this case, you must perform the following steps:
- correctly dismantle the old cuff without damaging the edges of the tank and drum;
- find and buy an original cuff that will ideally fit your washing machine model;
- properly prepare the new cuff for installation;
- install the new cuff correctly.
Note! You can, of course, call a specialist who will do all the work for you, but, firstly, he will increase the cost of the spare part, since the order will be produced by his company, and secondly, he will “tear off three skins” for the call and installation. The result is significant repair costs.
You can save a lot and try to seal the cuff, but you need to understand that it will not last long, and you will eventually have to return to the issue of replacing the part. If you decide to delay the inevitable and expect to tape the cuff, you will have to do the following:
- properly prepare the cuff for repair work;
- select tools and materials for work;
- choose the appropriate repair method;
- carry out repairs as efficiently as possible.
What else damages the cuff?
Many factors can disrupt the function of the sealing ring on the washing machine hatch. Repairing the machine due to damage to the cuff will cause such common reasons as:
- exposure to laundry detergents;
- careless loading/unloading of laundry;
- loss of sealing qualities over time;
- fungal infection;
- damage to internal components of the machine.
When the hatch cuff is torn or worn out, losing its original qualities and function to prevent water leakage, you can replace it. Doing this type of machine repair with your own hands will not be difficult. All you need is a little time, experience working with your hands and a little ingenuity. With this, repairing the machine to replace the cuff will not cause any problems. Replacing the cuff on a washing machine itself is performed in five steps.
Step 1
First you need to remove the outer clamp. It holds the curved part of the cuff in the front groove of the hatch. The retaining clamp can be of two types:
- spring;
- plastic.
The spring can be removed in two ways. The first is to simply unscrew the screw holding it, the second is to pry the spring itself and pull it towards you. Having removed the outer clamp, you need to bend the edge of the cuff and remove it from the dispenser pipe located on top.
Step 2
Next you will need to remove the inner clamp. To do this, first find the installation mark on the cuff. It helps to determine the correct position of the sealing rubber of the hatch relative to the washing tank. Because only a correctly installed cuff prevents water from leaking from the hatch and guarantees proper drainage.
If it was not possible to detect the mark, you can make it yourself. Place a mark on the cuff with a felt-tip pen to indicate it is factory installed. In the future, this will allow you to correctly install the new seal.
Before moving on to the next step of replacing the cuff on the washing machine, you need to carry out preparatory steps. Remove any possible dirt from the mounting grooves. To make it easier to insert a new seal, prepare a soap solution and apply it to the edges of the groove.
Step 3
At this stage, you need to insert a new cuff into the prepared grooves. It is when performing this step that you will need ingenuity and some effort. Before you pull the sealing rubber onto the edge of the hatch, you need to align the mark on the cuff with the mark on the tank. Then, take the seal from the side facing the tank and insert it sequentially with your thumbs. If the edge of the hatch has been treated with soapy water, then the insertion process will be easy.
Having put on more than half of the cuff, the process becomes slightly more difficult, since the part already put on will slide off the hatch. Therefore, to dress the remaining part, change the principle of operation. Do not pull the cuff sequentially (in one direction), but insert it simultaneously from both sides. After pulling the seal, check how tightly it fits to the tank.
Step 4
To secure the cuff, you need to reinstall the clamps. You need to start from the inside. To put on a spring clamp, be sure to fix it at the initial tension point. To do this, you can use a screwdriver by inserting it into the hole that blocks the hatch. When the spring is put on the screwdriver, stretch the clamp and gradually push it inward along the circumference of the hatch until it falls into place.
When installing the spring, the same difficulty arises as with the cuff. Having put the clamp on a little more than halfway, the tension angle changes, creating difficulty in further installation. But with a little practice and patience, the inner clamp can be completely put on.
If the washing machine is an old model, then you can only tighten the clamp using pliers. Because on older models the clamps do not have springs or screws for adjustment.
Step 5
The last thing that involves repairing is installing an external clamp. It will be much easier to install it. If the outer clamp is like that of older machine models, that is, without an adjusting screw or spring, then round nose pliers will come in handy again. They need to open and close the hooks located at the ends of the clamp.
After completing the repair of the washing machine, it is worth checking the result of the work. Start the rinse program and leave the machine to do it. When it is completed and the water drains, tilt the washing machine back and look for any signs of leakage. If they are not there, then the cuff replacement was done efficiently.
Finally, we suggest watching a video about replacing the cuff.
Conclusion
A washing machine is a unit that must be repaired by specialists. But there are operations that you can perform yourself. Our article describes in detail what to do if the rubber band of your washing machine breaks.
If you follow the instructions, performing all operations one by one, you can replace the cuff in a short time. It will be much cheaper, since you won’t have to overpay for work and home visits.
Naturally, this cannot be done if the washing machine is under warranty, since then it can be lost. In the event of a serious breakdown, you will still have to contact specialists.
Signs and causes of malfunction
The main sign of a faulty cuff is water leakage both during washing and during rinsing and spinning. Scuffs, cracks and holes appear in this elastic band.
A silicone seal can work for 10 years without any problems, especially when the SMA is quite expensive. The manufacturer, which is a well-deserved and reputable brand, does not skimp on the quality of materials and technological processes for manufacturing parts.
No matter how high the quality of the parts, they are subject to gradual wear. The cuff cracks from frequent overheating when you wash in boiling water, due to the use of special bleaching reagents, loaded either separately or contained in expensive washing powder. Scale washed off from the boiler (and a remedy for it), excessive water hardness, as well as untimely cleaning of the seal from mold that forms on it also have an impact. The latter is the most dangerous: mold itself is quite adaptable to new conditions. Growing into any material, including rubber, it irreversibly damages it over time. In addition to mold, other types of fungus are also dangerous. By creating growths on the surface of the seal, they disrupt the outer smooth contour of the cuff.
Other signs are:
- inability to close the hatch;
- extraneous sounds when the washing machine is operating.
There have been cases where the machine leaked water after an iPhone was accidentally washed without being removed from its pocket. The metal frame of this smartphone, which fits the device around the perimeter, completed its dirty deed, namely, it tore the thinned SMA cuff in several places.
Any electrical appliance, including washing machines, will soon break if handled carelessly. Not entirely careful transportation can also damage it, for example, when moving to a new apartment.
As for washing, it is permissible to use special bags that are easily permeable to water and washing powder, and also to turn clothes inside out. The latter will protect the drum, cuff and hatch door from fasteners, locks, buttons and plaques from which they cannot be released.
Reasons why cuffs fail
If a breakdown occurs in a front-loading machine, this will entail more serious consequences than in a vertical-type device. Most malfunctions occur for the following reasons:
- natural wear (even in the most durable material, vibration along with variable loads leads to rubbing of the rubber, it is useless to fight this, therefore, if a part becomes unusable, you simply need to replace it);
- damage due to the impact of sharp clothing fittings (decorative fasteners and buckles, sharp objects left in pockets - all this can lead to a cut of the rubber element, and if this happens, it is unlikely to be saved);
- the use of overly aggressive detergents (some chemicals lead to the dissolution of vulcanization, as a result, the rubber becomes less durable, so before washing you need to carefully read the composition of the products);
- fungal infections (over time, these bacteria spoil absolutely everything; timely cleaning of the washing machine and its regular ventilation will improve the situation; to ensure prevention, it is customary to use detergents that contain citric acid).
Practice shows that the lion's share of breakdowns occurs due to careless handling of equipment. Only compliance with operating conditions and regular preventive measures will lead to a long service life of both the cuff and the device itself.