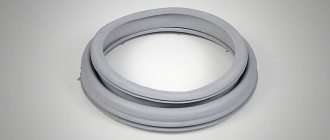
Purpose of the rubber seal
In any model of washing machine, the rubber seal performs the same function - it serves as a sealant.
It reliably isolates the space between the body and the tank. If the integrity of this part is compromised, then water can leak onto the electrics - the control board. The second rubber band - the one you see every day - is located on the door. It prevents water from overflowing from the drum and prevents short circuits.
Let's find out the reasons for the breakdown
To fix the problem yourself, it is first recommended to figure out what the cause of the breakdown is. Most often, the malfunction is associated with wear of the part or mechanical damage.
- As a result of long service life, the rubber of the cuff has worn out.
- When washing, caustic, corrosive chemicals were used, which could also damage the cuff.
- Entry of foreign solid or sharp objects into the hatch (all kinds of metal products, plastic, badges, keys, etc.).
- Frequently machine wash unsuitable items (e.g. hard-soled shoes, heavy outerwear, thick hats).
- Using low-quality washing powder or exceeding its permissible volume. Powder of inadequate quality can often cause destruction of the rubber element.
What are the reasons for wear of a part?
There are not many reasons why the cuff stops performing its functions. Moreover, most of them occur when the rules for using household appliances are not followed.
The main ones are the following:
- mechanical damage from rough objects;
- strong vibration of the drum during spinning;
- exposure to aggressive agents;
- mold on rubber;
- inaccurate loading of dirty items or removal of already washed items;
- natural wear and tear.
Damage from objects occurs when rough items are often washed in the machine, for example, sneakers, outerwear with hard “snakes,” etc. Metal products (nails, keys) and plastic that have fallen into the drum due to user carelessness can also cause the formation of significant defects on the rubber.
Cracks, cuts and tears in the rubber part can appear either as a result of a malfunction of the washing unit or due to the carelessness of users. Before loading clothes into the machine, be sure to check pockets for rough or sharp objects. They can easily damage the cuff
The washing machine drum tends to vibrate strongly if the machine is not installed correctly. Accordingly, the cuff attached to it suffers. The use of bleaching agents frequently and in high concentrations causes the rubber to become rougher. And the loss of elasticity, as is known, is fraught with the rapid appearance of defects.
The acids and alkalis used to clean the machine act in the same way. But again, if they are used incorrectly. For example, some users believe that the higher the concentration of the product, the more effective the cleaning. At the same time, they do not take into account the aggressive influence on the parts available for processing.
Mold is microscopic fungi that live in colonies. Having settled on soft rubber, the mycelium of these tiny creatures is able to germinate deeply. If the damage is severe, dark gray spots that emit an unpleasant odor cannot be removed with anything. In this situation, only replacing the cuff with a new one will save you.
The washing machine does not last forever. Even if you handle it very carefully, the parts gradually wear out. The rubber seal is no exception. It constantly experiences friction from the rotating drum of the washing machine and laundry, temperature changes, and exposure to detergents. All these factors make rubber brittle and brittle over time.
Symptoms of a problem
You can determine if there are problems with the rubber seal on the door by the uncharacteristic operation of the unit. There are 2 sure signs that can help identify a faulty cuff in an LG washing machine:
- water leakage from the car in front indicates a seal failure due to worn cuff;
- An unpleasant odor from the machine indicates the development of harmful microorganisms inside it.
When is it necessary to change a part?
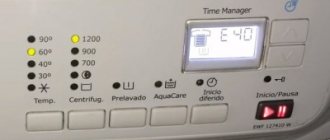
A signal that the rubber seal in the LG washing machine has worn out is water trails appearing on the front panel from under the loading hatch as soon as the tank is filled with water and washing begins.
At the same time, the washer signals problems with the cuff (closing the hatch) with the error code DE (shown on the display). If there is no information display on the washing machine panel, a problem with the cuff can be identified by the blinking of the temperature, wash and rinse indicators.
A puddle of water in front of the washing machine indicates that the rubber cuff is torn. It is unsafe to operate a washing machine with such damage . You must immediately turn off the household appliance from the power supply, turn off the water supply tap and begin troubleshooting the problem (either yourself or call a technician).
This article will tell you what are the reasons for water flowing from below the LG washing machine, how to find the problem and fix it.
When to remove the seal
Typically, removing the old cuff and installing a new cuff is necessary in the following situations:
- The rubber has served its service life.
- The cuff received mechanical damage.
The rubber seal breaks, as a rule, in the following cases:
- Low quality washing powders were selected.
- There are often hard and heavy items in the drum, such as shoes or jackets.
- Inaccurate loading of things.
- The washing temperature is too high.
- Keys, coins and other objects that could damage the elastic have fallen into the drum.
To understand that the seal is no longer suitable for use, take a closer look at your equipment. There are a lot of “symptoms” that indicate a violation of the integrity of the rubber cuff:
- You find water under or near the machine.
- When washing, you may hear sounds uncharacteristic of SMA.
If you hear a crash, it is very dangerous! Turn off the machine, drain the water, and replace the rubber band to avoid shorting.
- Closing the hatch is more difficult than usual.
Further repairs involve removing the rubber band. Next, we will tell you how to remove the cuff and not mix anything up.
Signs of damage to the rubber seal for a washing machine
A rubber seal is installed between the hatch door and the drum of the washing machine, which prevents water from leaking out from the tank during washing. If the sealing rubber has fallen off or even torn, then in this case it will simply be impossible to use the washing machine.
Replacing the rubber around the door is not so difficult, but it is better to entrust this operation to professionals
Some of the first signs of damage to the rubber seal are the following:
- During the washing process, smudges and puddles of water form on the front of the machine; the more damage there is, the more leaks will naturally occur. In addition, this risks water getting inside the machine, which can lead to corrosion of the housing and even an electrical short circuit.
- The hatch doors of the washing machine will not close well with sufficient force, and there may also be problems with opening them.
- During washing, in addition to the usual noise, sounds such as crackling and squeaking of wet rubber, crackling and other uncharacteristic sounds may be heard.
At the first signs of damage to the sealing rubber, you should inspect it for damage and, if any are found, you should immediately replace it with a new one. It can be changed by a specialist, or you can do it yourself. To do this, you should partially disassemble the machine, remove the spring-loaded clamps that hold the seal, and then remove the old sealing rubber. Putting a new one first on the tank, then on the front panel is not so difficult, the main thing is to choose the right model of rubber seal, since each brand of car, for example, Samsung or Indesit, has different seals.
Preparation for repair
In order to change the hatch cuff on an LG front-loading washing machine without much difficulty, you need to prepare. First, of course, we will study the instructions on the procedure for carrying out work and the safety instructions for repairing electrical appliances.
- We need to turn off the machine and drag it to where it will be convenient to work with it.
- We also need to purchase a new hatch seal that is guaranteed to fit your LG washing machine.
- After this, we need to collect simple tools, prepare mentally and begin work.
So, turn off the machine using the on/off button. We completely de-energize it by removing the power plug from the outlet. Next, turn off the water supply to the machine and remove the hoses: drain and fill. We twist the power cord and hoses, and then drag the machine to the place where the repair will be carried out.
Open the door of the washing machine. There is a silver plate right above the hatch that shows the full model name of your LG washing machine, for example LG F1056MD. We rewrite the name and go to the washing machine spare parts store. Knowing the name of your machine model, the seller will give you the cuff you need.
Required Tools
Replacing the cuff of a washing machine hatch with your own hands is possible; no special skills are required. Therefore, you can avoid calling repairmen and save money.
The main thing is to approach this process confidently and carefully.
Before replacing, prepare a new seal, a screwdriver, detergent (soap) and a marker.
Advice: in order not to make a mistake when buying a new cuff, take your old one with you and select the same model specifically for your machine.
Disassembling the machine
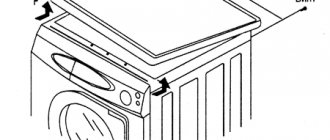
The cuff is difficult to replace without disassembling the washing machine, so we’ll start with disassembly. We go around the back of the machine and unscrew the screws that hold the top cover. Pull the lid towards you and lift it up.
Now we go around the front of the car. We need to get the powder tray out so that it doesn't interfere with our removal of the control panel and front wall. Pull the powder tray out towards you until it stops, press the plastic tab in the center and remove the powder receptacle completely.
Having pulled out the powder receptacle, you will see that there are two screws to the right and left of its niche. We unscrew these screws as carefully as possible using a Phillips screwdriver.
Now we need to remove the control panel of the LG washing machine. There are special latches on the back of the control panel behind the end of the housing. You can press them out using the same Phillips screwdriver. We press the latches one by one and carefully pull off the control panel.
Proceed with caution; there will be a large bundle of wires trailing behind the control panel. There is no need to disconnect them, just place the removed panel along with the wires on top of the corner of the machine body.
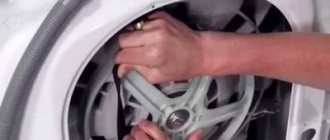
We take a flat screwdriver in our hands and squat down. We hook on the manhole cover that covers the garbage filter. This cover is located at the bottom on a narrow decorative panel.
Having opened the lid, we move aside the emergency drain hose, which may interfere with access to the fastening element. Using a Phillips screwdriver, unscrew the screw that holds the decorative panel. The screw is located to the right or left of the filter, depending on the LG CM model. Carefully grasp the decorative panel and pull it off the latches, first on the right side, then on the left.
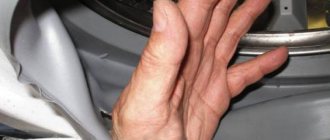
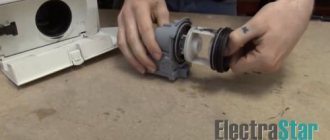
We open the hatch door wide, take a flat-head screwdriver and try to remove the front clamp of the hatch cuff. This needs to be done precisely at this stage, since this clamp will interfere with removing the front wall of the SM housing. We find the spring on the clamp. The spring can be located both above and below. We pry up the spring with a flat screwdriver and, moving it towards ourselves, carefully pull off the clamp.
Instead of a flat-head screwdriver, you can take a dull table knife; it will be even better for this operation.
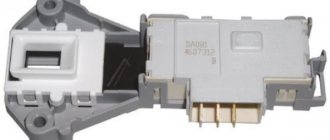
At this stage of disassembly, we cannot yet remove the door sealing rubber. But we can tuck it inside the drum so that its edges do not catch the front wall of the case during further disassembly. Thread the cuff into the drum. Next, unscrew the two screws that hold the UBL of the LG washing machine. There are screws to the right of the hatch and you will need a Phillips screwdriver to remove them.
To release the front wall of the LG washing machine, you need to unscrew five more screws. First unscrew the two screws on top, and then the two screws on the bottom.
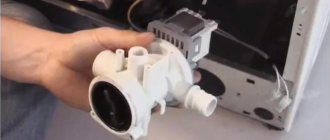
Using a screwdriver, carefully press the UBL out of the front wall so that it falls inside. Now you can remove the front wall and put it aside. There is no need to specially remove the hatch cover; let it remain assembled with the front wall of the machine body. Next we need to remove the hose attached to the cuff fitting.
Recommendations: how to properly remove the rubber band from the drum of a washing machine
When the rubber cuff fails, it requires replacement, since if it does not fit tightly to the hatch, water leaks may occur. To repair the washing machine, many turn to a specialist or take it to a service center. But you can try to remove the rubber band with your own hands.
In any case, before removing the rubber band, you first need to disconnect it from the outside of the machine
Stages:
- First, you should disconnect the washing machine from electricity;
- Then prepare a flathead and Phillips screwdriver;
- Using them, you should carefully remove the clamp, which can be either plastic or metal.
The clamp that is attached to the water supply hose (in some models) is also removed, the hose itself is removed from the pipe, and then the sealing rubber of the hatch is wrapped inside the drum. The machine is partially disassembled by removing the front panel, as well as the entire front wall of the washing machine. To do this, you need to unscrew the screws that hold it in place, and some models have plastic latches that hold the control panel in place; these should also be released and the control panel removed.
Care must be taken not to damage it.
This opens up access to the internal clamp that holds the rubber of the hatch; the clamp should also be removed using flat screwdrivers and, if possible, an assistant to carefully remove the clamp. Then you should wrap the rubber inside the drum and carefully pull it out, however, if the sealing rubber is in a deplorable state, then special care is not required when removing it. The main thing is not to damage the clamps, which will subsequently be used when installing a new rubber seal. The entire assembly of the washing machine is carried out in the reverse order; the main thing is not to rush, and not to damage both the seal itself and the clamps that secure it.
Replacing the hatch cuff of a washing machine: step-by-step instructions
The seal is attached to the tank and to the front wall of the machine with two clamps. The replacement process involves removing the clamps from the damaged cuff and putting them on a new one, placed in a shrinkable place.
Step 1: Preparing for removal
Unplug the machine and turn off the water supply.
Open the hatch door of the washing machine.
Step 2. Remove the outer clamp
If the clamp is plastic, you need to pull the elastic band at the junction of the latches towards you.
The clamp can be attached to the body with a screw. Loosen it with a screwdriver and pull it towards you.
Dismantling the clamp
Before removing the elastic band from the washing machine, buy a new original cuff that matches the model of your SMA in advance.
Important! You can buy a cuff at a service center, in a specialized store, or even on the Internet. The main thing is that the part is original and fits your SM model. The new rubber band should feel soft to the touch. Also, a high-quality new elastic band bends well.
Prepare for repair:
- Unplug the machine.
- Arm yourself with two screwdrivers: “plus” and “minus”.
At the first stage of dismantling the rubber seal, you will have to remove the clamp holding it in place. It can be made of either metal (in the form of a thin wire) or plastic. The clamp is removed, regardless of the model of the machine, always the same way:
- Locate the clamp latch or spring. It can be located at the bottom of the hatch or on the side - where the blocker is located.
- Take a minus screwdriver and pull back the spring, loosening it.
- If there is a screw there, take a second screwdriver and unscrew it.
- The plastic clamp is held in place by latches - they will open easily when you pull it towards you.
- Use a thin screwdriver to pry up the ring and remove it.
- Now you can remove the cuff by tucking it towards the drum - this way you will remove it without damaging it.
If you removed the cuff to get to other parts of the case, and are going to put it back in place, pay attention to one important nuance. There are small triangular marks on the elastic band and drum. They must necessarily match.
If one mark is missing, draw it yourself - this way you will assemble the structure correctly.
Procedure for replacement
So, if you were able to understand why there was a need to replace the cuff, you can get started.
Do not forget to first disconnect the machine from the power supply!
- First you need to remove the cuff. To do this you will need: a pair of screwdrivers, round-nose pliers, a water solution of soap and a marker (or felt-tip pen). Next, remove the two clamps, the function of which is to secure the cuff itself. The first clamp holds the curved part of the elastic. Pull it towards you at the locations of the latches. If the clamp is a spring, unscrew the screw and pull the spring toward you using a screwdriver.
- Next, we unfasten the front part of the cuff on the LG washing machine, which was previously held by its own tension. At the top of the cuff there is usually a mark indicating the correct location relative to the tank of the machine. On the tank of the car you will find a mark corresponding to the cuff. If there is no mark on the element to be replaced, make one yourself using a marker.
- Remove the second clamp, which clamps the cuff from the inside.
To get to it freely, you will have to remove the front panel along with the hatch. This is a painstaking and difficult task, it requires special care: do not drop or scratch the panel when removing it. - After accessing the second clamp, it's time to remove the cuff. On the other side of the elastic band there is also a mark, as in the first case. Inspect the place where it was located: most likely, there is a lot of contamination there. Wash all contaminated parts with a soap solution, because where there is dirt, fungus and mold may soon appear, which means that even a new cuff runs the risk of failure.
- Put on a new cuff. The correct location of your part will be indicated by marks on it and on the loading tank.
Before installing a new part, make sure that it is fully compatible with your washing machine model!
For example, appropriate cuffs are sold for an LG washing machine, and products from other brands may not fit or may not install tightly. And the lack of tightness leads to undesirable consequences such as a hatch leak.
If the damage to the cuff is minor, for the first time you can get by by simply sealing it. However, this is a temporary measure; for permanent use, it is still better to replace the damaged part with a new one.
Removing the front panel
In order to completely remove the rubber band from the drum of the washing machine, you also need to disassemble the facade. It's not difficult if you follow our recommendations:
- After unscrewing the fasteners on the back of the machine, remove the top cover.
- Remove the detergent dispenser - underneath you will find other bolts that hold the front panel in place.
- Using a thin screwdriver, bend the latches of the control unit, remove it and place it on top of the case.
- Also remove the bottom panel (where the drain filter is).
- Walk around the perimeter of the front panel to unscrew the fasteners holding it in place.
- Now you can pull the wall towards you, thereby providing access to the inside of the seal.
Attention! In brands such as AEG, Samsung or Indesit, you don’t have to remove the front part of the machine. It is enough that you simply unscrew and remove the top cover.
The nuances of replacing the rubber band on a washing machine
Replacing the rubber seal on a washing machine may be necessary if water leaks from under the hatch. A leak can occur due to mechanical damage, as well as due to the constant deposition of limescale (if the water is hard) and simply due to mechanical wear.
To replace the sealing collar of the hatch of a Samsung washing machine, you need to gain access to the inside of the machine through its front wall of the case
Many people, in order to replace this part, call a technician, or take the car to a service center. But, it is quite possible to change the rubber band yourself, the main thing is to study the design features of the washing machine, since changing the seal on different types, for example, on an Indesit washing machine, will differ from replacing it on a Samsung or Ariston.
The principle of replacing the seal is as follows
- Open the hatch.
- If necessary, it can be removed by unscrewing the corresponding screws.
- There is a spring-loaded clamp between the body and the seal; it should be picked up and carefully removed from the seat.
- Next, you need to unscrew the entire front panel of the machine, depending on the design, you may first need to unscrew the top cover, and also either unfasten the plastic latches that hold the control panel or unscrew the screws holding it in place.
There is no need to disconnect the wires; just place it on top of the machine. The front panel is unscrewed if necessary, the hatch lock is also removed, this provides access to the second spring-loaded clamp, which is mounted on an elastic band already inside the car.
It is also hooked and pulled out.
After this, all that remains is to install a new seal of the exact model that was there, and the entire assembly should be done in the reverse order. In this case, special care should be taken when installing spring-loaded clamps in place, as there is a risk of damaging the new rubber band.
What other problems may occur?
After replacing the cuff, it is best to check its functionality by running the washing machine “idle” (for example, on a short program, without loading laundry). This way you will understand whether the new part is installed tightly and whether repeated removal is required.
A common problem is a broken machine handle, especially the plastic part. Replacing the door handle of a washing machine is a very simple process, for which you probably only need one screwdriver. You can purchase a new part in a specialized store, indicating the make and model of your car. Qualified specialists will select a new part and offer their assistance in installing it.
It is worth noting that the hatch cuff requires regular maintenance. It must be cleaned, otherwise the dirt accumulated on it will become a source of not only an unpleasant odor, but also bacteria that corrode the material.
Subtleties of cuff repair
Sometimes situations arise when the “elastic band” located on the hatch of the washing machine breaks, and it is not yet possible to replace the cuff.
When might repairs be needed?
For example, at the moment it is impossible to find a part suitable for the existing car model, or it is on order, and delivery will take a long time.
There are also circumstances when right now it is impossible to allocate money from the family budget to purchase a new part. In such situations, repairing the cuff, that is, sealing the damage site, will help out.
High temperature, detergents and constant friction of the laundry will soon take their toll, and the hole in the cuff will make itself felt again
Please note that gluing the patch is a temporary measure. Therefore, you need to try to replace the worn seal with a new one as quickly as possible.
How to select and prepare a cuff?
First of all, you need to inspect the leaky cuff and determine the cause of the damage. This is the only way to find out whether it is advisable to repair the seal or whether there is no point in it. To do this, you will have to remove the cuff from the machine using the method described above.
Only by removing the front clamp and pulling the cuff towards you can you detect damage, assess its size and the possibility of repair
If the cut, puncture or abrasion is small, then repair definitely makes sense. And when the damage is large or there are several of them, it is better not to rush with sealing.
After determining the cause of the repair, the material for the patch should be selected. It must be durable and at the same time elastic. Some experts recommend using condoms or medical rubber gloves for this purpose.
A great option is special patches designed for repairing swimming air mattresses. You can find them in sports stores.
The glue planned for use must have excellent adhesive properties. In this case, the substance must remain elastic after complete drying. This is exactly how products intended for repairing shoes and rubber products behave.
Instructions for sealing the seal
Sealing a rubber seal is a task that does not require special knowledge and skills. However, to ensure that the result does not disappoint, it is better to strictly follow the instructions.
We offer the first repair method - gluing . It is performed according to the following scheme:
- They are preparing a patch . Pieces of the selected material are folded into several layers and glued together. The size of the patch should be 1.5-2 times larger than the defect itself.
- The damaged area and the area around it are degreased . To do this, use alcohol, acetone, white spirit, etc. Wait until the degreaser dries completely.
- Glue is applied to the cuff and patch .
- The lubricated surfaces are pressed against each other either immediately or after a few minutes - this depends on the instructions on the tube of glue.
- The cuff is fixed in its natural position using suitable objects. So the part is left for a day.
After the glue has completely dried, the seal can be reinstalled.
The repaired cuff should be returned to its place using the same method as putting on a new one. Since the rubber is already stretched, you won’t have to put in as much effort as if you were installing a new part.
There is a second method, which is considered more reliable. It combines stitching and gluing.
The method is performed as follows:
- The damage is stitched end-to-end with a thick synthetic thread. In this case, a football seam is used.
- Afterwards, everything is generously impregnated with silicone sealant for rubber and plastic.
Next, as in the previous method, the cuff is left in its natural position for a day, after which it is installed back into the machine body.
After the repair has been completed, you must check the quality of the work. To do this, load the drum with laundry and start the wash on the shortest program. At the end of the cycle, the gluing site is inspected to identify repeated ruptures.
You can change not only the cuff that hermetically seals the hatch of the front washing machine with your own hands. Home craftsmen are quite capable of replacing the washing machine belt. Step-by-step instructions for carrying out this work are described in detail in the article we recommend.