Application area
Such heating devices are characterized by high efficiency rates, as a result of which they almost instantly warm up the room and slowly cool it. These factors indicate greater efficiency of the devices. Because of this, their use in rooms with high ceilings and large heat losses can be considered justified.
The most important feature of IR heaters is that they heat not air, but objects towards which the device’s emitter is directed
In addition, infrared panels are often used to heat civil and agricultural premises. In particular, these are schools, offices, greenhouses, kindergartens, shops, etc. There are also modifications that are designed to heat open areas.
Before purchasing a specific heating device, you should compare the upcoming operating conditions with the technical characteristics. For each specific object, it is advisable to choose certain products:
- Shortwave devices. They are often used in production. This is due to the aggressiveness of the design in operation due to the instantaneous heating of the object due to the temperature increase to hundreds of degrees.
- Long- and medium-wave instruments. They are in demand in private homes, as well as on civilian sites.
From this video you will learn how to install an infrared heater yourself:
How does a thermostat work?
Such a regulator consists of two main components:
- A temperature sensor installed near a heat source and/or in a heated room.
- A control unit that processes the signals from the temperature sensor.
These structural elements interact with each other according to the following scheme:
- The control unit receives the heater operating program, which indicates the temperature in the room or the degree of heating of the heating element.
- The temperature sensor reads the “degrees” in the room and/or at the heating element, transmitting this information to the control unit.
- The control unit turns on the heating element if the temperature transmitted by the sensor is less than the programmed value. And turns off the infrared panel if the temperature in the room or at the heating plate exceeds the programmed parameter.
As a result, ceiling and wall infrared heaters with a thermostat consume only the required “volume” of electricity, warming the room only to the desired temperature. In this case, calibration of heat transfer and temperature is carried out in steps of 0.1-1.0 °C
Typical types of thermostats
Modern manufacturers produce two types of thermostats:
Mechanical devices. Such regulators use a special plate or diaphragm made of a temperature-sensitive material as a temperature sensor. Therefore, thermomechanical regulators, in fact, do not have a control unit. The plate closes or opens the contacts of the electrical circuit that powers the infrared heater, “influenced” by the actual temperature in the house. And all regulation consists of fixing the set temperature using a mechanical lever, with the help of which the elements of the plate temperature sensor are positioned.
- The main advantage of such a regulator is the ability to operate without supplying electricity to the device.
- The main disadvantage is the low calibration accuracy - from 0.5 to 1 °C.
Connection diagram of an infrared heater to a thermostat
Electronic devices. The temperature sensor of such a device detects thermal radiation by reading electromagnetic waves of a certain frequency. At the same time, both the temperature “overboard” and the degrees in the house are controlled. The control unit of such a controller receives signals from the sensor and processes them according to a built-in algorithm (program). Electronic devices have only digital controls. The algorithm for processing signals from the sensor is set using factory programs or buttons on the case. Information about temperature and operating modes is displayed.
- The main advantage of such a device is high accuracy - calibration is carried out in increments of 0.1 °C. In addition, there is some control autonomy. For example, infrared heaters with a thermostat for a summer residence can be programmed to operate for a week based on the air temperature outside the house and not even leave the country to monitor and adjust the operation of the heating system. Mechanical regulators cannot do this - the user will have to “turn the adjustment wheel” almost every day.
- The main disadvantage is that it only works when there is voltage in the network.
How to connect a thermostat to an infrared heater?
When installing a thermostat, you need to follow the following generally accepted rules:
- A separate regulator is installed in each heated room.
- A heat-reflecting screen must be installed between the temperature sensor and the supporting surface.
- Infrared ceiling heaters with a thermostat cannot be more powerful than 3 kW.
- The recommended placement height is 1.5 meters from the floor level.
The installation of the device itself is carried out as follows:
- A separate line is “pulled” from the central panel to the regulator, which ends at the incoming “zero” and “phase” terminals.
- A power supply line is drawn from the regulator to the heater, starting from the outgoing “zero” and “phase” terminals.
- External temperature sensors are connected to the corresponding connectors of the thermostat, connected to the regulator using separate lines or wireless communication protocols.
Exact installation diagrams are given in the data sheets for specific models of control devices.
Principle of operation and varieties
A characteristic feature of such products is the release of heat, which helps to heat various surfaces - walls, floors, ceilings, etc. It should be noted that the air is heated partially, because the main flux of radiation is directed towards objects, which subsequently give off heat from themselves.
Infrared radiation is not afraid of wind, drafts and can warm you up even on a windy day
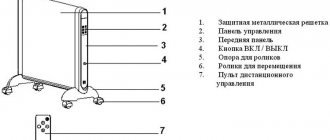
The device consists of a reflector and an emitter. The latter is responsible for the transmission of radiation during the heating process. The reflective element is a reflector, which is made from heat-resistant materials with high reflectivity. The heating elements can be:
- plates;
- open or closed spirals;
- quartz, infrared or halogen lamps;
- heating elements;
- carbon conductors.
Infrared equipment differs in several ways: purpose, installation method, energy source. According to the last parameter, they are divided into stationary and mobile. Devices can be for domestic and industrial needs.
The emitter has high power and a wide surface, due to which it provides comfortable conditions over large areas.
According to energy sources, all heaters are divided into several types:
- Electrical. The most popular type of devices that are installed in any premises. A mandatory element in the system is a mirror reflector for transmitting radiation in the required direction.
- Gas. Best suited for open areas or industrial buildings. Due to their high power, they are rarely found in residential areas. The fuel is a gas-air mixture.
- Diesel. They are in demand in rooms where wiring is weak. Such devices are often found on the street or in garages. The device does not require chimneys; cleaning is carried out through several filters.
- Film - often used in residential areas.
Peculiarities
Infrared heaters have a rather interesting operating principle. They heat not the air itself, but objects located around them due to infrared radiation.
As a result, they become warm, releasing part of the thermal energy into the atmosphere - the room becomes warm and comfortable. Let's look at the main features of IR heaters:
The most striking drawback of these heaters is the high electricity consumption, which is typical for any, even the most economical electrical appliance.
- Correct heat distribution. If you install traditional radiators indoors, it will be cool near the floors and hot near the ceilings. In the case of IR heaters, the floors will be warm, since they will be heated by IR radiation;
- When installed correctly, they do not cause harm to human health - if this equipment is installed correctly in its normal place, then it will not have a negative effect on the body (in particular, there will be no headaches);
- Fast heating of rooms - they warm up noticeably faster than traditional radiators;
- Almost complete silence - only gas appliances make noise (and even then they are practically inaudible);
- Can work in rooms with high humidity levels;
- Available for use in outdoor conditions, creating a comfortable environment in open areas;
- No negative impact on the environment.
Installing an IR heater in a living room will create a warm atmosphere in which it is pleasant not only to relax, but also to work.
Advantages and disadvantages
Any equipment has both positive and negative sides. The advantages of infrared heaters include:
- Cost-effective (especially when using devices as an additional heat source).
- The device does not burn oxygen.
- No harmful effects on human health (scientists have proven that devices can even have a positive effect on the body).
- When mounted on the ceiling, they take up minimal space in the room.
- Safety for children.
- Quiet operation. In addition, the products can be used as a light source.
- Many models are equipped with a built-in thermostat, with which you can maintain the optimal temperature level.
- The heat remains for a long time, because heated objects release energy into space.
- Infrared systems are resistant to moisture, so they can be installed in gazebos, bathrooms or on terraces.
Many models have a thermostat, which helps maintain a comfortable temperature level.
The only disadvantage of the products is their high price.
Even a novice master can install an infrared heater on the ceiling. It is very important to carry out installation calculations correctly so that the use of the device is not dangerous.
Infrared heater for ceilings and walls: pros and cons
To decide whether to opt for infrared heaters, let’s determine all the pros and cons, which are presented in the table:
| Behind | Against |
| Fast heating of the room. | When turned off, the room temperature drops quickly. |
| High fire safety. | Possibility of drying solid objects. |
| Service life from 20 to 50 years. | Uneven heating due to directional action of IR. |
| Precise temperature control. | Negative effects on humans with prolonged intense exposure (dry skin, dehydration). |
| The emitters destroy viruses harmful to humans. | A bright light that stands out strongly in dark rooms. |
| Quiet operation. | Strong heating of the bulb and reflector in high-temperature IR (dangerous for children and animals that may touch the device). |
| High efficiency. |
Choosing a suitable location
The most important requirement when installing an IR panel is the distance to a person’s head. This is especially true in work areas where people stay in one position for a long time.
The distance should be at least 1.5-2 m, it all depends on the power of the device. If it is less than 800 W, the device can be placed at a distance of 70 cm. If the indicators are 1-1.5 kW, then the minimum gap is 1 m. The specifics of specific premises determine a number of features of the installation of structures and the optimal layout of their placement. The table clearly shows the recommended location for the device in each specific room
To heat open areas, it is advisable to install several devices so that the radiation covers most of the human body. The units are capable of providing different temperature regimes for individual zones of the facility. To do this, it is enough to place several devices of different power in one room.
Installation of a film heater
The film heater is installed on a prepared surface
Installing the film also requires a number of nuances. For example, ceilings should not be lower than 230 cm. If this condition is not met, discomfort associated with overheating will be observed.
Installation rules:
- Laying the film should be carried out on an ideally prepared surface, on which the finishing work will already be completely carried out.
- The canvases are attached to moisture-proof material.
- If the installation site borders the attic, you should first deal with its insulation. Only in this case will there be a guaranteed result from use.
- Film cutting should be carried out exclusively according to the manufacturer's specified marks.
- For maximum efficiency, when laying, the length of one strip fragment should be taken into account. It should not exceed eight meters.
- As for the location of adjacent elements, there should be a distance of more than 5 mm between them.
- It is prohibited to bend the film heater more than 900.
- Fastening should only be done with staples.
- Installation work should only be carried out at positive air temperatures. If you lay the film at temperatures from -50C and below, then after the room warms up, folds may form.
The film is fixed using staples
The thermostat plays a huge and irreplaceable role in the operation of an infrared heater. Let's talk about what it is and what is its relationship with the heating facility in question? Its most important task is to monitor the regulation of the operation of the device. It should also be noted that thermostats exist to save energy. They periodically measure the air temperature, then during the test they regulate the operation of the infrared heater, turning it on or, on the contrary, pausing its operation.
Connection security
Safety when using infrared heaters, as well as any other electrical appliances, should always come first.
Attention: The infrared heater must be connected with a differential protective device, which is a transformer located inside the housing.
One winding of the transformer captures the input current, and the second the output. If the slightest imbalance occurs, the core moves and opens the power relay.
Working while people are away
If you choose an infrared heater correctly, then thanks to its performance characteristics it will allow you to efficiently heat the desired areas in the room and provide the opportunity to save significantly. But if you intend to leave the IR heater on while leaving on business, it is best to choose products with a metal plate for radiation. Attention: Quartz heaters should not be left running unattended for a long period of time.
This is due to the fact that quartz models of IR heaters have a spiral in the lamp, which heats up to a temperature of more than 500 degrees and can cause a fire. If a metal plate is installed in the heaters, then its heating temperature does not exceed 200 degrees. If there is a device to protect against overheating, they can be left on without fear.
When connecting IR heaters, external thermostats, fuses and differential devices should be used as protection equipment. Only if they are available can you guarantee that connecting the heater will be safe.
What to look for when choosing
Halogen heater
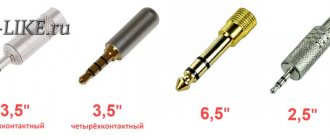
New generation devices are constantly appearing, which complicate the choice of heating equipment. When arriving at the store, the first thing they evaluate is what the heater looks like. The case should be both stylish and strong, the cable should be reliable, with a high-quality plug. In Moscow you can often find downright cheap devices. It's better not to choose these. There is a high probability that the components are of low quality, and therefore the heater will not “live” for long.
An important point when choosing is power. It is calculated simply: every 10 m2 requires 1.2 kW of energy.
Carbon Ceiling Infrared Heaters
In the reviews there are different devices, some are placed on the floor, others are attached to the wall or ceiling. After the installation method, the type of heating element is considered an equally important criterion. There are four varieties.
- Halogen. The source of infrared waves is an incandescent filament, which emits visible golden light and waves in small ranges. The latter do not have the best effect on human health. Therefore, such IR heaters are cheaper than others.
- Carbon. The heating element is made in the form of a quartz emitter. It heats up quickly, the efficiency is the highest among this equipment, but it “eats” a lot of electricity. The radiation is safe for human health. However, this heater cannot be used continuously.
- Ceramic. The heating element is protected by a ceramic shell, which “blocks” the radiation spectrum that is unpleasant to the human eye. Advantages: moisture resistance, strength, cost-effectiveness. Ceramic elements take a long time to heat up and take just as long to cool down.
- Tubular. Another name is heating element. One of the popular options, suitable for constant use. The air is not dried out and no radiation is emitted. True, they make a slight crackling noise when turning the heater on and off.
Required tools and materials
In order to quickly and easily install an infrared heater on the ceiling, you will need the following tools:
- Drill or screwdriver (drill holes for fastenings).
- Pliers (for shortening wires).
- Indicator screwdriver (determine phase and zero).
- Metal detector (optional, used to search for wiring and metal objects in the wall, so as not to accidentally hit these objects when drilling holes. You can make your own metal detector from improvised means.
- A simple pencil and a construction tape (mark the mounting points on the wall).
As for additional materials, to install and connect an infrared heater you may need:
- Demountable electrical plug.
- Three-core copper cable, cross-section 2.5 mm2.
- Wall mounts (purchased as needed, as only ceiling brackets are included in the kit).
Having collected all the necessary list of materials and tools, you can proceed to mounting and connecting the heater..
Main process
Hanging the case
First you need to determine the installation location of the infrared heater in the house (or apartment). As we said above, the housing can be placed both on the ceiling and on the walls, depending on the individual preferences of the owners.
The first thing you need to do is mark out the mounting locations yourself. To do this, use a tape measure to measure the same distance from the ceiling to the selected area. It is also recommended to use a building level, with which you can level the brackets in a horizontal plane.
After marking, proceed to drilling. If the ceiling (or wall) is made of wood, drill holes with a drill. If you have to deal with concrete, you cannot do without a hammer drill. You need to drive dowels into the created holes and screw in the brackets, after which you can install the infrared heater in its place.
Please note that the design of the unit varies. Some products have guides that are fixed into brackets. A simpler option is chains attached to the ceiling (special holders attach to them). Also on the market you can see infrared heaters on a leg, which are simply placed on the floor.
Electric installation work
As we said at the beginning, the process of connecting an infrared heater to the network will be carried out using a temperature controller.
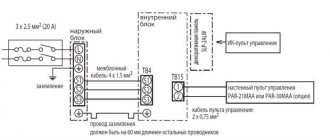
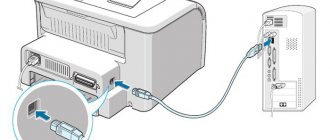
First you need to connect the contacts of the collapsible electrical plug to the thermostat terminal blocks, which are installed in the product body. Each “socket” has its own designation: N – zero, L – phase. It should be noted that there are at least two of both zero and phase terminals (from the network to the regulator and from the regulator to the heater). Everything is quite simple - you strip the wires, insert them into the seats until they click (or tighten the screws). Be sure to follow the color coding of the wires so that the connection is correct.
For your attention here are the correct connection diagrams:
As you can see, connecting an infrared heater through a thermostat is quite simple, the main thing is not to mix up the wires and tightly tighten them in the terminal blocks.
A very important nuance is the correct choice of location of the regulator. You should not install the product next to a heater, because in this case, the incoming warm air will negatively affect the accuracy of the measurements. It is best to place the device in a more distant area, at a height of one and a half meters above the floor.
Also note that you need to install the controller in the coldest room, otherwise the heating problem will not be completely solved. As for the number of infrared devices served by one temperature controller, it all depends on the power of the heaters. Typically, one 3 kW controller is used for several products, with a total power of no more than 2.5 kW (so that there is a reserve of at least 15%).
You can read more about connecting a thermostat to an IR heater in our separate article, which provides several installation diagrams!
So that you can clearly see the entire connection process with your own hands, we provide these lessons for viewing:
Video instructions: connecting an infrared heater with your own hands
How to connect a temperature controller
Calculation of the required number of IR heaters
If the IR heater is suspended from a wooden or suspended ceiling, for fastening you should use, for example, metal hooks, which usually come with the device. They can be easily screwed in without the use of additional tools. But if the ceiling is concrete, you will need to make holes in it using a hammer drill.
You should decide in advance on the number of IR heaters that you will need to install in each room. To do this, you should study the performance characteristics of these devices, paying special attention to their power. Of course, you also need to take into account the area of each room.
For example, if the area of the room is approximately 20 m2, then for high-quality heating two IR heaters will be sufficient, the total power of which will be approximately 2000 W.
If you plan to install it in a kitchen with an area of no more than 10 m2, the installed heater should have a power of approximately 800W. When installing in the kitchen, you can use ceiling or wall mounts.
If necessary, in a remote area of the kitchen, you can install another 500W infrared heater. But it should be remembered that these devices should be positioned in such a way that the entire space is heated evenly. But it is not recommended to have a refrigerator in the heating zone.
Infrared device option 3
Its manufacture requires the use of graphite. In addition to this, you need to prepare:
- A flat box, such as shoe polish.
- Pure river sand.
- Fork.
- Two wires.
- Pliers.
- A sheet of tin with dimensions not exceeding the same characteristics of the box.
The production of an infrared heater includes the following steps:
- Removing cream residue from the box and washing it. It should look like a mirror.
- Grinding graphite and mixing it with sand. Proportions: one to one.
- Place the prepared mixture in a container. Only fill half the box with the mixture.
- Cutting a circle or square from a sheet of tin. The blank must match the shape of the box and be placed in the middle of the box.
- Attaching one of the wires to a tin circle. To do this, use pliers. Next, the sheet metal with pliers is installed.
- Cutting a small hole in the side wall. It is necessary for the wire output.
- Further filling of the box with graphite and sand. The mixture is poured so that a dome-shaped top is formed.
- Blockage of the structure with a lid. The latter is pressed tightly, compressing the graphite with sand. Due to this, excess pressure is formed in the middle.
- Connecting the second wire to the box body.
- Installation of plug or terminals for battery. They are installed at the ends of the wires.
The made IR device is very easy to use and can be suitable for any room. especially for the garage. It is small and installation is very easy. It is able to work for a long time, because there is virtually nothing in it to burn out. Thanks to this, there will be no need for frequent repairs.
To control the IR heater, you need to change the position of the lid. The closer it is to the base, the greater the pressure inside becomes and the more the entire structure heats up. To reduce power, unscrew the lid or lift it higher.
Over time, its contents “sinter.” Therefore the power decreases. A small repair to restore power involves loosening the graphite. You can also shake the heater.
What is warmer, a convector or an infrared heater Infrared electric heater Convective infrared heater Infrared gas heater
Detailed instructions for DIY installation and connection
You can enjoy all the above benefits only by installing the device correctly. The work is carried out in 5 stages and requires strict adherence to the instructions.
Preparatory stage
First, you need a set of tools so that you don’t have to be distracted during installation. Must be present:
- Roulette.
- Pyrometer.
- Screwdriver.
- Screwdriver.
- Drill (perforator).
- Pliers.
Where and how to install an IR heater?
At this stage, the location of the infrared heater is determined. It can be installed on a wall, ceiling, or with a slope.
IR with a power of up to 800 W is installed in residential premises. If we are talking about public buildings, then the power starts from 1.5 kW.
The surface must be strong to support a load of 20-30 kg.
Do not install the heater near flammable objects
Location and height from the floor
IR is recommended to be installed next to surfaces that absorb heat.
Wood, carpets, and stone surfaces work well. Reflective surfaces should be avoided, since when using the device the owner will receive a minimal effect. Electrical wiring must be laid on a non-combustible base. The location of the heater largely depends on the specifics of the premises. There is an optimal scheme for placing IR in residential buildings. It looks like this:
- A pyrometer can measure the coldest place that needs heating. In the case of installing several heaters at once, it is required.
- The height from the floor should be 1.5 m in residential areas. If a person spends a lot of time under the heater, the value should start from 1.8 m.
- If the installation of a high-temperature infrared heater is carried out in public buildings, offices, then the distance should be 2 m.
Installation of the device
You can do the installation yourself without spending a penny. The only difficulty is that it requires certain skills and knowledge, as well as knowledge of the installation process.
MOUNTING TYPE WALL
The wall-mounted option for mounting heating devices is a classic of its kind. Electric infrared heaters are no exception in this case. A great variety of models that are attached to the wall are produced by almost every company. So, there is plenty to choose from.
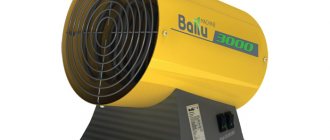
Our company offers wall-mounted infrared heaters from the following: “Teplofon”, “Mister Hit”, Noirot, Frico, Ballu.
1) Under the window. Wall-mounted infrared heaters are usually mounted in the same places as conventional water heating radiators - under the windows. And their task is the same. Installation of infrared heaters is simple, but when installing a group of devices with monitoring and control functions, it is better to invite a specialist. The device, located near the window, prevents fogging of the windows, traps waves of cold air from the walls, thereby adjusting the air temperature throughout the room, making it uniform and therefore comfortable. It does not overheat the wall - the wallpaper does not deteriorate, and the heat does not escape into the street.
2) Above the window. Infrared heaters can provide effective protection against drafts. To do this, they are installed above the windows. The Frico company produces special infrared moldings of the Comfort and Thermoplus series, which help to effectively combat drafts or serve as additional heating in rooms with a large glass area. They are small in size, so they are often used where the presence of heating devices should not be noticeable.
Infrared heater Frico Comfort ECV 30021
3) Heating of the local zone. In this case, wall-mounted infrared heaters are mounted in the intended location.
To do this, it is better to choose a device with a built-in thermostat. The advantage of this option is that it works autonomously and there is no need for complex installation work - the heater just needs to be hung on the wall and plugged into the nearest outlet, and the built-in thermostat will automatically turn it on and off when the set room temperature is reached.
4) In the bathroom. To quickly and efficiently heat bathrooms, you can use infrared quartz heaters with an open heating element. For example, Noirot heaters of the Royat series. The heating element is quartz tubes
These devices are compact and the important thing is that they provide almost instant heating of the room. What you usually need in the bathroom
The device is mounted on the wall, at a distance of up to 40 cm from the ceiling, with the radiating surface directed towards the area where the person will be. The device must be installed so that a person using the bathtub or shower cannot accidentally touch the switch or other controls. The tilt angle and power are adjustable. Such heaters have additional splash protection (IP 24) and can be used in damp rooms.
An example of installing the Noirot Royat-2 heater in a bathroom.
5) In the form of a painting or panel in the recreation area. An infrared heater can serve as an additional source of heating the room and at the same time perform a decorative function. This picture of a heater is hung on the wall and, due to the decorative coating, looks like an ordinary picture. The thickness of the electric heating panel itself is only a few millimeters. A variety of decorative coatings makes it easy to fit an infrared heater into any interior, since you can decorate its surface with your own photo posters, self-adhesive films, etc.
Direct connection of IR heater
The simplest, but at the same time inconvenient installation method is a direct connection to a household electrical network.
A power cord from the kit or purchased separately is connected to the terminals, which is plugged into a standard 220V socket.
This scheme is only suitable if your model of heating device has a built-in thermostat.
The disadvantages are obvious:
— Inability to automatically regulate temperature
The device will have only two operating modes, either on or off. You will have to change them manually. The principle here is simple - as soon as it gets cold, you turn it on, if it gets hot, turn it off.
— You cannot connect several IR heaters to one outlet
You depend on the number of electrical outlets and their location when choosing a location, installation method and the number of heaters in the room. The socket mechanisms have a maximum connected current, most often no more than 16A; accordingly, you can connect no more than 3 kW of electrical power to it. The problem of lack of socket mechanisms is also acute, because... You cannot connect heating devices through tees; there is always a risk of fire from overheating.
— One of the electrical outlets is occupied
If you did not previously plan to install additional electric heating devices, or did not install a special socket or outlet for this, you will have to use one of the existing mechanisms, which are often not superfluous.
- Requires manual switching on and off
To adjust and even simply control the operation of the equipment, you need to turn it on and off yourself, and this is terribly inconvenient.
- Appearance
External installation, when wires pass along the surface of the walls, even in a cable channel, this always spoils the appearance of the interior.
Main advantages:
— Easy installation
It all comes down to connecting the power cord to the terminals of the device and installing it into the outlet connector. The following advantage follows from this:
— Sales cost
Often, everything you need is always at hand and there is no need to purchase additional equipment or electrical materials.
— Ability to use the existing network of an apartment or house
Most often there is no need to lay separate power lines to the installation site. It is enough to use the existing apartment socket network.
CONCLUSION: It is recommended to use a direct connection only as a temporary connection, for example, at a time when the electrical wiring is not yet ready, the rest of the electrical equipment has not been installed or delivered, and the room already needs to be heated. At the same time, it is imperative to control the area in which the heating equipment is located and not leave it unattended.
In addition, this is a good option if the IR heater has a built-in thermostat. Then the main disadvantages will be different:
— it is not always convenient to make adjustments, because often devices are suspended from the ceiling
— You will have to occupy one of the sockets in the room
— External installation spoils the overall appearance of the interior
About the design of thermostats
Thermostats are divided into mechanical and electronic. The latter are more expensive, equipped with a liquid crystal display, and perform a number of additional functions.
Mechanical
A mechanical thermostat looks like a small plastic box with a circular knob for setting the temperature. Convenient risks marked with numbers will allow you to easily select a mode. The number 20 is replaced by a large convex circle. You don't need keen eyesight to find the icon. The trick helps people with poor vision and will also help the average person in the dark.
Inside the device there is a sensitive element that determines the accuracy of the device as a whole. Typical error is half a degree. Not bad at all. The limits for changing settings fall within the range of 5 – 30 degrees. Thermostats for infrared heaters are essentially reminiscent of a relay that is activated when the temperature in the room passes through a limit value. There are input and output contacts, the task of the device is to close and open the circuit between them.
The operating principle is mechanical, no external power is required. The response limit of the sensitive element is adjusted with a knob.
It is important to pay attention to the maximum operating power of the device. The thermostat for an infrared heater is capable of regulating the supply of electricity to a number of lines. It is permissible to install the only regulator per room or house
Example: thermostat power is 2 kW, the power of four heaters is 3.2 kW in total (1 + 1 + 0.6 + 0.6). Obviously, two regulators will be enough, each will control a pair of infrared emitters
It is permissible to install only one regulator per room or house. Example: thermostat power is 2 kW, the power of four heaters is 3.2 kW in total (1 + 1 + 0.6 + 0.6). Obviously, two regulators will be enough; each will control a pair of infrared emitters.
Electronic
A lot of temperature sensors have been released on the market.
For example, we will meet thermostats with an infrared sensitive element. As is known, heated bodies emit electromagnetic waves (devices on the topic of the article operate based on the phenomenon), they are perceived. The frequency of radiation is measured, which directly depends on temperature. This way the thermostat knows when it is time to stop supplying current to the infrared heaters.
The electronics are distinguished by a liquid crystal display and clarity; they will allow you to set a program, say, for a week in advance by day and hour. What you are prepared to do manually on mechanical models is done automatically here. This is convenient; heating can be started a quarter of an hour before arriving home. Which is basically impossible for mechanical thermostats.
The next step in evolution is “Smart Home” class devices. The thermostat communicates with the control center at a frequency of over 800 MHz and is capable of controlling a myriad of heating devices. There is no need to remind you that commands from a smartphone will help start heating the premises at the right time. This option is convenient if you are in a hurry and do not have time to turn off the heating. Wherever the owner is, the devices will obey.
Many devices are universal. Connecting the thermostat to the infrared heater can later be replaced with a Warm Floor system without hassle. The point is to correctly configure the sensors for measurement. Thermostats should not be exposed to direct sunlight or drafts. Devices should not be placed on the external wall of the room.
Most smart devices are equipped with self-monitoring functions. If the sensor fails, the heating devices are switched to 30% activity mode. This prevents the house from cooling completely and ensures that the premises do not overheat.
It is worth adding that electronic thermostats are many times more accurate than mechanical ones.
Connection via a thermostat plugged into an outlet
The main disadvantage of the previous scheme is the lack of automatic adjustment of the heater. This can be solved by using a thermostat.
In this case, the simplest option is to purchase an additional thermostat that plugs into a standard household outlet and connect the heater to it. The same principle is obtained when using a heating device with a built-in regulator, which is connected to a standard outlet in an apartment or house.
Main disadvantages
— binding to the location of sockets
As in the previous option, you remain tied to the existing location of the outlets.
— the need to purchase additional equipment - thermostat for socket
Additional purchase costs will be required, and in addition, such specific equipment is not available for purchase everywhere.
— There is no possibility of connecting several heaters to one independent thermostat
If you plan to use several heaters, for each of them you will have to use its own individual thermostat in the outlet.
— Installation appearance
All conductors remain visible, the socket is occupied.
Advantages:
— Simplicity
Implementation does not require any preparatory work or skills and knowledge.
— Possibility of automatic adjustment and maintenance of the desired temperature
You get a fully automated heating system.
We install the heater ourselves
The simplest and most effective installation method involves placing the heating device on the ceiling of the room. The chassis is suspended in the following order:
- At the short ends of the case, it is necessary to unscrew the screws and remove the covers; the suspension brackets are inserted into the slots and secured with a latch;
- The installation locations of anchor hooks are marked according to the distance between the brackets on the ceiling;
- Using the markings, holes are drilled in the ceiling slab, plugs are hammered in and the suspension hooks are screwed in
Does it make sense to get involved with infrared heaters?
There are approximately the same number of fans and ardent critics of heating residential premises using infrared radiation installations. It is worth recognizing that, despite the fierce criticism of fans of water heating, the idea of using electric infrared heaters is becoming increasingly popular.
Radiant electric heaters have their own rather interesting advantages:
- Versatility. The infrared heater can be installed on any surface, at any angle, without restrictions on height and method of fastening;
- Locality of heating. An infrared emitter allows you to organize heating of part of the room, even if it is not possible to limit the loss of warm air;
- Easy to install. It is enough to correctly lay the electrical wiring to the places where the heaters are installed, connect the input to the house and a meter designed for increased power consumption of electricity;
- Low inertia of infrared heaters. Heating of the room stops 10 minutes after the electric heater is turned off;
- Possibility of smooth adjustment and precise dosage of room heating.
For your information! Due to the very small thermal inertia of infrared heaters, the air temperature in the room can be adjusted with an accuracy of half a degree; it is enough to install digital or even mechanical thermostats.
Of course, similar options for maintaining the air temperature in a house or apartment at a given level can be implemented using heated floors or electric convectors, but in both cases, good results can only be achieved in closed rooms, when there are no drafts or passage rooms.
Practice once again proves that the use of radiant devices makes it possible to heat a room no less efficiently than using convectors or water and oil radiators. In this case, it is important to choose the right scheme and method of installing the infrared heater.
Conventional electric water-oil heaters and radiators, regardless of the installation scheme, heat the air by convection:
- Most of the heat-transfer surface is covered with a casing or screen to improve, according to the developers, the flow of air to the spirals or tubular sections;
- In some designs, convection electric heaters simply unsuccessfully copy the shape of cast-iron central heating radiators;
- Such heater designs are designed for installation in window sill niches, where warm air mixes with the flow of cold air from the ventilation valve and spreads well throughout the room. In all other cases, the efficiency and economy of air heaters is significantly lower than that of infrared heaters.
Important! There are quite a few comparison tests that measure heating performance, but the most reliable data shows a difference between infrared heaters and convectors by almost 18%.
In addition, infrared heaters are practically insensitive to the position of the housing, whereas for a convector, manufacturers require installation only in a vertical position, with an inclination angle of at least 4-7o.
Low temperature infrared heaters
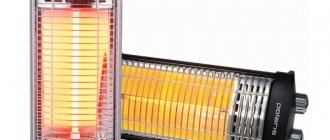
The most frequently criticized disadvantage of an infrared heater is related to the high temperature of the radiating surface. Most often, a spiral or ceramic panel heats up to 300-500°C, which can cause dry air in the room.
Relatively recently, so-called cold or low-temperature heaters began to be used for heating. New infrared heaters look like ordinary square facing slabs measuring 60 cm or 50 cm. The smooth heating surface is made of polymer ceramics; on the reverse side there may be a protective grille or a plastic panel covering the heating element.
Such heaters heat up to a temperature of 90-95°C, so even with prolonged contact with fabric, curtains or furniture there is no damage. Installation of such an infrared heater can be done almost anywhere, but preferably no closer than 40-50 cm to open parts of the body, you can use the advice in the video:
The most important thing is that the room heating efficiency of such a heater is approximately 20-25% higher than in comparison with vaunted convectors and oil radiators.
Optimal location of the heater
Of course, radiation alone, even from the most powerful heater, cannot guarantee to warm up every corner of the room; you still cannot do without convection. Only warm air moving under the influence of the ventilation flow is able to equalize the temperature and evenly warm the entire room.
Different rooms use their own, most optimal heater installation scheme:
- For a bedroom, the most convenient and effective would be to place the infrared heater at the maximum height above the head of the sofa or bed, so that 2/3 of the surface is located in the shadow of the heat flow;
- For the kitchen and living room, the heater is installed so that the heat flow of infrared radiation is directed to the window sill, the place where cold air flows into the room;
- In hallways and corridors, the heater is installed on the ceiling with the vertical direction of infrared radiation down to the floor. The heat emitter has a truly unique ability to quickly dry the floor and remove drops and residual moisture brought into the room from the street on shoes and outerwear. To avoid damaging shoes, they must be removed from the heat flow of the heater in a timely manner.
In addition, it is necessary to correctly calculate the height of the heater ceiling suspension. For the ceiling in the hallway, the best option would be to place the heater in the center; with a standard ceiling height of 250 cm, only people 170-175 cm tall will feel comfortable under an infrared heater with a power of 700 W.
Therefore, when planning the installation of infrared heaters, you will need to make the ceilings in the hallway 260-270 cm high, or instead of one device, use two low-power 500 W heaters so that it doesn’t get too hot. You can see the features of this installation in the video: