Operating principle and main elements of an infrared heater
To make an infrared heater from scrap materials, it is necessary to study the operating principle. How can you do something you know nothing about?
All heated bodies radiate heat, just like the Sun does. The rays emanating from a heat source are electromagnetic waves that heat bodies encountered in their path: pieces of furniture and people. In this case, the air does not heat up: the air receives only part of the heat during heat transfer from already heated bodies. Infrared heaters operate on the principle of thermal radiation, which includes two main elements:
- Radiation source . In industrial heaters, these are thin metal filaments that heat up when an electric current passes through them, or lamps (incandescent, halogen, quartz and others);
- Reflector . This is a highly reflective body, the function of which is to reflect infrared rays to disperse heat throughout the apartment or form separate heated zones.
Advice! To check the effect achieved by the reflector, take some food foil and hold it near your hand for a while. You will feel the heat, which is reflected and directed towards you.
Another important part in industrial infrared fireplaces is the controller, which regulates the degree of heating of the emitter. It may not be present in homemade designs. But its installation gives the advantage of being able to set the desired temperature range. The controller automatically causes the device to heat up if the temperature drops below normal, and cool down if the temperature exceeds it.
If you study the infrared ceiling heater, the operating principle will be the same as that of the floor/wall design. The only difference is in the installation method of the IR fireplace. But it depends on him which zones in the room will be more comfortable.
The figure shows the advantage of infrared heaters: heat reaches physical bodies and is absorbed by them, remaining there. Therefore, it may be warmer on the floor than under the ceiling. And when heating a house using the convection method, the floor is always cold: the coating itself does not receive heat. Heat is carried by air, which, when heated, rushes upward, and a new portion of cold air falls down.
Advantages of homemade heaters
A do-it-yourself dacha heater and homemade heating devices for the home have one undeniable advantage over their factory-made counterparts. The first ones are made from improvised means, and therefore their cost is low. On the other hand, homemade equipment must be made in strict accordance with the rules for the safe operation of electrical and gas appliances. Today you can make your own IR heaters, which are considered the most effective and inexpensive. If you need a device with increased power, you can make an oil radiator at home. There are schemes for making home convectors and portable stoves for tents.
The need for comfortable warmth increases in the off-season and with the onset of cold weather. But not all homeowners have the opportunity to purchase reliable factory-made heating equipment, the cost of which is often inflated. In this case, an alternative option is a homemade heater made from available materials, which can easily cope with the task.
Cheap and cheerful
Typically, devices that are heated by electricity are used as an emitter - incandescent filaments or lamps. But the simplest version of the emitter is a heating radiator. This is the same physical body as the Sun. And it can also emit heat. Stand by the radiator and feel the emanating heat - this is radiation. It just spreads in all directions. Why heat the walls if you can direct the rays towards the living space?
Take the foil, smooth it well to improve the reflective effect and stick it on the wall behind the radiators and radiators. As a result, the heat that the walls could receive will be directed in the opposite direction - towards you. This method helps to get up to 20% more heat without any tricks. The only drawback is the ugliness of the reflective screen: it spoils the interior.
Attention! Instead of foil, you can use heat insulators with a reflective screen. A striking example is the material penofol, one or both sides of which are foil-coated.
What are the requirements for a garage heater?
Since the garage space is not large in size and rarely has a ventilation system, a DIY garage heater assembled must meet certain safety requirements when used in enclosed spaces.
Heater requirements:
Fiberglass for heater
- First of all, the operation of such a structure must completely eliminate the risk of fire or explosion.
- During operation, the heater should not emit toxic substances or odors hazardous to human health.
- The heater should not reduce air humidity and burn oxygen.
- A homemade device should quickly heat the garage room to a certain temperature.
- The temperature must be maintained by the heater for the required time.
- Due to the small area of the garage, a homemade device should not take up much space and should be compact and easy to move.
- And of course, the cost of manufacturing a homemade heater should be much less than its factory counterpart.
- The electrical wiring in the garage must be in good working order, and the meter must be equipped with a circuit breaker.
- If the electrical outlet is located far from the intended location of the heater, then you should purchase an extension cord - a carrying case.
- Under no circumstances should you leave the heater on for a long time unattended, for example, all night so that you can go into a warm garage in the morning. You can be left without a garage and without a car.
This will make it possible to maintain heat in the garage for a long time in accordance with the weather conditions outside the garage walls, while simultaneously saving electricity. As such an element, you can use thermostats from household appliances, old irons, kettles, electric stoves or washing machines and similar devices.
The old Soviet reflector is in use!
A homemade infrared heater can be made from an old Soviet-made reflector. In addition to this, you will need:
- Nichrome thread;
- Steel rod;
- Fireproof dielectric (ceramic plate is suitable).
To make an IR fireplace from these things, follow the instructions:
- Remove dirt from the reflector;
- Check the plug, cord and terminals to turn on the coil (they must be intact);
- Measure the length of the spiral that is wound around the reflex cone;
- Cut a steel rod the same length as the spiral;
- Wind a nichrome thread onto the rod so that there are 5 turns for every centimeter;
- Carefully remove the rod from the nichrome winding;
- Place the spiral on a plate (another dielectric) so that the turns do not touch each other;
- Connect the ends of the nichrome spiral to the mains;
- Now the heated spiral will easily fit into the grooves of the cone from the reflector;
- Connect the ends of the spiral to the contacts.
The nichrome filament glows better than the spiral that was in the device before our manipulations. As a result, we get a powerful emitter, the energy of which is reflected from the walls of the reflector and hits opposing bodies, which begin to absorb heat.
Idea N4: Heater with a spiral
The classic version of a spiral-type heater involves connecting heating coils to the network. Heat-resistant dielectrics were used as the basis for installing the spiral in such models. But these are quite simple options, so in this article we will look at the principle of manufacturing a device whose characteristics are not inferior to a gas heater. It uses the same principle as a heat gun, but with less heat output.
To make it, you will need a heating coil, an electric fan, a metal pipe or box for the housing, a dielectric heat-resistant frame, and a power cord. The heater manufacturing process includes the following steps:
- Cut the asbestos cement pipe to the required length (in this example it will be used to make the supporting frame).
Rice. 17: Cut the pipe to the required length - Drill several holes in the pipe from different sides so that you can insert a nichrome spiral into them.
- Insert a spiral into the holes, in this example they are made in the form of a lattice, but this is not important, it is important that the heating elements have a different angle of inclination.
Rice. 18: position of the spiral in the pipe
If you are assembling several pieces of spiral, connect them together on the outside of the pipe.
- Place a fan on one side of the pipe to force air flow. The direction of the blades should ensure the movement of air towards the spirals stretched in the pipe. The distance from the fan to the heating element must ensure safe operation so that the blades do not melt. For additional cooling, the fan and asbestos pipe can be separated in the housing.
Rice. 19: separation of fan and pipe with heater - Insulate the electrical connections both from the fan to the power cord and from the nichrome spiral. To insulate the spiral joints, you can use micanite tape, which is wound directly onto the asbestos surface.
- Place the finished heater in the most suitable housing. In this example, to protect against accidental contact with the spiral, an additional grill is installed in front of the pipe.
It should be noted that the fan power should not be too high so that the coils have time to warm up. In practice, you should achieve a blowing effect, and the heating performance can be adjusted by the length of the spiral. It is also advisable to coat the inside of the asbestos pipe with heat-resistant varnish to prevent asbestos particles from entering the air. It would be a good idea to ground the heater body to a ground loop.
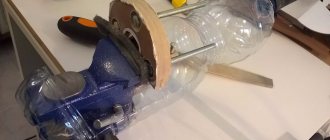
Heater glass + aluminum foil
You will need:
- Foil;
- Two glasses of the same size;
- Paraffin candle;
- Sealant;
- A wire with a plug at the end;
- Cotton napkin;
- Boxed;
- Cotton swabs;
- Any device for holding a candle.
Step-by-step instruction:
- Clean the glass with a napkin from paint, dust, grease;
- Light a candle. Place it in a glass, candlestick, or simply drip paraffin onto a flat surface and quickly place the candle on the puddle;
- Smoke the glass on one side by passing it over the fire at the same speed. The soot will lie evenly if the glass is cooled before the procedure. The dark layer will eventually become a conductive element;
- Run cotton swabs around the perimeter of the glass pieces so that you get a frame of clean glass 0.5 centimeters thick;
- Measure the width of the smoked rectangles on the glass with a ruler;
- Cut two rectangles of the same width from foil - these will be electrode strips;
- Take one glass and place it with the smoked side up;
- Apply boxing agent to it and place rectangles of foil on the edges so that they extend beyond the glass;
- Place the second glass on top with the smoked side down and press well so that the structure sticks well;
- Along the perimeter of the “layer cake”, spread sealant at the joints of the glass;
- Check the power of the structure. If it is not higher than 100 W per square meter of room, then the heater can be connected to the network using a wire and plug;
- To connect to the network, use a wooden block with metal plates reinforced at both ends. Solder a plug to one contact. If you install the glass on a block so that the foil coming out from the sides fits tightly to the metal contacts, you get a full-fledged heater.
Attention! To calculate the power of a structure, use a multimeter to measure the resistance of the conductive layer. Since the current strength in the circuit depends on the load, it is better to calculate the power using a more stable parameter - this is the voltage, which in the network is equal to 220 Volts. To do this you will need the formula: N=U*U/R .
N – required power. U – voltage (220V). R – measured resistance. Example: when measuring, we got 24 Ohms. Substitute into the formula: N=220*220/24. We get 2021 Watts. This is enough to heat a room with an area of 19-20 square meters.
If your power is more than 100 watts per square meter, then it needs to be reduced by increasing the resistance (we cannot change the network voltage). If the power is very low, then it needs to be increased.
What to do if the power is not suitable?
Now let’s talk about how to make an infrared heater with your own hands of the required power. To do this, you need to know the area of the room you want to heat. For example - 15 meters. Now you need to calculate the maximum permissible power at the rate of 100 watts per meter. Since we have 15 of them, the power will be 15 * 100 = 1500 Watts (it is necessary to count in them, despite the fact that in the passports of electrical appliances it is indicated in kW).
If the voltage is constant (220 Volts), then you can calculate the required resistance. To do this, we derive the resistance from the formula given above: R=U*U/N. Substituting the calculated power and voltage into the formula, we get: R= 220*220/1500=32 Ohms (approximately).
In the example above we had 24 ohms. This means that the resistance needs to be increased. To do this, you need to reduce the width of the smoked strip on the glass. This comes from the formula R=l*p/S . Where l is the length of the conductive layer (a constant value, because we will not cut glass), p is the resistivity (constant), S is the cross-sectional area of the conductive layer, which depends on its width. The wider the layer, the lower the resistance, the narrower it is, the greater it is.
Conclusion! To achieve the required resistance, you need to select it experimentally, making the soot strip narrower or wider, depending on whether you need to increase or decrease the resistance. In this case, each time you will have to disassemble the glass structure.
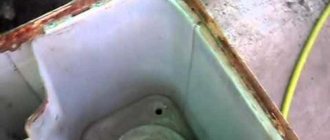
Making an oil heater with your own hands
Homemade register with heating element and air vent.
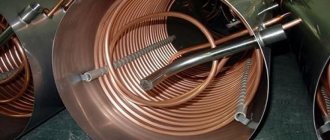
Firstly, the container for the future radiator must be absolutely sealed. Otherwise, the coolant will leak out, which will lead to overheating of the heating element (heating element). Therefore, you need to master some techniques for properly welding metal. We talked about them in the article about welding pipes for heating.
Secondly, the coolant here should be mineral oil, if possible transformer oil. It should fill the heater tank to 85%. The rest of the space is left for air. It is necessary to prevent water hammer. Thirdly, in the case of using a cast iron tank for the heater, a steel heating element is used. For a stainless steel tank, a copper heating element is suitable. Magnesium anodes cannot be used in this system.
- old, cast iron radiator or steel pipes with a diameter of 15 cm, pipes with a diameter of 7 cm;
- heating element;
- transformer oil;
- thermostat;
- two-core cord with a plug at the end;
- pump up to 2.5 kW.
You will have to work using a welding machine, a drill, a set of drills and electrodes. Pliers will come in handy. Making an oil heater for
The heating element is inserted into the lower end.
Do-it-yourself apartments begin with preparing the tank. If you took an old cast-iron battery, it must be disassembled into sections and thoroughly cleaned of dirt and rust, and be sure to degrease the inner surface. If you need a heater of increased power, then prepare a welded structure from prepared pipes, where pipes of larger diameter are located horizontally.
Pipes of smaller diameter serve as bridges between the main ones. The coolant will circulate through them. You need to remember that in the lower pipe you need to leave a hole for installing the heating element. If there are several heating elements, they are located on different sides of the tank and should not touch. A hole is also left for the pump. The heating element is securely fastened with bolts. The hole for it can be made with a grinder or autogens.
If a do-it-yourself room heater turns out to be voluminous and natural circulation of coolant in it is impossible, resort to the help of a pump. It is located at the bottom of the equipment. The pump should not come into contact with the heating element.
After installation of structural elements, the equipment is checked for leaks. If the result is satisfactory, then the coolant is filled. The drain hole is securely sealed with a plug. The equipment is connected to the electrical network in parallel. The circuit is supplemented with a bimetallic thermostat made from a regular iron. Before the first start-up, the installation is grounded. Homemade oil heaters for the home: the video will explain in detail their structure and installation rules:
Heater based on laminated plastic
To assemble a homemade infrared fireplace you will need:
- Laminated paper plastic - 2 pieces with an area of 1 square meter;
- Boxed;
- Graphite (you can buy powder or get it from old batteries, from a pencil - but you will have to crush it);
- Copper plates;
- Wood;
- Plug with cord.
If everything is there, start assembling:
- Mix graphite powder with bauxide to form a thick mass with high resistance;
- Place the plastic sheet with the rough surface facing the table;
- Apply bauxide mixed with graphite onto the plastic using zigzag strokes;
- Prepare the second sheet of plastic in the same way;
- Glue both plastic sheets together, pressing them tightly together;
- On opposite sides of the plates, attach copper plates that will act as terminals;
- Build a wooden frame into which you will need to insert the resulting structure;
- Allow the future heater to dry;
- Measure the conductor resistance and calculate the power.
Attention! Here, the calculation of power and resistance is carried out using the same method as in the previous case. Only the resistance will depend not on the width of the conductive layer, but on the graphite content in the box. The more powder, the higher the resistance, and vice versa.
You will have to disassemble and reassemble the structure several times before you experimentally achieve the required power. Only then can you connect the device to the plug and connect it to the network for operation.
Infrared device option 3
Its manufacture requires the use of graphite. In addition to this, you need to prepare:
- A flat box, such as shoe polish.
- Pure river sand.
- Fork.
- Two wires.
- Pliers.
- A sheet of tin with dimensions not exceeding the same characteristics of the box.
The production of an infrared heater includes the following steps:
- Removing cream residue from the box and washing it. It should look like a mirror.
- Grinding graphite and mixing it with sand. Proportions: one to one.
- Place the prepared mixture in a container. Only fill half the box with the mixture.
- Cutting a circle or square from a sheet of tin. The blank must match the shape of the box and be placed in the middle of the box.
- Attaching one of the wires to a tin circle. To do this, use pliers. Next, the sheet metal with pliers is installed.
- Cutting a small hole in the side wall. It is necessary for the wire output.
- Further filling of the box with graphite and sand. The mixture is poured so that a dome-shaped top is formed.
- Blockage of the structure with a lid. The latter is pressed tightly, compressing the graphite with sand. Due to this, excess pressure is formed in the middle.
- Connecting the second wire to the box body.
- Installation of plug or terminals for battery. They are installed at the ends of the wires.
The made IR device is very easy to use and can be suitable for any room. especially for the garage. It is small and installation is very easy. It is able to work for a long time, because there is virtually nothing in it to burn out. Thanks to this, there will be no need for frequent repairs.
To control the IR heater, you need to change the position of the lid. The closer it is to the base, the greater the pressure inside becomes and the more the entire structure heats up. To reduce power, unscrew the lid or lift it higher.
Over time, its contents “sinter.” Therefore the power decreases. A small repair to restore power involves loosening the graphite. You can also shake the heater.
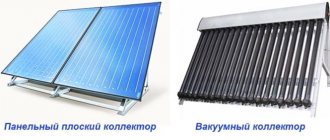
What is warmer, a convector or an infrared heater Infrared electric heater Convective infrared heater Infrared gas heater
Mini heater made from a shoe polish can
Prepare materials:
- Flat shoe polish box;
- Two conductors;
- Can;
- Graphite powder;
- Sand;
- Plug.
Step-by-step instruction:
- Wash the box;
- Mix sand with graphite powder, taking them in equal quantities;
- Pour the mixture into the box, filling it halfway;
- Cut a circle out of tin;
- Attach a wire to it;
- Place the circle on top of the graphite-sand mixture;
- Add enough sand and graphite until the jar is full;
- Close the jar with a lid to create pressure inside;
- Connect the second wire to the body of the can and connect it to the network using a plug (you can use a car battery).
To regulate the degree of heating, screw the lid of the jar looser or tighter to change the pressure inside. The tighter the jar is twisted, the stronger the heating, and vice versa. But do not allow it to overheat, at which point the jar begins to emit yellow or orange light rays. In this case, the contents inside the can are sintered, causing the efficiency of the heater to decrease significantly. To improve performance after sintering, you need to shake the jar vigorously - then the graphite-sand mixture will again become loose and suitable for work.
Optimal heating power
To assemble a lamp heater, it is best to use 150W models
Just note that after the introduction of a law prohibiting the production of conventional incandescent lamps of more than 100W, they began to be sold under the name “heat emitters”
With their sequential connection scheme, even two copies, you can immediately feel the radiated heat. At the same time, they do not blind the eyes.
The current in such a circuit at the same voltage will be 420mA. This means that two lamps consume about 100 W in total, and most of them are used for heating.
You can compare what power infrared heaters are sold for and what area they are designed for. The ratio for conventional models is 100W per 1m2.
Oil radiators have almost the same indicators.
That is, in any case, watts turn into heat. Only specialized infrared models will have more directed radiation to a specific point or area, while your homemade product will have a wider angle.
By the way, these 100 W/m2 are taken from SNiP for premises insulated according to all standards. This is the optimal power for all heaters in central Russia.
For northern latitudes, including cold, uninsulated garages, the values will be higher. If, for example, the heat loss in a garage is 1000 W/hour, and you heat it at 300 W, then your temperature will never rise.
But if the ideal heat loss is close to zero, then 100 W will be enough to create a bathhouse inside.
This power also depends on the height of the ceilings (the average calculated one is up to 3 m).
Heater based on the reflection principle
This method is one of the easiest and cheapest. To make a heater, you will need several sheets of foil. It looks like this: foil is attached behind the central heating radiator, thereby reflecting the heat emanating from the radiator into the room, and without it everything is absorbed by the wall.
This modification allows you to increase heat transfer by approximately 10-20%, and the costs required for this method will be mere pennies, because you will only need to buy foil and glue.
Water heating system
You need to understand that installing water heating makes sense when you are in the garage all the time. Otherwise, the costs will not justify themselves, because in addition to a source of heat and fuel, you will need to buy:
- cast iron or steel batteries (as an option, weld registers from pipes);
- circulation pump;
- expansion tank;
- pipes on the main line;
- non-freezing coolant - antifreeze.
Knowing the need for the amount of heat to heat the room (calculated in the previous section), select the power of the radiators or determine the length of the pipes of the homemade register using the table:
In the table, t1 means the coolant temperature, t2 means the air in the room
The calculation method is as follows. We take a steel pipe DN 80 (Ø89 mm) and find out from the table that 1 m of length is enough to heat an area of 1.37 m². We take the square footage of the garage, for example, 20 m² and divide by this figure: 20 / 1.37 = 14.6 m - the total length of the heating part. We distribute it among 2-3 heating devices and cook the registers according to the drawing.
Use the circulation pump with the lowest pressure (4 m of water column), and the expansion tank with the minimum volume. Pipes - polypropylene, steel or metal-plastic size DN 15. Then install radiators on 2 opposite walls and assemble a simple two-pipe closed-type heating system connected to a heat source according to the following diagram:
Instead of a wood-burning stove with a water circuit, an electric boiler or other heat source is installed in the circuit
The following can be used as a water heating installation:
- a wood-burning or exhaust stove with a water circuit, shown in the diagram above;
- heat exchanger – samovar-type economizer installed on the chimney;
- an electric heating element mounted in a vertical steel pipe, as shown in the diagram;
- a full-fledged electric boiler or solid fuel unit.
Why don’t we recommend making an open-type system in the garage, as it is simpler and cheaper? The reason is antifreeze, which will evaporate from an open tank, which is unsafe for health (ethylene glycol is poisonous), not to mention the price of the coolant.
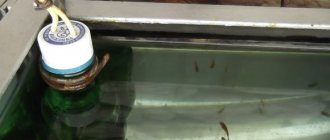
What is a heat exchanger?
Unlike many other heating devices, this device removes combustion products outside, so there is no need to “let in” fresh air and lose the heat produced. To do this, the tent must have at least one hatch in the upper part. In addition to the chimney, design features worth highlighting are the presence of air-heating tubes and a fan to enhance the effect (powered by batteries or accumulator).
How does a heat exchanger work in an ice fishing tent? A burner installed below heats the exchanger tubes, through which air is drawn using a fan. Passing through them, it also heats up and enters the tent. Gases resulting from combustion of fuel exit through the chimney. As you can see, nothing complicated. This design is similar to fire tube heat exchangers used in solid fuel boilers, and it works on the same principle. The air passed through the hot tubes turns into dry heat and heats the interior of the tent.
Heat exchangers can have different thermal radiation. For some the radiation is stronger, for others it is weaker. This important technical characteristic depends on:
- burner thermal power;
- heated area;
- the material from which the device is made;
- heat exchanger shapes.
As for the shape, the round version is more effective than the rectangular one, since there are no corners where heat could “stagnate.”