DIY aquarium heater
Hello to all readers of my blog! In this publication, I want to tell you how you can design a salt heater for an aquarium with your own hands using an ordinary plastic bottle. I can say with confidence that over the course of several years of operation of this heater, it has proven itself to be excellent.
Attention! If you do not know the safety precautions for handling electricity, do not undertake the manufacture of such an electrical appliance. To make a homemade salt heater you will need: a small plastic bottle, a piece of insulated electrical wire (preferably removed from the electrical appliance and with a plug installed), two rings 15 - 20 mm long, necessarily sawed off from a copper tube, and a piece of not very hard wire for making a hook for which hang the heater in the aquarium.
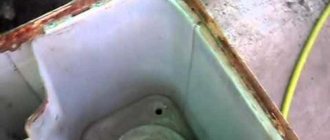
The first thing you need to do is make (you can burn a nail) three small holes in the cork of a plastic bottle. Two holes for the electrical wire, and the third for the exit of condensate, which will slowly evaporate from heating the water in the bottle. You can get by with two holes if they are made free enough.
After you make the holes in them, you need to insert the wires and then flatten the rings on the stripped ends of the wires. To do this, you need to take a hammer and push the wire into the ring and flatten it with a hammer blow; the same must be done with the second wire. Remember, in order to avoid a short circuit, the contacts placed in the bottle should always be apart, that is, one contact at the bottom at the very bottom of the bottle, and the second at the top, closer to the neck itself, but not higher than the level of water filled in the bottle.
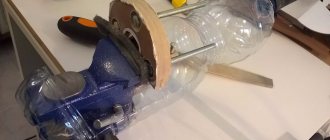
Before filling the heater with water and installing it in the aquarium, you must first make a weighting material so that the bottle suspended in the aquarium does not tip over on its side. To do this, you need to pour some stones into the bottle; you can simply take some soil from the aquarium. The norm is checked experimentally: when in an aquarium, a bottle hung on the wall and filled with water stops turning over on its side, which means it is enough. A piece of not very rigid wire will be needed to make a hook for which the heater will be attached.
To do this, wrap the wire tightly around the neck of the bottle, leaving the end of the wire bent into a hook. After everything is done, you need to fill the bottle with water, but not to the edge of the neck to avoid accidental contact with water in the aquarium.
The correct placement of a water heater in an aquarium is to raise the neck of the bottle completely above the water level in the aquarium. It is important to know that the temperature of a salt heater is controlled by adding salt to it. The more salt you add, the higher the temperature of the heater will be and vice versa.
Based on this, you need to be very serious about adding salt, otherwise the water in the bottle will boil and you will kill your fish. I add salt after first dissolving it in a glass of water and only after that add drops to the water heater. Attention! When adding salt to the heater, as well as during all technical work involving moving and removing the plug from the heater, strictly only be carried out when it is disconnected from the network.
After adding salt to the water heater, the water temperature in the aquarium is monitored throughout the day. If after 24 hours it has reached the planned norm and does not rise higher, then the temperature limit is considered adjusted. And if the water temperature has risen above normal, then in this case you need to turn off the heater and replace some of the water in it with fresh water. For very small aquariums, the high water temperature is reduced by adding distilled water to the water heater. This kind of aquarium heater is not safe, but it can be very useful.
Source
How to install
The device is mounted in the tank both vertically (the adjustment handle should be above the surface of the water) and horizontally, lowering the whole thing. Do not place it in the ground unless you are talking about cables.
The water level must exceed the minimum immersion level, that is, the “MINIMUM WATER LEVEL” icon, which you will see on the body of the device. Please note that due to evaporation this level drops from time to time.
The heater is installed on the wall of the “fish house” thanks to a bracket with two suction cups; it is mounted on the heater immediately under the head. Fix the device where water is always present and its movement is uniform.
How to make a thermostat for an aquarium with your own hands
Aquarium fish are demanding in terms of keeping conditions. Their health and beauty depend on the volume of the aquarium, the presence of shelters, the nature of the bottom covering, the level of water aeration and its temperature. And while some fish can withstand significant temperature fluctuations, for others they can be destructive. And it is especially important to maintain a certain level of heat during the spawning period. The maturation and quality of eggs, the rate of hatching of fry and their survival depend on this.
To obtain and maintain healthy offspring of fish, use a special aquarium heater with a thermostat.
Why do you need a homemade thermostat?
Store-bought thermostats are very massive. They are designed for keeping large aquariums with whimsical animals. They are not suitable for beginner aquarists who breed small fish in small containers. And the costs will be unjustified (purchased water heating equipment is expensive). Therefore, a do-it-yourself thermostat for an aquarium is:
The only thing you have to spend is time.
When is it necessary to buy a heater?
There is a significant difference between industrial and homemade devices: the purchased one heats the water itself, while the one made by hand heats the bottom. If in small aquariums, using convection, heat quickly spreads throughout the entire volume, then for large containers this is not enough.
To ensure that the water is the same temperature at all levels, you will have to use a commercial aquarium heater with a thermostat. But if you made a mistake in calculating the power, and it turned out to be insufficient, then building an assistant - a homemade thermostat - will help correct the mistake.
Do you need a water heater?
Some novice aquarists believe that a water heater is not the most important thing. But they are very wrong. Many fish in their natural environment live in tropical and warm rivers.
Although summer is not yet an indicator, since the water temperature changes day and night and not every fish will survive these changes (even 2-4 degrees). Also, water can be affected by leaving a window open for a long time or suddenly turning off the heating in the apartment.
The simplest DIY heater
The device is actually simple: it does not have a thermostat. But due to the low power, you will not be able to overheat the water in the aquarium: no one will cook in it. However, exceeding the norm by 1-2 degrees is quite likely. To prevent this, place a water thermometer in the aquarium. And when the water heats up to the desired level, turn off the heater (if you forget to turn it off, nothing bad will happen if you chose the right wire resistance).
To build it you will need:
DIY automatic heater
This method allows you to create an aquarium heater that independently regulates the temperature set by the user. But you can make a device only if you have special knowledge in the field of radio engineering.
To make an aquarium heater with a thermostat, you will need:
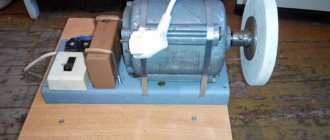
The photo shows an unusual transformer. This is a coil borrowed from an outdated induction electric meter.
It can be seen that the circuit provides a 7805 stabilizer with a constant output voltage of 5 V. It is from this that the zener diode is powered. Therefore, the thermostat will have stable characteristics that will remain constant even when the supply voltage surges.
The temperature sensor in this case is a thermal resistor, the resistance of which is 50,000 Ohms at room temperature. However, its resistance will drop when heated.
Such a heater with a temperature controller will turn on at a temperature below the user set one. If necessary, it can be done so that the load is supplied at a temperature if it is higher than the set one. To do this, you need to swap the resistor that plays the role of sensor (R2) with resistors numbered 1 and 3.
Source
How to heat water in an aquarium :: DIY aquarium heater :: Aquarium fish
How to heat water in an aquarium
Most aquarium fish are tropical inhabitants. Water at room temperature is not suitable for them. The aquarium must be heated. This can be done in several ways.
You will need
Instructions
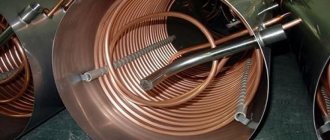
3. The most advanced method is heating using a special heater. You can buy it at a pet store. This heater is a long test tube in which an electric coil is placed. The test tube is filled with fine dry quartz sand. The hermetically sealed terminals of the spiral are located in its upper part. Such a heater is connected to the network using a cord.
5. Secure the heater in the aquarium
using rubber suction cups and plastic rings. If you cannot find them, you can use metal wire as a fastener. This mount must be above the water level.
6. Use a thermostat at the same time as the heater. They are also sold in pet stores. Monitor the temperature of the water in the aquarium using a thermometer immersed in it.
note
The main disadvantage of heating using a reflector is that the device has to be turned off at night, and the water temperature drops to room temperature. The second disadvantage can be considered the increased overgrowth of lower algae on the glass located on the side of the reflector. In addition, this device has a rather low efficiency. There are salt heaters. As a rule, they are homemade. You shouldn't use them. Salt in the water can be harmful to some fish and plants.
How to properly install a heater: a step-by-step guide
There is no problem in installing a water heater correctly - it is perhaps the easiest device to install for an aquarium, except for a thermometer.
⚫ Checking network requirements. Before installing an aquarium heater, read the instructions and its technical approval. Standard models are powered by AC power and do not require the installation of adapters. An important condition when carrying out any manipulations with the heater is to disconnect it from the power supply. It is strictly prohibited to turn on the device if it is not completely immersed in water. Remember about safety precautions: if you have the slightest suspicion that a heater or other electrical appliance is malfunctioning, do not put your hand in the water until you turn it off. Any damage to the wire is grounds for replacing the device with a new one. It is not recommended to carry out even minor repairs to heating equipment for an aquarium, otherwise the fish can just as easily be released into the bathtub with a hairdryer turned on.
⚫ Pre-installation. Attach the supplied suction cups to the bracket. Screw the bracket over the top end of the heater or insert the flask into it, depending on the configuration of the fastener. That's all!
⚫ Immersion of the device. The minimum water level provided for placing the heater is usually indicated on the body using a special mark under the adjustment handle. Remember that the higher the temperature of the water, the faster it evaporates and the more often it needs to be topped up. Otherwise, the heater may be above the water level, which is prohibited by the user manual. Immersing the device to a depth of more than 80 cm is also not recommended - more accurate information about each model is contained in the instructions for it.
The design features of the device allow it to be placed not only vertically, but also horizontally in order to disguise it or effectively use the area of the side walls. Never bury the heater in sand or fine gravel! Do not place the device in the “dead” zone of the aquarium, where there is no water circulation - in this case, its actual benefit will be reduced several times.
⚫ Temperature equalization. Before turning on the device, leave it in water for 15 minutes so that the body reaches the same temperature as the environment.
⚫ Turn on. Insert the plug into the socket and wait until the indicator reaches the required level. Check the thermometer readings with the desired temperature several times to ensure that the device is not defective.
Aquarium heater with thermostat
One of the important conditions for keeping fish at home is maintaining a stable temperature in the aquarium, which, without human intervention, always corresponds to the microclimate in the room. Sharp fluctuations within 2–4 degrees, caused by an open window or turned off heating, negatively affect the health of aquatic organisms. This is especially true for aquariums with a small displacement, where temperature changes can occur in a matter of minutes. In addition, during the year situations arise when the room is too cold for a long period, and this can cause serious damage to the entire ecosystem.
Types of Aquarium Heaters
To make it possible to create the most comfortable conditions for the habitat of fish and plants, special devices are used - aquarium heaters. There are several types of them, but the principle of operation is the same for all - electrical heating of the element in a sealed environment. The most commonly used heaters are:
Submersible (plastic, glass, titanium). It consists of a heating element built into an impact-resistant, heat-resistant housing in the form of a flask or elongated cylinder, and is designed to be lowered into an aqueous environment.
Flow-through . It has a plastic body and is mounted in a vertical position on the return hose of an external filter, which saves internal space and creates a flow of warm, aerated water.
Heating cables . They are installed under the ground and allow you to evenly heat the entire aquarium and create additional water circulation.
Heating mats . They are rectangular mats that are installed under the aquarium. The heat generated passes evenly through the bottom and increases the temperature of the water.
It is generally accepted that sufficient heating device power should correspond to 1 W per liter, but in practice 0.7–0.8 W per liter is often used.
Aquarium heater with thermostat
The main inconveniences when using the heater are related to the need to constantly monitor its operation.
Even having reached the desired water temperature, the device still continues to function and must be disconnected from the network manually. To get rid of this problem, a special device is used - a thermostat, which is a device with a built-in temperature sensor. It allows you to turn off the heating element when a preset value is reached and turn it on again when the water begins to cool.
This ensures a stable microclimate without temperature changes. The use of modern technologies makes it possible to produce very compact and easy-to-use thermostats.
According to manufacturing technology, they are divided into two types.
Electronic . They are highly accurate (most of them are equipped with an information board). Disadvantages include the relative high cost and lack of reliability.
Mechanical .
They are found most often, are characterized by stability and reliability during operation, and are cheaper in price. They often distort real readings by several degrees, so to accurately adjust the device, you must use a separate thermometer.
Calculation of heater power depending on the volume and temperature of water
The key criterion for choosing a heater is its power. When choosing optimal indicators, you should be guided by the calculation of 1 W of power per 1 liter of water, but in practice the principle of 0.7-0.8 W per 1 liter is used. Before purchasing any heating equipment, you need to make several calculations and determine its operating parameters. The task will be simplified if these characteristics are indicated on the packaging.
So, the approximate volume-power ratio is as follows:
- For 10-25 liter aquariums, a 25 W heater is sufficient.
- With a volume of 30-60 liters, a 50 W system will be required.
- 75-watt units are effective in aquariums with a volume of 60-80 liters.
- If an artificial reservoir holds 80-120 liters, it needs to be equipped with a more powerful device with a power of 100 W.
- The 150-watt unit is intended for large aquariums of 120-170 liters.
- If the volume exceeds 280-300 liters, the optimal power will be 300 W.
Such a calculation is approximate, since when determining power it is necessary to take into account the required difference between the temperature of the water and the surrounding air.
Experienced aquarium owners choose 2 devices with half power and place them in different parts of the tank. This promotes uniform heating and allows you to monitor the temperature manually.