How to connect?
There are two ways:
- network;
- local.
Usually, a connection via a cable is enough to work; then the device itself recognizes the printer. All that remains is to install the software, or download the driver or program, which is usually included on the disk included with the printer itself. After installing the necessary applications, you can print.
However, this is not always the case, especially in Windows 7. The owner will have to configure the equipment himself and force his PC to recognize the connected device. Drivers are usually included with the printer.
Opening the Printer Settings Window
Open the HP print driver window in standard Windows applications and learn how to navigate through the various tabs and menus.
- Open a document or photo on your computer, click File or the menu icon, and then click Print. The Print or Print Images opens with general settings for your print job, including a menu for selecting the printer to print to.
- Open Document Properties or Print Settings in the main window or print panel to access HP print driver settings. The name of the button or link varies depending on the application you are printing from.
- Microsoft Word : Click Printer Properties
- Paint and WordPad : Click Settings
- Windows Photo Viewers : Click Options... in the lower right corner of the screen, then click Printer Properties... in the Printing Preferences window
- Adobe PDF Reader : Click Properties
- To view the various settings, click the tabs along the top of the window. To access additional settings, click the Advanced button, which is usually located on the Layout . Rice. : Example of the printer “Document Properties” window
- If the Print Shortcut tab is available, click it to use shortcuts that are already configured for common types of print jobs with all the settings you need. You can also create your own shortcuts for subsequent print jobs.
Settings for color and black and white printing
The HP driver can be used to control how the printer perceives colors and uses ink to print. For best results, edit the photo or document in the application where it was created before printing to improve colors, brightness, contrast, and any other appearance settings.
| Settings and options | Countries/Regions |
Choice of color or black and white printing:
| Select Color or Black & White from the Paper/Quality tab. On the Color or Features tab, or under Advanced Options, click the menu button next to Grayscale Printing and select Off. for color printing, High-quality grayscale printing, or Black ink only Under Printer Features on the Advanced tab |
Color Management Options: Determine the range of colors to print based on industry color standards and the application you are printing from. The print driver converts the colors from the current color settings to the selected option.
| The Color Management or Color Space menu on the Color tab. The Image Color Management menu on the Advanced tab. |
| Advanced color settings : Adjust saturation, brightness and hue, or change the levels of individual colors. | Color Attributes or Advanced Color Settings or Advanced Color Options sliders |
Settings for paper type, size, and input tray
Settings for paper type, paper size, and tray allow the printer to properly handle and scale paper print jobs. The paper type and size are included in some Printing Shortcuts when available.
Note: When loading paper in the input tray, wait until you are prompted to confirm the paper type and size you loaded if your printer has a text or touchscreen control panel.
| Parameter | Countries/Regions |
| Paper Type : Set the type of paper you are using, such as HP photo paper, plain paper, and specialty media, to ensure the printer handles and prints the paper properly. Select Automatic to let the printer automatically select the paper type if available. | Type, Type Set, Paper Type, or Media on the Paper/Quality or Features tab |
| Paper size : Select the size of paper loaded in the printer, such as 4 x 6, legal, or 8.5 x 11 plain paper. Check the paper sizes supported by the printer. Some newer printers support additional paper options. For more information, go to Creating custom paper sizes. | Size menu, Set Size or Paper Size under Advanced Options on the Paper/Quality or Features tab |
| Paper Tray or Source : Select the tray you loaded paper in if your printer has multiple trays. If the Automatically select option is available, select it to have paper come from the main tray. If the main tray is empty, paper will come from another full tray. | Source menu, Source Selected or Paper Source on the Paper/Quality or Features tab |
Via network cable
Connecting a device via a network cable involves several steps.
Stage 1
- One end of the wire is connected to the printer, and the other to the system unit.
We connect one end of the wire to the printer, and the other to the system unit - Click the Printscreen button. The device will “spit out” the sheet with the IP address.
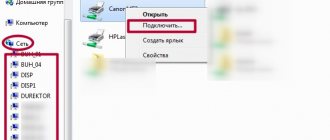
Press the “Printscreen” button on the printer - On the PC, press the start button, the printing devices section, as in the picture.
Expand the “Start” menu, open the “Devices and Printers” section - Click the “Add Printer” button located at the top.
Click the “Add a printer” button at the top - The installation wizard will ask you what type of device you are connecting to. Select the first item in the window. That is, a local device, with a note that its use is permissible only in the absence of a USB printer.
Click on “Add a local printer” and click “Next”
Stage 2
- A window will appear where the system will ask you to select the port for the connected device. In the field, click create new.
Oh, click “Next”On a note! In the English version, “Use the following” means select the proposed one, the second means “Create a new port” - set up a new one.
- From all the available options, after clicking the corresponding line, select “Standard TCP/IP Port”. Confirm with the “Next” or “Next” button if the selected language is English.
Select “Standard TCP/IP Port”, click “Next” - The system will prompt you to select an IP address. The piece of paper with IP printed out at the very beginning will come in handy here. The numbers from it are entered into the form. All that remains is to confirm the action by clicking on the “OK” button.
In the “Port name” field, enter the printer’s IP from the printed sheet, click “OK”
Stage 3
Now the lack of a driver separates the user from using the device as intended. To search, click the “Browse” button, update center. Windows itself will download what you need.
Select your printer in the list, click “Windows Update”
Attention! The Internet must be available for this!
Stage 4
All that remains is to designate who will have access to the device:
- open the device properties by right-clicking on the printer name icon;
Right-click on the printer icon, then left-click on the line “Printer properties” - and in the “Access” tab, mark the item for sharing the printer.
In the “Access” tab, check the box for sharing the printer
Connection in Mac OS X
This instruction is for those who prefer Apple products. In this case, the algorithm will be slightly different.
- The first thing a computer owner needs to do is check that all necessary updates are installed on the PC. That is, drivers and patches of the latest version.
- Find a convenient location for the printer and make sure there is no tension on the wire.
- Connect the printer to a power source and turn on the device. Turn on your PC and wait until the system boots completely.
- Connect your PC and printer using a cable. If the computer is not equipped with standard connectors, then you will have to buy an adapter, clarify this point and take care of the availability of additional elements in advance.
- As soon as the computer recognizes the device, a dialog box will appear. Click the "Install" command.
- Wait for the process to complete. In some cases, you will have to confirm several times in a pop-up window.
Now the setup is complete, you can start printing.
How to connect a printer to a computer with a software disc
Most printer models that have complex installations come with CDs that contain all the software for the corresponding device. In this case, you need to perform only three steps one by one.
| Stages | Description of actions |
| Connecting all wires | To do this, insert all cords correctly into the appropriate connectors on the printer and computer. Connect power. |
| Opening a CD | Start your computer, insert the CD into the drive and wait for it to load on the screen. |
| Software installation | Following the instructions, complete all the steps by clicking the “Next” button, and also select the installation method: “Automatic” or “Manual”. Once installation is complete, restart your computer. |
Many printer models are compatible with tablets and smartphones, so control is convenient using these gadgets. The functions of such software include: selection of print type, number of copies, sheet orientation, etc.
Wi-Fi and Bluetooth connectivity
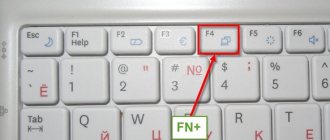
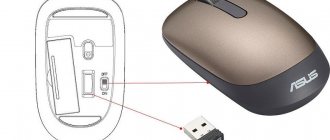
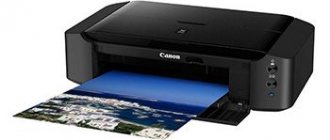
There are models of MFPs, inkjet printers and laser printers that support connection using wireless technologies. For example, you can take the Canon PIXMA G3400 inkjet, which has the ability to connect via Wi-Fi. A small nuance should be taken into account: this device connects to a Wi-Fi router using WPS technology. Therefore, you need to buy a router that supports WPS, and this feature must be enabled on it. The following figure shows how to enable WPS on the D-Link DIR-615 router.
Next, to connect your Canon PIXMA G3400 to a wireless network on Windows 10, you will need to follow these steps.
- Turn on the device to the network and press the button marked “Wi-Fi” located on it. Keep it pressed until the orange LED flashes once. After this, the blue Wi-Fi indicator will start blinking, indicating that the device has started searching for a wireless network.
- At this stage, you will need to connect the router to your inkjet machine (laser machine). Press the WPS button on it and hold it until the blue indicator on the inkjet stops blinking and begins to glow steadily. This will indicate that the printer has connected to the Wi-Fi network.
- Next, it is necessary for the OS to see the equipment. To do this, through the “Start” menu, select the “Settings” tab, after which a new window will open.
- Select the “Devices” section and click on “Add a printer or scanner”. The system will begin searching for equipment and ultimately display a link “The printer you need is not in the list,” which you will need to click.
- Next, you should place a marker near the item, as shown in the following figure.
- By clicking the “Next” button, a search for equipment (Bluetooth or Wi-Fi printer) will start. Select the required found equipment and click “Next”.
- After this, the necessary drivers will be installed and the equipment will be ready for use.
Settings on your computer
All that needs to be done right away is to designate the printer as the main one and provide general access to the device.
To set as default, right-click on the icon and select “Set as default”.
Now, when you send a print job, you won't have to select the current device every time. The printer will be immediately selected to complete the job.
The setup only makes sense when you have several printers added to your computer. If one printer is connected, all jobs will go only to it.
To give access to the device, go to “Printer Properties” and on the “Access” tab, check the box.
Additionally, to share the device on the network, you need to enable sharing of folders, files, and printers. To do this, open the control panel. In all versions of "windows" the "control" command will work.
Open the “Network and Internet” section, then “Network and Sharing Center”.
On the left side of the window, click on the “Advanced sharing options” link.
Turn it on everywhere.
Using a print server
A print server is a small device that connects to a local network and a printer, and then allows all devices on the network to access that printer.
It is worth keeping in mind that the word “print server” has very many meanings. Some equipment (for example, routers or switches) have a print server function - that is, they have a special interface and web configurator for connecting the printer to a local network. A print server is also called software that allows the computer itself to become such a server. In general, to avoid confusion, below we will call “print server” only the individual devices themselves that perform only this function.
The cost of print servers ranges from 2 to 5 thousand rubles
The main problem with print servers is compatibility. Typically, these boxes are produced by the manufacturers of printing devices themselves - for example, print servers from Canon, Epson, and HP LaserJet are very popular. However, they are usually only able to work with their own printers. Therefore, before purchasing, be sure to find out what devices the print server you are targeting supports. This information is always available on the box manufacturer's website.
How to use a print server? It’s very simple - you need to connect a printer to a USB port, and connect the print server itself to a local network router using a patch cord. Details of connecting to the network may vary from manufacturer to manufacturer, so here we will direct you to the operating instructions - they always cover this point in detail. Most print servers also come with disks for quick installation. The print server is usually configured, like routers, through the web interface.
After this, all computers connected to the same local network will have access to the printer. There is no need to install drivers or configure access - that’s the beauty of special equipment.
General recommendations on how to connect a printer to a computer in several ways
In most cases, a printer is a universal device and offers its user a lot of additional functions. Accordingly, such equipment can be connected to a PC using different methods:
- Wired connection . This method is carried out by connecting two devices using a USB cable. To do this, connect the supplied wire with a standard output to the USB connector of the computer case, and the other to the corresponding socket of the printer.
- Wireless connection. Bluetooth and Wi-Fi modules may be involved here. Of course, this method is available for devices equipped with similar functionality.
- Opening the "Sharing" option. This method is useful if you need to print from an additional PC, and the printing device is programmed for a desktop computer.
- MFPs are connected to a computer in the same way as single devices
- Connect via built-in features . For new home PC models, the easiest way to connect a printer is assumed. To do this, you only need to turn on both devices and connect them with a cable, after which an “installation wizard” will appear on the monitor, which will independently recognize the printer and install the necessary software.
- Using drivers . You can find them on the disk that comes with your printing machine, or on the website of your printer manufacturer. But for this you need to accurately indicate the model of the device.
The methods for connecting your computer and printer to each other may vary depending on the type of operating system installed. Only the most important stages differ.
Via router
The printing device can be connected to a local network and via a router if it has a USB port. In this case, you need to turn off the printer and router, connect them with a USB cable, and then turn them on again.
If the printer can connect to Wi-Fi, then you can do without wires. In the printer menu, find the desired network, enter the password for it and connect. Detailed instructions on how to connect to Wi-Fi specifically on your model will be in the user manual for the device.
This connection has a number of disadvantages. Firstly, the performance of the printer strongly depends on the router firmware - it must be updated regularly, and if after the update the printer stops working, it must be rolled back. Secondly, drivers for the printer will have to be installed on each PC that is connected to the network. Thirdly, in Russian apartments the router is often located in the hallway. Putting a much bulkier printer there is not the best idea. Therefore, for home use, it is better to abandon the router in favor of a regular cable connection to the computer.
Settings
All devices connected to the router's network will be able to access it after a short setup process:
- Click Start - Control Panel (Windows 7) or right-click Start - Control Panel (Windows 8, 8.1 and 10).
- Select "Devices and Printers".
If you have difficulty finding the item you need, enter it in the search box
- Now click on “Add a Printer”.
The required button is located at the top of the window
- The search for the printer will begin, but we are not interested in it. Immediately click “The printer you require is not in the list.”
Searching for a printer will not give us the desired result, so we can skip it
- In the window that opens, select the third item - search by TCP/IP. Further.
If you connected the printer to the router, then this is the only way we can recognize it
- Select Device Type - TCP/IP. Enter 192.168.1.1 twice. If you use a different address to access your router's web interface, enter it. Do not check the “Poll the printer” checkbox. Click Next.
Here you need to enter in the fields a combination of numbers that opens access to the router’s web configurator - usually this is 192.168.1.1
- Now check the “Special” checkbox and then click on “Options” next to it.
Here we can set some parameters manually
- Check the LPR checkbox and enter any name in Latin in the “Queue name” field. For simplicity, you can enter the brand of your PC. Click OK.
Do not change anything else in this window - this may cause the printer to not work.
- You will be returned to the previous window. Without changing the checkbox, click Next.
- Windows will now ask you to install drivers. If you have a disk with them, install the software from the disk - it will be easiest. If not, then download the drivers from the official website of the printer manufacturer.
- After installing the driver, the system will ask you to name the printer. You can call it whatever you want.
- Steps 1 - 11 must be performed on each computer that will use the network printer.
Connecting the Printer to a Windows PC: Basic Features
Connecting a printer to a personal computer requires care, because one wrong step can lead to malfunctions of both devices. We bring to your attention the exact connection algorithm:
Stretching the cable connecting two devices cannot guarantee their quality connection
USB to AMBM cable for printer
- We unpack the printer and install it in a designated place not far from the PC. Make sure that the connecting cable is sufficient for a good connection with the connectors. Connect the power cable to a 220 V socket.
- Start the operating system, wait until it is completely loaded, and then click the “Enable” icon on the printing device. In the lower right corner you will see an icon indicating the search and automatic installation of drivers (typical for new PCs).
- Next, go to the Start menu (this is the button in the lower left corner of the screen). Then go to “Settings”, then “Devices and Printers”. If your printer doesn't appear, click Add Device.
- Then select the name corresponding to the brand of your device from the list and follow the instructions, confirming your agreement by constantly pressing the “Next” button.
Each software has a license agreement. You need to familiarize yourself with it to correctly install the printing device.
Installing drivers
If the Windows system does not automatically install the drivers, then you need to do it manually yourself. The printer will not print without special software. An excellent scenario for you is to have an installation disk. If the device is not new or comes without a disk, then the situation is more complicated.
Using the installation disk
In the box with the equipment there should be a disk with drivers, or maybe several for different operating systems and types of systems. The installation process is very simple:
- Find the correct type of disk. Must correspond to the OS version and its bit depth.
- Insert it into the drive and wait for the installation wizard to autostart.
- Follow the program's instructions.
- Choose customizable settings to suit your needs.
If there is no disk
There is also a way out of this situation, and even several.
- You can download the driver on the website of the manufacturer of your device model. Cybersecurity experts recommend downloading any software from the original source sites. All you need to know is the exact model name. It is indicated on the product itself or its box. After downloading, run the exe or msi installation file and follow the instructions of the installation wizard.
- You can also use the built-in driver database in the Windows system itself. This database is available in any version. Through the control panel, go to the devices and printers section. Click on the button to install a new device.
In the first window, select installing a local printer.
At the next step you will be able to select drivers for your model.
Follow the prompts and click “Next” everywhere. After the installation is complete, we find this new device in the list. Using the context menu, remove the newly installed printer.
We turn on the device, wait a bit and try to print. - Enable automatic detection and installation of software for any connected device. In the “Devices and Printers” section, you need to find your PC in the list. In the context menu, select “Installation options”. In the window that opens, agree to automatic downloading.
We reboot our computer, wait for the system to try to download drivers from the Internet on its own.
The printer is set up for Windows but needs to be used on a Mac
Sometimes this happens: the printer is connected to a gadget running Windows, but you need to connect it to a Mac. To do this, you need to change the printer from a local one to a network one.
- the algorithm is similar to the previous one, the difference is that in the printing equipment subsection, select the “Windows” tab;
Select the “Windows” tab - after scanning, the service will display the computer name and printing device identifier. There are difficulties with provision. After clicking on the printer and in the “Used” field it would be necessary to decide on the security. But often the user does not know which driver to choose. It all depends on whether there is “native” software for the device. If there is none, they settle on the universal option: PostScript, as in the photo;
Click on the printer, then in the “Use” field. select “PostScript Shared Printer”On a note! It’s better, of course, to stop at the point of selecting software - the service itself will recognize and install it. You can download the driver yourself, but only from an official or trustworthy source.
- When the software is installed, click the “Add” button.
Click the “Add” button
The printer will successfully appear on the desktop and you can print everything you need on it.
Printing from a smartphone
Modern phones have a built-in operating system. It can be IOS or Android. Setting up printing from a smartphone or tablet involves connecting a printer in one of these mobile operating systems. As is the case with Windows, there are two connection methods:
- A direct connection via cable will require the use of a special adapter.
- Network access requires the installation of special applications. This could be AirPrint for Apple equipment, Google Cloud Print for Android systems, software from printer manufacturers - ePrint from HP.
All methods of connecting a phone or tablet to a printer and setting up printing via Wi-Hi. A detailed description of the options for all possible options to 'make friends' with Android or IOS equipment with your printing equipment.
The nuances of connecting a printer to MacOSX by sharing it over the network
This operating system has some differences, so if you need to share the printer for public use, you need to complete all the steps up to step four from the previous section, after which we move on to the next step:
- Open the Apple system menu and go to “System Preferences”, “Printers and Scanners”, click “+” in the list that appears.
- Go to the Windows tab at the top of the new window that appears. Here, enter the name of the printer that you want to make accessible to all home PCs.
MacOS is a custom system, so connecting your printer to it will be slightly different
Setting up a printer with a computer running an Apple operating system is similar to traditional computers. The difference between connections via cable or wireless network Bluetooth or Wi-Fi for MacOS is obvious. Here it is important to follow the instructions and know the technique for connecting devices on standard WindowsXP.
Setting up an ink jet (laser) for printing
To configure the device, you need to go to “Devices and Printers”, right-click on the desired equipment and select “Printer Properties”. To check the functionality of the machine, click on “Test Print”.
By clicking the “Print Settings” button, you can select the paper size and determine the page orientation, as well as the print quality.
How to turn on the default printer
Sometimes it happens that several printing devices are connected to the computer. But if you use one of them most often, then constantly choosing it from the list is very inconvenient. The problem is solved in a fairly simple way: you need to add the desired inkjet (laser) to the default devices:
- open control panel:
- open the “Printers and Faxes” section;
- Double-click on the required equipment and check the box next to the “Use as default” line.
For convenience, make a shortcut to the “Printers and Faxes” folder and place it on your desktop or pin it to the Start screen in Windows 10.
Setting up a print queue
Print queue management allows the user to control all documents in its list . Thanks to this service, you can re-select and send a document for printing at any time. You can also put it in “Favorites” so that you don’t have to send it for printing next time.
There are 3 types of print queues:
- general - all PC users can perform any tasks;
- direct - you can print out a document from the designated equipment;
- secure—printing the document will not be possible without authorization.
In the event of a failure, the inkjet printer (laser printer) may refuse to print documents from the queue, or will print the same document without moving on to the next one. In this case, the queue can be cleared by double-clicking on the icon of the desired device in the control panel. Next, click on the “Printer” menu and select the “Clear print queue” line.
Setting up color printing
Setting the color profile is a very important step for high-quality color reproduction when printing. You might have seen, for example, in the device settings for printing, the choice of either glossy paper or matte paper. Each type of photo paper has its own color profile in the form of a special file containing specific commands for the inkjet printer.
Color profiles for the ink or paper used can be downloaded from the Internet and installed on your computer.
You can also set up color printing manually, by trial and error, creating your own profile for the highest quality color reproduction. To do this, use the inkjet driver. For example, setting up a Canon inkjet driver will look like this.
- First, open the printer driver window. Click in turn: “Control Panel” and “Devices and Printers”. After that, right-click on the desired equipment and select “Printer Properties”.
- Select the Main tab and select Manual color settings, then click on “Set...”.
- In the manual color settings window that opens, check the box next to “Print a pattern for color adjustment” and click on the “Pattern Print...” button to set the printing parameters.
- After opening the next window, select the options as in the image below. By the way, the paper size may be different, for example, A4. After making changes, click OK.
- Make a test print by clicking OK on the (Main) tab. A sheet will be printed with several images in which the color balance will vary.
- Having looked at the result, you should select the image with the best (natural) color rendition and remember the values that are written under it.
- In the color settings window, enter the color balance values that were indicated under the picture opposite Cyan, Magenta and Yellow.
- Uncheck the box next to “Print a pattern for color...” and print the image you need.
Now printing will be done taking into account color balance adjustments, and images will look better and more realistic. Print driver windows from different manufacturers may differ in the set of commands and button layout. But in general, the algorithm for adjusting the color balance is similar, and its implementation will not cause any particular difficulties.
If the PC does not see the equipment
It often happens that even after connecting, a device from a reputable company sits and shows no signs of life, and it is not possible to start printing from a computer for the simple reason that the PC or laptop does not see anything printing. You should not immediately make claims against the manufacturer or seller - most likely, this is not the case.
The answer to the question why the system does not see the device may lie in the following:
- the owner did not follow the connection algorithm and made a mistake;
- another printing device is connected, which the system recognizes as the main one;
- The print service does not work;
- no corresponding software;
- The port is clogged or the cable is damaged.
- Reasons why the computer does not see the printer after connecting
There are different methods for resolving these incidents. First of all, if the printer does not “come to life”, and the system does not read it at all, you should re-read the instructions again and make sure that your actions are correct. Or all the rules are followed, but the owner completely forgot about the driver. It is possible that the owner did not push the wire all the way through when connecting, and therefore the devices did not come into contact.
Driver problems are one of the most common reasons why a computer won't recognize what's connected to it. “Native” software is most preferable. At a minimum, from a credible source. Many users choose it at random: they open the first site they come across, download it and consider the matter settled.
This is a fundamentally wrong approach. A foreign driver will not fix the problem and the device will remain “lifeless”.
If the problem is the wrong driver, the system will display the following message.
Error when downloading the wrong driver
It happens that the driver itself does not work correctly - it should be removed and a new one downloaded. Usually the issue is resolved at this stage.
If the user is convinced that all connection steps were carried out according to the rules, the connectors and wires should be checked and cleaned if necessary.
On some PCs the print service is deactivated. In order to fix:
- Open “Control Panel” in the “Start” menu.
- In the “Start” menu, find and open “Control Panel”
- Next is the “Administration” tab.
- In the “View” mode, set “Large icons”, find and click on the “Administration” service
- In it, select the “Services” subsection.
- Expand “Services” by double left clicking the mouse
- You need to find “Print Manager” and double-click on it with the left mouse button.
- Find and open the “Print Manager” service
- The service is activated by selecting a startup type or the appropriate command. In this case, set the “Automatic” option.
- We set the automatic startup type, if the service is disabled, click “Run”, then “Apply”, then “OK”
If this is the only problem, the printer will work. Sometimes something else happens: everything is connected correctly, but the system takes the user to the wrong printer, but to another device.
So, the printer can be connected to any computer and configure the appropriate access options. It is important to follow the instructions and if something does not work, it most likely means that the user performed the wrong action. If there is no doubt about the correctness, it’s worth calling a professional.
Video - How to install and connect a network printer to a computer
Sources
- https://printeru.info/podklyuchenie/sposoby-ustanovit
- https://useron.ru/kompyutery/208-kak-pravilno-podklyuchit-printer-k-kompyuteru-sposoby-instruktsii.html
- https://SmartBobr.ru/poleznosti/kak-podklyuchit-printer-k-kompyuteru-poshagovaya-instruktsiya/
- https://strana-it.ru/kak-podklyuchit-printer-k-kompyuteru-rukovodstvo-na-vse-sluchai/
- https://tehno.guru/ru/kak-podklyuchit-printer-k-kompyuteru/
- https://naseti.com/o-routerah/podklyuchenie-printera.html
- https://pc-consultant.ru/raznoe/kak-podkljuchit-printer-k-kompjuteru/
Possible connection problems
Many people have encountered errors when trying to connect a printer to a computer. To properly switch devices, it is necessary to urgently solve the problem that has arisen, and therefore find the cause.
If you do not see your device in this tab or it is not working correctly, you need to look for the cause of the failure
If the computer does not see the printer: what could it be?
Have you bought a new printer, but when you try to install the device to work via a computer, it is not visible in the devices? Most likely, the problem is in the installation disk, or more precisely, that the drivers on it are outdated. In this situation, you can download a more recent version of the utilities.
If antivirus is enabled on your OS, the program can also block the connection being created. Therefore, temporarily disable the application and restart your PC. If this action does not help, check your PC for viruses, and, of course, check that all cables and settings are connected correctly (if it is wireless switching).
Physical connection with USB cable
A USB cable is the most common option for connecting a printer today. Outdated LPT or COM are practically no longer used. The essence of connecting with a cable is to establish physical contact between devices through a wire.
After unpacking the new device, you may not find the required cable in the box. The fact is that many manufacturers do not include such a cord with their products, especially if it supports other connection methods. The cord is easy to buy at any computer store and is very inexpensive. If everything is in stock, then we can start.
- Unpack the box. Carefully slowly remove the device and free it from the protective tapes. Pay special attention to the cartridge in this regard.
- Find the USB input at the back. It is square shaped and looks like an Ethernet input. Do not mix it up so as not to damage the equipment.
- Insert the second end of the cable, where the plug is flat, into the corresponding input on the computer. We recommend not using interfaces on the front panel of the PC.
- Connect the power cord to the printer and plug it into a power outlet.
- Apply power to the device by pressing the corresponding button on its body.
- Wait a while for the system to be able to “see” and identify the device.
- Check the result by printing any document.
How to scan a document or photo, make a photocopy on a printer: step-by-step instructions
You can see a printer in almost every home. This device has become an integral part of our lives. Every day a person needs to print out a task, photocopy documents on a printer, etc.
Today, there are many new generation devices on the market called multifunctional devices (MFPs). They not only speed up work, but also save space and money. How to scan a photo to a computer?
Previously, before the advent of these devices, people had to purchase several devices in order to separately perform the functions of copier, scan and print. This took a lot of time. Now we can freely and in a short period of time, from one device, photocopy or photocopy a document.
Where can I buy an MFP?
MFPs can be purchased in special stores specializing in technology, such as Eldorado, M.Video, etc. Or in online stores, for example Ozon.
List of printer-scanner models:
- Sharp
- Samsung
- Ricoh
- Panasonic
- Kyocera
- Xerox
- HP
- Epson
- Canon
- Brother
Of the presented manufacturers, MFP produces models of different price categories. Mid- and high-end products have a sufficient list of features.
In order to determine the type of printer, you need to look at the device body. If the top cover is equipped with special glass, then this device is an MFP. If it is equipped only with a paper tray, it is usually a printer.
Learning to use the scanner yourself
What is a scan and what does a copy mean?
Scanning (scanning) is a process that converts paper documents into electronic form.
Scanning, photocopying, printing - all this speeds up work in office work and more.
Photocopying is the exact reproduction of information (copying) and the production of duplicates on paper.
How to use the scanner?
2 options for scanning a document to a computer:
- Editable
- Not editable
Editable document - a scan of the document is loaded through a recognizer (special software)
A non-editable document is a scan of a document that turns any text document into a non-editable image.
Preparing for work
Preparation starts with the scanner:
- Check the connection of the scanner to the computer.
- Plug in the device and press the power button
- After turning on, insert a disk (flash drive) to install drivers. Often such programs come bundled with the printer.
- If for some reason the disk is not included in the kit, you need to go to the manufacturer’s website and download drivers from the site.
After installing the drivers, decide what software you will work with. It will be impossible to scan documents without a scanning program.
Popular programs:
To check the capabilities of the scanner in the interface of any of the above programs, click - “File” - “Import”.
In the last branch you should see the name of the device, then it works properly.
Scanner
How to scan to a computer through the Windows Printer Wizard - MFP.
- Lift the lid
- If there are foreign bodies, wipe the scanner glass
- Place the sheet of text or photo face down
- Close the scanner cover
- Open the tab in the “Start” system and sequentially open: “Control Panel” - “Hardware and Sound” - “Devices and Printers”
- Right-click on the shortcut with the name of your MFP
- "Start Scan"
- Options: “Preview” - “Scan”
- The scanned document will appear in a pop-up window
- “Save”, or, if necessary, send the file for printing.
How to scan a document to a computer from a printer using special software.
- After installing the device data, open the program list
- Open the printer icon
- "Scan"
- Select format: black and white/color
- Select resolution
- Specify the folder to save the file
- “Preview” - “Scan” - “Save”
Here's how to scan a document to your computer from a printer.
How to make a copy of your passport
- Instructions on how to make a copy of your passport
- NECESSARILY! Remove all foreign objects (staples, stickers, covers, etc.)
- “Settings” - “Options” - “Grayscale” - “Resolution”
- Place the document face down
- Place the document (passport) closer to the edge, moving 3-5 cm from the edge
- Close the lid tightly
- "Print"
- Using the frame, select the desired area, leave empty fields outside the limit, you can scan documents
- Select the desired format for saving the document to your computer.
for official data format –tif/bmp)
How to scan documents, photos and images
- Check for stains in the photo, as well as foreign bodies
- Place photo face down
- Use a scanning program (for example scanitto pro)
- Specify the type of scanning in this software (black and white/color)
- Set the format to "Photo"
- Set the resolution to maximum
- DO NOT make changes to the settings during the process, or lift the lid!
- Scan documents and images with the “Save” printer
- Select a folder to save photos
- A very simple diagram: how to make a scan of a document, photo and images
Save scanned documents.
- If the MFP application does not save the necessary scanned information, then press the key combination “Ctrl + S”
- Select a folder to place the scanned document in
- It is recommended to install programs that can easily help you save scans automatically (for example, Adobe Reader, DJVU Reaser")
- If after scanning the file turns out to have black fields, cut them off in the editor.
- Standard photo resolution: 150 dpi
- Permission for special certificates – 300
- jpg has a lower resolution than tif/bmp
optimize image parameters, change resolution (the higher it is, the larger the final file size)
A simple tip will help you figure out how to use the scanner.
How to scan with an HP printer?
HP - almost any person can find equipment from this brand. Easy to use, simple settings, convenient functionality. Let's move on to the mini-instructions on how to scan on an HP printer.
Method 1: Program from the HP package
- Connect the printer either via WI-FI or USB cable.
- Open the top cover
- Place the document face down
- Go to the “HP Deskjet” (“ScanJet”) program
- If the tool is not found, then reinstall it or load it through the disk that you provided (you can leave the settings as standard)
- "Save"
Simple steps to answer the question: How to scan on an HP printer.
Method 2: How to scan with an HP printer - Button on the scanner
- Repeat all the points above.
- Find the “Scan” or “Scan” button on the printer panel
- "Save"
(You can use analogues of the program if the license disk is lost).
How does the photocopying process work on a printer?
Photocopying is the exact reproduction of information (copying) and the production of duplicates on paper.
How to make a photocopy of documents?
- You will need an MFP
- Paper
- Refilling the multifunction printer
- Load paper into the input tray
- Clean the glass if necessary
- Place the document face down
- Align with the border of the guides (lines around the glass)
- Close the copier/printer cover
- Select print color from the control panel
- If you need many copies of the same document, click the Start button several times.
- (At one time, depending on the device, you can make from 1 to 20 copies at a time.)
- To change the paper format, press the “paper” button
What to do if the device does not scan?
- "Start"
- "Control Panel"
- "Administration
- "Device Manager"
- Find scanner name
- "Image Processing Devices"
- Click on + - this is how you will find the model name
- download the driver for scanning.
- If everything is in working order, but scanning does not work, then download or upload the program for your MFP.
You also need to check the operating condition of the device, namely:
- Power supply unit (wire)
- Visible damage
- Mains voltage
- Grounding electrical wiring
- Restore and check settings
MFP operating techniques
- Temperature compliance
- Maintaining air humidity
- Monitor ink levels
- Regular care
- Monitoring the state of the print head of the reading device
Managing printers in Windows 10
In order to find a printer on a computer in this version of the operating system, you can go in two ways. The first is using the command in the “Run” window. The second is through Windows Settings and the third is through the good old Control Panel. Yes, yes, it’s there in Windows 10, it’s just hidden a little further.
control printers command
This is the easiest and fastest way to get into “Printers and Faxes” on Windows 10.
To begin, press the Win+R buttons on the keyboard at the same time.
Windows + R keyboard shortcut
The Run window will appear. Copy the control printers and click “Ok”.
control printers command
A window will appear with all the printers that are or have been connected to your PC.
Devices and Printers window in Windows 10
Windows 10 Settings
To use this method, you need to open the Start menu and click on the gear icon (Options) at the bottom left.
Windows 10 Settings via Start Menu
Next, select “Devices” and in the menu on the left “Printers and scanners”.
Devices in Windows 10 Settings
The printer is controlled by left-clicking on it and selecting the “Manage” button in the menu that appears.
All printers installed on the system
Devices and Printers in Control Panel
In order to find a printer on a computer in Windows 10 using this method, open the control panel, for example through the same “Run” window. To do this, simultaneously press the Win + R buttons on the keyboard and copy the command control panel
Windows + R keyboard shortcut
Control panel command to open the control panel in Windows 10
The familiar control panel will launch, where printers are managed through “Devices and Printers”.
Go to “Devices and Printers”
The best way to thank the author of the article is to repost it on your page
Where are printers located in Windows 10 How to find the printer you need on a computer with Windows 10 connected to the computer Managing connected printers in Windows 10
How to make a photocopy on a Canon, HP, Epson and others printer
Modern office equipment performs various operations with images and texts.
Converts them, corrects them, and then prints them. The purpose of this article is to help the reader understand how to make a photocopy on a printer. The features of such well-known models as Canon, HP, Epson will also be considered. A life hack will also be given - how to photocopy documents onto a computer if the device does not have a photocopier function, but can scan or has a separate scanner. Do you use a regular copier or do you want to make a copy on a scanner? Poll Options are limited because JavaScript is disabled in your browser.
- There is a computer, a scanner and a printer, but you need to make a photocopy. 67%, 34 votes
34 votes 67%
34 votes - 67% of all votes
- I have an MFP. 33%, 17 votes
17 votes 33%
17 votes - 33% of all votes
Total votes: 51
05.08.2019
×
You or from your IP have already voted.
The content of the article:
Making copies on printers with a built-in copier
If the printing device has a copier function, then in order to make a copy, you need to perform a few simple steps:
- Connect the printer to the network.
- Place the paper in a special tray for it.
- Lift the top cover and place the desired document or photograph on the working glass surface.
Note. The document is placed on the side that needs to be photocopied. It should be leveled, guided by the marks placed around the surface.
- Close the lid.
- Press the button on the printer panel intended for color or black and white photocopies.
- Set the required number of copies. This can be done using the button indicated in step 5 (by clicking as many times as you need to duplicate the file), or the button with the “+” sign (if available), setting the number of pages.
The number of photocopies of a document that can be made at one time depends on the model of the printing device or its functionality. For example, some printers do not print more than 20 copies at a time.
- To change the sheet format, the user can find the “Paper” button or another button responsible for changing the paper format. Then select the print format on the screen (regular A4, A4 photo paper, 10×15 photo paper).
- Select image quality (text, photo, text/photo). For a document with text, the “Text” function is suitable, since the letters will be clear and bright. If the document contains text with an image, then it is better to use the combined “Text/Photo” function. And when you need to copy only an image or photograph, the “Photo” property is used. Then it will turn out not darkened or light, conveying the quality of the original.
- Click the “OK” button and wait for the photocopying process to complete.
Do not open the cover during photocopying, as the image with text will be distorted, and dark spots will appear on the paper itself.
How to make a copier from a printer and scanner?
If the printing device does not have a built-in copier function, but it is possible to scan a document, then the scanner can be converted into a copier. To do this, the selected document is placed on the working surface of the equipment, scanned, processed on a computer, and sent back to the printer for printing.
To simplify the process of making a copy, you can download the free KseroLite program on the Internet and install it on your computer. Then the program starts. In the settings menu, click the “Select scanner” button. In the window that appears, the user indicates the source of the document. The user's printing device is then selected. The device must be selected “Default” in advance, through the “Start” menu and “Devices and Printers”, click on your printer and in its properties o.
After selecting the printing equipment, using the KseroLite program, print parameters are set - quality, color of the document. It is better to set the quality to medium, and in the color item select “Shades of Gray”. Next, the user in the “Photocopy of documents” item notes the number of pages to be copied and clicks “OK”. The process is complete.
Features of photocopying in models from different manufacturers
The operating principle of most printer models is no different from each other. Therefore, the user should not have any special problems with the copier. But some devices have their own characteristics that should be taken into account when working with the equipment. Below the reader will get acquainted with the most famous models of printing equipment and their nuances.
HP
HP brand equipment is reliable, multifunctional and easy to use. It is suitable for both offices and home. Many models have a built-in automatic paper feed function, so the document is not placed on the work surface on top, but in the sheet tray. Moreover, the document is placed upward with the side from which a copy needs to be made.
The maximum number of sheets that can be placed in the tray is about 35 pieces. But the device can only copy a document on one side. To photocopy the second side, you need to turn the sheets over in the tray. If the equipment does not have an automatic paper feed function, then the original is placed on a glass surface and the photocopy is made according to the standard principle. The original must be free of debris, dirty spots, dents, abrasions or scratches. Otherwise, the copies will be of poor quality.
Epson
To make a copy of an original using an Epson printer, it is not necessary to connect the device to a computer. It can work independently in offline mode. For photocopying, a high-quality original must be used. Both regular sheets and photo paper are suitable. If the document is thick and as a result the lid does not close, then it can be removed and, after the copying process is completed, replaced.
If during photocopying, the printer notifies you that the ink supply is depleted, then work can continue until the ink is completely used up. The text will still be clear and bright.
Canon
Operation of Canon model equipment is similar to previous brands. The equipment is multifunctional and capable of performing several tasks simultaneously. Canon has a long service life and quality equipment parts. One cartridge refill is enough to make about 5 thousand copies. The device can transmit not only primary colors, but also halftones.
The user can use the AutoOff mode if the equipment does not work for a long time - in order to save energy resources, as well as the duplex printing mode - for fast and economical work.
Conclusion
Using modern printers to photocopy documents is not that difficult. Even if the equipment does not have a copier function, the reader learned from the article how easily this can be fixed.