Ariston Academy names the main mistakes in connecting an electric storage water heater, which can put the tank in danger. Replacement of the original valve with an average check valve, complete exclusion of the specified element from the piping. In order not to repair the Ariston water heater with your own hands on an ongoing basis, as well as purchase an Ariston water heater on your own, again and again, know a couple of simple rules, which we will talk about casually below. The features of Ariston water heaters are limited by the lack of flow-through models. There is a magnesium anode everywhere, the tank is made of steel. It’s useful to remember when you get the hang of doing your own Ariston water heater repair.
About the brand
In the mid-40s of the last century, Aristide Merloni launched the production of electric water heaters under the Ariston (Successful) brand. The name fully justified itself, and after some time all the sons of the entrepreneur successfully entered into a similar business, and the youngest, Vittorio, inherited his father’s company.
The Ariston company today is one of the top three in terms of global sales of household appliances, and Ariston brand kitchens are sold with already built-in basic household appliances from the refrigerator to the dishwasher. In Russia, this company became famous in the late 90s of the last century, and now almost every major city has its service center.
Quality and weaknesses
Ariston water heaters have a stylish modern design, excellent functionality, and differ from analogues from other manufacturers at a reasonable price. Developers pay careful attention to the safety of products during operation: the units are equipped with various protections for all occasions, turning off the product in the event of a power failure, overheating, or lack of water supply.
But this reliable equipment suffers from the hardness of our water and quite frequent changes and surges in voltage. The weakest points, according to experienced craftsmen, are tubular-type heating elements, a magnesium anode and a check valve. These very simple breakdowns can be fixed with your own hands if you have the necessary minimum tools. The design of the product has a standard design, so prevention and repairs are not difficult.
The user should pay special attention to the integrity of the internal coating, where modern materials are used, which include titanium, silver-strengthening enamels, glass ceramics and other high-tech additives.
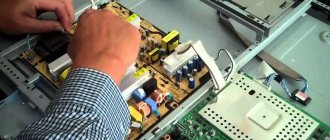
Preparation for repair work
Before disassembling the Ariston water heater for repair, it is necessary to study the design of the product, prepare the necessary tools, as well as various accessories. To repair mechanical damage, such as water leaks, you will need:
- a set of keys or one small adjustable one;
- a set of various adapters;
- new check valve.
If a malfunction occurs with the electrical part, you need to prepare a multimeter.
Preparation also includes the following work: disconnecting the device from the home electrical network, draining the water from the tank.
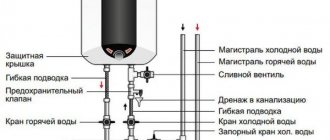
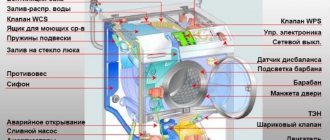
The tank in the Ariston water heater consists of the following main components:
- A heating element.
- Thermostat - designed to control the set temperature, as well as to adjust the heating mode.
- A relay that controls turning the heating element on or off.
- Special anode - it protects the internal coating from corrosion.
- Safety valve - regulates internal pressure when water is heated.
- Signal lights in budget models (they should turn on when current is applied) or electronics for more expensive products.
The home handyman should study the instructions in detail before starting maintenance or minor repairs in order to be able to navigate freely.
How to descale an Ariston water heater: detailed instructions
First of all, the tank must be descaled, because it constantly contains tap water with salts dissolved in it, so the appearance of scale is inevitable. Next you need to clean the heating element.
To work you will need:
- Soft textiles.
- descaling agent.
- Hose.
- Sponge coated with abrasive material.
- Water.
It’s easy to descale your tank:
- Remove significant dirt manually.
- Use a hose to flush the tank. Water pressure is average.
- Then soak a soft cloth in the descaling solution and wipe the inside of the tank.
After cleaning the tank is completed, proceed to work with the heating element:
- To clean the heating element, you need to use a sponge with an abrasive.
- Some people advise using a knife, but this is not advisable. Of course, you will clean the scale, but the risk of damaging the part is quite high.
If the heating element is not only dirty, but also damaged, cleaning it loses all meaning. You need to buy a new heating element and install it on the tank.
As already mentioned, there is no need to clean the magnesium anode - its working life is 1 year, so it simply needs to be replaced. The price for this part is low, so this procedure cannot be called expensive.
Cleaning of the device is completed. All that remains is to reassemble the boiler and connect it to the electricity and water supply networks.
Basic faults
According to statistics, during operation of the Ariston boiler the following typical malfunctions may occur:
- no water heating - the heating element has burned out;
- The thermostat needs to be replaced;
- the magnesium anode has completely used up its assigned resource;
- A large layer of limescale from heating elements formed.
If these malfunctions occur, in addition to the second option, you need to completely disassemble the product.
There is absolutely no difference what size Ariston water heater you have - 50 or 100 liters, the dismantling process will be identical.
Ariston water heater thermostat
How to choose the right mechanism
Heating element for Ariston boiler
How to read the designation of the heating element, for example, heating element - 32 A 13 / 1.5 J 220 where:
- TEN – tubular electric heater.
- 32 – expanded length of the heating element along the shell.
- A – designation for sealing the contact rod.
- 13 – diameter of the heating element shell.
- 1.5 – rated power in kW.
- J – designation of the heating medium and heating element material
- 220 – rated voltage in V.
If you follow the markings, you can find the right model quickly and without unnecessary nerves. And for this you don’t need to walk around with a centimeter or carry a broken product with you. It will be enough to compare the data on your heating element and the one you are going to buy.
When choosing a heating element for an Ariston boiler, you should pay attention not only to the price, but also to the design differences. It is also necessary to take into account the operational characteristics of electric heaters
Having a stable voltage and proper operating conditions, a “wet” heating element will last on average 5 years, and a “dry” one – 15.
The company recommends purchasing equipment for replacement in factory-made water heaters and according to the existing model of the unit.
Heating elements with a power of 1.5 kW are more common for Ariston boilers. They are often used in equipment with a volume of both 20 liters and 100.
Engineers categorically do not advise replacing a low-power heating element with a more productive one, since the water in the equipment heats up to 85 degrees and the boiler turns off. And high power disrupts the operation of the device and increases the cost of each water heating.
When choosing a heating element, you should also pay attention to the flange. Threaded - thanks to the existing thread, the heater is attached to the boiler by screwing
The thread diameter is 1 1/4 inches. Clamping ones - come in the following diameters: 62 mm, 72 and 82 mm.
For dry heating elements - they are made of enameled metal, almost always in pairs, and have closely spaced contacts with a “petal” type fastening.
We carry out dismantling
Every owner of Ariston water heaters should know that when replacing the thermostat, relay and safety valve, dismantling the tank is not required. Draining the water and completely disassembling the boiler is carried out only during maintenance work and when replacing a burnt-out heating element.
Disassembly of the product is divided into standard stages:
- Disconnect the water heater from the home electrical network.
- Drain the water from the tank.
- Remove the flanges and gain access to the inside of the water heater.
Before disassembling the product, you need to make sure that it is disconnected from the network: if the heater is powered by a separate line, then you need to turn off the circuit breaker, but if it’s just through a cord, then simply pull out the plug from the socket.
Some readers may wonder: why emphasize these points so often? But statistics say that during home repairs or when replacing burnt out parts, very often craftsmen who neglect safety precautions receive electrical injuries of varying severity.
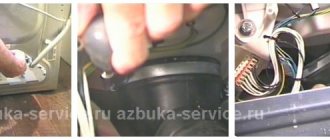
Only after turning off the power can you begin dismantling the Ariston boiler with your own hands:
- unscrew the cover, which is secured with screws;
- before starting dismantling, take a photo of the location so as not to confuse anything during assembly;
- disconnect the three-wire cable, the first two wires - phase and neutral were connected to the thermostat, so you can carefully remove it.
All electrical work has been successfully completed, and you can begin draining the water from the tank.
Removing the thermostat
Removing water
If the initial installation of the water heater was carried out by a service technician, then he had to install a special tee with a drain tap and screw a fitting into it. Quite a convenient device - the user easily connects the hose, as shown in the photo, and drains the water into the bathroom. In the absence of a special device, water is removed by connecting a hose directly to the nozzle of the product.
Need to know! To balance the external and internal pressure, it is necessary to open the hot water tap.
Draining the water can take several minutes if the heater capacity is up to 50 liters, and when you have an 80-liter Ariston, the wait will last up to 30 minutes or more.
Hose with fitting
Opening access inside
All modifications of products under the Ariston have an oval flange on which heaters, a magnesium anode and a tube with a thermostat inside are installed . An elastic rubber gasket is placed on the flange body from below to ensure tightness. The flange is secured with a U-shaped strip, which is secured with a nut.
We unscrew the nut, carefully push the flange in, turn it and pull it out. Next, the failed parts are replaced and the surfaces are cleaned of salt and lime deposits.
Attention! Do not make any effort when cleaning the boiler tank: over time it becomes thinner due to the effects of corrosion. When performing preventive maintenance, it is advisable not to clean off thin scale.
Remove excess debris at the bottom of the tank, visually inspect the rubber seal, if everything is in order, then do not change it - it is very expensive, and it is very difficult to get a new one. Dismantling and subsequent assembly can be done independently by any user without special training. We attach this video to help:
The operation statistics of similar heaters allows us to conclude: regular inspections of the wear of the magnesium anode, cleaning of the heating elements, and preventive maintenance of the internal coating of the tank must be done regularly and by doing this you will significantly extend the service life of the product.
Central nut 55
If you need to disassemble a water heating tank, in which the heating element is secured at the bottom with a large hex nut, as in the photo below, you can do everything quickly.
First of all, disconnect the boiler from the power supply and water supply. Before unscrewing the flexible hoses, be sure to turn off the cold water supply. After disconnecting, you need to drain the water from the water heating tank, which can be easily done using this video instruction:
When the water is drained, you need to disassemble the bottom cover of the water heater housing, which is usually attached to 2 self-tapping screws. Under the cover you will find this large nut and the thermostat, which also needs to be removed by disconnecting the terminals that go to it. Now that you have free access to the nut, take a gas wrench No. 2 or a hub wrench 55, both can be seen in the photo:
Symptoms of a problem
Many models of water heaters are equipped with an electronic display on which various error codes are displayed. You can decipher them using the instructions. Visually the user can identify the following faults:
- The product does not turn on - the circuit breaker has tripped;
- the water is very hot - the thermostat has burned out;
- drips form in the lower part of the tank;
- if when the product is turned on, the plug heats up - this is a signal that the power of the socket is low.
Some users do not suspect that the boiler may not turn on due to a burnt contact in the socket, which indicates its low power or lack of grounding.
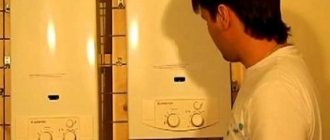
The lineup
The Ariston brand produces many models of water heaters. Positive customer reviews clearly prove that this brand is number one in the market for the production of gas appliances. The Ariston Fast Evo model is the most popular of the entire line of heaters. The model is available in two types, differing in productivity (11 and 14 liters per minute). This is a turbocharged automatic car with electric ignition. To operate the device you only need two batteries. In addition, the model has a built-in flame modulation system. Such a system allows you to maintain temperature constancy.
The main advantages of Ariston Fast Evo include:
- ability to work at two water intake points;
- ignition occurs at minimum pressure;
- optimal outlet temperature.
Another popular model is part of the Marco Polo series - Gi7S with a closed combustion chamber. The device is equipped with a flow-through heater and does not have a chimney. An important feature of the device is that the pipe is led outside, therefore, combustion products do not remain indoors, but go outside. Gi7S is the most powerful unit, therefore it is very energy-consuming. Among the more budget models, Ariston CA 11P is in particular demand. The unit has a classic design and is easy to operate. It stably maintains the set parameters and does not upset the settings.
Causes of failure
Any failure of reliable household appliances can be caused by the following reasons:
- Formation of a large amount of scale on the heating element.
- Voltage surges in the electrical network contribute to electronic failure.
- Water flow decreases due to clogged filter and check valve.
To revive the equipment you will need spare parts, cleaning the heating element and washing the inside of the tank.
Advice! In order for equipment of any brand to serve for a long time and properly, do not set the temperature above 600C - this significantly reduces the process of scale formation.
Tips for using water heaters
Useful tips and recommendations will help you increase the service life of your boiler:
- install an anti-scale filter;
- refuse to buy a boiler with a galvanized heating element;
- Install a water purification filter on the cold water pipeline;
- give preference to a boiler with a magnetic thermostat;
- if you rarely use the device, drain 100 liters of water once every two months;
- Periodic heating to the maximum permissible temperature disinfects the water in the tank.
The recommendations given will significantly help extend the life of the water heating electrical appliance.
Annual cleaning, preventative flushing, and timely replacement of the magnesium anode will cost less than buying a new water heater.