So, what to do if the fan in the bathroom is clogged or the floor fan in the room is broken? Most often, the cause of the breakdown and the method of repair are hidden inside the device. However, depending on the purpose, fans have different structural diagrams, which means that the analysis of each type will have its own characteristics.
Fan
Today we will look at the features, main malfunctions, process and algorithm for disassembling exhaust, duct and floor fans.
Basic faults
A household fan does not have a complicated design, and the principle of its design can be seen in the figure below.
If you look closely at the figure, it becomes clear that the electric motor, gearbox, crank, rotation speed switch and propeller that creates the air flow can fail in the device.
The main difference between a desktop cooler and a floor-standing one is the high stand in the floor-standing version. Otherwise the designs are identical.
So, the main malfunctions that you can observe in the cooler you purchased:
- the unit does not turn on, the power light does not light up;
- the device does not work, but the light is on;
- the cooler blades do not rotate well;
- the unit does not turn to the sides;
- The cooler makes a humming noise and does not rotate.
Floor Fan Motor Speed Control Method
Nothing is said about the speed control method, which is not surprising. In the model considered, four wires come to the coils, one supplies a plug. The other three enter the winding through fabric cambrics. What is inside is not known for certain. The choice is small; an asynchronous motor with an insulated rotor is controlled in two ways:
- Change in voltage amplitude.
- Switching windings with an unequal number of turns.
We don’t take inverter control into account; in this case there is simply no room for such a complex circuit. What remains is regulation of the voltage amplitude. Each wire has an unequal number of turns. If one speed (two) fails, the cambrics will have to be cut, therefore, the electrical circuit of the engine will become obvious. A diligent master will wind a new coil, a lazy one will take money from the client to buy a new engine (the old one will be used for non-ferrous metal).
The number of turns is indirectly determined through the resistance ratios between the terminals of each speed. The tester uses a constant voltage to measure the quantity, so the inductive part of the impedance is eliminated from consideration. The number of turns is directly proportional to the ohmic resistance of the winding section.
The unit does not turn on
In this situation, there may be 2 options: the light indicating that the unit is ready for operation may light up or not. Depending on this, the breakdown diagnostic algorithm will differ.
The light doesn't light up
If, after plugging the device into the socket, the light located on its body does not light up and it does not start, then, first of all, you need to check whether there is voltage in the socket. This is done simply: take any electrical appliance and plug it into this outlet. If the device works, then you need to look for a fault in the electrical plug and cord.
To check the plug, unscrew it and check that the wires are securely connected to the terminals. To check the cable, you need to disconnect it from the terminal block of the device and “ring” it with a tester. If a break is detected in the cable cores, it should be replaced.
The light is on
The reason for this behavior of the unit, when the indicator light is on, but the fan does not work, and no sounds are heard, may be caused by a breakdown of the block with buttons. To check the buttons, you will need to disassemble the button block located on the stand of the floor fan or the stand of the desktop device. But, before disassembling the device, make sure that it is unplugged from the outlet.
The operation of the buttons is very simple: there is an “on” and “off” position. It is necessary to check the “output” and “input” on each key using a tester.
If a faulty button is detected, it cannot be repaired. Therefore, the switch should be replaced or the connection made directly. This approach to solving the problem will help to put the unit into operation if you are far from the store, for example, in the country.
Faulty speed switches can also be the reason why the fan does not turn on. To check the regulator, you will need to put it in the maximum position and check the “input” and “output” using the same tester.
Bathroom fan
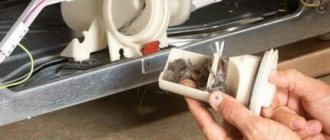
These devices are installed inside the exhaust openings. Most often, the exhaust mechanism fails due to the blown fuses located on the motor inside the fan. And for repair, the fuse must be replaced. To do this you need to get to the engine itself, located in the middle. For disassembly you only need a screwdriver.
The parsing algorithm is as follows:
- Remove the mechanism from the wall. Disassembling the device is quite a delicate job, so getting to the motor without removing the fan from the wall will be very difficult, plus there is the possibility of causing even more damage during disassembly.
Bathroom fan assembled
- Remove the protective plate. The front protective part is attached to the mechanism, most often with bolts, so removing it will not be difficult. You just need to choose the appropriate screwdriver.
- After removing the front plate, turn the fan over. It is necessary to remove the protective plate from the back. Unfortunately, the back side is most often soldered to the body, so it will have to be torn off. To assemble the mechanism, you must prepare “Moment” type glue.
- Remove the working unit with blades. This element is not attached to the body in any way, since it requires torsion. Therefore, it is very easy to remove it.
- Turn the device over. Remove engine protection. This is an ellipsoidal-shaped element located immediately behind the front plate. Unfortunately, it is also, most often, soldered to the body, so it also needs to be torn off and glued when reassembled.
- Remove the power cables. When the protection is removed, you can already see the target - the engine. Power cables pass from it through special holes and are connected to the rear of the case. These cables need to be removed through those same holes.
Front side
- Turn the mechanism over again. On the back side, in the place where the working blade element was, you can see several bolts (usually there are 2 of them). These bolts secure the engine to the housing. They need to be unscrewed, and the goal will be achieved.
Having reached the engine, you can find the same fuse next to the winding. It can be easily removed and replaced with a new one.
Backside
Cooler blades do not rotate well
If the fan does not pull and does not move air well, you will need to disassemble the housing in which the motor is located. Sometimes the fact that the propeller does not spin may indicate insufficient lubrication in the plain bearing installed in the electric motor.
The fan is disassembled as follows.
- First you need to unscrew the protective mesh (its front part) and remove it.
- After the grid, disconnect the propeller. It can be screwed to the motor shaft with a nut with a left-hand thread. That is, to unscrew the nut, rotate it clockwise, and to tighten it, counterclockwise.
- Remove the rear protective mesh by unscrewing another nut.
- Unscrew all fasteners holding the unit casing. Sometimes there is another bolt in the handle to adjust the rotation of the body. If you do not unscrew it, you will not be able to remove the motor casing.
- Now, when the engine is open, you should drop a few drops of machine oil (it is better to use spindle oil) onto the bushing (indicated by the red arrow) and rotate the shaft several times in different directions so that the lubricant is absorbed inside.
- After this procedure, slight rotation of the shaft is resumed. Reassemble the motor housing in reverse order.
- Turn on the unit and check the air flow.
Problems with the blades
Since plastic is used in the manufacture of the blades, this part of the fan is very susceptible to external mechanical influences. As a result, the blades often become deformed and break if any foreign objects get caught behind the mesh. In this case, in order to repair the fan, the owner needs to dismantle the protective mesh. The back cover can remain in place. There is no need to remove it. The protective mesh is held in place by a special clip in the form of a plastic cap. It is easy to turn with just your hands. After the clamp is twisted and the protective mesh is removed, the special lining that secures the blades is detached. This stage of work can be completed without the use of tools. The blades must be replaced if they are very deformed. If during operation of the fan there is slight friction against the protective grille, then they can be easily aligned by hand. According to fan owners, plastic blades bend very easily.
The fan does not turn to the sides
How to fix a floor fan if it stops spinning (turning) from side to side? It's all about the crank, the mounting screws of which can become loose or unscrewed. To find out, you will need to disassemble the motor housing. If during operation of the unit the body turns with a delay or a complete stop, then the gears in the gearbox should be checked for engagement. It is also necessary to check the gear switch itself, namely, its movement up and down.
Disassemble the gearbox and remove the main gear. The shaft will also have to be pulled out. Apply lubricant to all moving parts and assemble the gearbox. If the gears are heavily worn, they require replacement, although it is quite difficult to find analogues of broken fan parts. In this case, you will have to assemble the unit without a gearbox and use the cooler in normal mode, when the air masses move in one direction.
The most reliable fans of 2021
Table fan Mystery MSF-2428
A broken fan should not be thrown away immediately; the most reasonable thing to do would be to figure out the reasons and, if possible, repair the device. Often fan malfunctions are not related to breakdowns, but simply require simple cleaning and lubrication.
Some types of mechanical damage can be eliminated yourself by replacing the failed part. It is more difficult to repair floor or tabletop models with a more complex design. Since fans are included in most modern refrigeration and air conditioning devices, each case is individual. We will consider only the most common causes of breakdowns and ways to eliminate them.
The cooler makes a humming noise and does not spin
Cases when the fan does not spin and the motor hums are quite common. There may be several reasons causing this failure:
- lack of lubrication on the bearings (what to do was discussed above);
- capacitor failure;
- electric motor malfunction.
Capacitor failure
Repairing a floor fan in this case comes down to checking the capacitance of the capacitor using a tester. To get to the radio component, you will need to disassemble the motor housing. A detailed description of how to disassemble the case was given above. After removing the casing, you will see the capacitor attached to the motor.
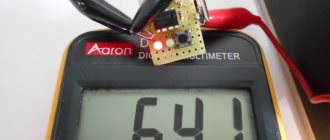
The presented device has a capacitor capacity of 0.85 microfarads. For this reason, the device must be set to a value ranging from 2 microfarads to 200 nanofarads, as shown in the figure below.
In this case, after connecting the capacitor to the device, it is clear that its capacity is 0.841 microfarads. If we take into account the error of ± 5%, then the capacity of the radio component is within normal limits, and it is not the reason why the cooler stopped working.
Engine malfunction
When repairing a fan with your own hands, you also need to “ring” the electric motor in search of a breakdown. If it is faulty, the device will not turn on and will make a humming noise. It is necessary to measure the resistance on the two stator windings, having first disconnected the wires going to them, as shown in the following figure.
As you can see, the resistance is also within normal limits, since its value is 1215 Ohms (1.2 kOhms). Otherwise, the device will buzz but will not turn on. In such a situation, the motor will need to be rewinded in a special workshop.
Do-it-yourself household fan repair
No matter how well electrical equipment works, sooner or later it fails. Especially often those devices that are used very intensively break down. These include a household fan. There are various types of breakdowns in this product. When they occur, the owner has no choice but to contact the workshop. However, in some cases you can do it on your own. To do this, it is enough to know well the structure and operating principle of this electrical equipment. Information on how to repair a fan yourself is presented in the article.
Electrical product design
Before you begin repairing a home fan, it is advisable to familiarize yourself with its structure. In this electrical equipment, cooling is carried out due to the rotation of the blades.
The place where they are mounted is a special shaft on cranks, which is driven by a motor. The fans are equipped with electric motors, which, depending on the model, can have different power. They are started using stators. The flanges are used as supports for the contact blocks. The fan can be equipped with a gearbox. It is fixed using a clamping bar. The mechanism is housed in a plastic case on a long stem.
Disassembly
Fan repair requires mandatory disassembly of the equipment. To do this you need to do the following:
- Unscrew the fan cover. This is its front part in the form of a protective mesh.
- Disconnect the propeller. It is mounted on the motor shaft using a nut. Since it has a left-hand thread, you need to rotate the nut clockwise. Upon completion of the fan repair, the nut is installed back by tightening it in the opposite direction.
- Remove another protective mesh. It is secured with a nut at the back of the device.
- Remove the protective cover. It is connected to a handle that adjusts the rotation of the housing in the product using a hidden bolt.
Engine repair
Fans become very overheated during intensive use. Motor failure is considered one of the most common breakdowns.
Fan repair should begin with an initial inspection. To do this you need:
- Remove the cover with the protective grille.
- Remove the motor. It is secured with four bolts.
- View contacts. If there is darkening on them, the problem should be sought in burnt out contacts. If there are no darkenings, then the master will have to “ring” the engine. A broken motor will make a humming noise.
- Measure the resistance of the stator windings. The normal value is 1.2 kOhm. If the motor hums but does not turn on, it means it needs a new rewind. This can be done in a specialized workshop. Judging by the reviews of some owners who were faced with the problem of a burnt-out engine, it is impossible to independently repair a household fan with such a breakdown. Many consumers advise buying a new engine straight away rather than taking the old one to a mechanic for winding.
Problems with the cooler
It often happens that the fan blades do not spin, although the motor in the product is in perfect working order. The reason may be:
- Faulty capacitor.
- There is no grease on the bearings.
Repairing the capacitor
The cause of capacitor failure can be sudden surges in voltage in the electrical network. In this case, repairing the fan, as usual, begins with disassembling it. For most models, the condenser is located immediately behind the central flange. To get it, you must first remove the engine and disassemble the power supply. In some fan models, removal of the condenser may be prevented by the presence of a crank, in which the owner will have to remove the flange as well.
In this case, repair of the floor fan will be limited to checking the capacitance of the capacitor. To measure the resistance on the conductors, the home technician will have to use a special tester. If the readings of this device exceed 50 Ohms, then you should purchase a new capacitor.
The speed switch is broken
If the fan makes a lot of noise during operation, the first thing the owner should do is check the serviceability of the product regulator. It is located next to the control unit.
Removing the regulator is simple: just remove the back cover. The control unit will be closed by a contact block. It is also removable. It is advisable that the clamping bar remains intact. After removing the block, you can begin to inspect the regulator. Very often, the cause of a speed switch breakdown can be a disconnected conductor. In this case, it is not difficult to repair the floor fan yourself. Using a blow torch, the DIYer mounts the conductor back into place. It happens that he simply burns out. Then the fan owner will have to get a new conductor.
How to repair the control unit?
The most common problem with blocks is broken worm gears. The fan owner will first have to remove the contact block. In this case, it is not necessary to remove the electric motor. Most models of electric fans are equipped with special pads that cover the control units. These pads should be removed. Then, using a screwdriver, you need to completely unscrew the shaft. Only after this is the control unit removed. By removing the back cover, you can see the condition of the worm gear. Below it is a contact shaft. The block resistance is checked by a tester. The resulting parameter should be up to 50 Ohms. If the readings are higher, then such a control unit should be replaced with a new one.
How to replace the rotor?
This procedure is considered rare for ventilators. But still, due to overheating of the electric motor, the rotor may also become unusable. To fix it, the owner first needs to remove the fan cover. The location of the rotor was a special gasket behind the shaft. To get the rotor, you will have to use a screwdriver to remove the electric motor. After this, an initial inspection is carried out. Very often the cause of a breakdown is burnt out wires. If they are ok, then the rotor itself is broken. According to many owners, in this case it should be immediately replaced with a new one. The old gasket can be used. The new rotor must be installed so that it does not come into contact with the electric motor.
If the diffuser is broken
The cause of failure of this element is considered to be twisting of the regulator. Such cases are very rare. Repairs should begin by removing the fan cover. The electric motor can be left in place. However, in order to make it more convenient to work with the control unit, some technicians recommend removing the central flanges from the fans. Otherwise, after repairing the diffuser, installing the unit back in its original place will be problematic. The diffuser is located on the back of the control unit. In some fan models, diffusers are secured using special clamps. The failed element is disconnected from the block using a knife or screwdriver. The technician just needs to slightly pry the diffuser. The faulty element is replaced with a new one.
Problems with the blades
Since plastic is used in the manufacture of the blades, this part of the fan is very susceptible to external mechanical influences. As a result, the blades often become deformed and break if any foreign objects get caught behind the mesh. In this case, in order to repair the fan, the owner needs to dismantle the protective mesh. The back cover can remain in place. There is no need to remove it. The protective mesh is held in place by a special clip in the form of a plastic cap. It is easy to turn with just your hands. After the clamp is twisted and the protective mesh is removed, the special lining that secures the blades is detached. This stage of work can be completed without the use of tools. The blades must be replaced if they are very deformed. If during operation of the fan there is slight friction against the protective grille, then they can be easily aligned by hand. According to fan owners, plastic blades bend very easily.
If the flange is broken
Since the flanges are made of plastic, this part of the fan is very susceptible to impacts. Flanges become unusable as a result of falling of an electrical product. Repair begins with dismantling the protective cover. In some models, the flanges are located near the electric motors. In this case, there is no need to remove the control units. After twisting the crank and removing the worm gear, the derailleur is disconnected. The location of the flange is a special panel on which it is mounted with four screws.
In some fan models, the flanges are located near the control units. In this case, the owner will first have to remove the clamping bar, and then the block itself. There is a special gasket near the rotor. In order to get to the flange, it must be removed. It is secured with two screws.
The device is very noisy
Since the propeller of the unit, the main task of which is to create air flow, is made of plastic (not always of high quality), there is a high probability of deformation of the latter. This usually occurs if the unit is left for a long time in direct sunlight, or near a source of high temperature. When deformed, the balance between the blades is disturbed, which causes strong vibration and noise during normal air flow.
Shaft vibration may also occur due to a sliding bearing sleeve that has become loose from long-term use.
Often, when the device falls and the blades spin, the protective grille becomes deformed. If a rotating propeller hits it, one of the blades may break.
To summarize, we can say that in different fan models, the main components and control elements may look different. But this does not change the principles of diagnostics and troubleshooting.
Ventilation problems in apartments
Built-in exhaust fans are much simpler in design. But their cost is low and it is often easier to purchase a new one than to look for parts that have disappeared from circulation. Poor ventilation of rooms may not be due to the operation of the device itself, but to errors in the organization of the exhaust system.
Ventilation in the bathroom
If ventilation in the bathroom does not work, the air becomes humid and is not ventilated, laundry does not dry well, and mold may appear.
Normal ventilation pattern
The reasons may be the following:
- the ventilation hole is clogged with dust and cobwebs;
- foreign objects in the shaft;
- The exhaust fan is set to draw in air instead of exhausting it.
The correct solution to the problem would be to contact the management company. Specialists lower a load into the ventilation shaft all the way to the apartment to break through all obstacles. In particularly advanced cases, a camera is lowered into the shaft to determine the location of obstacles. The ventilation shaft is opened from the entrance. You may have to go around the neighbors in the riser and check if they have incorrectly installed fans that are disrupting the hood.
Advice! An exhaust fan with a check valve is suitable for the bathroom, preventing air flow from the ventilation shaft.
Hood in the kitchen
Exhaust ventilation is designed to remove unpleasant odors and stale air from the apartment. However, if the construction technology is violated or due to other reasons, air begins to enter the apartment from the exhaust vent, despite the working fan.
Ventilation shaft contamination
Because of this, foreign odors arise in the apartment. Cooking products are not removed from the kitchen. The reasons may be the following:
- design defects in ventilation shafts and ducts create reverse draft;
- strong gusts of wind in one direction blow air currents into the mine;
- accumulation of vapor masses and frosty air in ventilation;
- mine contamination with snow and waste.
As a result, the axial fan draws air masses from one shaft to another and the hood begins to silently work in the opposite direction.
It is better to invite specialists to resolve the shortcomings. They will evaluate the rational use of equipment in accordance with the documentation and conduct a high-quality examination of the installation and operation of the ventilation system. The resulting report will indicate all the shortcomings of the existing system and measures to correct them. Management company employees are required to clear the ventilation shafts of foreign objects. Also, to get rid of the reverse draft effect, install a deflector in the hood to suck in smoke and create through air flows in the kitchen.
How to check fan windings
Set the resistance on the multimeter to 2000 ohms. Next, in order not to bite the wires anywhere, at the place where the capacitor is connected, strip off the insulation a little.
Look for the common point of the circuit, as in the diagram below.
Having found it, you call up the resistance of the winding. To do this, touch the contacts on the switch with the second probe one by one.
Approximate fan winding resistance values can be as follows:
Of course, they may differ slightly for different models, but the most important thing is that there is no breakage or short circuit. Measurements can show either several hundred Ohms or a little more than 1 kOhm.
It all depends on the power of the fan and the cross-section of the wire.
The resistance between the terminals of the windings will be lower - 100-200 Ohms.
The capacitor winding and the total resistance of all windings combined are also checked.
Here is the most competent and complete video on checking the performance of fan windings with a multimeter.
If checking the integrity of the windings also does not reveal any deviations or defects, move on. To do this, you completely disassemble the fan, as they say, piece by piece.
How to disassemble the cooler?
Having completed these simple steps, proceed directly to disassembling the fan itself:
- Peel off the label on the side where the wires are located.
- Using a sharp object, pry up the rubber plug and remove it.
- Remove the retaining ring with a slot on one side. To do this, insert the tip of a knife or thin screwdriver into the slot and turn it 90° so that it moves apart and lift the ring.
- Remove the rubber sealing ring framing the rod.
- Disconnect the impeller from the fan frame.
- Then you can clean and lubricate.
Cleaning the fan using a homemade mixture
You can make a mixture of white vinegar, dishwashing liquid and shampoo. Once mixed, place your cleaning solution into a spray bottle. To clean the fan blades, you do not need to disassemble the fan. First, use a spray bottle to apply the mixture to the fan, simply sprinkling water onto the electrical appliance.
Then wrap it in a plastic bag. Turn on the fan at minimum speed. Let it work for a while. When rotating, it will clean automatically.
After the fan has been running for a while, turn it off, carefully remove the bag and check how clean it is. If necessary, repeat the procedure by putting the bag back on.
As a rule, two such attempts are enough for your fan to be like new again.
Self-diagnosis of stove malfunction
If the safety elements are intact, you need to check how efficient the fan is by first opening its power supply connector. The electric motor in the stove is located either in the space under the hood (behind the engine shield near the passenger compartment), or under the dashboard of the car interior.
The location of the heating fan and how to open it are in the vehicle operating instructions. There is also a circuit for starting the fan.
When studying the circuit, you need to find out which of the connector pins of the electric motor is positive when starting the first speed of the fan. Next, any contact of the control device is connected to this pin, another of its contacts is shorted to ground, the ignition system is turned on and the fan switch is turned to any position. If the control lamp turns on, then the cause of the fan malfunction is the electric motor. Otherwise, fan malfunctions occur due to a break in the wiring leading to the heating switch.
The main reasons for the failure of the stove fan
There are many more reasons for failure, they arise for a variety of reasons, we will look at the most basic causes of failure, which even an ordinary car enthusiast who is not involved in professional repairs can eliminate.
The stove brushes are worn out or damaged
In such a situation, you need to disassemble the stove motor and be sure to replace the brushes. To do this, the impeller wheel is removed from the electric motor housing (it is usually secured with latches). If the catalog of automobile spare parts does not contain the necessary brushes, then you can unsolder the old analogues and replace them with identical ones in size. As a last resort, graphite-copper brushes are filed using a needle file.
Naturally, soldering brushes cannot be done without solder, rosin and a soldering device. After replacing the brushes when assembling the electric motor, it is necessary to clean its insides from the wear product of the outdated brushes.
If squeaking or noisy sounds occur during operation of the fan, it is necessary to lubricate the bushings with a lithol solution when repairing it. To do this, a small portion of lubricant is placed on the bushing (its end) and then heated to ensure it flows inside. When the fan operates silently, lubrication of its bushings is excluded, since the lubricating solution, trapping dust, turns it into a viscous paste, making it difficult for the fans to operate .
The fan runs at maximum speed or does not switch.
If the fan only operates at maximum speed or it is impossible to switch to one of its speeds, this problem occurs due to damaged additional resistors used in the electrical circuits on most machines.
How to test a resistor?
Additional resistors are checked using a multimeter. The diagnostic process consists of measuring the resistance value of the terminals of this electrical element, as well as comparing the obtained values with the resistor values specified in the instructions for a particular machine. In this case, it is worth checking the condition of the thermal fuse, which can burn out if there is a short circuit. Sometimes a problem arises when the resistor is desoldered due to its high heat. A new resistor with identical parameters is selected on the radio market.
The automatic heating control system does not function.
The sources of the problem are the temperature sensor, the sensor that fixes the position of the air dampers, the control electrical circuit, as well as the automatic electronic control module unit. Using the above information, you can easily determine the cause of the stove fan failure, and if you have experience working with electricity, you can repair this element yourself.
Sources:
https://elektro-blog.ru/elinstrument/37-instrument/145-remont-ventiliatora https://pktitan-spb.ru/articles/article_post/617209.html https://tehnika.expert/klimaticheskaya/ventilyator/ razborka-i-remont.html https://elektro-blog.ru/elinstrument/37-instrument/145-remont-ventiliatora https://autozona54.ru/statyi/polezno-znat/ustranyaem-neispravnosti-v-ventilyato. php
Useful tips
Please pay attention to the following useful tips:
- do not let the fan run for too long (continuously);
- do not use fan equipment with open rotating elements, that is, in the absence of a protective grille;
- do not expose plastic elements to direct sunlight (they will become deformed);
- do not forget about lubrication;
- do not install the device near heating appliances (gas or electric stove);
- if you doubt that you will remember the exact location of all the parts, it is better to take corresponding photographs while disassembling the fan;
- do not connect the device directly to the power supply after manual repairs - use RCD blockers (if they work, take the fan to a workshop or double-check the wire connection).
If you decide to repair a floor or table fan yourself, be sure to study all the information and, if necessary, consult with specialists. Even if you don't have enough experience, still try and believe in yourself.
Source
Troubleshooting the electrical part of the fan
When the fan stops completely, you need to check the serviceability of the power cord and operating mode switches. For this you will need a multimeter. The best method for testing the power cord is to measure the voltage at the fan input terminal block or where the cord connects to its internal components.
Be careful when testing: do not touch live areas with your hands. After checking, immediately remove the plug from the socket
The serviceability of the switches is checked by measuring their resistance in the “on” position. They can fail if used frequently. It is best to immediately measure the voltage on the electric motor, but to do this you need to know the electrical circuit of the fan. And also the principle of its operation and control of the rotation speed.
Speed adjustment is carried out by switching leads from the motor. In this case, one of its windings has a number of taps (tap taps), by switching which the number of turns on the stator changes. With this design, you need to measure before and after the switch to find out if it is working. If there is voltage and the motor does not rotate, you need to measure the resistance of its windings. If the device shows a break, it means that the engine is to blame for the malfunction.
Fan speed control circuit by switching winding leads
Another element whose malfunction causes the fan to stop is the phase-shifting capacitor. In circuits where it is used, the electric motor has two windings. One of them is connected to the power supply directly, and the other is connected through a capacitor, which shifts the voltage across it in phase by 90 degrees.
Phase-shifting capacitor connection diagram
If the capacitor fails, the winding either does not receive power or there is no phase shift. In both cases, the electric motor will not rotate. You can check the serviceability of the capacitor with a multimeter in resistance measurement mode. In this case, you need to select the largest measurement limit. Before connecting the device, the capacitor must be discharged by shorting its terminals together.
If, at the moment of touching the multimeter probes, readings appear briefly, and then it shows a “break”, then the capacitor is working. If its readings are zero or infinity and do not change, then the capacitor is faulty and requires replacement.
The operating voltage of the new capacitor should not be less than that of the one being replaced, and the capacitance should correspond to the original one. Its value is calculated in relation to the parameters of the electric motor winding; if it is changed, the phase shift angle will be greater or less than 90˚, and the fan will not start or will rotate more slowly.
Attention, do not mix up the winding terminals. Before disconnecting, mark the wires and sketch how they were connected
Additionally, take a photo of the assembly before disassembling.
If breaks in the motor windings are detected, the repair ends. You can try to find the break point or make sure that the winding has burned out (this is indicated by the darkening of the color of the insulation of its wires). But rewinding modern household devices is not economically feasible, and to carry it out at home you need to have professional wrapping skills. Therefore, devices with burnt-out electric motors can be thrown away without remorse.
The same applies to malfunctions of electronic fan speed control devices.
The device and principle of operation of the hair dryer
When the hair dryer is turned on, cold air from the room is sucked into its pipe using a rotating impeller mounted on the shaft of a DC electric motor. Next, the air flow passes through a tetrahedral heat-resistant frame made of mica or ceramic, on which a heated nichrome spiral is wound. When cooling the spiral, the air flow heats up to a temperature of 60°C, and in construction up to 600°C, after which it exits the pipe.
There is usually a switch on the body of the hair dryer, combined with a stepwise setting of the operating mode, which allows you to turn the hair dryer into full or half power mode.
The photo shows the appearance of a typical slide mode switch.
To prevent skin burns when drying hair and destruction of the hair dryer body if the engine malfunctions, thermal protection in the form of a bimetallic plate is installed on the frame.
When the air is heated above a set temperature, the bimetallic plate bends upward along the arrow in the drawing and opens the contacts. The heating coil is de-energized and air heating stops. After cooling, the bimetallic plate returns to its original position and the contacts close again.
As you can see, the operating principle and design of a hair dryer is not much different from other heating household electrical appliances, and any home craftsman can repair a hair dryer.
Engine disassembly and malfunction
First, the engine must be freed of all plastic parts. Unscrew the 4 screws from the front side and remove the cover.
On new models, in addition to screws, there are also latches. They need to be bent with a screwdriver.
To disconnect the leg, you need to find another screw, which is usually hidden under the plug.
Loosen it and pull out the mounting shaft. To dismantle the wires that pass through the leg, you will need to bite them out or unsolder them from the terminal blocks on the speed buttons.
At the same time, write down or sketch where each one is initially connected.
As a result, you should have a bare fan motor in your hands without anything unnecessary.
Let's take it apart. Unscrew the screws holding the back cover together.
At the same time, before disassembling, be sure to put marks on all covers and hardware indicating how everything was originally assembled.
Otherwise, after incorrect docking, you will lose alignment. There will be problems with the shaft wedging and the rotation of the blades.
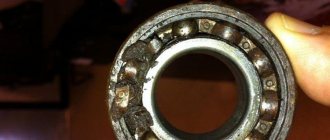
Causes of breakdowns and types of malfunctions of electric motors of ventilation units
The electric motor is rightly called the heart of the ventilation unit. Its stop due to failure leads to the failure of the entire air circulation system. Therefore, those responsible for the operation of ventilation are obliged to prevent failure of the electric motor. Regular maintenance of equipment allows you to avoid breakdowns. However, even the most professional service work is not able to protect the electric motor from malfunctions, most of which occur due to violations of the rules for storing and transporting equipment, as well as improper operation. Electric motors of ventilation units especially suffer from moisture, to which they are often exposed in unheated or very damp warehouses. When storing an electric motor outdoors, the risk of its breakdown during operation or even during the first start increases many times over. This is due to a layer of rust formed on the outer surface of the rotor and the inner surface of the stator core, which fills the gap between these parts of the electric motor.