Choosing the right tool
First, you need to choose the right power tool based on your own needs. It is important to understand that the more powerful the device, the greater its weight. This will directly affect the further ease of use. Therefore, you should not purchase a tool paying attention solely to its power.
When choosing, you need to pay attention to some useful additions to the device. For example, lighting and airflow can actually often come in handy when working with a jigsaw. It is also recommended to purchase models with stepwise speed control, electronic stabilizer, and pendulum stroke. All this will greatly simplify woodworking.
Before paying money for a tool, it is recommended to hold it in your hands and make sure it is comfortable. Some stores allow customers to try out a new tool on site, so it’s a good idea to take advantage of this opportunity.
Fastening material
In order for the cutting line to be smooth, the working surface must be as stable, rigid and durable as possible. When working at home, this can be an ordinary table with reliable legs and a flat tabletop.
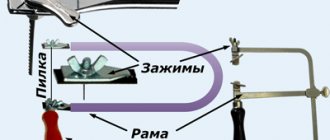
The board is fixed to the surface using clamps secured on both sides with moderate force. The sheet to be processed must be positioned in such a way that the tool does not rest against the surface during operation. To prevent pressure from being applied to the saw during the cutting process, you can weigh down the protruding edge hanging from the surface using an attached weight.
Selection of cutting blade
For an even cut, it is important to choose the right cutting blades. They are classified according to the length and frequency of the teeth. Regardless of the type of fabric, it is better to give preference to trusted manufacturers. Basically, blades of models No. 3, No. 5, and No. 7 are purchased for working with a manual jigsaw, but there are exceptions.
Classification of paintings:
- standard - files with teeth of the same size, oriented in the same direction at an equal distance;
- blade with a missing tooth - the cutting element has one tooth missing in turn. This increases the cutting speed and reduces the heating of the file.
- double teeth - the speed of working with such a blade is noticeably reduced, but the quality of the cut is many times better;
- reversible - thanks to the teeth located on the reverse side of the blade, you can cut the material without chipping.
Why does a jigsaw cut crookedly?
The saw blade leaving the pre-planned line may be due to several reasons. The operator may not have enough experience in handling the tool, the file may be defective, and the rod and guide roller for the jigsaw may have serious play. In order not to guess from the coffee grounds, it is worth starting to sift out the factors that determine the accuracy and evenness of the cut line in your individual case.
As usual, it’s better to start with yourself and your approach to sawing.
Often, novice craftsmen rush things and, wanting to speed up the cutting, apply a lot of pressure to the jigsaw. The tool does not have time to bite evenly into the material and create a clear groove for the file, which begins to follow the path of least resistance and makes unpredictable movements. This problem is especially common when working with thick timber (from 40 mm) and varnished plywood from Soviet times. This is one of the reasons why the jigsaw moves to the side. What to do about this? The answer is obvious. Apply the minimum pressure sufficient to guide the tool along the line and set the maximum number of revolutions (when working with wood). The pendulum mode usually does not affect the evenness of the cut if its design is in good order.
The quality of assembly and wear of tool parts can be a good reason for the formation of beveled lines when sawing. There are basically no complaints about devices from the budget segment (up to 2,500 rubles), as well as hopes for their conscientious assembly. It’s another matter when original, branded instruments begin to perform such tricks. Often, the cause of a crooked cut is the guide roller, the jigsaw rod or its sole.
You can check the reliability of the element’s fixation by simply tugging it with your hand. Loosening of the rod or roller by more than 1 mm determines that this device is not capable of producing a perfectly even cut. The more play there is in the parts, the less accurate the cutting line they form. This problem should be corrected based on the circumstances. If the part itself is worn out, it can be replaced with a similar one. It is difficult to fix a breakdown if the attachment point to the mechanism is worn out. Not every modern Kulibin undertakes such repairs, and this problem is usually solved by purchasing a new tool.
Unfortunately, the products of many trusted brands are often counterfeited, and jigsaw files are very popular in this regard. It so happens that low-quality and counterfeit products have a rather short service life, which brings many problems to the owner. One of these problems is a crooked cut. An initially smooth blade can bend due to poor-quality metal, which can cause deformation of the tooth set, if it was present at all. In this regard, if your jigsaw cuts crookedly, replacing the saw blade can correct the situation. The process of choosing a high-quality jigsaw file was discussed in detail in a separate topic. To get an absolutely even cut, you don’t have to be a master or have a professional tool with original consumables. For such purposes, there is a very simple and useful device, which we will discuss below.
Marking the cut line
For a neat cut, marking the cut line plays a very important role. The first step is to use a ruler and pencil to draw all the necessary lines according to the required dimensions. If shaped cutting of material is required, you should initially apply it to paper and then transfer it to the material using carbon paper.
Next, you need to use a straight strip as a guide. Without it, the jigsaw blade can easily move to the side, and the workpiece will be damaged. Some models of jigsaws have a laser beam, which helps to orient the tool more evenly, but you should not neglect the guide rail.
To cut out a circle, markings are made according to a pre-made stencil. A hole is drilled in the center of the circle, and the canvas is drawn from it to the edges of the marking and cut around the perimeter.
Guide rail for jigsaw
Not every craftsman with straight arms will be able to make a perfectly even cut with a jigsaw without the use of auxiliary devices. Only the most experienced experts who are masters of the tool will be able to get a straight line “by eye”, and only if it is in good working order and has suitable saw blades. Of course, not everyone has the time and desire to become a straight-cut saw with a jigsaw, and purchasing a circular or plunge-cut saw for such a task is quite expensive. If you only have a jigsaw with files at your disposal, then a special guide rail will help you get the desired straight line.
The guide for a jigsaw is a simple device, at first glance, similar to a large metal ruler or rule. The main difference between the tire and the above devices is a special groove along which, like on rails, the sole with a jigsaw mounted on it moves. Most guides have rubberized strips that prevent sliding on the surface of the material, and for additional fixation, they are attached with small clamps. The average length of such devices is from 1.5 to 3 meters, and can be increased by another, similar ruler, using an adapter. Many modern manufacturers of electric jigsaws produce special guide bars tailored to their products. Such devices have rather low versatility, limited to working with tools of only a given brand. Fortunately for owners of non-branded devices, there is an advanced, universal Line Master guide, with an adjustable sole and many useful functions. The average cost of such a line with an adapter will be about 3,000 rubles. The price is higher than some jigsaw models, but a high-quality, universal guide is well worth it. A detailed analysis of the device is clearly presented in the video below.
Technology for making an even cut
To ensure an accurate cut, you should adhere to some nuances:
- Do not put too much pressure on the device during operation. In this case, the canvas may break, and defects may appear on the material.
- When cutting a steel sheet, you need to use a powerful tool and work at maximum speed. When heated by friction, the metal will become more malleable.
- Working with plastic, org. When working with glass or metal, it is important to take periodic breaks from working so that the cutting element has time to cool down.
- To avoid melting the plastic when cutting it, you should work with this material only at low engine speeds.
- To ensure accurate figure cutting, you should choose a narrow blade with small teeth.
All these recommendations will help you learn how to cut smoothly with a jigsaw, even if it seems to you that this is impossible.
Rules for straight cutting
Thus, in order to make a cut correctly and evenly, you must adhere to the following rules:
- Carefully select a file that is suitable for your source material.
- Prepare all necessary auxiliary items.
- Carefully secure the workpiece.
- Take into account the correct positioning of the workpiece so that you do not have to correct flaws - in some cases the canvas is positioned face down.
- Practice the technique of operating the device with the help of professionals or through a training video.
- Follow safety precautions carefully.
In fact, processing products with a jigsaw is not such a difficult task that any novice carpenter can do. Even if an even and neat cut does not work out right away, you should not despair: you need to soberly assess what nuances you may not have paid attention to. And you shouldn’t ignore the advice of professionals who can speed up the process of mastering the art of sawing with a jigsaw and reveal some secrets. Try and improve!
Useful information
Application of adhesive tape
The fact that we cut smoothly with a jigsaw does not always give the desired result. Adhesive tape, for example, even ordinary tape, protects the back side of the material. Tape should be glued to the cut line, which will protect the processed fabric from tearing off large elements. Masking tape cannot be considered a sufficiently effective option for preserving material when cutting with an electric jigsaw, because the strength indicator is very low. It is best to use a fairly wide reinforced or aluminum fiberglass tape (each side of the cut on the material should be covered by at least 15 cm). Moreover, the adhesive tape should be pressed with a dry cloth to eliminate the risk of wrinkles.
Reworking the jigsaw sole
When setting up an electric jigsaw, you first need to check that the blade is perpendicular, because sometimes it is not easy to fix the clamp. Experts often modify the sole of the tool, namely, reduce the gap between the pressure pad and the leg. This will help eliminate “breakage” of the crust in the layers of material on top.
Please note that when using overlays, every novice craftsman must remember that they should not scratch the surface of the part. In this case, they should be replaced every 5 meters of cutting. Zero clearance can be obtained by attaching the cover plate to the support leg of an electric jigsaw.
The pad has only a narrow slot that fits tightly to the cutting element. For this reason, even a weak feed of the teeth can cut off small chips, and not turn out the chips of the top layer. The highest quality linings, which are guaranteed to last you as long as possible, are usually made of fiberglass, sheet plastic or metal sheets.
Making a clean cut
In most cases of material processing, the chip size is reduced to 0.5 mm. Such minor imperfections are practically not noticeable, and they can be removed by chamfering with sandpaper or covering up the chips with a correction pencil. You can also sand the end with sandpaper or cut through the top of the surface with a utility knife. To begin, you will need to make two cuts with a depth of 0.5 mm on both sides of the part, and also indicate the thickness. Mark two grooves along the edges of the cut, which can be made using an oblique segment or shoe knife (for uncoated wood material, or for chipboard), or using a pobedite cutter and a sharp blade (for laminate).
Correcting existing chips
Cutting material with an electric jigsaw and avoiding chipping is an almost impossible task. You can do this - cut the part with an electric jigsaw with a small allowance (about 0.2 cm), and then mill or grind off the allowance with a belt sander. During milling, the edge is cleaner than when working with a grinder. As a rule, material is milled on a tire that is made by hand (modeled on a tire from a circular saw). Spiral cutters help improve the quality of milling, and you should prepare them (two pieces).
If you want only the front side to be clean, then you need to use the simplest two-flute cutter. If both clean sides are required, use a four-flute router bit with two main flaps running to the left and two scoring flaps running to the right. In this case, it will turn out that when cutting the material, the upper branches will press the material down, and the lower ones will pull it up. This will prevent the formation of chips on the edge.
Sawing process
In order to get started, it is necessary to carry out preliminary activities and prepare:
- gloves;
- protective glasses;
- machine oil;
- the material we will process;
- clamps guiding the tape measure;
- construction pencil;
- the jigsaw itself.
The sawing process is carried out as follows:
- Strengthening the source material. In our example, the starting material will be wood. The prepared sample of wood and the guide, the role of which can be played by an ordinary flat strip, must fit between two clamps. The sample is placed on some elevation so that the jigsaw cannot rest during the cutting process. After this, using a tape measure, you need to accurately measure the desired width of the product that should be obtained, and draw a cutting line with a pencil. Then lay the guide at the required distance from the line and secure it with clamps. A jigsaw with a guide placed with a file in the direction of the marked line is also secured with a clamp. You need to fasten well, but do not overdo it. The same is done on the other side.
- Sawing Turn on the jigsaw and start working. Proper use of the device does not involve pressing it too hard, which can cause the product to quickly heat up and break. You should also not use the same file for a long time, since it becomes dull very quickly. If a very hard wood is chosen as the starting material, then you can pre-lubricate the surface with machine oil. The file will glide easier, the cut will become smoother, and the jigsaw will last longer.
What affects sawing accuracy?
Sawing accuracy when using a jigsaw depends on several factors:
- on power - the higher it is, the lower the vibration of the tool and the less vibration of the saw from side to side;
- from the pitch of the teeth - it is better to cut thick wood with blades with a distance between the tips of 3-6 mm; for metal, select a pitch of up to 1 mm;
- depending on the length of the blade - wide workpieces should be cut smoothly using large attachments, otherwise the cutting element will vibrate and the seam will turn out crooked;
- on the stroke frequency - low values are chosen for metal, and high values for wood.
It is recommended to cut material in a straight line using wide blades. Narrow ones are used for circular and figured cuts.
The stiffer the jigsaw blade, the less vibration it produces and allows you to cut the material evenly
Professional secrets
Cutting with a jigsaw according to the drawing
It is necessary to check how firmly the canvas is fastened.
This mechanism may have its own characteristics depending on the manufacturer.
It is recommended to ensure the reliability of the fastening before starting work.
To work with any cutting tools, the fastening of the blade, its general position, is really important.
It is best to read the instructions that come with the kit in advance.
A useful device would be a system responsible for removing sawdust. Its operating principle is very simple. There is a flow of air from the fan cooling the motor.
It is used to remove debris. The removal system makes the cut line more visible to the master's eye.
The drill can be easily changed when cutting holes using a technique called "pocketing". To do this, just tilt the jigsaw forward, then the rounded tips will rest on the surface being cut.
The blade should be positioned above the future cutting line with maximum accuracy. You need to lower the support saw horizontally and then continue cutting.
Straight cutting technique: nuances you need to know
To achieve an even cut, additional tools are used. Before you start sawing, you need to secure the material well. The work surface must be stable. Experts do not recommend sawing wood along the grain. It will be difficult to achieve an even cut. It is better to use a circular saw. If it is not there, you can use a rip fence. One edge is fixed on the product, the second leans against the tool. This way the cut is evened out.
If you need to make a circle, first drill a small hole in the middle. A jigsaw is attached to it, moving along the contours of the marked lines. When a rectangle is required, the saw is pointed forward, rounding the corners and then shaping them.
It is forbidden to put pressure on the saw - it can overheat and break. Many novice users try to guide its movements so that it cuts faster. This is a typical mistake of masters. If you run the saw for too long, the tool will become dull and begin to snag the wood.
To make the move easier, use machine oil. They lubricate the file with it. To avoid overheating, you should stop occasionally. After sawing, you need to clean the jigsaw and moisten it with oil.
What else you need to know about working with a jigsaw
At its core, this device is a regular saw, only equipped with an electric motor. It is recommended to take tables for carpentry work if it is necessary to cut surfaces with wide, smooth sides.
In this case, the instrument itself remains in place. Movement is organized only by the material that needs processing.
The cut is made from the back side, then its characteristics will please you.
- Machine oil for lubrication is needed if you are working with metal or tiles.
- Cold water should cool the cut line when processing metal.
- Personal protection cannot be provided without glasses and gloves.
- Plastic is processed with a jigsaw only from the rear, otherwise it is impossible to obtain an even cut.
A special plate is attached to the support sole of the jigsaw; it allows for greater accuracy. This makes the saw blades move smoother over the surface. Any surface will be cut smoothly.
Design and its features
Each jigsaw has a so-called support sole. It always rests on the part that needs to be sawed. Due to this, the accuracy of work is noticeably increased.
The soleplate can be easily rotated to make bevel cuts. Some manufacturers produce models in which the main tool is fixed only at a certain angle.
The file acts as the main cutting tool. Tooth spacing, sharpening method, size, shape, materials - literally every model has its own. 75, 85 and 100 millimeters are the most suitable lengths if you need to cut materials of low density. The saw step size also becomes a fairly important parameter.
- Metal requires a pitch of 12 millimeters.
- For wooden products it is from 2.5 to 4.
Why do chips appear?
Before cutting laminated chipboard or laminate using a jigsaw, it is advisable to understand why chips form when cutting sheet material. And the answer here is simple: everything lies in the design of the jigsaw, or rather in the design of the nail file.
So, during the cutting process, the file receives return movements (up and down). And if when the saw moves along the teeth (usually downwards), chips practically do not form, then when the tool moves in the opposite direction, the teeth seem to tear out the top layer of material, thereby forming an unpleasant chip. That is why you can observe an almost perfect cut on the bottom side of the chipboard and a chipped cut along its upper edge.
Disadvantages of cutting chipboard at home
Also, one of the disadvantages of cutting is the exposure of the inner layer of chipboard, which can also be deformed in case of unprofessional work. To avoid this, use adhesive plastic tape. The adhesive coating and veneer will protect the chipboard from sagging.
As you can see, the process of cutting chipboard is labor-intensive; it requires obtaining certain skills and experience in working with this type of material. Therefore, if you are not sure that you can cut chipboard yourself, seek help from specialists who will do everything efficiently and quickly.
If you decide to do everything yourself, then we will be glad if the materials in the article help you with this, and you can cut the chipboard yourself beautifully and accurately.