Faulty defrost in Atlant refrigerator
The nature of the breakdown may depend on the type of defrost in your refrigerator. Older models had a drip defrosting system: the user had to manually defrost the equipment at regular intervals.
Modern manufacturers use the No Frost system, which means: no frost. This technique does not require artificial defrosting, since there should be no snow or ice. The refrigerator is equipped with a fan that circulates cold air. At the outlet, the air passes through the evaporator, leaving frost on it, which thaws into a special compartment.
Once you opened the Indesit, Atlant, Samsung or other model refrigerator, you discovered that the defrost does not work. Ice and snow accumulations formed on the back wall of the chamber. What happened?
Why doesn't the back wall thaw?
- For electronic control, a frequent problem is the failure of the thermostat that regulates the temperature. It happens that the user sets the values incorrectly, so the refrigerator freezes. In models with electronic control, the air sensor could break. A faulty temperature sensor provides incorrect signals to the module. The compressor starts working without stopping, so the snow on the wall does not thaw.
- A similar situation occurs when there is a refrigerant leak when the system is working hard to increase the temperature. Leakage occurs when the housing or capillary is damaged.
- A blockage in the capillary pipe leads to poor refrigerant circulation. It is necessary to clear the system of blockages and refill freon.
- The housing insulation began to freeze. The accumulation of moisture on the walls caused the insulation of the housing to become wet. It is necessary to remove the damaged one and install new insulation.
- The cooling switch valve does not work, so one of the compartments begins to freeze.
It may also be that after defrosting the refrigerator does not turn on. You open the chamber door, but no cooling occurs. Perhaps only one department is not working, or both at once.
Don’t rush to look for a problem; give the refrigerator a day so that it can enter operating mode and gain temperature.
What happened:
- If the refrigerator does not turn on or only works for a short time, there is most likely a freon leak. The temperature in the chambers rises, a sound signal may beep or a red light may light up.
- If the motor-compressor malfunctions, the equipment does not turn on at all, and the lights in the department do not light up. The motor may start for a short time and then turn off immediately.
- Damage to the electronic unit due to moisture. The system may not behave predictably: it may not start, it may not freeze well.
Correct operation of equipment will help to avoid such breakdowns. It is important to defrost your refrigerator correctly. After releasing the chambers, allow time for natural defrosting. Do not try to speed up thawing by chipping the ice with foreign objects. After connecting, you shouldn’t immediately clutter the shelves with food; let the refrigerator work for nothing for a couple of hours.
Operating principles of know frost
Easy maintenance of the refrigerator is possible thanks to the following features:
- an evaporator is located on the back wall of the device or above the freezer;
- behind it there is a fan that blows through the evaporator and circulates air through separate channels. Cold air currents are always in motion;
- Moisture settles on the evaporator - the coldest area.
- The compressor turns off on its own and sets the heater in motion, eliminating frost on it;
- If moisture forms, it is discharged through the grooves into the tank and then evaporates.
The air that cools the food inside the refrigerator passes through the evaporator, then enters the chamber, the rest goes into the refrigerator compartment.
You can change the temperature using the cold air channel. It is separated by a damper, whose position is set by a thermostat. In standard refrigerator models, the temperature on the lower shelves is lower than at the top; their difference can reach 5 degrees. You will not find such changes in Know Frost refrigerators.
Manufacturers produce two types of refrigerators: wind and drip. The drip defrosting technology is similar to classic models. The compressor in such devices stops for a while, the snow melts, the liquid flows into a special hole at the bottom of the housing, from where it evaporates.
Devices of the second type are designed differently: the evaporator with the refrigerant is located behind the casing and is inaccessible from the outside. This is a grille with curved tubes that resembles a radiator in a car. Thanks to this design, the products do not come into contact with the evaporator. Another feature of this type of refrigerator is the fan located on the back wall. Its main task is to ensure continuous circulation of air that passes through the cooling radiator.
Manufacturers of Asian household appliances add a dry defrosting system to refrigerators, so many appliances have both the freezer and the upper compartment equipped with them. European companies usually add wind defrost only to the freezer. If you bring your hand to the inner walls, you will feel a slight airflow. It serves as an additional flow of cool air in the chamber. The main regulation is allocated to large channels, blocking which changes the temperature inside.
Manufacturers of No Frost equipment are improving their products by rearranging existing structures: the evaporator and fan are located below, next to the freezer. The so-called air shower works according to a certain principle. Air currents rise along the inner rear wall and cool the food from above.
Depending on the technologies used, “Frost Free” and “Full No Frost” refrigerators differ. In the first, no frost is used only in the freezer, and in the second, the entire container is exposed to a flow of cold air.
Defrost diagnostics in the Atlant refrigerator
You can diagnose a breakdown in the defrost of the refrigerator yourself.
- First, the functionality of the electronic defrost timer is checked. When the overall temperature in the refrigerator exceeds -10 degrees Celsius, you need to press the timer button. If:
- Defrosting has started, then the sensor is working.
- The refrigerator has not started defrosting, then the sensor is faulty and needs to be replaced.
- Diagnostics of the electromechanical defrost timer. To diagnose this sensor you need
- Remove it from the refrigerator.
- Disassemble.
- Screw in the gears yourself (they screw in clockwise).
- If two sharp clicks are heard while screwing in, it means the sensor is working. If there are no clicks, then the sensor is faulty and needs to be replaced.
- Case diagnostics. Any, even minor damage to the housing can lead to a malfunction of the entire defrost, so you need to carefully examine the housing for damage.
- Diagnostics of fastenings. Weakness of the fasteners can affect the operation of defrosting in the refrigerator as a whole, so any looseness can cause a breakdown.
Checking the electromechanical defrost timer
The removed timer must be disassembled, and then the gears must be manually turned clockwise. Normally there should be no jams. When scrolling, you should hear two characteristic clicks. The timer clicks to indicate that the defrost mode has started and ended.
If there are no problems, you need to check the integrity of the timer housing and separator. Particular attention should be paid to the mounting locations of the device.
Causes of failure in the defrost of the Atlant refrigerator
Main signs of failure:
- ice or snow “coat” on the back wall inside the chamber;
- frost on the evaporator;
- the temperature in the refrigerator is too high or too low.
Frequent causes of problems: power outages, wear of the seal or compressor, placing hot foods in the refrigerator.
If the defrost timer does not turn on, resolve the repair issue promptly. This breakdown provokes more serious consequences for the evaporator and compressor.
Samsung refrigerator malfunctions
Korean Samsung refrigerators are characterized by high quality components and the use of new technologies. The electronic unit with push-button and touch controls is responsive to commands. The compressors are energy efficient and reliable. Malfunctions in a Samsung refrigerator are possible, but the cause is a gross violation of operating conditions.
Samsung refrigerator malfunctions and their solutions
Samsung refrigerators attract buyers with their design and reliability. In the absence of preventive maintenance, after 6-7 years of continuous operation, individual components become unusable. The No Frost cooling system and electronics are the most vulnerable.
Have you noticed an ice crust in a two-chamber refrigerator with No Frost? The temperature may be set incorrectly. Ice may accumulate in the chamber if the drain hole is clogged or there is a blockage in the condensate tube. These reasons are obvious; you can fix Samsung refrigerator malfunctions yourself. Severe freezing and increased temperature in the chamber that arises suddenly should alert you.
Universal sensors monitor the temperature in the evaporator, in the room and in the chambers, and display the information on the display. You can change the mode using the rotary knob or the Cooling Power and Fridge keys. The list of main malfunctions of the Samsung refrigerator is displayed in the form of an error code. Deciphering problems in the operating instructions.
Experts consider the peculiarity of Samsung refrigerators to be their tolerance. Fault notifications will be received for a long time, but the refrigerator will continue to operate without eliminating them. Among these causes of breakdowns:
- constantly increasing frost on the evaporator - the temperature sensor or defrost timer in the No Frost system is faulty;
- incorrect temperature conditions in the chambers, no response to a new task;
- non-stop or very short compressor operation;
- extraneous noise, knocking in the engine.
Breakdown of the defrost timer in the Atlant refrigerator with the No Frost system
Any equipment can sooner or later stop working; in this case, a common breakdown is various malfunctions of the defrost timer. Using an Atlant brand device as an example, we highlight the following signs of a timer failure:
- The device does not enter defrost mode, the evaporator freezes, and the temperature in the chambers gradually begins to rise;
- It does not turn on and does not perform its main functions, but the lights in the cells are on;
- Electricity consumption increases significantly, and the temperature in the freezer increases.
Device and how it works
The relay in the refrigerator is considered an important element that is responsible for proper power supply of the installed asynchronous motor. The features of the device are as follows:
- The field located inside the motor device must necessarily rotate. This can only be checked by applying the correct phase value to the three phase windings. To ensure such conditions, a three-phase 380V network is required, but it is not found in domestic conditions. A refrigerator start-up protection relay is installed when the device is powered from a two-phase network.
- Field rotation is possible only if there are two vectors. Field shifting requires a compressor that provides a 90-degree voltage shift. In this case, a smooth start is practically impossible, but the conditions created are sufficient for the uninterrupted operation of the device.
- A second vector is created, thanks to which the field begins to rotate. The force generated is sufficient to spin the rotor. To improve installation efficiency and save energy, the coil is switched off.
The device operates according to a simple circuit; the refrigerator starting relay can last a long time. The operating principle is characterized by the following features:
- The start relay for the refrigerator compressor determines the maximum energy consumption at the beginning of operation. In this case, such a device is used as additional protection; a thermal relay is installed; when the main element heats up, the circuit breaks.
- The device is characterized by different operating principles. After a period of time has passed, the main part heats up and the relay turns off, thereby reducing energy consumption.
Motor relays can be classified according to design characteristics. The most common versions are the following:
- Pills. A similar design of the starting relay is made using a substance that can expand when heated. When the engine starts, the device is cold, but as it operates it heats up. A constant increase in temperature leads to the circuit opening, leaving only the coil working.
- Inductive relay. This device works on the principle of interaction of two electromagnets. The maximum amount of current that is supplied causes the core and the starting coil contact to interact. If the current drops, the connection weakens.
- Compressor relay with bimetallic plates. This version opens the contact almost immediately after the temperature rises.
Indesit thermostats are manufactured using various materials. Each manufacturer uses its own production technologies, which determine the performance characteristics.
Repair of the defrost timer in the Atlant refrigerator
If your appliance is equipped with a No Frost system, the timer may have broken and caused problems. It is programmed for a certain time after which defrost starts. You can check and replace the timer in your refrigerator.
How to check the defrost timer:
- open the freezer door;
- remove all shelves and baskets;
- remove the panel that covers the fan;
- remove the inner panel where the fan and timer are located;
- you need to short-circuit the wires of the timer: if it turns off, it means the element is working.
Most often, the timer fails due to “sticking”. If the appliance is stuck in the cooling or defrosting position, the refrigerator will operate accordingly. The timer circuit could also be broken.
Which defrosting system is better?
The primitive method of defrosting and washing the chamber involves mechanical action. Manual defrosting is the lot of owners of middle-aged household appliances that cannot cope with the task without outside participation, as well as some single-chamber models (for example, LG and Electrolux). In this case, after the ice “moves,” it will simply begin to fall off in pieces and gradually turn into liquid, that is, you will be required to collect water in a timely manner and eliminate possible flooding.
The matter is certainly troublesome, but the whole process is controlled by a person, and not by a cleverly programmed unit. You have to resort to traditional manual defrosting regularly - if the device is quite “old”, up to 1-2 times a month,
No Frost option is famous for the fact that it is ready to take over defrosting entirely. In modern conditions, such a system is equipped not only with elite, but also economical models of refrigerators - for example, the well-known Atlant and Biryusa.
An additional advantage of these units is associated with the accelerated circulation of cold air: frost actively travels along the entire perimeter of the chamber, cooling the loaded products as quickly as possible.
At the same time, it is impossible not to note certain shortcomings of the No Frost system:
- even full automation does not free you from manual labor at all, since the inside of the camera needs regular wet cleaning (of course, after first disconnecting from the network);
- The No Frost system is based on the use of exclusively dry air, which makes it necessary to store food in sealed containers - otherwise it will simply dry out.
An intermediate option between manual and automated defrosting is the so-called drip system. The principle of its operation is as follows:
- As soon as an unfavorable temperature regime is established inside the chamber, the refrigerator gives a signal, notifying the owner that it is time to melt the ice.
- The operation of the compressor is temporarily interrupted, and later, thanks to the built-in drain hole, the melt water flows into a special tank.
By the way, the main drawback of this format is associated with this nuance: particles of dirt, stuck crumbs and all sorts of small debris that accumulated during the working period come out mixed with the liquid - accordingly, there is a possibility of causing a “clog”.
However, drip systems still have more advantages:
- They are autonomous, so your work will only consist of draining the thawed water and returning the tank to its original place;
- due to the fact that defrosting occurs naturally, you will not encounter the problem of failure of complex automation;
- If you compare the cost of purchase and maintenance, drip-type refrigerators (there are many of these in the Bosch, Ariston and Beko line) will be in a much more advantageous position than automatic engineering giants like Liebherr, Samsung or Indesit "
Obviously, each defrosting system has both positive and negative sides. Innovative automation deserves praise for saving time and effort, but at the same time, its brilliant capabilities do not always justify high financial expenses - against this background, the drip approach looks both more democratic and more reliable. As for manual defrosting, it will soon completely fall into oblivion, completely replaced by more efficient mechanisms.
When do you need to replace the defrost timer in an Atlant refrigerator?
Depending on the nature of the breakdown, the malfunction may manifest itself:
- Lack of activation of the defrost mode, which is accompanied by freezing of the evaporator and cutting of the fan blades into the ice crust. As a result, the production of cold is sharply reduced and the temperature in the chambers increases. This situation is caused by the part jamming in the “cooling” mode;
- Too low temperature in the chambers;
- The refrigeration equipment does not turn on, the temperature in the chambers is equal to room values, there is light in the compartments. The reason is jamming in the “defrost” mode;
- Partial freezing of the evaporator and a decrease in cooling capacity caused by an open circuit of the heater;
- Increased temperature in the departments. The drain begins to freeze, and energy consumption increases. The cause is a broken circuit of the heating element for defrosting the drip tray.
Natural and accelerated defrosting
Natural defrosting is...
When everything melts away as usual. If you are not in a hurry and there are no perishable products, it is better not to rush into the thawing process - let the ice melt on its own.
It is very important to refrain from trying to help the unit with all your might: under no circumstances should you chip off pieces of ice with a knife or other auxiliary objects, otherwise you may damage structural elements or scratch the painted surface. Complete defrosting, depending on the thickness of the ice, usually takes from one to twelve hours.
Accelerated defrosting is...
This is when you need it quickly. In this case, you can resort to some tricks:
- Install a running fan opposite the open chamber. Even if the device provides a heating function, you should not use it (you risk melting the plastic coating); conventional air conditioning is quite enough.
- Arm yourself with a hairdryer and direct a stream of warm air at particularly icy areas from a distance. Alternatively, you can place cups of heated (but by no means hot!) water on the shelves or lay out several heating pads.
- Use a special plastic shovel to remove melted snow. At the same time, carefully ensure that the liquid does not seep into the system components, otherwise rust will likely form.
Note: remember that regularly resorting to quick defrosting is highly undesirable - this can harm the system and shorten the life of your equipment.
Selection of defrosting element for a refrigerator with a No Frost system
Relatively recently, the concept of No Frost did not exist at all among craftsmen and consumers. But since the late 90s, units with such a defrosting system have become firmly established in our everyday life. Of course, they are not without their shortcomings, but their most important advantage is durability, and I think the increased noise and weathering of products can be somehow survived. The most important problem that exists in No Frost refrigerators is the failure of the freezer evaporator defrosting system; usually the heating element burns or the defrost sensor breaks.
Replacing the defrost sensor is not a problem, the main thing is to know what resistance it has and how to get to it. As for the heating element, everything is much more complicated here and this is connected not so much with replacing it, but with finding just such a heating element. At the moment, manufacturers produce a very large number of models and it is very difficult for a simple consumer who decided to change the defrost heating element with his own hands to understand the modifications of this spare part. Few people know that despite the fact that there are Samsung refrigerator models, etc. with the No Frost system, a large number are produced, only a few types of heating elements are installed on them, that is, in most cases they are interchangeable, and the difference between them is only that their wires are connected differently. This is exactly the case shown in the video below, I highly recommend watching it so that you can further understand what I will talk about.
Before talking about replacing the defrost heating element, I would like to point out the signs of its malfunction. Even if the masters don’t judge me too much, there are still a lot of questions about this on my YouTube channel. You could see how to get to the heating element to check it in the video above, I also showed there how to check the defrost heating element, I think I won’t focus on this anymore, but first of all I’ll tell you about what indicates a malfunction of the defrosting system
- The refrigerator compartment has stopped working → If the freezer in your refrigerator is shaking normally, and the cold in the refrigerator has disappeared, this indicates that ice has formed on the freezer evaporator
- The refrigerator turned off and does not turn on → This applies to any control system, be it electronic or mechanical. The fact is that until the temperature sensor of the freezing evaporator (defrost sensor) reaches the required temperature, the refrigerator will not turn on. In an electronic control system, this usually happens like this: the consumer turns on the refrigerator, it works either for about an hour or about 8 hours and turns off, and then it can turn on after two days. The defrost sensor may also be to blame for this behavior. In general, everything needs to be checked
- The freezer doesn’t freeze → It’s not for nothing that I put this point separately, many times I hear that in the No Frost refrigerator, food has disappeared in the freezer, but in the refrigerator everything seems to be fine - this also happens. The fact is that if the air duct to the refrigerator compartment is not frozen, then this behavior is quite possible; in general, this happens in some models. Again, you need to get to the freezer and look at the ice on the evaporator
I have listed the 3 most important signs that indicate that the defrost heating element has burned out. Now you can proceed to the question that worries many, namely how to choose a defrost heating element for your model. To do this, you need to look at what parameters this needs to be done.
- Type of heating element → there are several of them: l-shaped, u-shaped, glass - straight, ceramic and ordinary heating element, which goes throughout the entire body of the freezer evaporator and then goes to the lower part, where the condensate flows - this is the most common heating element in all No Frost refrigerator models
- Configuration → Usually on different models of the same brand, the bends of the heating element are practically the same
- Wires → This is where the main differences exist. In the video above you could see that on a Samsung refrigerator of one model, I installed a heating element from a completely different model, but from the same manufacturer
- Width and height → Here there may be differences, you need to measure the distance between the bends of the heating element, its height and width, and also pay attention to the configuration at the bottom of this element. After taking the measurements, feel free to call the online store and ask them to select a defrost heating element for you, exactly according to your dimensions, be sure to indicate that the wiring is not of great importance. Usually the store meets the buyer halfway, in any case, if I don’t find the original, that’s what I do
- Power → So that you don’t get confused, I’ll say this: for the same types of heating elements, the current consumption is usually the same. For example, the L-shaped one has 250 watts, the same one, but with a different model, the power will be approximately the same, and even if there is a difference of 10/30 watts, I think globally this will not affect the operation of the refrigerator
Let me sum it up. In order to select a heating element to replace the original one, you just need to measure its width and height, and also pay attention to the configuration, that is, if it is U-shaped, then you need to take the U-shaped one. You don’t have to bother with power, the difference is small
What is know frost
No Frost is a system of refrigerators and freezers that starts the process of circulating cold air and minimizes the appearance of ice on the walls.
From English this term is translated as “without frost”. This is the main difference between the capsule system and know frost: it does not form a snow deposit. This technology distributes air evenly throughout the refrigerator compartment. This eliminates the formation of zones with temperature differences where moisture freezes and condenses. Ice in know frost systems occurs, but very rarely, outside the chambers, and is eliminated on its own. Know Frost refrigerators not only protect food from freezing, but also free the owner from additional cleaning of the device.
Replacement of the original heating element for the Atlant No Frost refrigerator
According to my observations, it doesn’t matter what kind of heating element is in your freezer, the main thing is that it properly heats the evaporator, plus it does not allow the condensate drain channel to freeze. In general, if you haven’t found a heating element specifically for your model, then you can replace it with a universal one; at the moment they are sold in almost every online store and they differ only in that there are simply no terminals at the ends of the wires. I think these terminals can be completely removed from the old heating element and installed on a new one; by the way, the price of a universal one is much less than the original.
How to extend the life of a refrigerator?
Proper operation will protect you from premature separation from the “breadwinner” and save a lot of money on forced repairs. Take note of some valuable tips:
- The refrigerator should be connected to a separate outlet with good grounding, without any intermediate extension cord.
- Do not neglect installing a network stabilizer: the voltage passing through such a filter is significantly equalized, so the electronics will be reliably protected from overloads and sudden surges in current.
- When placing the unit, try to maintain at least a minimum, 5-centimeter, distance from the walls and surrounding furniture - otherwise the walls of the unit may heat up (this feature is typical for models with a side-mounted condenser).
- At least ten minutes must pass from the moment of shutdown until the refrigerator resumes operation again.
- Monitor the condition of food every day: the slightest signs of spoilage will indicate that the food needs to be urgently evacuated outside the cell - otherwise a persistent unpleasant odor will appear very quickly. For the same reasons, it is also recommended to ventilate the refrigerator periodically.
- Wet cleaning should be done every week, regardless of defrosting (any dirt must be removed immediately). Be sure to unplug the power cord from the outlet while cleaning.
- It is strictly forbidden to wash the glass shelves of the refrigerator with hot water: due to a sharp jump in temperature, there is a risk of cracks forming. The exception is removable shelves, which can be pre-warmed at room temperature.
- To store food, it is advisable to use cling film, foil and plastic containers with airtight lids. Before laying out fruits and vegetables, be sure to cover the bottom of the compartment with a plastic bag.
- A rubber bulb will help clear the blockage in the drain system during defrosting. Fill it with warm water and squeeze a powerful stream into the drain hole. In the future, to prevent a “relapse”, move the products as far as possible from the evaporator.
Defrosting a refrigerator is an extremely important and useful procedure that greatly prolongs the life of the unit. It must be carried out systematically, as the snow freezes, and do not be lazy to diligently maintain cleanliness both inside and outside the compartments.
Defrost timer in the Atlant refrigerator - what is it
A timer is needed to control defrosting in the refrigerator. It is set to a defrost cycle that ranges from 4 to 24 hours. A refrigerator compartment timer works much the same as a regular timer: it waits for a specific specified time and then broadcasts a signal to other parts of the refrigerator. Having received the signal, they begin to defrost the refrigerator.
The defrost timer in the refrigerator may be
- Electronic.
- Mechanical.
As already mentioned, a defrost timer set for a certain number of hours, after this period has expired, starts the defrost process. For example, there is a defrost timer in the refrigerator programmed for 12 hours. Then, defrosting will begin after 12 hours, at a temperature of minus 10 degrees Celsius. And it will continue until the temperature in the refrigerator compartment rises by 20 degrees. Moreover, the timer does not work alone; a defroster is connected to protect the evaporator.
How to check the refrigerator defrost sensor
Timer defrosts are an element of the No Frost system that controls the defrost cycle. The timer is programmed with a specific defrost cycle (4, 6, 8, 12, or 24 hours). The timer “calculates” the required time, and upon reaching the desired moment it gives a signal to the remaining elements of the system to start defrosting. It is always located next to the evaporator. There are two types of defrost timers: electronic and mechanical.
Operating principle of the defrost timer
So let's say our timer is programmed on a 12 hour cycle. Defrosting in the refrigerator will begin when the temperature in the freezer reaches -10 °C, and will end when the thermostat registers a temperature of +10 °C. The defroster also comes into play: it protects the evaporator from possible overheating. The defrosting time depends on the amount of frost on the evaporator. And so on every 12 hours.
How to check if the electronic defrost timer is working properly?
For example, using the Indesit and Ariston refrigerator timers, we will tell you how to check the functionality of the timer. Attention! The algorithm of actions presented below is for informational purposes only. If you doubt your abilities, entrust the diagnosis and repair of your refrigerator to a professional technician.
Checking the electronic defrost timer
You should check the defrost timer (or, as refrigeration workers say, “ring it”) in three modes:
- manual setting of defrost mode,
- pause,
- turning on the refrigeration mode.
The need for defrosting in the Atlant refrigerator
This device is found in modern refrigeration equipment with the No frost function.
There are two types of timers:
- electronic (LIEBHERR, LG, Samsung and many other brands);
- electromechanical (some models Indesit, Stinol, Ariston).
The electrical appliance starts defrosting, which guarantees the absence of ice (No frost).
The defrost sensor sends a signal to the evaporator heating element, and the refrigerator warms up.
The defrosting cycle is repeated every 4-24 hours.
General recommendations
During the defrosting process, you should rely on the following recommendations:
- Do not defrost in hot weather. Temperature surges negatively affect the operation of the compressor.
- It is necessary to carefully study the instructions.
- The equipment should be started no earlier than 12 hours after shutdown.
Some models provide convenient defrosting of individual chambers. You can wash the freezer first, and then the other compartments.
Convenient defrosting of individual chambers
How does defrosting work in an Atlant refrigerator?
The evaporator of the refrigerator chamber does not freeze after the defrost coil is disconnected from the power supply. Since the proportion of refrigerant in the cycle decreases, and the motor-compressor continues to operate. During defrost, the defrost relay is automatically switched on. Relay function switches on and off different processes:
- Cooling.
- Defrost.
- Alarms.
- Lighting.
- Fan.
There is also an additional relay that is used as an emergency relay. When this relay is turned on, defrost is carried out by the fans.
When defrosting in the refrigerator should begin, the evaporator defrost heating element is turned on. The evaporator defrost heating element controls the temperature in the refrigerator. And when the evaporator heats up to +10 degrees Celsius under the action of the evaporator defrost heating element, the process stops.
Samsung refrigerator error codes
Good to know
error codes, refrigerator repair, Samsung
When an error appears on the display, first of all you should make sure that this is not an accidental failure. To do this, perform the following steps to identify the error code:
- Disconnect the refrigerator from the network;
- We wait at least 10 minutes;
- We turn the refrigerator back on;
- We wait about 5 minutes.
So, the same error appeared on the display again. We'll decipher it.
Operation of the temperature sensor in the refrigerator system
It is advisable to consider the principle of operation of the thermosensor of refrigeration units (domestic, industrial) together with a description of the operation of the entire system, since the element affects all its main aspects. The temperature detector is the main sensitive control unit; further commands from the electronics and thermostat depend on its indicators.
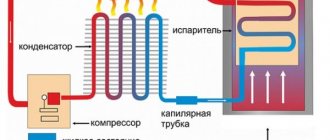
A household refrigerator, strictly speaking, does not produce cold itself in some complex ways, by mixing special reagents, etc. The principle is extremely simple: it uses an environment that already exists, the system only removes heat from inside the cabinet through the circulation of the coolant. The air is cooled using an evaporator (defrost) inside the device in the process of freon (refrigerant, refrigerant, cooler) taking heat from the chambers and releasing it to the surrounding space through an external condenser (radiator).
The algorithm is like this:
- The piston of the compressor (motor) with a container of freon compresses this substance, it boils and transforms into gas. Due to the specified and created pressure, it is distilled.
- The refrigerant flows inside the cabinet through a system of tubes and an evaporator (also known as a defrost, a small coil inside the cabinet) - as it moves, it takes heat from the internal space, thus lowering the temperature.
- Next, the freon enters the main line and the coil on the external elements (the condenser, the familiar radiator at the back), where its temperature now decreases, and the captured heat is absorbed by the environment. The substance turns into a liquid state, enters the filter-drier, where the moisture evaporates, passes through a capillary tube, and returns to the motor capacity. From there again - the evaporator. The cycle repeats.
Place and function of the temperature sensor in the system:
- t° readings are sent to the thermostat;
- The thermostat compares the received information with the mode limits set on it and sends a command to the motor, which ensures the implementation of the set values, that is, achieving the desired temperature inside the cabinet. This creates cooling cycles inside the chambers. The longer the compressor operates, the faster and more frequently the freon moves through the tubes and the more intense the cooling and freezing occurs, and, conversely, the less frequent and shorter the start, the weaker these processes are.
The process of replacing refrigerator temperature sensors
Removing the old one and installing a new thermistor or thermostat with a tube sensor is difficult only if they are hidden far behind the casing. Then you need to remove the cabinet panels.
If the sensor is electronic, then the disconnection itself is simple - there is a plastic plug on it, which is connected to the thermostat or a segment of the control unit (there are connectors there). All you need to do is snap it off, remove the old one and snap on the new product in the same way.
If it is difficult to get to the electronic thermostat, you can simply cut off and solder the wiring to the new sensor (we will discuss the process below), but with a mechanical unit such a procedure is impossible - there are no wiring, but a tube.
Mechanical models are tubes that go into the thermostat with a metal plate attached with bolts or clamps to it; theoretically, it is enough to unscrew/bend them and attach a new spare part in the same way. But they almost never do that. For this type of assembly, it is difficult to find sensors on sale - tubes with a bellows (we have already described this disadvantage above), they are usually not sold separately. Then there is only one way out - buy this part via the Internet, in workshops, but it is not a fact that it will be possible to attach it, and also that there will be no calibration.
For the above reasons, and also to eliminate miscalibration, they purchase a whole thermostat of this type - this is typical for mechanical options. It will be necessary to replace the entire thermostats of the described type, together with the detector tube. They are pulled out as follows: remove the cover near the selector, the device cover and the handle, after which the assembly itself is removed. Remember the location of the wiring in the terminals. The new product is inserted using the described steps in reverse order, observing the memorized location of the power wires to the thermostat.
All information about whether temperature sensors are sold for a specific refrigerator model and whether they are available separately from the thermostat can be found on special forums by contacting the support service on the manufacturers’ websites. Usually in the instructions and on the Internet you can also find a description of the replacement process for specific models with schematic images.
Installing a new electronic temperature sensor
Let's consider the option of replacing only the sensitive part without updating the entire cable; the advantage is that there is no need to disassemble the walls of the refrigerator:
- Remove the sensor from its seat.
- Make sure that the new part fits the clamps and fits into the recesses in the plastic.
- Cut the cable near the most sensitive part; do not shorten it. The length of the cord should be approximately the same as it was before in order to fit into the recesses in the seat, a difference of a few mm is allowed.
- Strip the ends.
- Install new insulation - two heat-shrinkable tubes for each wire and one thicker one, covering all the wires at once.
- Solder the wires of the new thermocouple to the mating ends.
- Slide the heat shrink over the connection, heat it with a lighter - the insulation will tighten and secure.
In extreme cases, instead of heat shrinking, you can use electrical tape as insulation, and instead of soldering, you can use twisting, but such a connection will be less reliable.
Importance of Thermal Sensor
The refrigerator motor is designed only for periodic on/off. The switching period is long only at the first start (can reach several hours), when the set temperature is dialed and set. Then the refrigerator works like a thermos: the cabinet is sealed and insulated. Over the course of a day, with standard periods of the door being open, the temperature rises by only a few degrees. Turning on the compressor itself (not fans, injection units, etc.) is required only to maintain the mode and they are short-term - in total, under average conditions they amount to 2–4 minutes. in 60 min.
The system operates automatically - the sensor detects insufficient temperature, so there is no command to stop working. The motor drives the refrigerant, the cycles are repeated until the sensor reports that the value set on the thermostat has been reached. After this, the compressor is turned off by a relay (in electronic control, a microcontroller is involved in this), which received data from the detector.
If the thermal detector is broken and does not give an impulse, the control units regard this as the presence of insufficient temperature inside the cabinet and force the motor to work constantly, for wear and tear, until it burns out, and there will be freezing inside the cabinet. There are also types of situations when the sensor provides incorrect readings. For example, if he constantly sends reports that the temperature is sufficient, although in reality the opposite is true, then the engine will not turn on, the refrigerator will not cool or freeze. But it is the first situation described that is more dangerous, since such a breakdown results in engine failure.
If the device’s motor (except for the first start) operates constantly, this indicates a breakdown of the t° sensor, but this is also typical for depressurization, freon leakage, or problems with the thermostat in general, so diagnostics are somewhat more complicated. The compressor in this mode will fail in just a few days. The power unit definitely needs periodic “rest”, then it will work for years.
Recommendations for pauses in the refrigerator compressor from one of the special sites:
The importance of the temperature sensor is that the switching periods directly depend on it, since it is the one that notifies the system about the temperature in the chambers. For example, the thermostat receives a message from the sensor that t° corresponds to the set value, which means that a command to start the motor is not required. When the sensor detects an exceedance of the set value, a command is issued to turn it on/off. That is, the detector is the first link of the described part of the control system; if it is broken, the entire circuit functions incorrectly.
Repair
The thermocouple (thermistor) cannot be repaired - it is too miniature and has no replaceable parts. The wiring can be repaired (soldered, twisted, replaced), but not the specified elements. The sensor tube for mechanical thermostats is especially not repairable: no matter how well the hole in it is insulated during repair, including solder, sooner or later it will depressurize, and a bellows with flaws is extremely difficult to bring into proper condition - there will always be miscalibration.
The exceptions are the following cases:
- when the contacts come off, there is a break, a short circuit, an incorrect fit - then the connections are resoldered, the parts are positioned properly;
- installing a new thermocouple on an already installed cable (simply cut and solder in place of the old thermistor, without snapping off the wiring chip from the control unit).
A case of repair from user experience
Let's give an example of how the location of a thermistor affects its performance. The case of the Liebherr CP4003 refrigerator is described. In this model, if the temperature sensor malfunctions, an alarm sound is generated, which was observed by the user. The owner ordered a new sensor, but also decided to simultaneously check the old product and try to revive it.
The refrigerator was turned off, defrosted, and the chambers were dried. Then the protective panel (cover) was removed from the detector. In this case, the device type is no frost, and the part in question is placed on a “crying wall”. The detector was dried with a regular hairdryer without removing it from its seat. In this case, it is necessary to ensure that the directed heat is moderate; high temperatures can damage and melt plastic parts. After these procedures, we launched it and everything worked properly.
Obviously, the cause of the problem is an unsuccessful location for installing the temperature sensor. Over time, due to aggressive conditions, the sensor depressurizes, condensation gets inside, which distorts the readings. Accordingly, the system issues an alarm about a breakdown; incorrect messages are sent to the compressor, forcing it to work constantly.
The further solution was that the protective panel was not mounted, the element was left open, without a cover, and condensation was removed from the walls near the device once a week with an ordinary rag or napkin. The new sensor was not needed and was left as a spare.