A technical hair dryer is a universal power tool that is used in the household for construction or repair work. With its help, they prepare surfaces for painting, bend plastic pipes of any diameter when installing water supply and sewerage systems, perform operations with heat-shrinkable materials, solder and perform many other works. If at the right time a construction hairdryer is not at hand, you can make it yourself. This task is especially relevant for those who do not have a constant need for this tool, so it is not economically feasible to buy it for one-time work.
What is a hair dryer
A construction hair dryer is a professional tool that produces hot air. The temperature maximum can reach 650 degrees. The device is equipped with attachments that help perform a number of specific operations:
- Heating and removing old paintwork.
- Heating and soldering of various plastic parts.
- Melting frozen compounds.
- Welding the film.
- Drying the surface after painting.
- Removing glue, linoleum and similar materials from the heated surface.
- Soldering metal parts.
- Bending plastic pipes.
A construction hairdryer, factory-made or made independently, is indispensable when carrying out construction and repair work.
With open pistol grip
Covered handle protects your hand from hot air
Design and design drawings
The design of a technical hair dryer differs little from household models used for drying hair. The main components of this unit are the housing, the heating element and the device with which the hot air is redirected to a given location.
Unlike other thermal appliances, there is no open flame in a hair dryer. This reduces the fire hazard of the device and eliminates the need to burn fuel. The device contains the following structural parts:
- Electric motor.
- A heating element.
- Fan.
Hot air comes out of the narrow nozzle of the unit, due to which a powerful directed jet is formed. The volume of air that the device produces per unit of time is its performance.
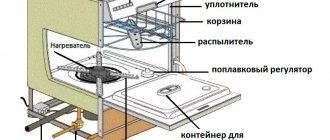
All major details shown
Modern construction hair dryers, developed in industrial production, have several additional functions. Their number varies depending on the specific model:
- Controlling the force of hot air passing through the nozzle.
- Temperature adjustment. As you know, a regular household hair dryer produces up to 60 degrees. In powerful technical devices, this figure can reach 650–700 degrees, but such ultra-high temperatures are not always required.
- Select the mode in which the device will operate.
Diagram of a hair dryer using the example of a Makita product
Many modern models have built-in LED indicators showing the heating temperature of the air stream. This allows you to control the operation of the device. The construction hair dryer is also equipped with a number of attachments, many of which can be made independently. They change the shape of the air stream depending on where the unit is used.
Tools and materials
Many amateurs with some knowledge in the field of electrical engineering can make a hair dryer themselves. Such a unit can hardly be called professional, but it is quite suitable for cleaning a door from dried paint.
Most often, a homemade hair dryer is based on a conventional device for drying hair. The body must be made of ceramic. All plastic parts are removed from it.
If this procedure is not done, the wires may short out during operation with further melting of plastic particles and failure of the electronics.
For the same reason, the use of a plastic case is not allowed: plastic does not withstand high temperatures.
Other materials you will need:
- Spiral nichrome wire needed to create a heating element.
- Metal plates. These are used to create the blades necessary for the operation of the ventilation system.
- Electrical cable. The wire cross-section is more than 4 millimeters, otherwise overload is possible.
- Rubber pipe. This small detail will provide thermal protection to the handle of a homemade hair dryer.
- Metal tip that forms an air stream.
Instructions for use and safety precautions
A construction hair dryer is a tool that requires great care when handling . High air temperatures can cause skin burns. If handled carelessly, flammable materials may ignite. With this in mind, you should follow safety precautions when working with the device.
Careless handling of a hairdryer can lead to burns to the skin of your hands.
When preparing for work you must:
- provide the necessary ventilation in the room;
- remove flammable materials;
- wear protective clothing that does not allow oil or gasoline stains. Clothes should not flutter;
- cover your hair with a headdress.
During work:
- It is prohibited to use a hot air gun for purposes other than its intended purpose;
- replacement of attachments is allowed only with gloves made of thermal insulating material;
- It is forbidden to change attachments while the hair dryer is turned on, or remove them before they cool down;
- It is unacceptable to block the air intake grille;
- It is forbidden to hold the hair dryer perpendicular to the surface being treated; you can only work at an acute angle (optimally at an angle of 45°);
The correct position of the nozzle for cleaning frames will protect the glass from heating and cracking
- ceiling work is carried out only with the use of safety glasses and a respirator; a hair dryer must not be placed above the head;
- It is forbidden to lower a hot hair dryer onto horizontal surfaces; while cooling, hang the tool by its loops or brackets;
- Do not use spatulas and scrapers with short handles, this can lead to burns to your hands;
Using scrapers with long handles will protect the skin of your hands from burns
- Do not inhale gases during heat treatment of varnishes or paints; you must use a respirator;
- If there is a sudden loss of power in the network, the device must be de-energized by unplugging the plug from the socket.
After work it is prohibited:
- touch the treated surface with bare hands;
- Pack the hot air gun before it has completely cooled down.
Manufacturing process
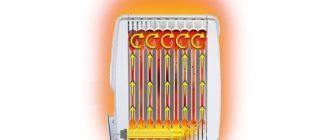
A homemade hot air gun at home can be assembled not only from an ordinary household one, but also from a traditional soldering iron, or rather, from its body. The “insides” of the soldering iron must be removed with great care, and the metal tube-housing and handle must be left intact. You also need to take a halogen lamp, the power of which is from 1.5 to 2.2 kW. It will organize a quartz insulator; for these purposes, the lamp does not have to be working; a burnt-out one will do.
The flattened ends are cut off using a diamond machine, after which a quartz tube is obtained. A hole is prepared at one end of the tube through which the heater will be removed. In this case, the heating element becomes nichrome of a certain thickness - from 0.3 to 0.7 mm. Using nichrome with a larger diameter will increase the cooling period of the wire. In order for the equipment to work accurately and correctly, you need a regulator for adjustment.
Assemble the hairdryer (or mini-hairdryer, depending on the size) in this way:
- form a spiral - you need to make it yourself;
- a quartz tube is inserted inside the spiral - this work will require great care, the end must be extended with a wire;
- to ensure that the temperature does not exceed the permissible temperature, the tube must be evenly wrapped with foil;
- the foil tube must be combined with the metal holder of the case, after which the wire must be fixed on the side on which the handle is located;
- then the tube is wrapped with an asbestos cord, after which it will independently take its place in the center of the body, where it will hold securely without “dangling” inside it;
- the tube outlet at the front must be carefully clamped without damaging it;
- Next, a hose is pulled into the handle through which air will be supplied; in the situation under consideration, its source will be a compressor similar to an aquarium one.
It would be a mistake to assume that to assemble a hot air gun it is enough to take a heater and a fan. This is not true, because to melt, for example, tin, you need a very powerful installation, and the above items are not enough to assemble it. Reducing engine speed to increase heating is just as dangerous as reducing the size of the hole. The first will lead to overheating of the spiral, followed by its shutdown or breakage. The second can provoke melting of the structure itself.
Nozzle shapes
The nozzle that forms the flow of hot air is the main working part of the device. Depending on the shape of the nozzle, it is intended for a specific range of work:
- Flat. Form a wide flat flow. Used for removing paint and film coatings, wallpaper, and directional deformation of plastic sheets.
- Round. They form a cylindrical flow and are used when working with copper pipes.
- Reflector. They have a rounded petal that forms an annular shelf. Used for bending plastic pipes
- Slotted. Create a narrow, flat stream of high intensity. They are used to weld sheets of plastic.
- Lateral. Used to remove coatings and dirt from window frames. They have a separate petal to protect the glass.
- Cutting. They create an even narrower flat flow and are used for cutting foam sheets.
- Ring. Create a flow in the form of a ring. Used for welding polypropylene pipes.
A self-made hair dryer can use all these attachments; it is enough to make its nozzle with the appropriate diameter. Nozzles can be made from sheet metal or with your own hands.
How to make a construction hair dryer and attachments for it with your own hands with drawings and videos
A construction hairdryer is necessary to perform a number of finishing and other works. The need for a powerful professional device does not always arise. You can make an electrical appliance with your own hands, using an old household hairdryer, even a broken one.
How to make a hair dryer with your own hands
To make a construction electrical appliance from a regular hair dryer, it is necessary to modernize the device.
- First of all, you need to disassemble the case.
- After disassembling a household electrical appliance, it is necessary to remove all plastic parts that can melt under high temperatures. They can be replaced with products made of textolite and ebonite.
- The spent heating element is also removed. Instead, a ceramic part is installed on which a nichrome spiral is wound. The operating temperature of the device depends on the number of its turns. The denser they are, the more degrees the output will be. There are some features here:
- Nichrome turns should not touch each other. Otherwise, a short circuit may occur during operation.
- In home-made household appliances, you should not lay the coils too tightly: the electrician may not be able to withstand it.
- The easiest way is to make a heating element from the body of a powerful halogen lamp and a nichrome spiral. Lamp glass can withstand very high temperatures without any damage. The twisted wire is placed in a glass case.
- The ends of the nichrome wire are screwed to the transformer wire and insulated.
The hairdryer is first switched to fan mode. Working with a soldering iron is excluded: the material from which the spiral is made cannot be soldered. All plastic parts are removed - The finished heating element is wrapped in foil. Reflected radiation is created, increasing the power of the electrical appliance. In addition, heat loss from the heating element is minimized.
- As an alternative to the lamp body, you can use fiberglass wound over a nichrome spiral. A durable steel tube is placed on top, through which hot air will escape out.
- The heating element is placed in the body of a hair dryer and connected to a transformer.
The device must be positioned exactly in the center. It is first wrapped in several layers of asbestos thread, which evenly increases its diameter. A part from an old computer will do - A pre-prepared rubber tube is placed on the handle of the hair dryer. This prevents hand burns from touching hot ceramics. For this purpose, you can use an old corrugation from a vacuum cleaner, rubberized on the inside and made of fabric on the outside. This material will reliably protect the worker.
Examples in the photo
Used for heat treatment of individual layers of fabric or film
Used in processing linoleum
https://www.youtube.com/watch?v=z0CsK2UXh54
It can be used to bend polymer pipes
Used for welding polymers, banners, cleaning walls from paint
Used for heat shrinking of packages, pipes, etc.
Most parts can be made yourself
Most nozzles can be made independently from leftover chrome pipes. Let us take two forms as an example: tapering towards the exit and flat, in the form of a vacuum cleaner nozzle.
- We take two pieces of pipe of the required length (depending on the planned size of the nozzle).
- We make four small cuts on one of the cuts.
- Using a hacksaw for metal, we cut out isosceles triangles based on the cuts.
We make a similar cut on the other side, resulting in an equilateral angle. The cut parts are approximately equal to each other - The resulting petals are bent inward.
All edges must be smooth - The joined sides are welded to each other.
- If desired, you can clean up the weld.
This is done to give the part a more aesthetic appearance. Part after grinding, ready for use - We put it on the fan nozzle, if necessary, make two cuts (if the diameter of the pipe does not match the requirements of the hair dryer), we work.
To make a flat nozzle for a hair dryer, just tap one side of the pipe cut a little with a hammer. If necessary, cuts are made on the reverse part for more convenient contact with the nozzle of the electrical appliance.
To make it, just flatten a piece of pipe a little with a hammer
Making a hair dryer yourself is quite a complicated matter and requires skills in working with electrical appliances. If the basic requirements of the technology are not met, electrical failure may occur.
- Maxim Ovsyannikov
Safety when using a hair dryer
To protect yourself from injury, you need to know.
- Sharing use of the device and gas equipment is unacceptable. Particularly in kitchen areas, where there is the presence of open air and flexible hoses. Improper operation and sparking may cause a gas explosion.
- It is prohibited to use a construction hair dryer to work with paint and varnish materials in an unventilated area. When heated, harmful components scatter, which are hazardous to health.
- When removing paint, you must first find out what its origin is, as there is a possibility that it contains toxic lead.
- When using a construction hair dryer for any task, it is necessary to provide for the availability of fire extinguishing means in advance.
- The work process should be carried out wearing gloves and long sleeves to protect against possible burns.
- When removing paint from windows, you should use a special nozzle that protects the glass. But a homemade device naturally does not provide for it. Therefore, it is better to purchase it or remove the paint without using a hair dryer. Since during operation there is a high probability of glass breaking and flying fragments.
- When working with such equipment, you must ensure that there are no children or animals nearby.
First, the hair dryer is checked from a safe distance. If the device functions properly: the coil heats up to a red state, air is being pumped, then this indicates that the device can be used. To try it out in practice, use something of lesser value.
Making a hair dryer with your own hands at home is not easy, since it requires certain skills and knowledge of designing electrical appliances. If you do not take into account the list of necessary requirements, then equipment breakdown is not completely ruled out. To prevent this from happening, you can watch the video tutorials below on creating devices of this type.
Electrical circuit for an INTERSKOL hair dryer on a DB230V board
Hairdryer Interskol FE-2000. DB230V board with triac and optocoupler. Photo in analysis.
DB230V board. Closer photo.
Hairdryer Interskol FE-2000. DB230V board. Connection diagram
DB230V board_connection diagram. Option 2.
DB230V board_electrical circuit diagram. In the circuit, there is an underdrawing - between the point Gx and the connection point of the spirals R1 and R2 - a thermal fuse is turned on (see the table with the list of parts above). In addition, the thermocouple output is connected incorrectly, see comments.
03/04/13: I am posting for public use the electronics diagram of the DB 230 V board, which was sent to me by a reader who wished to remain anonymous:
Interskol FE-2000 hair dryer circuit on DB-230V board
Heating element housing
The most complex assembly unit of a soldering gun is the heating element body. It was assembled from three parts: a glass, a tube and a washer.
A glass with an outer diameter of 16.5 mm was obtained by disassembling a lithium-ion battery from a laptop. The fact is that the very aggressive filling of lithium-ion batteries and batteries is enclosed in stainless steel cases.
Used batteries can be purchased at the radio market, and faulty ones can be asked at a computer workshop. If somewhere at a radio market or flea market you come across a whole laptop battery, here are the instructions for disassembling it>>>
Attention! Before disassembling the battery bank, it must be discharged. This can be done using a powerful, low-resistance resistor
I used a 10-Ohm PEV resistor with a power of 10 Watts, which I usually use to discharge electrolytic capacitors.
Although, if you are not so scrupulous, you can rivet the heater body from tin from a tin can, after first making sure with a magnet that the can is steel. Of all the metals that a DIYer may have at hand, only aluminum alloys have a low melting point. At the same time, steel, brass and copper are suitable for the manufacture of such parts.
Thin-walled tubes of various diameters can be obtained by disassembling a broken telescopic antenna from a radio or radio. How to cut the antenna section and flare the edge of the tube is shown in the video.
The flange securing the thin-walled tube is made of a steel washer 1 mm thick. M1.6 screws were chosen as fastenings, although rivets made of copper wire can also be used.
Hairdryer from a soldering iron
There are many cases where home craftsmen were able to make a soldering device from an ordinary hair dryer, a hair dryer, and even a soldering iron. But in the latter case, serious alterations have to be made. The fact is that a soldering iron initially does not have special air supply devices, and creating them is much more difficult than a heating element.
Regardless of which of the devices listed above you decide to use as the basis for making a do-it-yourself soldering device, you need to make sure that the finished hair dryer can maintain the set temperature.
If you find a good hair dryer with a thermostat, then be prepared to make certain changes to its design. And this will inevitably lead to the fact that the temperature scale on it will not display the real indicators created by the device on the printed circuit board.
Therefore, we advise you to first test your homemade soldering device using a contact digital thermometer. If, after numerous tests, the temperature remains in the range of 190-240 degrees, then this means that your hair dryer is ready for use. If you observe some deviations, then you will have to additionally work on its design and bring the temperature indicators to optimal levels.
The most difficult thing is to make a soldering device from a soldering iron. The fact is that here you will not only have to stabilize the temperature, but also somehow solve the problem of air supply, and for this you will have to do everything from scratch.
- To create such a device for soldering, you will need a heating element, which is placed in a glass tube, and air will be supplied through it from the other end.
- You will have to get rid of the soldering iron tip.
- For proper operation, air must enter the tube directly through the coil, which, in turn, will heat it.
- The second end of the tube should be slightly longer than the first. Subsequently, you will connect a hose to it to pump air. As suitable mechanisms for this task, you can choose a converted aquarium compressor, a home-made bellows from a plastic bottle, or you can completely abandon such devices and pump air through your mouth.
Since the most problems arise when creating such a hairdryer (setting the temperature, the inability to adjust the heating intensity), you will have to spend a lot of time and effort on making it, but even in this case you will not be sure that such a hairdryer will maintain the parameters you set . It is best to use a regular cheap hair dryer as a base, and you can use a soldering iron for other purposes.
Construction hair dryer: buy or make it yourself?
It would seem like a simple device: a heating element and a fan. At the same time, with its help you can perform so many operations that you can replace a hair dryer at home with practically nothing. Read this article on how to choose the right hair dryer.
Maybe a blowtorch or a gas torch. But these devices do not have a temperature or blowing speed controller, and an uncontrolled flame can easily cause a fire.
There are a lot of industrial samples: from a simple “wind blower” to devices with intelligent control modes.
Various nozzles allow you not only to heat the selected area, but also to weld pipes and linoleum.
Areas of application for a construction hair dryer:
- Express drying of wet surfaces.
- Acceleration of hardening of adhesive joints.
- Softening of bitumen bases (car sound insulation, soft roofing, etc.).
- Waxing of various surfaces.
- Surface treatment before painting: removing old coating, degreasing.
- Dismantling of vinyl and plastic coverings (linoleum, plastic tiles).
- Peeling off self-adhesive materials (stickers, window tinting, etc.).
- Softening plastics with a low melting point to give them the required shape.
- Local heating of surfaces, if required by the work technology.
- Melting of fusible metals, tinning, soldering.
- Forming thin wooden products.
- Using polypropylene pipes as a soldering iron.
- Loosening stuck bolted connections.
- "Letting go" of hardened steel.
- Crimping of heat-shrinkable pipes.
- Defrosting pipelines and locks.
- Lighting fireplaces and charcoal grills.
Almost none of these operations can be performed with another device, at least with the same comfort and convenience.
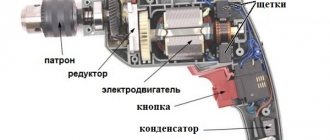
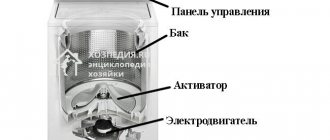
To understand how a hair dryer works, you need to remember the structure of a household fan heater.
The structure of a construction hair dryer is clearly visible in the illustration:
There is a fan in the back (1)
on the axis of the electric motor
(2)
.
(3)
is placed in a heat-resistant pipe .
It is made of low resistance nichrome wire.
When an electric current flows, the wire becomes hot and the air flow passing through it heats up. A protection device (4)
in the form of a bimetallic switch. When overheating, the contacts open and the hair dryer stops working until it cools down.
There is also a simpler electrical circuit for a hair dryer with protection. The engine is switched on in series with the heating element, and when the windings break (the engine stops), heating also stops.
A control unit is installed in the handle (5)
. This could be a switch with several operating modes, or a temperature controller. In the first case, heating is regulated by connecting the heating filament in different combinations.
Less resistance means higher heating temperature and power consumption. In the second case, you can set the temperature with higher accuracy.
Despite the undeniable convenience of the design, it is not always possible to spend money on its purchase. We will tell you how to make a hair dryer with your own hands.
The next element is the heater
Its manufacture must be carefully considered, since it is a matter of safe operation. The insulator core can be ceramic, but this is ineffective since free passage of air is not ensured.
Popular: DIY jigsaw machine - drawings and video details
It is necessary to obtain mica plates (in this case, a ready-made structure from a burnt household hair dryer will do). You can purchase a ready-made element in spare parts stores for household power tools.
If you wind the spiral yourself, you need to correctly calculate the parameters. It is more convenient to make a two-mode hair dryer, with separate spirals for each temperature.
Normal resistance:
- 1 spiral about 80-100 Ohm
- 2 spiral about 200-250 Ohm
Having selected a suitable nichrome wire, use a multimeter to measure the resistivity of 1 meter of material. Then we unwind the necessary pieces (100 Ohm and 250 Ohm).
Depending on the length obtained, we wind the wire directly onto the insulator (smooth) or pre-twist it into a spiral. This is done on a rod 4-6 mm in diameter.
We place the finished spiral on the insulator inside the guide pipe-air duct, leaving a gap to the walls of 5-7 mm.
You can use a ready-made element from a household hair dryer, or a 220-volt fan for a personal computer.
If the fan assembly can be made with a speed controller, this will add functionality to your device. When installing a motor or fan housing, care must be taken to ensure its thermal protection.
The body of the hair dryer can become very hot and the plastic will melt. Make gaskets from fluoroplastic or balsa wood. The general principle of installation is as far as possible from the heating elements, as far as the length of the pipe and common sense allow.
Next we make the handle
If you used a household hair dryer as a donor, this issue has already been resolved. The main thing in this design is to properly secure the air duct with the heater.
The attachment points to the finished body with the handle should be located in the rear.
Popular: Hot smoked smokehouse: do it yourself
If the hairdryer is made entirely of scrap materials, then the handle is made of any heat-insulating material. For example, made of wood. Again, remember about heating the air duct.
The handle mount is located in a place where there are no heating elements. The best option is a pistol-type power tool.
After installing the handle, you can cover the air duct with heat-insulating material. Asbestos or fiberglass pad. This will protect the operator from accidental burns, and will retain heat inside the housing, increasing efficiency.
Where is it used?
Today, hair dryers with attachments are used both at home and in large enterprises for a variety of tasks. The tool itself is not capable of performing many functions, but with a set of attachments the tool becomes universal and is used for:
connections and processing of joints;
repair of cracks, irregularities, deformations;
soldering parts made of plastic, polymer film and other materials;
roofing works;
installation, repair, dismantling work in the automotive sector.
In addition to these tasks, a hair dryer with nozzles is capable of performing many other tasks where soft polymer materials are used and thermal effects are required.
Possible malfunctions and ways to eliminate them
During the operation of a construction hair dryer, the following common malfunctions were noticed:
- damage or breakage of the power cable. In this case, the tool does not turn on or works intermittently;
- failure of one of the elements of the control circuits. Expressed in the inability to regulate temperature and performance;
- burnout of the heating element - nichrome spiral. The hair dryer stops heating the air;
- fan malfunction. The hairdryer heats, but does not create an air stream.
All these faults can be easily eliminated with a set of screwdrivers, a multimeter and a soldering iron:
- Having disassembled the hair dryer body, we diagnose the serviceability of the main parts by visual inspection.
- If there are no visible faults, we determine the faulty element by measuring the resistance of the circuits with a multimeter. The absence of resistance in the area being diagnosed will indicate a damaged element.
- if the spiral burns out, it can be joined using a small bolt, nut and washers. Or replace it with a new one with parameters similar to the burnt one;
- a fan motor with burnt-out windings must also be replaced;
- A faulty power cord can be repaired by removing the damaged section. But if at the same time it becomes too short, it is better to replace it with a new one or from old devices and tools.
How to bend and connect plastic pipes with a hairdryer?
You can prevent a plastic pipe from breaking during bending by filling it with hot sand filler. Bushings and plugs should be secured along the edges of filled pipes.
To bend the pipe, a reflex nozzle is installed on a hair dryer. Thanks to its shape, the heated air flow envelops the pipe. The device should be set to work with low air flow, and the temperature should be selected based on the material of the product.
Installation and connection of the heat gun is carried out on the table, so that the nozzle is located upward. The tube is held on top of the nozzle, slowly rotates and the bent area is heated. You should not make the heating happen quickly, as this may cause the structure of the material to collapse. Once sufficient plasticity is achieved, the pipe can be bent without removing it from the hair dryer.
A construction hair dryer can be used when welding plastic pipes. To do this, you need to use a reflector nozzle that has a special coating that will prevent the plastic from sticking to the surface of the nozzle. In the hair dryer settings, the minimum air flow is set, the temperature is selected according to the materials used. The heat gun is placed on the table, and then the reflector is heated to the desired temperature value. After this, you need to press the end of each plastic pipe against it. When the plastic softens, these two ends can be connected by pressing them and holding them for 30-45 seconds. This short time will be enough for them to bond and harden.
To do this, they need to be overlapped, stretched a little, after which they can be welded. The width of the overlap must be maintained at least 2.5 centimeters. The temperature of the hair dryer must be appropriate for the materials. A crevice nozzle is put on the device and the film joining area is processed. When softening, roll them with a roller. To obtain the desired result, you should make a test solder and test it for strength. If the strength of the connection is not enough, then the temperature during processing must be increased.
Getting to know the technical hair dryer
Household and hair dryers are essentially devices for producing a stream of hot air. Structurally, they are almost the same, but since the temperature of the air stream obtained in household and technical devices is very different, differences are also formed.
How does a hair dryer work?
The gun-shaped body of the hair dryer contains the main elements of the device:
- switching devices: switch, thermostat, air flow speed regulator;
- compact fan with electric motor to create air flow;
- electric heater (TEH), which is designed to heat air;
- nozzle - forms an air stream.
A construction hair dryer consists of several main parts.
The principle of operation is as follows:
- A stream of air is drawn into the hair dryer.
- It passes through the heating element, where the air is heated to the required temperature.
- The heated stream of air is ejected from the nozzle by a fan.
Thus, a hair dryer creates an air stream with a temperature of up to 650°C.
Areas of application for a hair dryer
The use of hot air created by this versatile device is varied and varied. The works below do not exhaust all possible types of work, but are the most common:
- preparation of paint and varnish coatings to be removed by thermal action of an air jet;
- drainage of external and internal cavities and planes;
- welding of thermoplastic materials;
- heating parts and pipeline elements to change their shape;
- creating a temperature difference in parts of metal joints to facilitate their disassembly;
- soldering of copper and plastic pipelines and other parts;
- soldering of electronic boards;
- defrosting frozen sections of water pipes;
- softening the connecting layer to separate the glued elements.
Construction hair dryers are equipped with various attachments, so these devices can be used for many different jobs.
For example, during drying and heating, nozzles are used that create the maximum cross-section of the air stream and provide a large heating area. And for soldering electronic circuit boards, nozzles are used that form a minimum cross-section of the air flow for the least dissipation of thermal energy.
A variety of attachments for a hair dryer allows you to use the device for the most unexpected jobs.
What types of construction hair dryers are there?
Construction hair dryers are classified according to several parameters. Based on the temperature of the air stream, they are divided into:
- medium temperature (up to 650 °C);
- high temperature (up to 900 °C);
- specialized (over 900 °C).
By design:
- shaped like a pistol
- straight shape,
The construction hairdryer can have a straight shape - combined, having a removable handle,
- specially shaped hair dryers.
Devices are also divided by functionality into:
- simple - without adjusting the temperature of the air stream and its speed,
- professional ones that have air temperature and performance adjustment.
Homemade construction hair dryer
If you still decide to make an industrial hair dryer from improvised materials at home, you will need:
- purchase or find a housing for your mounting device, it should be made exclusively of ceramics,
- make fan blades from a tin sheet,
- take a metal nozzle pressed down on one side to simplify melting and heating,
- find a small piece of rubber tubing to protect your hands,
- choose a copper power cord with a cross-section greater than 4 mm, otherwise the device will melt under voltage,
- take a nozzle in the form of a straight tube for soldering,
- purchase a nichrome spiral,
- do not forget about gloves as an auxiliary protective equipment.
Before you start producing the device, you will have to remove the plastic parts from a regular hair dryer to avoid shorting the wires. After this, wind the nichrome wire onto the heating element. The closer together you make the turns, the higher the operating temperature will be. The ends of the wires must be brought out. Maintain distance and avoid contact of turns to prevent short circuit.
Then connect the ends to the cord by winding and insulate. Use the waste vacuum cleaner hose as additional insulation for the handle. It will help protect your hands from exposure to high temperatures.
Upon completion of production of the device, test its functionality. To check, it is necessary to treat the unnecessary surface, since the current temperature must be adjusted during use of the product.
To prevent the hot device from injuring your hands, place the rubber tube of the vacuum cleaner on the handle. It does not need to be insulated if the heating part is located far from the main body of the device. Despite the fact that the homemade design does not have an aesthetic appearance, it serves its purpose properly.
Do not forget to switch the almost completed device to fan mode before connecting it to the transformer. Remember: at the beginning you need to turn on the air flow, and after heating, when you turn it off, it’s the other way around.
Preparation process
To assemble a high-power hair dryer, you must first prepare a set of tools for plumbing work, be patient and persistent in order to accomplish your plans.
If you don’t have the knowledge and experience of working with electrical products of varying complexity, or the ability to understand the nuances of electrical circuits, then don’t even start the preparatory work - you won’t be able to do it.
For those who are in the know and know how to work with metal and various tools, we continue our story. From the details we will need:
- metal or durable thick plastic for the base; a plastic body from a hair dryer is not suitable for drying hair, because it will move at high temperatures;
- metal or duralumin sheet - we will use it to make propeller blades for the fan;
- nichrome wire of a certain cross-section for making a powerful spiral of the heating element - the base can be borrowed from an old hair dryer if it is made of ceramic;
- powerful cable from which the power cord is made;
- use a piece of rubber pipe of the required diameter as an insulator;
- a metal nozzle that will form and direct a hot stream to the desired location;
- thick assembly gloves, goggles and other personal protective equipment.
When designing a construction hair dryer, it is necessary to take into account the high temperature that will be created in the operating area of the heating element. Therefore, whenever possible, it should be moved outside the main building or additional insulation means should be used.
Using the device at home
Due to its characteristics, a technical hair dryer can also be used for domestic purposes, for example, for removing old paint or soldering plastic pipes, as well as other types of work.
Removing paint
Due to the fact that most technical hair dryers have the ability to adjust the temperature, they can be used in almost all areas of activity. In everyday life, it can be used to remove old layers of paint and other finishing materials. However, it is worth considering the base from which the paint will be removed, for example, dismantling from plastic products will be quite difficult, but from wooden ones it will be more convenient and comfortable.
In order to remove old paint, you need to perform the following steps:
- Take a technical hair dryer and set the temperature in the range from 500 to 650.
- Bring the air flow value to the maximum level (if there is a corresponding adjustment).
- Visually draw the product into sections of 2–5 cm (with a pencil) and evenly heat the surface of each of them.
- Wait until the last stage of paint deformation (peel off from the product).
- Take a scraper and slowly begin removing paint while continuing to heat the substance being removed.
Video: removing paint from a door
Soldering plastic pipes
Sometimes there are situations when it is necessary to solder several plastic pipes together or attach an additional element to the existing system, for example, when repairing or upgrading the sewer system in the bathroom. In order to solder plastic pipes, you need to perform the following steps:
- Take a hairdryer and set the temperature in the range from 250 to 350 (sometimes you may need 500).
- Reduce the air flow value to the minimum level.
- Place the device in a vertical position (nozzle up).
- Take a pipe and heat one of its ends evenly.
- Next, quickly connect the second pipe to the heated end.
Video: soldering (welding) of plastic pipes
Scorching wood
Singeing of wood is used to give wood a darker color, as well as to treat and disinfect products made from it. In order to singe wood using a technical hair dryer, you need to perform the following steps:
- Take the object that will be worked on.
- Treat it: clean the surface of the wood using a brass brush, and then sand it using fine-grained sandpaper.
- Place the wide attachment on the hair dryer (before turning on the device).
- Turn on the device and set it to a temperature between 500-600, as well as a high air flow rate.
- Select the optimal distance of the nozzle from the surface of the product, which should be more than one centimeter.
Types of hair dryers and their characteristics
In order to better navigate the vast sea of products from companies producing construction tools, a simple classification has been adopted. Construction hair dryers are divided into:
- household or amateur. These models will be a good help in the household. Minor repairs, gluing, paint removal and much more can be done with a construction hair dryer with a power of up to 1400–1700 W. Its cost is low - around 10 dollars. The simplicity of the device and the absence of complex functions allow you to repair it yourself and without high costs;
- technical. The most popular and widespread class of hair dryers. This is no longer quite an amateur instrument; its power ranges from 1700 to 2000 W. The package contains some useful options, the price range is affordable - from 20 to 150 US dollars. They go on sale with a set of attachments and a removable thermal protection casing. Habitat: construction site. They are used during the installation of life support engineering systems - water supply, sewerage, electrification;
With the help of a technical hair dryer you can perform many construction operations
- professional, designed for long-term continuous operation. As the name suggests, these models are designed for permanent work. It is conventionally believed that the power of such devices starts from 2000 W. Tools, as a rule, are equipped with “smart” electronics, an LCD display and are made from materials with increased wear resistance. They are used by specialized specialists to perform certain operations on a daily basis. They have a long service life and price. On average, a hairdryer of this class costs $200 or more.
Types of construction hair dryers
Construction hot air guns are divided into categories rather arbitrarily. It is customary to distinguish the following types according to power:
- household - up to 1.1 kW;
- professional - on average up to 2 kW;
- industrial - 2 kW or more.
The higher the power of the hair dryer, the higher its maximum temperatures. Industrial models are capable of delivering a jet of air at about 700 °C.
Another classification divides hair dryers by design.
- Pistol. These models are the most popular; they have a handle located perpendicular to the body, on which control buttons are mounted.
- Direct. These models do not have a handle; they have an elongated shape. You need to hold a straight hot air gun by the body, which allows you to conveniently grab it with both hands, but at the same time increases the risk of burns or electric shock.
Another classification divides technical hair dryers into varieties according to the type of power supply:
- From the network. Models are more powerful, but they can only be turned on close to an outlet.
- From the battery. You can use a technical hairdryer of this type anywhere, but its capabilities are limited.
The handle of pistol models can be not only open, but also closed, protecting fingers from accidental burns. In addition to the fact that such devices are safer, they can be comfortably grabbed with two hands. But at the same time, the disadvantage of the protected design is its bulkiness; you cannot use such a hairdryer in hard-to-reach places.
Criterias of choice
The following criteria will help you make sure you choose the right model.
Manufacturer
It is better to give preference to well-known brands. Large manufacturers value their reputation, so they will not skimp on product quality. The hair dryers from the following companies are trustworthy:
- BOSCH;
- Interskol;
- Metabo;
- Hitachi;
- GRAPHITE;
- Anchor;
- VORTEX.
Household or professional
Choosing a hair dryer
By type, construction hair dryers are:
- household;
- professional;
- industrial.
The first type is designed to perform small-volume work. The device is characterized by a simple design, low power, and a limited set of functions. You can use a hair dryer continuously for a short period of time. The main advantage is the low price.
A professional hair dryer is considered more powerful and wear-resistant. This is a multi-functional tool that is suitable for long-term work. The engine is protected against overheating. Another difference from household models is the high price.
For large-scale events, it is recommended to use industrial devices. These are large devices with high power consumption. The price of equipment is high.
Which hair dryer to choose | |
| Domestic | Professional |
| continuous operation time – up to 15 minutes | closed handle |
| Max. heating temperature – 500-560° | removable heat shield |
| no need for smooth temperature control | temperature stabilization function regime |
| function of smooth temperature control | |
Nutrition
Models powered by mains and batteries are available. When performing work in an area where there is no power supply, it is recommended to choose battery-type hair dryers. They provide energy independence. When studying the technical specifications, it is worth paying attention to the period of continuous operation of the battery, as well as the battery charging time.
Professional models with removable batteries are popular. This allows two batteries to be used alternately, eliminating downtime required for charging.
Power, W
Models with a power of 500-4000 W are available on the market. If you plan to use the tool from time to time, it is worth considering options with a rating of 1400-1800 W. For professional use, you should pay attention to hair dryers with a power of 2000 W or more.
Maximum operating temperature, °C
This parameter depends on the power of the tool. The value must be taken into account when working with refractory materials. The devices are capable of heating the surface to the following values:
- household – up to 500°;
- professional – up to 650°;
- industrial – up to 700°.
When choosing a model, it is also important to take into account the minimum heating temperature, especially if you plan to dry paint materials or cool welded parts. Hair dryers that have a cold blow function (flow temperature does not exceed 25 degrees) deserve attention.
Temperature adjustment
This option allows you to change the temperature of the air at the outlet of the instrument. This is one of the most important functions. There are two types of adjustment:
- smooth;
- stepped.
In the first case, the regulator does not have a fixed position, due to which the temperature is set more accurately. These models have a high price. The option is used primarily in professional devices.
The stepped version has a regulator with several fixed positions. The temperature is set less accurately, but this model is ideal for performing simple work. The cost of hair dryers with step adjustment is less than that of devices without a fixed position of the regulator.
What attachments are included?
The functionality of the tool is determined not only by the power, but also by the presence of nozzles in the kit. These are special nozzles through which the device supplies hot air to the surface being treated.
| Nozzle type | Purpose |
| Round focusing | soldering copper, sealing cracks and crevices using plastic tape |
| cutting | straight and shaped cutting of foam plastic |
| Flat guide | removing paints, old wallpaper, veneer, putty, film from the surface |
| Special glass protection | Removing paint and varnish coatings from ceramics, glass and other fragile materials |
| Welded | working with synthetic welding cables |
| Reflex | heating plastic pipes before giving them a certain shape, as well as self-compressing hoses before welding them |
| Splined | welding of polyvinyl chloride sheets, foil |
| Mirror | welding plastic |
Cable length, m
This parameter is taken into account on an individual basis if there are restrictions on access to the outlet. The average is 2-3 m.
Weight, kg
Most often, construction hair dryers are compact and light in weight. The load is distributed evenly, which eliminates rapid hand fatigue. The exception is industrial models, which are made of high-strength materials and have a powerful engine in their design.
Reference! The average weight of devices for household and professional use is 0.9-4 kg.
What are the options?
For convenient use of the tool and expanding the scope of its use, it is recommended to pay attention to additional options when selecting a model.
| Air flow adjustment | The option allows you to change the flow speed, which makes the tool universal, suitable for a wide range of tasks. |
| overheat protection | When the engine load is increased, the thermocouple is switched off, which prevents engine damage. Turns off the thermocouple in case of overheating. The danger of overheating is observed when the device is operated perpendicular to the surface being treated. |
| Display | The presence of a display allows you to control the heating temperature. |
| Incoming air filter | When using a hair dryer for repair and finishing work, when there is a high concentration of dust in the air, it is recommended to choose models with a filter for the input flow. Blowing dusty air through the tool will shorten its service life. |
| Cold air system | When performing soldering, the function of not only heating is important, but also blowing cold air to speed up the fixation of the connection. Some models are equipped with an option to turn off the coil, which ensures the supply of cold flow. |
When choosing a construction hair dryer, you should pay attention to models equipped with a control indication function. This solution allows you to better perform complex work where there is a risk of surface overheating or insufficient heating. The option is presented in the form of LED backlight or display.
What is a hair dryer
A construction hair dryer is a professional tool that produces hot air. The temperature maximum can reach 650 degrees. The device is equipped with attachments that help perform a number of specific operations:
- Heating and removing old paintwork.
- Heating and soldering of various plastic parts.
- Melting frozen compounds.
- Welding the film.
- Drying the surface after painting.
- Removing glue, linoleum and similar materials from the heated surface.
- Soldering metal parts.
- Bending plastic pipes.
A construction hairdryer, factory-made or made independently, is indispensable when carrying out construction and repair work.
With open pistol grip
Covered handle protects your hand from hot air
Why do you need a hair dryer and what functions does it perform?
A construction hair dryer, or as it is also called, a hand-held hot air apparatus, is highly valued by professional craftsmen and amateurs. The device is practical and versatile, which allows you to use its functions to perform any kind of work.
The stores offer a huge selection of models, but how much a particular device will cost is influenced not only by the technical characteristics, but also by the manufacturer’s brand.
Welding bumpers and other plastic parts
Using a heat gun, for example, from the Bosch brand, is considered an effective way to restore a damaged bumper part. When using the apparatus and plastic filler rods, the parts are tightly connected throughout the entire thickness. This operation is called welding.
The method is suitable not only for welding automotive parts. However, the material to be repaired must be thermoplastic, which softens and sticks together under the influence of high air temperatures.
It should be borne in mind that each type of plastic melts under the influence of a certain temperature, so the hair dryer must be set to the optimal mode. For work, it is best to choose a “welding” Y-shaped nozzle.
It is permissible to start operating the tool only with a mask and gloves, since the unit belongs to the category of traumatic
Welding linoleum using a hair dryer
In its principle, the technology resembles the method described above. The same nozzle is used, but a soft rolled 4 mm cord is used along with the rod.
Important! In rooms with high humidity levels, hot welding is a prerequisite for installing linoleum.
Welding PVC fabric
Work process:
- The material must be joined with an overlap of several cm.
- On a heat gun, for example, Interskol brand or any other, install a crevice nozzle, the width of which is 20-40 ml.
- The overlap area overheats.
- The nozzle must be moved along the seam, while simultaneously rolling the surfaces to be glued with a hard roller.
Important! PVC fabrics can vary in composition and structure, so it is necessary to set the optimal temperature and transfer speed of the device.
The heat gun allows you to quickly connect any materials
Soldering copper pipes
Principle of operation:
- A pipe cutter is used to cut elements of the required length.
- The pipe is ground and its diameter is increased using a pipe expander.
- Flux is applied to the soldering area, after which the pipes are connected.
- You need to install a nozzle with a reflector on the device and set the temperature to 50 degrees.
- The pipe connection is warming up.
- After performing these steps, the tool must be removed and the solder wire must be brought into the seam area.
Removing floor coverings with a technical hair dryer
A heat gun allows you to quickly and without unnecessary difficulties remove the old floor covering that covers the house. To do this, you will need to set the temperature on the device to about 600 degrees, fix a wide narrow nozzle in the nozzle and start heating the material.
The tool is used to blow the coating from the edge. Simultaneously with this action, it is necessary to lift the material using a rigid spatula.
A construction hair dryer allows you to remove old flooring without unnecessary difficulties
Sticking and removing car films
Polymer material applied to a car, for example, when embossing is performed, that is, creating a three-dimensional pattern, can be removed with a heat gun. To do this, you need to heat the vinyl covering until the adhesive layer softens.
Furniture edging
It is recommended to install PVC film using a technical hair dryer. To this end:
- The tape must be cut to the length of the edge.
- Using a heat gun with a wide nozzle installed, it is heated from the side of the adhesive layer.
- Roll the glued edge with a hard roller.
- Using a metal ruler, trim the protruding edge strip flush with the furniture piece.
Crimping of heat-shrinkable tubes, cable sleeves, films
For work, industrial hair dryers with straight lattice nozzles are used. To warm up heat-shrinkable tubes and couplings, use a device with an installed “spoon” or reflective grating nozzle.
During operation, no combustion products are released into the air
Removing paint and varnish coatings
A worker can remove varnish using the device in a matter of minutes, without spending a lot of effort. This method is safe, since no solvents are used and no toxic substances are released into the air.
You need to mount the crevice nozzle on the tool, and then set the temperature to 500 degrees. Next, you should warm up the required surface and when the paint or varnish softens, remove them with a spatula.
Dismantling and installation of electronic components
Principle of operation:
- A reduction nozzle is installed on the nozzle of the device.
- The microcircuit is closed using a mechanism convenient for the employee.
- Once the solder has melted, the electronic component is removed from the board.
Other areas of use of a technical hair dryer
An electrical device allows you to solve any, even the most complex tasks, so with it any construction becomes not difficult:
- quick defrosting of locks;
- destruction of bitumen stains and grease;
- drying primers, glue and varnish that are applied to the farm;
- using hot air to remove mildew, mold and insect pests (eg bedbugs).
The device can be used to perform any household work.