A meat grinder is considered one of the most popular kitchen appliances; all modern food processors and blenders have not been able to supplant it from the kitchen. With the help of a meat grinder you can make not only minced meat and pates, it is used for making homemade sausages and sausages, squeezing juice, preparing vegetable puree, original cookies and pasta. All this will be available to any housewife, but to do this you need to know how to properly assemble a meat grinder so as not to call your husband into the kitchen when you urgently need to grind meat or squeeze out juice.
Mechanical meat grinder
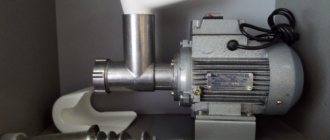
Electric meat grinder
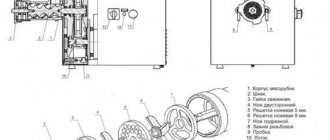
Design of a conventional meat grinder
Before assembling a meat grinder, you need to study its design. Since the times of the USSR, we were well aware of the old, but very reliable Soviet design - a manual version that still helps users in the kitchen today. Then its analogues began to appear, but only with an electric drive, but the main details remained the same.
- The one-piece body was made of cast iron, then they switched to various alloys based on light and durable aluminum. In the upper part of it there is the neck of the meat receiver, where processed products are placed.
- An auger is a specially shaped shaft that, when rotated, propels products toward the exit of the product.
- At its end, a knife is put on, which performs the grinding - it can be disk or with wings.
- The grid regulates the degree of grinding of products; instead, shaped devices are inserted into the meat grinder when working with dough.
- A round-shaped clamping device is used to securely fix all elements in the housing. There are special protrusions on it for easy fastening.
- A handle is attached to the rear of the shaft with a special wing screw to rotate the entire mechanism.
Important! The manual version of the product is installed on the edge of the table and secured using a special threaded device. Material must be placed under the metal base to prevent the product from moving on the table.
Step-by-step instructions for assembling an electric meat grinder
If a person knows how to assemble a mechanical device, the electrical version will not cause any difficulties. You need to adhere to the following algorithm:
- Connect the gearbox to the auger, the end of the latter should be placed in the plastic groove of the gearbox, carefully twist counterclockwise until a click forms. If the connection of the components is not tight enough, the screw will not spin.
- Attach the grid and blade to the other end of the auger. It is important that the protrusion fits exactly into the hole.
- Screw the elements with a nut.
- Install the loading container and get to work.
After use, any meat grinder requires mandatory cleaning. To process all parts, you will need to disassemble the device. Once assembled, washing it is strictly prohibited. It will not be possible to remove the remaining pieces of meat from a hand-held device, and cleaning with water often causes an electrical short.
You need to act this way:
- Disconnect the meat receiver, if possible in the device of a particular model.
- Carefully unscrew the clamping nut. It is worth maintaining it, otherwise pieces of food will fall out.
- Remove the ring and knife.
- Unscrew the screw and remove the handle in the mechanical device.
- Remove the snack from the housing.
- Treat each part with warm water and wait until dry.
Hot water should not be used for knives. This can make them dull. It is necessary to clean the minced meat from the disks using simple toothpicks or matches. The body of the electrical appliance is wiped with a damp cloth.
Video: how to assemble a manual and electric meat grinder step by step with photos?
Step-by-step assembly algorithm
How to assemble a mechanical meat grinder? To do everything correctly, you need to follow the operating instructions that come with each product. If it is missing, then we will tell you a step-by-step assembly method.
- The main shaft or auger must be inserted into the housing, with the handle attachment point coming out from the opposite side, and the remaining parts are installed at the thinner end.
- Installing the knife is the most important task; one side of it is flat and polished to a shine, so this part must face the grate in order to slide along it while working. Many users are confused about which side the cutting tool should be placed on - as a result, the device is assembled incorrectly.
- When installing the disk version, the cutting edge also always faces the grille. It is this moment that is of great importance - it all depends on how to install the knife correctly so that the meat grinder chops the food and does not crush it.
- Now it’s time to install the grille correctly - it has a special groove that must be inserted into the protrusion on the main body. The grid should fit snugly against the cutting tool.
- The final step is to tighten the clamping device, which securely fixes all the parts inside the case.
- Now you can install and secure the handle to rotate the mechanism. The meat grinder is assembled - you can attach it to the edge of the table and prepare minced meat.
We described in detail how to correctly assemble a manual meat grinder yourself; the main task is to correctly install the knife and grid, otherwise the product will not work. How to properly position the product for work is shown in the photo below.
Rules of care and features of changing attachments
After use, the meat grinder must be disassembled and all its elements washed. We begin this process in reverse order. The handle is removed first. Then the nut securing the grille is unscrewed, the grille is removed, the knives are carefully removed, and then the shaft. Under no circumstances should you wash the meat grinder when assembled - you will not be able to guarantee proper cleaning of the container and elements even under high pressure of water. And spoiled meat can lead to infections and germs, as well as an unpleasant odor that will be difficult to get rid of later.
Most often, for proper drying, parts and elements are laid out on a kitchen towel, where excess moisture drains and evaporates. Only after this can the product be reassembled or all the elements put away in a box or cabinet.
Today, the range of manual meat grinders is quite wide. The market offers both cast iron, aluminum, plastic and stainless steel models. Such diversity, of course, makes it difficult to choose the right product. The editors of the site decided not to stand aside and have prepared several recommendations that will help you decide on the right model.
- study the material from which the device is made. Some types of plastic may be toxic. If in doubt, ask for a certificate of conformity;
- look at the functionality. If you just need a meat grinder, do not buy a more expensive device with extra attachments. You will save money there;
- mounting option. Here it is worth starting from your preferences. These are usually silicone suction cups, which do not always live up to expectations. Silicone should be undamaged, durable, moderately dense;
- Last but not least is the price. The cost of mechanical models is lower than electric ones, however, a very cheap tool for grinding meat should raise questions, first of all, about the quality of the material. Study carefully the most important mechanisms: the screw shaft, the handle fastening, the shaft stroke during operation;
- Buy any household appliances only with the appropriate certificates. This is especially true for those machines and tools that are somehow involved in preparing food. Be sure to require certificates for the quality of the material and its toxicity;
- If you are planning to purchase online, be sure to check the store's reviews. You should also not buy goods on sale. Usually it already has defects. In addition, you should refrain from purchasing an item that was used as a demo model.
So, we have told you the main points that you should pay attention to when choosing a mechanical meat grinder. In addition, you now have some knowledge that will help when assembling and disassembling the product
Do not forget that any mechanisms require careful care.
And in conclusion, we suggest watching a useful video on assembling a manual meat grinder.
MAYBE
Electric meat grinder design
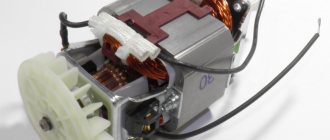
The body of electric meat grinders is most often made of plastic, in contrast to manual devices, which consist entirely of metal parts. In electrical appliances, only those parts that directly grind products (knives, grates) are made of metal, as well as other loaded elements that work to transmit force (auger, fixing and connecting elements). The main working part of the meat grinder is the engine built into the main body. When turned on, it rotates the auger, pushes the food towards the knives, and rotates the knife. In general, it does all the work.
The electric meat grinder does not have a handle through which the user drives the auger; it is not necessary. But the devices often have a removable tray for serving food, which can be removed when not in use to save space.
The electric meat grinder always comes with a food pusher. You should definitely use it to move the meat towards the auger, this will avoid injury. The auger itself ends in a plastic fastening element, thanks to which the rotating element is fixed inside the housing. In new models of electric meat grinders, the knife has a complex relief, thanks to which the minced meat is of higher quality.
Read more about the design of a meat grinder in this article.
How to put a knife in a meat grinder?
join the discussion
Share with your friends
A meat grinder is a household appliance that quickly took root in the kitchen and became popular. Today, with its help, many culinary processes are carried out, semi-finished products are prepared for further use. A meat grinder can hardly be called a complex unit to set up, but still some difficulties may arise. One of the pressing questions is how to insert a knife correctly? This is exactly what we will talk about in this article. The instructions, which will be described in detail here, will enable the user to assemble the device without much effort and problems.
How to properly assemble an electric meat grinder
Assembling an electric meat grinder is no more difficult than a manual one. Detailed instructions, often illustrated, are in the user manual for each specific device. In general, the order of assembling the device is as follows.
- First you need to insert the auger into the slot on the motor housing. Then fix it by turning it counterclockwise so that the part snaps into place. This guarantees proper operation of the mechanism and transmission of force.
- It is advisable to check whether the mounting hole coincides with the auger and whether it is well secured. Otherwise, the meat grinder will not work, at least the auger will rotate in the socket.
- A knife is put on the free end of the screw part, and a grille is screwed on top of it. It is important to ensure that the parts are marked and fit correctly on the holes and threads. This will allow you to assemble the knife blade and the grate with the correct side.
- The entire structure is fixed with a clamping nut. It needs to be secured well.
- Next, you need to mount the food supply tray on the device body. That's it, the meat grinder is ready to work.
Key points
The removable meat receiver is removed from the neck of the body.
The clamping nut is unscrewed counterclockwise, and to fully grasp it by hand, cover it with a dry cloth. The knife and grid are removed from the screw shaft finger.
Then the fastening screw that holds the handle of the machine is unscrewed, and after that the handle itself is removed.
Next, you can remove the shaft itself from the body, thereby freeing the manual meat grinder from it.
The knife and other parts are completely cleaned of minced meat residues and washed in warm water - with a special dishwashing gel or by adding a small amount of soda. At the end, everything is rinsed and laid out on a clean cloth or napkin to thoroughly dry all the parts.
Experts recommend storing the mechanism disassembled, and before assembling it begins, you need to lubricate the auger with vegetable oil. This storage technology helps to securely hold all the components together and prepare good minced meat.
Installing additional equipment on a meat grinder
Many appliances also come with attachments for preparing sausages, cookies, or grills of various sizes. They can also be purchased separately. Depending on what accessory is used, the assembly sequence of the meat grinder may differ from the standard one. This information is in the user manual for each specific device.
The attachment for forming sausages and shaped attachments for cookies are attached to the end of the auger instead of a knife and grid, and is also secured with a clamping nut.
Kebbe attachment for forming sausages from minced meat
Some models have juice making equipment. It usually comes assembled and is simply installed on the meat grinder body.
Assembly and operation of a manual meat grinder
Before starting the main work, it is necessary to thoroughly wipe all components. Carrying out such actions will increase the service life of the device. Moisture and food residues will cause rust to appear on the body.
How to properly assemble a manual meat grinder
Now we’ll find out how to assemble a manual meat grinder step by step:
- We take the auger and insert it into the housing. The wide part of this device should be located near the handle, the narrow part - in the place where the knife is secured.
- We insert the handle into the ledge of the auger and fix its position using a special screw.
- In another part of the auger we install a cross-shaped knife, its flat part should face outward. The disc-type cutting element must be in contact with the grate with its edges.
- After the knife is installed, put on a metal round mesh (the protrusions on the body and the mesh must match).
At the final stage of work, we tighten the fixing round nut and check the functionality of the equipment by several rotations of the handle.
How to properly place a knife in a meat grinder
Previously, we got acquainted with the process of assembling a manual meat grinder, now we will learn how to correctly insert a knife into a meat grinder. You can find two main types of knives in stores, with a single-sided or double-sided blade.
When the auger is installed, a part with a one-sided blade is fixed to the device so that the cutting part slides along the surface of the grate. If secured incorrectly, meat or other foods will squash but not shred.
Elements with a double-sided blade are installed on either side.
How to use a manual meat grinder
The device in question has a manual drive. The principle of its operation is based on the pressure created by the screw.
The meat from the loading hopper falls onto the auger, which presses the product against the body and moves it towards the outlet. When moving along the shaft, part of the meat falls under the knife, which cuts off small fragments from the piece and pushes the product through the grate into a substitute container.
The grinding of raw materials occurs constantly along with the rotation of the device handle. If the user wants to get fine minced meat, it is recommended to use racks with small holes or pass the product through a meat grinder again. If large pieces of meat are stuck or a product jam occurs, then the handle is rotated in the opposite direction.
The reason for improper operation of the device is most often the winding of meat films around the cutting part. In this case, you need to disassemble the meat grinder, clean the knife from stuck parts and put it back together. It is recommended to disassemble the device after each chopping of meat or other products. This will increase the service life of the device.
How to unscrew a meat grinder
There are times when it is very difficult to unscrew the clamping washer of a meat grinder. This occurs due to the dullness of the knife, which leads to accumulation of meat near the cutting part. In such a situation, proceed as follows:
- Turn the device over and place it in a container of hot water for about 10 minutes.
- We take a small hammer and make light taps in the center of the grille, as well as on the ribs of the clamping nut.
- We unscrew the part, after the manipulations it should quickly give in.
If you have an assistant nearby, you can try to unscrew the meat grinder together. In this case, one person holds the device, and the second unscrews it.