Despite the wide range of modern household appliances, the meat grinder has firmly entered the life of every housewife, becoming a sought-after appliance in the kitchen. Many users prefer a manual meat grinder, which has long established itself as a reliable assistant in the field of cooking.
With this kitchen appliance you can quickly chop meat or vegetables, as well as prepare fruit puree or squeeze juice. But not every housewife knows how to properly assemble the mechanism of a kitchen appliance so that all the parts perform their functions.
Electric meat grinder design
The body of electric meat grinders is most often made of plastic, in contrast to manual devices, which consist entirely of metal parts. In electrical appliances, only those parts that directly grind products (knives, grates) are made of metal, as well as other loaded elements that work to transmit force (auger, fixing and connecting elements).
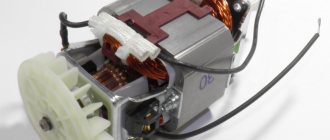
The main working part of the meat grinder is the engine built into the main body. When turned on, it rotates the auger, pushes the food towards the knives, and rotates the knife.
In general, it does all the work.
The electric meat grinder does not have a handle through which the user drives the auger; it is not necessary. But the devices often have a removable tray for serving food, which can be removed when not in use to save space.
The electric meat grinder always comes with a food pusher. You should definitely use it to move the meat towards the auger, this will avoid injury.
The auger itself ends in a plastic fastening element, thanks to which the rotating element is fixed inside the housing. In new models of electric meat grinders, the knife has a complex relief, thanks to which the minced meat is of higher quality.
Read more about the design of a meat grinder in this article.
Design
Before assembling a meat grinder, you need to study its design. Since the times of the USSR, we were well aware of the old, but very reliable Soviet design - a manual version that still helps users in the kitchen today. Then its analogues began to appear, but only with an electric drive, but the main details remained the same.
- The one-piece body was made of cast iron, then they switched to various alloys based on light and durable aluminum. In the upper part of it there is the neck of the meat receiver, where processed products are placed.
- An auger is a specially shaped shaft that, when rotated, propels products toward the exit of the product.
- At its end, a knife is put on, which performs the grinding - it can be disk or with wings.
- The grid regulates the degree of grinding of products; instead, shaped devices are inserted into the meat grinder when working with dough.
- A round-shaped clamping device is used to securely fix all elements in the housing. There are special protrusions on it for easy fastening.
- A handle is attached to the rear of the shaft with a special wing screw to rotate the entire mechanism.
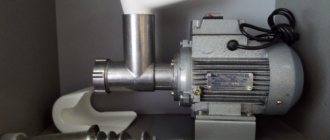
In electric meat grinders, the set of main parts is identical, they must be assembled in exactly the same way, the only difference is in the drive and the housing, which is made of hard plastic. Such a device is controlled using keys located on a special panel, and rotation is carried out by an electric motor.
Important! The manual version of the product is installed on the edge of the table and secured using a special threaded device. Material must be placed under the metal base to prevent the product from moving on the table.
How to properly assemble an electric meat grinder
Expert opinion
Zakharov Igor Vyacheslavovich
Consultant at a furniture store. 5 years of experience.
Assembling an electric meat grinder is no more difficult than a manual one. Detailed instructions, often illustrated, are in the user manual for each specific device. In general, the order of assembling the device is as follows.
- First you need to insert the auger into the slot on the motor housing. Then fix it by turning it counterclockwise so that the part snaps into place. This guarantees proper operation of the mechanism and transmission of force.
- It is advisable to check whether the mounting hole coincides with the auger and whether it is well secured. Otherwise, the meat grinder will not work, at least the auger will rotate in the socket.
- A knife is put on the free end of the screw part, and a grille is screwed on top of it. It is important to ensure that the parts are marked and fit correctly on the holes and threads. This will allow you to assemble the knife blade and the grate with the correct side.
- The entire structure is fixed with a clamping nut. It needs to be secured well.
- Next, you need to mount the food supply tray on the device body. That's it, the meat grinder is ready to work.
Step-by-step assembly algorithm
How to assemble a mechanical meat grinder? To do everything correctly, you need to follow the operating instructions that come with each product. If it is missing, then we will tell you a step-by-step assembly method.
Manual meat grinder
We described in detail how to correctly assemble a manual meat grinder yourself; the main task is to correctly install the knife and grid, otherwise the product will not work. How to properly position the product for work is shown in the photo below.
Electric meat grinder
We figured out how to assemble a manual meat grinder, now it remains to find out the nuances and differences in assembling its electric counterpart, which is much more complicated in operating principle, but the process of assembling the main body is identical.
To assemble an electric meat grinder, for example, the most popular and widespread brand Mulinex, you need to take into account some of its features.
- Installation of the product should be carried out using a similar method as was done when assembling a manual meat grinder. Then the housing with all the main parts must be connected to the electrical part. To do this, insert the hexagon of the auger
into the special hole and turn it counterclockwise until it clicks. - Then we install a special bowl or tray for loading products
into the socket located on top - the meat grinder is ready for use.
When assembling different models, there may be minor differences; to find out, you need to check the instructions. For clarity, there is a video that shows the whole process step by step and clearly:
For preparing homemade sausage or frankfurters, there are special conical attachments.
, and instead of the grate and knife, you need to insert a special washer (see photo). All parts are assembled in the same way: the nozzle has a groove identical to the grille, then everything is secured with a clamping device. The conical part can be made of the same alloy as all internal parts. If it is made of plastic, it is secured with a nut made of a homogeneous material.
It is worth remembering that sausages, wieners and other similar products require a special casing, which is made from the intestines of large animals; without it they cannot be cooked.
Sausage attachments
Installing additional equipment on a meat grinder
Many appliances also come with attachments for preparing sausages, cookies, or grills of various sizes. They can also be purchased separately.
Depending on what accessory is used, the assembly sequence of the meat grinder may differ from the standard one. This information is in the user manual for each specific device.
The attachment for forming sausages and shaped attachments for cookies are attached to the end of the auger instead of a knife and grid, and is also secured with a clamping nut.
Kebbe attachment for forming sausages from minced meat
Some models have juice making equipment. It usually comes assembled and is simply installed on the meat grinder body.
How to disassemble and wash a meat grinder
The meat grinder should be disassembled and washed after each use. It is necessary to remove all dirt, otherwise food residues can become a source of bacterial growth and unpleasant odors. In addition, metal parts may begin to rust, and rubber parts may lose their elasticity.
Therefore, the meat grinder must be disassembled and thoroughly washed, paying attention to every small detail.
To disassemble the electric meat grinder, you need to do the following:
- make sure that the device is disconnected from the network;
- if the tray (meat receptacle) is removable, it must be removed first;
- unscrew the clamping nut, while holding the parts that it fixed;
- remove the knife and grate;
- dismantle the auger and remove it from the housing.
All removed elements are washed with detergent. It is necessary to rinse thoroughly under running water.
Small parts may become clogged with debris. You can clean them with a dish brush, toothbrush or toothpicks.
All elements must be dried. Some manufacturers allow you to wash spare parts in the dishwasher (this is indicated in the instructions for the specific model of the device).
There are several important guidelines to follow.
- To store the device, you must choose a dry, ventilated place so that rust or mold cannot appear on the parts.
- It is recommended to wash knives in warm water, avoiding temperature shock (sudden change of hot water to cold and back), because This makes the cutting edge brittle and quickly dulls.
- It is enough to wipe the body of the device with a damp cloth or a special cloth designed for caring for household appliances.
- The housing and electrical mechanisms inside cannot be washed under water. This will lead to device failure.
To understand how to assemble a manual meat grinder, you need to understand what parts it consists of. Assembling a manual meat grinder is quite simple, regardless of its model, since they have almost the same operating principle, and all their parts are also made the same. Manufacturers are improving the case, changing the type of fastening to a more convenient and functional one, however, the internal part of the device remains unchanged.
Photo: how to properly assemble a manual meat grinder
It is advisable to keep the meat grinder disassembled so that the included steel knife and grid do not become rusty. To properly assemble this kitchen appliance, you must know the basic principle of its operation and exactly what parts it consists of.
When assembling the meat grinder, make sure that all components are clean and dry. Failure to follow these simple rules can reduce the performance of the mechanism.
There are three holes in the meat grinder body, namely:
- Meat receiver into which products for processing are loaded;
- Rear output of the auger shaft, intended for the handle;
- The front exit is where the knife and mesh are secured.
To ensure that the handle holds firmly and does not slip during operation, manufacturers equip it with a special nut. At the bottom of the case is added a device with which the meat grinder is firmly attached to the table for work. Thanks to the special fastening, the meat grinder will stand very firmly on the table surface and will not move during operation.
Before you start assembling a manual meat grinder step by step, you need to study the structure of the device, which consists of:
- Screw shaft;
- A knife made in the form of a disk or propeller;
- Lattices;
- Clamp nut;
- Pens.
Expert opinion
Zakharov Igor Vyacheslavovich
Consultant at a furniture store. 5 years of experience.
To assemble a mechanical meat grinder, you first need to lay out all the parts on the table. First, take the metal housing and insert the screw shaft into it, so that its larger edge extends into the narrow hole of the meat grinder.
Attach a handle to it and tighten it tightly with a nut. If the nut is not included in the kit, then the handle should be installed last.
The smaller side of the auger should be located in the area of the wide round hole. It is long enough and two parts will be attached to it. First you need to put on a knife.
This is considered one of the most important steps in assembling a meat grinder, since you need to know which side to insert the knife, otherwise the meat grinder will not work.
On the one hand, the knife has a flat part, and on the other, a slightly convex part. It must be installed so that the flat side is on the front side of the meat grinder and is clearly visible, and the convex side is located inside the auger.
The knife, made in the form of a disk, is mounted so that its cutting edges are located outside. It is important to use only those knives that came with the meat grinder, as others may not be suitable according to their parameters.
Then put a grate on the end of the auger, on which there are several tendrils, and on the wide opening of the meat grinder body there are depressions, which must coincide with each other. After the entire mesh has been assembled, install the clamping nut and tighten it.
Installation is carried out so that the nut is level and fits firmly into the thread. The assembly diagram of the meat grinder design will help you determine in stages how to properly assemble the device and prepare it for work.
Correct assembly
To assemble the meat grinder, you first need to insert the auger inside the body, orienting it so that the threaded end comes out of the rear, narrower hole. A handle is put on it, which is fixed to the meat grinder with a special screw. On the other hand, a knife is installed in it. It is directed with the flat side outward, and its convex surface, accordingly, will look inside the body. The grille does not have a clearly defined orientation, so it can be placed on either side, always aligning the side cut with the protrusion.
A tightening ring is screwed on top. There is no need to apply excessive force to it and twist it very tightly. This can complicate the work process, and then it will be difficult to disassemble the meat grinder to wash it. All that remains is to securely fix the meat grinder to the edge of the table using the clamp screw.
Electric model: how to properly assemble a meat grinder
Despite the fact that food processors and other types of equipment have appeared, the meat grinder still remains a fairly popular device. However, in order to get high-quality homemade minced meat, you must follow the assembly sequence of the meat grinder and take into account the structure of the device.
The range of meat grinders is quite large, however, they are divided into only two types: manual and electric.
It is noteworthy that before assembling an electric meat grinder, you need to remember the principle of assembling a mechanical device and its parts
A wide variety of knives and attachments makes this device multifunctional, since it is possible not only to grind minced meat, but also to cook:
- Sausages and sausages;
- Various types of purees;
- Juices;
- Pasta.
Many people prefer to use an electric meat grinder, as it is multifunctional and quite easy to use. When using it, you do not need to exert any physical effort; you just need to place the meat or other products in the meat receiver and press the button.
Important! The mechanical device is quite easy to use and does not have many attachments and speeds. An electric meat grinder allows you to control the degree of grinding of minced meat and the speed of its grinding.
Assembling an electric meat grinder is quite simple, especially if you have previously mastered assembling a manual device. Connect the gearbox to the auger; to do this, place the end of the auger in the plastic groove of the gearbox and turn it slightly in the opposite direction until a characteristic click is heard.
All parts must be installed tightly. Place the blade and grid on the opposite end of the auger.
The protrusion must fit strictly into the hole. Secure the parts with a nut, install the loading container and you can start working.
It is worth noting that the electric meat grinder, regardless of the manufacturer, is made of durable plastic. Among the most popular options, it is necessary to highlight meat grinders from Mulinex, Scarlett, Bosch, since all the proposed models are distinguished by high quality, reliability and functionality.
The housing of such a device contains a starting motor and to start working, you just need to press a button. In almost all models of electric meat grinders, the meat receiver is removable, which is why it must be installed before starting work. The set includes a special pusher for better and faster movement of products to the knife.
The surface of the knife has special convexities, which contributes to better chopping of products.
Make it four!
Pay attention to the picture below. It is in this way, and no other way, that your wrist should be fixed at the moment the knife leaves your hand. You will definitely want to lower your hand down, since your mind will be sure that from this position the blade, which is almost perpendicular to the ground, will definitely fly up somewhere. But don't trust your feelings. Your inner voice is wrong again, just like that time when it advised you to bet all your money on zero.
Despite the wide range of modern household appliances, the meat grinder has firmly entered the life of every housewife, becoming a sought-after appliance in the kitchen. Many users prefer a manual meat grinder, which has long established itself as a reliable assistant in the field of cooking.
With this kitchen appliance you can quickly chop meat or vegetables, as well as prepare fruit puree or squeeze juice. But not every housewife knows how to properly assemble the mechanism of a kitchen appliance so that all the parts perform their functions.
Instructions: how to assemble a manual meat grinder
You need to know not only how to properly assemble an old Soviet manual meat grinder, but also how to disassemble the device after use. After use, this household appliance must be thoroughly cleaned to remove food residues. In order to thoroughly wash all the parts, you must disassemble it, since washing the device when folded is strictly prohibited.
The quality of grinding meat and the prepared dish depends on the correct assembly
Initially, you need to unscrew the clamping nut, then:
- Remove the sieve and knife;
- Unscrew the screw and remove the handle;
- Pull the auger out of the housing.
Rinse all elements well with warm water, possibly adding dishwashing detergent, and lay them out until completely dry. It is not advisable to wash knives with hot water, as this reduces their sharpness. The grate can be cleaned of minced meat residues with toothpicks or matches. After cleaning, the body should be washed with warm water and dried thoroughly with a towel.
After assembling a manual meat grinder several times, you can do this without much difficulty, since the whole process will become automatic. At first, you can use the instructions supplied with the device, as this will allow you to determine the correct installation of additional elements.
Tips and photos: how to properly place a knife in a meat grinder
Despite the fact that the process of assembling a meat grinder is quite simple, however, it is important to know how to position the knife correctly so that you can work with the device without problems.
Despite the simplicity of the meat grinder, the question “how to properly install a meat grinder knife” is very popular
The knife has a fairly simple structure and consists of:
- Convex surface;
- Flat part with cutting edges;
- A central hole made in the shape of a screw tip.
When assembling a manual meat grinder, you need to remember that the knife is always put on with the flat side out. Otherwise, the meat grinder will only press on the meat, but not grind it.
If the meat grinder is equipped with a circular knife, then its installation should also not cause difficulties, since its cutting edges are very clearly visible and should also come out. If there are difficulties with chopping food, you need to open the meat grinder and check that the knife and other parts of the device are installed correctly.
Electric complicated models have a slightly different assembly algorithm, since they come with two knives. The first double-sided knife is installed on the auger, then the grid comes, and after that, the second knife is put on, then the grid with smaller holes, and only after that, the fixing ring is put on.
Types of meat grinders
There are two types of meat grinders. Electric, high and medium power. The former successfully process any type of product - streaky meat or even frozen meat, which is why they are much more convenient than manual ones - you don’t have to wait for the meat to defrost, you can immediately start shredding. In addition, an electric chopper can not only grind meat into minced meat, but also cut it into small cubes.
Several types of attachments will allow you to set a certain amount of minced meat obtained at the output. Upon detailed study, it will be possible to understand that there are no fundamental differences in the design of meat grinders - both are similar in their design. Once you understand what goes where, you can easily correctly install all the screws, knives and fastening elements for your device.
Design of meat grinders: types and features
These devices are produced in a wide range, however, they come in only two types: manual and electric. The versatility of the devices is created using a large number of different attachments.
Electric analogues are especially popular at the moment. In order to process the ingredients, it is enough to place them in the meat receiver compartment, press the start button, and the products will begin to be processed. However, in addition to the advantages, this design has disadvantages:
- there is no way to control the presence of bones, and if they are caught, the device may deteriorate;
- in the absence of electricity, it is impossible to cook minced meat on such a device;
- If the engine burns out, processing of the ingredients will not work.
The design of electrical devices consists of the following parts:
- Housing made of durable plastic material;
- A motor that performs manipulations when the start key is pressed;
- Lack of handle and clamp;
- Most models have a removable meat receiver, which is installed before food processing begins;
- The presence of convexities on the surface of the knife for gentle chopping;
- At the screw end there is a plastic corrugated rod to ensure high-quality fixation.
Expert opinion
Zakharov Igor Vyacheslavovich
Consultant at a furniture store. 5 years of experience.
Healthy! Plastic may pose some health hazards. To avoid this negative phenomenon, the composition of the plastic material should be clarified.
Many housewives claim that mechanical analogues are already outdated, but they continue to delight users with their reliability and durability. This type of device almost never fails; the only unfavorable factor is the dullness of the knives. These working elements can be easily sharpened with your own hands, with a minimum of effort.
The body of manual meat grinders is made of reliable stainless steel, cast iron, and, less commonly, aluminum.
The design of a mechanical product includes the following components:
- The case is made of reliable metal, has a clamp to install the unit on various surfaces;
- Screw element - screw rod;
- A knife for chopping components, can be disk or with wings;
- Tightening ring for fixation;
- Handle attached with a screw;
- Grids having holes of different diameters.
Healthy! Mechanical devices are not very functional, but will last a long time without breakdowns. Such devices can handle any type of meat and will not be damaged if a bone gets in.
Additional components of the meat grinder
Manufacturers equip the units with standard parts and elements, but depending on the model, they may differ in additional attachments.
Manual designs are equipped with grates with different hole diameters to obtain different grinding ingredients. Cutting parts may differ in shape - with wings, disk.
Electric meat grinders are equipped with a removable meat receiver and a pusher for moving ingredients to the grinding element.
How to properly place a knife in a meat grinder
The assembly process itself is very simple, but it is important to know how to install the knife correctly so that the device effectively processes food. The cutting part consists of the main elements:
- Convex smooth surface;
- The flat part having cutting edges;
- A hole in the center, which is made in the form of a screw tip.
When assembling a manual meat grinder, you should follow the main rule - the knife is installed with a flat surface outward. If you miss this criterion, the device will press on the meat without chopping it.
In a circular knife, the edges are clearly visible, so they should also be with the cutting surface on top. In cases where problems arise with the processing of ingredients, it is necessary to check the correct installation of the cutting part and other working parts.
In electric models, the assembly of the structure is more difficult, because two knives are used simultaneously. The double-sided element must be installed on the auger, after which the grid is fixed, a second knife and a grid with small holes are installed on top, and the structure is secured with a fixing ring.
Important! In order for the unit to grind food efficiently, all parts must be accurately installed. If processing fails, all working elements must be rechecked for correct assembly.
Tips for care and disassembly for cleaning
Upon completion of use of the device, it must be disassembled into individual parts and thoroughly cleaned so that all contaminants are removed. It is prohibited to wash the meat grinder in the assembled state, because in a mechanical unit it will not be possible to remove food residues, and in electrical equipment such a situation can lead to a short circuit.
Key points for caring for the device:
- the removable meat receiver is removed from the body;
- the clamping nut is removed, while the internal contents must be lightly held;
- the grid and knife are removed, the screw securing the handle is unscrewed;
- the auger is removed from the structure;
- all parts are washed under running water, and the holes are cleaned with a toothpick or match;
- The products are dried on a napkin until the moisture is completely removed.
Important! It is not recommended to assemble a wet meat grinder! If moisture remains on the parts, corrosion may occur, and in electrical units the liquid can lead to motor combustion.
A manual or electric meat grinder is considered a fairly popular kitchen appliance. It is used for processing meat into minced meat, squeezing juice from fruits, stuffing homemade sausage, preparing vegetable puree or preparing pasta.
Expert opinion
Zakharov Igor Vyacheslavovich
Consultant at a furniture store. 5 years of experience.
In order for the equipment to work correctly, you need to familiarize yourself with the nuances of its design. From our article we will learn how to assemble and disassemble a meat grinder.
How to properly install the grid on a meat grinder so that the knife does not become dull
In this material we will not discuss how to properly assemble a meat grinder, etc. There is plenty of information on this topic on the Internet, but not many people know that you need to assemble the grill for a meat grinder correctly.
It doesn't matter whether your meat grinder is electric or manual.
Probably many of us have encountered such a problem as a dull knife in a meat grinder or the fact that the meat grinder stops “chopping” the meat and starts turning it in the body.
For example, when you have a new meat grinder, the knife is perfectly sharpened to the plane. But over time, the knife constantly “goes” along one plane and it wears in.
For example, you chop meat, of course, every meat contains fats, which act as a lubricant for the knife, it glides and the meat is cut.
You rolled up the minced meat, disassembled the meat grinder, washed everything, dried it and put it in the cabinet.
You need a meat grinder, you assemble it and indiscriminately install the grate on the other side
.
As a result, the knife begins to rub against the other side of the grate, completely differently.
After such “maneuvers,” a completely different groove begins to appear on the knife blade.
This is precisely the big mistake many people make!
To prevent the knife from becoming dull and the meat grinder to work for a long time and properly, do not forget to install the grill with only one side facing the knives.
Here is the lapped side of the grate.
Here's the other side.
By the way, new meat grinders are already equipped with grates with “shoulders”. You can’t go wrong with such a grille, because it can only be installed in one position.
Total: We always install the grid to the knives with one side!
Source: zen.yandex.ru
Existing types and design features of meat grinders
In modern stores you can find a huge number of models of meat grinders. All of them can be divided into two types: electric and manual. Along with the devices, the manufacturer also supplies additional parts (attachments and knives), which increases their functionality.
Attention!
A kitchen designer
has started working on our website . You can get acquainted with it and design the kitchen of your dreams completely free of charge! A wardrobe designer can also be useful.
Electric models have gained popularity among users. To obtain the final product, you do not need to expend physical effort; just press the start button and push the meat or vegetables into a special funnel.
Most modern housewives prefer to buy electric meat grinders for the kitchen, considering the manual version to be a relic of the past. In fact, these devices are reliable and easy to use, they actually do not break down.
One part that can fail is the knife, but it can be easily sharpened. The body of hand-held devices is made of stainless steel, aluminum or cast iron.
Manual meat grinders are easy to use. At the same time, electric models make it possible to select the required grinding speed or reverse motion. A variety of attachments allows you to create additional products.
A manual meat grinder consists of the following elements:
- steel case with special fasteners for installing the device on different types of surfaces;
- screw auger;
- cross-shaped or circular knife (used for chopping products);
- tightening metal ring;
- handle (fixed to the device using a special screw);
- round grilles with holes and a slot for fixing on the body.
Manual models are fixed to the surface using a special foot. For final fixation, a screw with an overlay is used. Devices with a plastic foot are securely attached to the surface. When installing metal products, place a piece of soft cloth under the foot so that the device does not slip on the surface.
The structure of the electric meat grinder is as follows:
- plastic case;
- electric motor;
- removable meat receiver;
- convenient plastic pusher;
- screw;
- corrugated plastic rod (this element is installed on the auger for reliable fixation);
- metal knife of a convex shape.
Unlike manual models, there are no paws. The stability of the device is ensured by a wide platform with several rubber pads.
When and how to use
If you are using a trimmer with a flexible rod, then only plastic blades or fishing line are acceptable. This requirement is due to safety regulations. Note that the manufacturer himself often attaches a plastic trimmer knife to his products.
But a metal disk head with a variable number of blades is much better. She doesn’t even care about thickets of old weeds and burdocks, which can tear hundreds of meters of fishing line. And plastic knives in this case are bad helpers.
Related Posts
Assembly and operation of a manual meat grinder
Before starting the main work, it is necessary to thoroughly wipe all components. Carrying out such actions will increase the service life of the device. Moisture and food residues will cause rust to appear on the body.
How to properly assemble a manual meat grinder
Now we’ll find out how to assemble a manual meat grinder step by step:
- We take the auger and insert it into the housing. The wide part of this device should be located near the handle, the narrow part - in the place where the knife is secured.
- We insert the handle into the ledge of the auger and fix its position using a special screw.
- In another part of the auger we install a cross-shaped knife, its flat part should face outward. The disc-type cutting element must be in contact with the grate with its edges.
- After the knife is installed, put on a metal round mesh (the protrusions on the body and the mesh must match).
At the final stage of work, we tighten the fixing round nut and check the functionality of the equipment by several rotations of the handle.
How to properly place a knife in a meat grinder
Previously, we got acquainted with the process of assembling a manual meat grinder, now we will learn how to correctly insert a knife into a meat grinder. You can find two main types of knives in stores, with a single-sided or double-sided blade.
When the auger is installed, a part with a one-sided blade is fixed to the device so that the cutting part slides along the surface of the grate. If secured incorrectly, meat or other foods will squash but not shred.
Elements with a double-sided blade are installed on either side.
How to use a manual meat grinder
The device in question has a manual drive. The principle of its operation is based on the pressure created by the screw.
The meat from the loading hopper falls onto the auger, which presses the product against the body and moves it towards the outlet. When moving along the shaft, part of the meat falls under the knife, which cuts off small fragments from the piece and pushes the product through the grate into a substitute container.
The grinding of raw materials occurs constantly along with the rotation of the device handle. If the user wants to get fine minced meat, it is recommended to use racks with small holes or pass the product through a meat grinder again. If large pieces of meat are stuck or a product jam occurs, then the handle is rotated in the opposite direction.
The reason for improper operation of the device is most often the winding of meat films around the cutting part. In this case, you need to disassemble the meat grinder, clean the knife from stuck parts and put it back together. It is recommended to disassemble the device after each chopping of meat or other products. This will increase the service life of the device.
How to unscrew a meat grinder
There are times when it is very difficult to unscrew the clamping washer of a meat grinder. This occurs due to the dullness of the knife, which leads to accumulation of meat near the cutting part. In such a situation, proceed as follows:
- Turn the device over and place it in a container of hot water for about 10 minutes.
- We take a small hammer and make light taps in the center of the grille, as well as on the ribs of the clamping nut.
- We unscrew the part, after the manipulations it should quickly give in.
If you have an assistant nearby, you can try to unscrew the meat grinder together. In this case, one person holds the device, and the second unscrews it.
Rules for assembling an electric meat grinder
The electric model is more bulky equipment. Before entering the grinder, the meat passes through a funnel, and then, with the help of special pushing mechanisms, it passes into the hopper. Some models are capable of not only making minced meat, but also cutting meat into cubes. The equipment is assembled according to the following scheme:
- As in the manual model, a screw is initially inserted into the housing
- The next step is to insert a ring with several holes
- The double-sided knife is also installed with the flat side facing out
- Now we attach the grille with medium-sized holes
- Installing another knife
- Now we install a smaller grid and fix everything with a special ring
Thus, the meat undergoes double processing. In general, the scheme is almost identical to that used when assembling a conventional, manual model. The knives here must also be installed with the correct side, otherwise they simply will not cut anything. Electric meat grinders with high production capacities have a huge energy reserve, which is why they can grind even frozen pieces. If the power of the devices is low or average, then you will only be able to grind fresh products.
Electric meat grinder and components
Each model has its own individual characteristics. Manual ones are practically no different from each other. Electric models have different powers and capabilities. All of them will work stably if assembled correctly - the mechanism of the device is as sensitive to assembly disturbances as any other. If you follow the order when installing the knife, then you will not have any difficulties when processing meat. The main thing to remember is that the knife should be installed with the flat side outward, and the convex side inside the body.
Source: technosova.ru
Assembly and operation of an electric meat grinder
If the user has encountered assembling a manual model, he can easily figure out an electric household appliance.
How to properly assemble an electric meat grinder
The assembly diagram of the meat grinder is as follows:
- We connect the plastic gearbox to the metal rim of the auger; the grooves of the parts must align. Turn the gearbox counterclockwise until a characteristic click appears. If the parts are connected incorrectly, the engine will not be able to turn the auger.
- The inside of the auger must exactly match the outline of the hole on the body.
- We put a sharp knife on the output part of the auger and install a grate. The holes and protrusions must match. When carrying out such work, it is necessary to position the knife correctly.
- We tighten the clamping nut and install the loading hopper in the upper part of the device body.
Now that we know how to assemble an electric meat grinder, let’s get acquainted with other nuances of this process.
How to properly insert a knife into an electric meat grinder
When installing the part, the cutting part of the knife should be in contact with the grid, which will facilitate thorough chopping of the supplied products. After installing the knife, secure the grill, fixing it in a special groove, then tighten the nut. If the cutting element is installed incorrectly, the meat will clog and remain inside the device.
How to use an electric meat grinder
At the initial stage of work, we cut the processed products into small pieces; they should fit into the opening of the receiving hopper. We plug the device into the outlet, press the start button and begin to push the product using a pusher to the auger.
Once on the shaft, the raw material will move and end up on the knife. Here the product is crushed and goes out into the receiving bowl.
When the engine is running, the recycling process occurs continuously. If the auger becomes clogged, the user only needs to turn on the reverse and remove the remaining product. Later they can also be used along with a new portion of meat.
There are several simple rules for using an electric meat grinder. Do not throw bones into the loading hopper together with meat. Before serving, any product is cut into small pieces. After carrying out the work, it is necessary to disassemble the household appliance, thoroughly wash and dry all parts.
Assembling a meat grinder: video
If you still can’t figure out the instructions, watch a video on how to assemble an electric and manual meat grinder. The authors describe in detail the configuration of the models and the sequence of assembly/disassembly.
Assembling a meat grinder is not that difficult, just a couple of training sessions and you will be able to cope with this task in a few seconds! It is best to store the meat grinder disassembled. Make sure that all parts are stored in one place, since replacing any component from the kit may affect the performance of the kitchen appliance.
- Knives - get a current promotional code for an X-FISHING discount on Akademika or buy knives at a discount on sale at X-FISHING
Kalashnikov, Mikhail Timofeevich
— Mikhail Timofeevich Kalashnikov Occupation: small arms designer... Wikipedia
Galileo (program)
— This term has other meanings, see Galileo. Galileo Genre popular science entertainment program Director(s) Kirill Gavrilov, Elena Kaliberda Editor(s) Dmitry Samorodov Production Television format (... Wikipedia
Medicine
— I Medicine Medicine is a system of scientific knowledge and practical activities, the goals of which are to strengthen and preserve health, prolong the life of people, prevent and treat human diseases. To accomplish these tasks, M. studies the structure and... ... Medical Encyclopedia
KNIFE
- Throw yourself at the knife. Kar. Commit suicide by stabbing yourself. SRGK 1, 119. For what knife? Region Why? What for? Mokienko 1986, 179. Pushes someone with a knife. Yarosl. About crying out loud. SRNG 21, 268. Good for a knife. Kursk About a desperate man. BotSan, 103 ... Large dictionary of Russian sayings
CLMN
— Plastic set of utensils KLMN is a generally accepted tourist abbreviation to denote a personal set of utensils. It stands for Mug Spoon Bowl Knife, and, as a rule, consists only of these items. Glasses, plates and forks are extremely popular when hiking... ...Tourist Encyclopedia
Assassin's Creed
— This is an article about a computer game. For a series of computer games, see the article Assassin's Creed (game series) Assassin's Creed Developer Ubisoft Montreal ... Wikipedia
Wolf or canine family
— (Canidae)** * * The family includes 16 modern genera and 36 species. Canids are widespread in Eurasia, Africa, North and South America; they entered New Guinea and Australia with humans. With the exception of one species, they have more... ...Animal life
ARTWORKS IN THE HOME
— ART PRODUCTS IN THE HOUSE. Artwork made of glass, crystal, porcelain, metal, stone, wood and other factory or handicraft materials are used to decorate a room. Many of them not only decorate, but also have... ... Brief Encyclopedia of Household Economy
Chemical laboratory*
— General device. L. can be called any kind of room adapted for chemical research. According to the nature of the work, they distinguish between organic chemistry, analytical chemistry, various types of chemical and technical laboratory, etc. From... ... Encyclopedic Dictionary of F.A. Brockhaus and I.A. Efron
Installing the knife into the plane
Setting or adjustment consists of setting the amount of extension of the tip beyond the plane of the sole. Determine the degree of release by looking along the sole of the plane from its front part towards the “back of the head”. If the knife blade is extended too far from the block, it will catch too thick chips and tear the wood. This can be done with a sherhebel, intended for rough, rough planing, and the plane should remove thin, even chips. A knife set too low will slide over the material being processed and remove too thin chips, which greatly increases the processing time. With a skewed knife, it is impossible to plan a smooth surface.
Now there are many types of planes, we will analyze all the suitable planes.
1.Installing the knife into a wooden plane with a single knife.
Place the knife on the plane tap hole with the chamfer down (Fig. 20)
(Fig.20)
Holding the plane knife, secure it with a wedge (Fig. 21)
(Fig.21)
Lightly tap the wedge with a hammer, then turn the plane over and, holding it by the front handle, look along the sole of the plane (Fig. 22),
(Fig.22)
then we begin to tap the plane knife until the blade comes out above the surface of the plane (Fig. 23)
(Fig.23)
the blade should extend 0.2-0.3 mm above the sole. evenly across the entire width of the sole; if the blade comes out uneven, it is leveled with gentle blows of a hammer on the side edges of the knife (Fig. 24),
(Fig. 24) after leveling the plane knife, we knock in a wedge to finally secure the knife in the plane.
2. Installing the knife into a wooden plane with a double knife.
Assembling a double knife with a chipbreaker (Fig. 25)
(Fig.25)
Then we repeat all the steps when installing a single knife (Fig. 20 to 24).
3.Installing the knife into a metal plane with a single knife.
We place the knife on the plane tap hole with the chamfer down (Fig. 26)
(Fig.26)
Holding the plane knife, secure it with a wedge (Fig. 27)
(Fig.27)
We press the knife with a screw, but not too hard, then we begin to tap the plane knife until the blade comes out 0.2-0.3 mm above the surface of the plane (Fig. 28)
(Fig.28)
After aligning the blade, secure it with a screw completely.
4.Installing the knife into a metal plane with a single knife and adjusting screws.
Place the knife on the plane's tap hole with the chamfer down. Hold the plane knife and secure it with a wedge (Fig. 29)
(Fig.29)
Then we press the knife with a screw, but not too hard, then, by tightening the adjusting screws, we extend the blade 0.2-0.3 mm from the sole of the plane (Fig. 30),
(Fig. 30)
After aligning the blade, we finally secure the knife in the plane.
5.Installing the knife into a metal plane with a double knife.
We assemble a double knife with a chipbreaker (Fig. 25). Place the knife on the plane tap hole with the chamfer down
Holding the plane knife, secure it with a wedge (Fig. 31)
(Fig. 31)
then we extend the knife using the adjusting screw (Fig. 32),
(Fig. 32)
using the adjusting rack, we align the parallelism of the knife to the sole of the plane (Fig. 33),
(Fig. 33)
then finally secure the knife with a wedge.
The plane is one of the main tools of the carpenter and its good work depends on the correct sharpening of the knife and the correct settings of the plane. Depending on what material you have to deal with, the setting of the plane depends. Proper sharpening and adjustment of the plane is the key to half the success in the planing process.
How to properly install a knife on a trimmer