So, the topic of our today's material is again the hand router. Why again? Yes, because not so long ago we published the first article on this topic, addressing mainly those who are just taking their first steps in working with this unit. Today we will go further in our story. And let's touch on practical issues.
To see our first material addressed to beginners, click on this link.
Mastering a hand cutter for wood in practice
By purchasing a portable woodworking device of this type, you can independently master construction skills, relying on video and photo master classes on the Internet. These materials often contain not only the basics of working with a hand cutter, but also proprietary techniques that can expand the range of available tasks and also simplify the work.
At the initial stage of getting to know the device and functionality, it is useful to gain basic knowledge about the tool.
What a hand cutter can do
A manual milling machine is a compact power tool that has a high degree of mobility compared to a milling unit and allows you to:
- Creation of recesses and grooves.
- Drilling through and blind holes.
- Both straight and shaped processing of edge and end parts of parts.
- Sawing parts of complex shapes.
- Applying patterns and inscriptions to a wooden surface.
- High-precision copying of parts.
It is used in carpentry, as well as in construction craftsmanship and other related fields. With its help you can do a lot of woodworking:
- Production and assembly of furniture.
- Mortise of door hinges and locks.
- Artistic wood cutting.
- Wood processing during construction.
- Sawing holes and grooves.
Having a hand cutter in your home arsenal will speed up and simplify the tasks of repairing and creating wooden products, provided you follow the rules for working with power tools.
Preparing for work
In creating beautiful wooden products, it is of great importance to take practical lessons in working with a hand router. You should start with light models and simple operations. It is more convenient to work with a submersible type tool that has columns directed perpendicular to the sole. The housing with the engine and the tool is lowered along them. They make it much easier to adjust the depth of cut and require less effort to control the tool.
First, you should learn how a manual wood router works. A motor is installed in the housing. The rotating moment is transmitted to the spindle and directly to the tool secured by the collet. The manual wood milling machine rests on the sole. It has a window opposite the spindle through which the tool is lowered into the working area. There are notches opposite the cutter axis. The operator is guided by them during manual cutting along the markings.
Milling of wood is carried out by rotating a cutter secured by a collet in the spindle. The tool is manually guided along the marking line or templates and special devices are used to create a beautiful cutting line.
Craftsmen note the wide capabilities of a wood milling machine. The main operations it performs:
- drilling holes;
- sampling of quarters;
- milling of grooves, splines;
- creating spikes of various shapes;
- alignment of side surfaces;
- adjustment of seats;
- edge profiling;
- cutting discs of various sizes;
- decorative wood carving.
Craftsmen independently create devices and increase the number of operations performed with a manual wood milling machine.
Rules for working with a hand router
Working with a hand cutter on wood should be carried out using work gloves and safety glasses: this measure will protect your hands from splinters and other minor injuries, and your eyes from construction debris. Manipulations must be performed slowly, without sudden movements: otherwise the result may be disappointing due to the presence of defects (“torn” edges, grooves, etc.).
Removing and securing the knife in the clamp must be done using a screwdriver or the key included with the unit. It is important to tighten the thread firmly, but not to overdo it so as not to strip it.
The movement must be carried out evenly throughout the entire operation of the engine. Otherwise, the result will not be of good quality.
Beginners often apply too much or too little force when working with a cutter. As a result, the quality of the product suffers. You should not slow down the unit when turning the cutting element, as this can lead to overheating of the cutter and burning of the wood.
The required cutting depth is achieved by calibration - using a lifting mechanism that changes the distance between the pin and washer located next to the electric drive. A straight guide helps to achieve smooth movement of the knives during operation. Some cutters are equipped with a circular guide, which allows you to create smooth circles of large radius. Milling circles with a radius of less than 15 cm is carried out using an adjustable centering pin inserted into a provided hole in the base of the tool.
Milling of grooves is carried out using an angular stop mounted on the cutter body. The workpiece being processed is fixed in a stationary state - for safety and quality of the result. It is recommended to select grooves with a depth of more than 5 mm in several approaches. The same rule applies to any work on removing the top layer of the workpiece to any depth.
You should not start working with a router without studying the safety rules. The cutter is a source of increased danger that can cause injuries and injuries. Woodworking with a hand cutter will be safe and productive if:
- The cutter will be sharp (the need to replace the nozzle will be indicated by the uneven edge of the product and an overheating motor).
- The milled part will be fixed in a stationary state.
- The depth of wood removal will not exceed 5 mm in one approach.
- Nozzles will be replaced only after the instrument has been de-energized.
When working with a cutter, it is important to monitor the condition and “behavior” of the tool and follow the manufacturer’s recommendations contained in the instructions or on the packaging. Violation of the technological process, as well as lack of proper care of the tool, will lead to undesirable consequences. One of the most important working conditions is the correct choice of attachment for the router.
Types of router
To choose which hand router is suitable for a given purpose or intended for universal use, you should familiarize yourself with the manufacturing options of this tool and what each of them is used for.
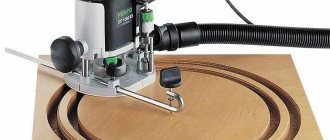
Types of attachmentsSource perego-shop.ru
Rod
The submersible model has a body that is mounted on a special rod, along which it can move vertically. A support mechanism is attached to the bottom of the guide. The entire unit is placed on it and, using the side handles that need to be pressed, it is immersed in the material.
After finishing the work, release the handles and the router will rise up under the pressure of the springs. It can be used to make grooves, cutouts, holes or joints, as well as curly patterns. Due to its high functionality, this model is considered universal, but the increased weight does not allow it to work well in vertical areas. Working with a router for beginners with this tool will be simpler and more understandable.
Tool with immersion mechanismSource i.allo.ua
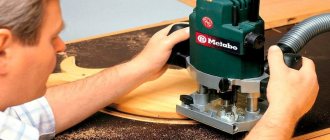
Edging
An edge tool (trimmer) is capable of working not only on horizontal surfaces, but also on vertical ones. Most often it is small in size, so it can be used with one hand. The body itself has a narrowing and a special rubberized coating. This is necessary to use it as a handle.
The bottom of the device has a sliding surface to prevent scratches and also for smoother movement. The immersion depth of the cutter is changed using a special scale. With this tool you can use additional attachments: a rip fence - for processing the edges of a part or corners, as well as a copying sleeve, which allows you to make cuts according to a template.
Using this tool, you can process laminated or veneered parts, select grooves, round corners, fit blanks, and make shallow cutouts for decoration. The trimmer is recommended for use in workshops that require daily edging work.
Edging routerSource www.rucne-naradie.sk
Lamellar
The body of such a tool has a horizontal body and is similar in design to a grinder. At the bottom it has a mechanism for operation, and a wide handle is attached above it. This model is equipped with a disk cutter for cutting into wood. To work, you need to press the tool on the material to immerse the cutter inside. Thus, you can make a special groove for attaching oval parts (lamellas).
It is recommended to work with a manual router of this type for making grooves or trimming parts. This machine is not suitable for rare use, since its purchase will not pay for itself. Therefore, you should choose such a model for frequent use in workshops for which it is needed every day.
Lamellar routerSource laukar.com
Additive
This type of milling tool is similar in shape and design to a lamellar one, but there is a significant difference in its mechanism. To operate, this model uses 2 spiral cutters that work on the principle of a drill. With their help, an accurate connection of parts is made, since they cut into the material at a certain distance from each other. When immersed, the tips cut grooves into which dowels can be installed.
This type of tool is used in furniture production to connect parts whose fastening areas need to be made invisible. The cutter for this tool can be dowel or dowel. With their help, you can make holes for detachable and non-demountable connections.
Filler milling cutterSource harrer.at
Rotary
This type of tool is similar in operating principle to a rod tool, but has a smaller size and a narrowed body, like an edging tool. It can be used for woodworking or ceramic tile work. It is also capable of processing plasterboard floors, chipboard, plastic and soft types of metal. Its speed reaches 30 thousand per minute, which makes it possible to work with hard materials.
The small size of the device makes it possible to work with a manual wood router using one hand, since its weight is small. When replacing a cutter, you can install a diamond rod or a cutter for working with ceramics. Using this type of tool, if it is equipped with speed control, work is performed on materials of varying densities, for example, cutting holes or processing edges.
Rotary milling machineSource allegroimg.com
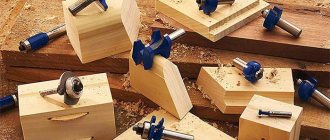
Main types of nozzles
There are many attachments for working on wood with a hand router:
- Edges. Equipped with a bearing that allows you to set the distance from the edge of the part to the knife. Used to create both curly and smooth edges on wooden parts.
- Groove (spiral, fillet, dovetail, shaped). Allows you to cut recesses and grooves.
There are both simple and stacked cutters, assembled from two or more cutting elements. Using a typesetting cutter, you can realize the required shape of the product.
In addition to the shape, attachments for hand routers differ in thickness, height, and the relative position of the knives, which allows you to select the cutting elements for any task.
Cutter with support bearing
The most elementary and compact device that sets the position of the machine is the cutter itself, if it is supplemented with a miniature ball bearing.
It is located under or above the cutting knives and, accordingly, rests on the upper or lower edge of the edge. With the help of such equipment, shaped edges are obtained or grooves are cut for a connection, edging, seal, etc. The advantages of the method include the ease of preparatory operations (you only need to adjust the vertical position) and the ability to accurately process rounded and curved edges (a typical example is a tabletop). The disadvantages follow from the advantages - it will not be possible to make a curve straight.
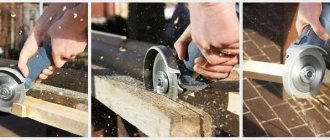
The most common cutting techniques
Using milling, you can create wood products. Carved railings, furniture facades, decorative elements, all kinds of crafts and souvenirs. The capabilities of this instrument are limited only by the skill and imagination of the master himself. There are a number of basic elements that any beginner should master. Mastering the following cutting techniques will allow you to achieve complex tasks through their application and combination.
Open groove
If it is necessary to create a workpiece with a groove starting from the edge, the cutter should be positioned so that the knife protrudes beyond the edge of the wood. After this, install the cutting element and only then start the engine. After processing the edge of the product, you need to lift the knife, loosen its lock and turn off the power to the unit.
Blind grooves are created in a similar way, with the only difference being that the cutting element is installed not at the edge of the product, but at the starting point of the slot.
Deep groove
If the depth of the required groove exceeds 5 mm, it is recommended to carry out the work in several approaches, each time increasing the depth of the excavation, especially when working with hard wood. The depth of the last notch should be limited to 1.5 mm - for the smoothness of the part and the geometry of the groove.
Narrow groove
To ensure convenience and results when creating a part with a narrow groove, it is recommended to attach a flat base to the router base. This part, in tandem with guide rods installed on both sides, serves as an auxiliary plane that ensures the correct trajectory of the knife. It is important to set the location of the axes in line with the center of the cutting element. The hand cutter is driven smoothly and slowly, ensuring that the guides fit snugly to the side parts of the workpiece.
End surface
The main indicator of correct operation of a cutter with the end part of a wooden workpiece is the geometric accuracy and smoothness of the resulting edge. When processing the end, it is necessary to begin its implementation by creating a shallow cut by moving the knife in the direction of its rotation. This will ensure high quality sampling of the base material, after which all that remains is to correct the result by moving the cutting element against the direction of its rotation.
Curved edges
To create curved edges with a manual router, it is necessary to ensure the accuracy of the trajectory of the knife and use templates equipped with a stop ring. With this cutting method, a round plate with a rim, called a “ring,” moves along the template, providing a path for the cutting part of the tool. Before starting work, the thrust ring is fixed on the sole of the router. The template is attached to the workpiece, which is fixed with clamps on the working surface.
Using templates when working with a cutter allows you to produce identical parts in the required quantity.
Milling cutters
Working with a stop or guide and using a special cutter, make grooves for installing furniture hinges. For precise longitudinal positioning of holes, you can use a special tire that allows you to rigidly fix the position of the router at standard length intervals.
Some tenon joints are made using one cutter (a counter profile is not needed).
Special cutters required for making binding.
Special cutters required for making binding.
One of the cutters (profile) forms the edge of the part; pair (counter-profile) “pass” the end of the mating workpiece.
One of the cutters (profile) forms the edge of the part; pair (counter-profile) “pass” the end of the mating workpiece. This equipment is easy to use and also allows you to mill curved edges.
This equipment is easy to use and also allows you to mill curved edges.
Decorative finishing
Complex carved elements, three-dimensional patterns, paintings and inscriptions, curly cutouts - all this can be created in the milling process. As the master's practical experience increases, the complexity of the projects available to him will also increase.
Artistic milling is a popular method of processing wooden products, and knowing the basics of the process will help you cope with it.
To ensure stability of the surface being processed, it is best to use a vice. The drawing is applied to the product in advance with a simple or carpenter's pencil. After the surface is marked and firmly fixed at an angle convenient for work, the direct milling process begins.
An attachment is attached to the router, which carefully, layer by layer, removes the wood along the applied contour, which gives the image volume.
Modern architecture rarely resorts to the use of hand tools in the process of creating decorative elements. Carved trims, intricate railings, furniture with relief patterns and monograms - these products are successfully created using an electric hand router, which provides high accuracy and speed of artistic cutting.
Types of milling work
The milling cutter is a unique device that makes a large number of rotations per second, while creating holes of the required diameter and shape. The work performed is divided into several categories . The holes that are created by a router are almost always part of a detachable or one-piece structure that decorates the product.
It is necessary to consider in more detail the work carried out using a router.
- Profiling of products such as cornices, platbands, skirting boards, glazing beads, etc. is carried out using an edge. Such work is suitable for furniture manufacturers. This is a great solution for decorating wood products.
- Decorating the edges of complex products using a router helps create an exclusive product. A professional can even create a masterpiece. For beginners, a video will help in this case. This process is necessarily carried out using templates. They help create identical patterns over large areas.
- Using a wood router, simple everyday problems can be solved. For example, it is necessary to make recesses for locks or for awnings. A special milling cutter is used for this, but for home work you can also use hand tools.
Safety precautions
Caution when working with a hand router is the key to the safety of the master and the results of his work. Basic safety rules:
- Use only sharp cutting elements. The degree of sharpness of the knife can be checked by carefully touching the tip of the cutter with the tip of your finger: if the skin “sticks” to the blade, the knife is sharp. Another sign of insufficient sharpness of the knife is overheating of the unit’s motor during operation and a “dirty” edge of the product.
- Check the serviceability of the power cord and plug of the unit before each time it is turned on.
- Remove dust and debris from the caliper, housing and collet nut.
- Securely fix the cutter in the collet using a wrench.
- After installing the cutting element, you should fix it in the desired position by pressing the caliper lever.
- Always use safety glasses when working with a cutter, regardless of the presence of a protective screen in the design of the unit. You can supplement your protection with a respirator.
- Before starting the electric motor, make sure that the moving part is not blocked.
- To avoid injury, first start the unit and only then insert its knife into the workpiece.
- After finishing milling, remove the knife from the part, and only then turn off the engine.
- While working, keep the rotating cutter head and the internal opening of the caliper in your field of vision.
- Before replacing the nozzle, completely de-energize the unit.
- It is important to secure the workpieces to the work surface using clamps.
- Use only clean knives. If dirt is found on the nozzle, clean it before installation.
- When using an edge cutter with a bearing, make sure that it rotates easily on the end end and does not jam or squeak.
- Use only a properly functioning unit.
A hand cutter for wood is a tool that will not take up much space, but will allow you to perform most tasks when working with wood. The unit will make minor household repairs accessible and will open up opportunities in the field of modern architecture and personal creative development. Choose a router carefully, follow the rules of its operation, and working with it will be productive and full of positive emotions.
Special cutters
When making decorative selections, for example, ornaments, fonts, V-shaped (conical) engraving cutters are used. In this case, the milling machine is moved along the markings freely by hand. For drilling and making holes, cutters with a stop center and a trimmer are used. Holes for dowels are drilled with cutters 06, 08 and 012 mm. Sockets for furniture fittings are selected with cutters 015-35 mm. When working with cutters of larger diameter, the milling machine should be switched to lower speeds.
With the help of some cutters it is possible to form two mutually matching profiles, one of which is a counter profile. This can be a set of two separate cutters that complement each other (“profile-counter-profile”), or one cutter that creates its own counter profile when turning the workpiece to the other side.
Where to begin
In order to “make friends” with a router, you need to practice on simple products. Working according to the template will help you get better. Take a pre-prepared blank and apply a drawing, trying to maintain the proportions. Finding templates is easy. There are options on the Internet that are easy to transfer with a pencil.
Drawings for inspiration:
Patterns on products may vary. Everything depends on the imagination of the creator, because the one who creates sees the work in his own way. Beginners, having mastered the basic rules, proceed to complex ones. You can learn to adjust the depth of the cut by adding patterns with different cutters. To make the work unique, craftsmen add notched carvings to the products.
Effective work
Using a hand-held electric router is suitable for artistic carved furniture. Artistic carvings look especially beautiful on furniture. Cutters of different sizes and profiles easily perform various tasks. Unfortunately, it is impossible to make triangular-notched work with a router. This task is suitable for chisels or knives. Bas-relief, contour cutting on wood - all this can be done with a hand router.
We can say that the functionality of the tool depends on the configuration. Various devices can work wonders, improve the product and make the work of the master easier.
Stencils are suitable not only for conventional tools, but also for a hand router. Examples can be seen below:
What else can you use a hand router for? Craftsmen can transform the interior of a home using this tool.
Designer items and interesting objects often attract attention. If you want to change something in the house, then a router is especially for this! He is able to revive old things
A beautiful pattern has never detracted from the look of a tree!
To carry out this kind of task, there is a figured carving that embodies unusual solutions in interior design. It can be used to decorate furniture, parquet floors, and make new decorations. This carving predominates in the Slavic style. Nowadays, it is coming back into fashion and hand-milled products are highly valued on the goods market.
For inspiration, you can look at photographs of works that are most often found on the Internet:
A few words about the main thing
A router is a universal tool that is used for processing wood. Experts often use it during repairs. For example, drill holes, install locks on the door, etc. In carving, the tool is designed for processing the edges of products.
Not all craftsmen are able to work with a router. Very often in educational books you can find a quote: “Learn to work with a jigsaw and chisels. Try doing the work with your hands. Once you gain experience, it will be easier to handle the router.” When choosing, you should consult with specialists so as not to buy a low-quality tool.
To get started with the tool, you can sign up for courses. Unfortunately, they can be expensive or not everyone will want to attend them. Nowadays, it is quite easy to find tutorials. There are video tutorials that will help you learn the basics of working with a router. Examples of some of them are listed below.
A milling cutter is a difficult tool, so before watching the video you need to read the instructions on how to use the tool. Many sites and books offer the basics of assembly, settings, and tell you about the purpose of each cutter. In specialized stores you can find additional attachments for the router.
The router diagram for beginners is shown in the photo:
How to use hand tools
The principle of operation is to drill certain holes with cutters selected for these purposes, immersed to a depth determined by the user.
- A nozzle selected by diameter is selected.
- The shank snaps into the chuck no more than 2 cm.
- The router is installed to the desired depth.
- The tuning knob is moved to the middle position (between minus and plus).
Next, the speed controller is adjusted. This indicator must be selected based on the characteristics of the material. It's better to practice on a sample first.
Usually the requirements are specified in the attached manual. While working, the tool can be either held in your hands or mounted on a table - the latter option should be used when processing small parts. When fixing on the table, the router should point with the spindle up.
The router is fixed on the bed
After turning on the tool, it is important to adhere to the following rules. It is recommended to install a ruler-guide on the working surface (or an arc-shaped pattern if you are working on a semicircle)
This will help create straight lines. If we are talking about working on a router with various parts in a variable profile, narrow-end rulers will come in handy. They can be attached perpendicular to the workpiece.
The router should be used without neglecting safety precautions to eliminate the risk of injury.
The device must be moved along the product in the opposite direction from the movement of the cutter
Otherwise, you may not be able to hold the device. It is important to take a stable position - this will help you not to lose your balance. All parts should also be firmly secured. The tool must be held very tightly - contact with the material “gives” a small blow
Otherwise, the device may fly out of your hands and create a traumatic situation. The user should wear a special protective suit, tucked in without the possibility of wrapping around the plywood. To protect your respiratory system (fine dust may occur), it is recommended to wear a respirator. After finishing work or during a break, you must turn off the device from the network.
Wood coating after milling
Wood easily absorbs moisture and dries, changing its geometry. Even after milling the product, it may warp, which is most often unacceptable. To prevent this from happening, wooden blanks and products must be stored at constant low humidity.
Another important process is coating, which serves several purposes at once:
1. Protects wood from moisture.
2. Gives the product a smooth surface and removes micro-irregularities.
3. Creates a layer that protects the part from external mechanical influences.
Different coatings can be used for different purposes: paints, varnishes, primers.
Wood milling on CNC machines ensures high manufacturing accuracy and is good for the production of serial products: parts are made according to the same program and have excellent repeatability. Often it is visually impossible to distinguish whether a product is produced on a CNC router or made by hand.