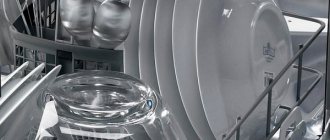
There are three water supply buttons in the thermopot - one is a large pump button for manual injection located in the top cover, and two electric drive (pump) buttons, one on top on the control panel, the second behind the spout from which water flows, on the bottom. When you press any of them, water should flow from the spout.
If you have experience in repairing electrical appliances, then read on; if not, it’s better to take it to a service center.
It is necessary to determine which of the buttons does not work - a mechanical pump or an electric one. Arm yourself with a Phillips screwdriver and preferably have a multimeter.
All three buttons fail at once very rarely, this is if the seagull has not seen a lot of time and cleaning and maintenance.
The most common problem with electrical button failure is failure of the pump motor or clogging of the impeller and tubes with scale.
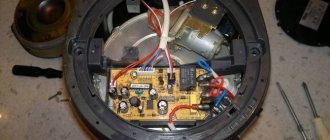
There is no way to do this without disassembling the thermopot. First of all, turn off the kettle from the 220 volt power supply. We turn it over and take out the belt on which the kettle is able to spin while standing, we see long screws (usually there are two or three of them). We unscrew the screws, remove the bottom cover and find ourselves in the bottom part of the kettle where the tube, the electronic control and power board, and the pump are located.
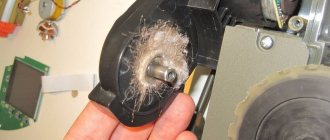
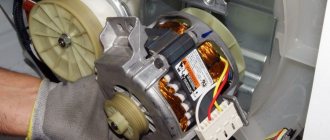
Usually in such a situation, the first thing I do is disassemble the pump. Separate the impeller and the engine
Sometimes there is a lot of scale in the impeller compartment, and not just small scale. Sometimes even the petals of exfoliated solid scale simply jam the impeller blades. Everything needs to be thoroughly cleaned.
We also clean the magnet from foreign objects and possible rust -
Reassemble in reverse order.
You should also ring both pump activation buttons with a tester to ensure they are making proper contact in the on position. The wires themselves rarely fail, but the soldering points may be poorly soldered - also check their contacts.
For deeper repairs, if the motor does not even hum, you should check for voltage at the motor terminals with the buttons turned on; the motor is usually designed for power in the range of 8 to 12 Volts DC. This is the voltage that should be supplied to it from the board.
If everything is normal with the voltage, most likely the stator winding of the pump motor has a break - here only a complete replacement is required, rewinding is not economically feasible.
Thermopot is an invention of modern civilization. This is a symbiosis of an electric kettle and a thermos, working on the principle of a samovar. Like a kettle, the thermopot boils water, and like a thermos, it keeps it hot for a long time. But this invention also has to be repaired sometimes. To start repairing a thermopot with your own hands, you need to study its internal structure and operating principle, therefore technical instructions are attached to the thermopot.
How does a thermopot work?
All such devices are designed the same, and may differ in auxiliary options. The working components of the thermopot are placed in the housing, and to repair the device it must be removed. Water is poured into a stainless steel tank with two heating elements in the bottom. One heating element heats the water to 100 o C, the second keeps it hot. All electrical parts are equipped with appropriate electrical protection.
A motor is attached to the side of the body, which supplies water from the reservoir. The device is also equipped with electronics that perform the functions of a time relay for re-boiling water and reducing the network voltage for the pump and time relay.
Also, the thermopot has a built-in automatic control board for reheating, indicating the status of the device and water supply. The thermal switch, which is duplicated by a thermal fuse, is mounted on the side wall of the tank and on the bottom of the housing. This protection prevents the thermopot from overheating or burning out.
If you know how the thermopot works and where everything is, it will be easier for you to identify the problem and repair the thermopot yourself. It won’t hurt to familiarize yourself with the electrical diagram of the device - then you can also repair some components yourself. For example, a power supply circuit for a Vitek thermopot can be purchased for about 1000-1200 rubles, and it consists of the following parts and components:
- Pulse transformer.
- Diode bridge.
- Elements of an electrical circuit: capacitors, resistors, diodes, transistors, etc.
Thus, a Panasonic NC-EH30PWTW thermopot costs about 5,000-6,000 rubles, and replacing electronics during repairs costs more than 2,000 rubles. The pump also costs about 2,000 rubles, so it is cheaper and easier to buy a new device than to repair an old device. However, if you still decide to repair the thermopot yourself, then start with the power cord.
What to do if the thermopot does not turn off as expected when it boils?
Thermopots rarely break. If you take proper care of them, they will serve you for a decent period of time. However, you may encounter the following situation: the device constantly boils water, but does not even think about turning off. It continues to seethe, showing with all its appearance that something has gone wrong. What to do in such a situation?
- The first step is to disconnect the device from the electricity.
- We look at the warranty period of the device. If the device is under warranty, pour boiling water through the neck of the device, take the documents attached to it and take it to the service center. If the warranty period for the thermopot has already expired, you can try to repair the device yourself.
- Most often, the causes of breakdowns are associated with the formation of scale in the thermopot. In order not to provoke such a situation, it is necessary to periodically wash the device. We buy descaling agent in household chemical stores, then follow the instructions. From available means, you can use baking soda - 1 tablespoon per liter of water. We boil water and soda in a thermopot as many times as required by a particular case. We drain the water.
Anti-scale agents for electrical appliances
If the previous step did not help, you need to check the thermal switches installed on the bottom and side of the tank. A working thermal switch not connected to the mains will show zero resistance when tested with an ohmmeter. As a rule, the thermal switch installed in the bottom of the device is to blame for this thermopot malfunction. It serves to turn off the main heating element when the boiling point of water is reached. The thermal switch is marked KSD 302, the operating temperature is above one hundred degrees. If a faulty thermal switch is detected, it is recommended to replace it. But finding the right one can be difficult. One way is to try to find the required part in an online store. When purchasing, pay attention to the declared operating temperature and the nature of the thermal switch terminals.
- When troubleshooting a unit, check the resistance of the heating coils. The resistance of the main spiral, which is used for boiling, is 70–80 Ohms, the resistance of the pilot heating spiral is approximately 700–800 Ohms.
- The cause of the problem of boiling water may be a breakdown of the circuit, which is located on the control board and is responsible for the functions of boiling and supplying water, but if you do not have the skills to work with electronic boards, it is better to leave this work to an equipment repair specialist.
Before turning on the thermopot for the first time, carefully read the instructions for it. As a rule, it contains simple rules for operating the device. Follow them, and your device will delight you for years.
Enjoy your tea!
Disassembling the thermopot
Any deviation from the normal operation of the device can be called a breakdown requiring repair.
To remove the top housing, locate and remove the screws in the bottom of the unit. Next, make a visual inspection of all components for damage - mechanical and thermal, which can most often be repaired using a soldering iron.
The next step is to check the thermal switch in the bottom of the case using a regular household tester. A working switch does not have infinite resistance. Simply replace a non-working unit with a new one, and the easiest way to order it is via the Internet.
The pump can be disconnected only after disconnecting the supply tube and unscrewing the fastening bolts. Check it for clogging - often cleaning the impeller and magnet is enough to give the pump a second life.
Also, a standard thermopot, for example, Polaris or Boch, has not one, but several thermal switches, one of which is needed to control the water temperature, and the second protects the device from turning on if it is empty. The thermal switch is located so that the walls of the tank and the flange are in close contact. A special thermally conductive lubricant is used for contact.
How to fix simple breakdowns
Do not attempt to work with an unsuitable soldering iron, removing and replacing the microchip in the same Ideal ID-40TPS model or any other that requires the use of a hot air gun.
The most common faults can often be identified and corrected yourself. Here are some of them:
- The indicators do not light up, the device does not work and shows no signs of life. First, you should check the wiring and electrical connections, the fuse and the thermostat - these parts and assemblies fail more often than others.
- Only the reheat mode works - the main boiling does not work. Most likely, the bottom thermal switch is faulty or the main heating element has burned out.
- The main boiling mode works, reheating does not. Check the elements of the main board.
- The water supply is not working. The breakdown may be caused by a malfunction of the pump's power supply circuit or a breakdown of the pump itself. The additional heating coil (heating element), through which voltage is supplied to the pump motor, often burns out. If the heating elements fail, it is not economically profitable to repair the thermopot - it is cheaper to buy a new one, for example, scarlett SL-1509.
After completing the repair, check the electrical safety of the device - use the same tester to measure the resistance (it should be infinite) between the reservoir and the contacts of the electrical plug, between the body and the contacts of the plug.
Typical breakdowns and their elimination
Devices manufactured according to the same design are characterized by typical malfunctions. How to find and eliminate them will be described in pictures below.
Doesn't turn on
If the device does not turn on, then the problem is that the electrical circuit contacts are broken. The only question is where the break occurred. You need to start checking with the power cord. If it is unusable, replace the wire with a new one. Then all connections of both thermal switches must be checked. Perhaps an emergency trip occurred, and due to a faulty thermostat, the contacts did not return to place. Also, the connection at the thermal fuse may not be restored. To check, you need to disconnect the questionable part and short-circuit the wires directly. If this works, the defective part is replaced with a new one.
Constantly boils water
A situation where the water constantly boils and the device does not turn off can only occur with the most budget models with one thermostat. It is because of its breakdown that the thermopot does not turn off after boiling. Here you should immediately, without any checks, change the thermal switch. Good and reliable samples always have a backup thermostat. And some manufacturers install additional control in the form of a thermal fuse, which will protect you if for some reason both protections do not work and the kettle constantly boils water.
Shuts off before boiling
Usually this only happens with devices that have been in operation for more than one year. This is due to the loss of its properties by the bimetallic plate in the thermostat, which over time begins to react to a lower temperature than planned. To correct the situation, you can try to temporarily bend the contacts at the plate. The best solution would be to replace the thermal switch.
Banal scale may be to blame for the fact that the thermopot has stopped boiling water. As it settles in a thick layer on the heating element, it reduces its thermal conductivity. The heating element gradually begins to overheat. At a certain point, the thermostat sees this as a fire threat and opens the electrical circuit moments before the water boils. You can get rid of scale on heating elements by simply boiling a solution of citric acid. If this does not help, you will have to disconnect the heater and clean it with a knife.
Important! The thermopot may also not boil water due to a leak in the flask. Even a few drops of liquid can cause overheating. The search for cracks is carried out visually, and it is more reliable to eliminate them in a workshop.
Another cause of breakdowns can be poor contacts. In this case, you should check all connections to the wires of the heating element and thermal switch. If necessary, the contacts are resoldered.
Water supply button does not work
If the water supply button does not work, there may be several reasons. First of all, this could happen due to a blockage in the system. Garbage most often consists of scale particles that settle on the walls of tubes and hoses, gradually reducing their clearance. This ultimately leads to the pump not pumping water.
To remove scale, you also need to use citric acid or vinegar by boiling water with them in the device. In the case of insoluble debris, the pump and the entire water system will have to be completely disassembled. To do this, you need to disconnect all the hoses and blow them out. The pump itself should be disassembled as follows:
- disconnect it from the device body;
- unscrew the impeller and clean the scale from it;
- remove dirt from the magnet.
Advice! If after cleaning the pump still does not pump, this may mean that the winding on the motor has burned out. And it is better and more reliable to fix such breakdowns in the service.
The liquid filling button also does not work if there are poor contacts on the button itself or at the junction of the wires with the electric pump. To eliminate it, you need to check the entire circuit for breaks. If the second heating element fails, voltage is no longer supplied to the electric pump motor.
The auto-fill may not work if there is a problem with the control module. In this case, you need to check the board for cracks and burnt parts, if found, you will have to work with a soldering iron.
Important! If the thermopot has only one electric pump and the water supply does not work, then first of all you need to check the serviceability of the outlet and the presence of electricity in the house.
Doesn't heat water when the light is on
When the device does not heat water when the indicator is on, the first thing to do is check the heating element. But if the heater is working properly, then the reason may lie in the electrical circuit. That is, the thermopot does not heat the water, but the light comes on if there is a fuse in the circuit after the indicator that has blown. To fix the problem, the faulty part must be replaced.
Other faults
If the thermal kettle operates for a long time or incorrectly, other problems may occur.
- Reboiling does not work - the reason must be sought in the additional heater and control module.
- There is no main boil, while the restart button works - you should check the thermostat.
- The thermopot only works for heating, but does not boil - the culprit is a burnt-out main heating element.
Repair of other thermopot elements
- If your thermopot's heating element burns out, you won't be able to repair it - you'll have to buy a new device. A new heating element costs 2,000 rubles and more, so replacing it in an old thermopot is simply unprofitable.
- Electrical cord. There is a block inside the case that secures the cord. It is necessary to release the cable and check it for short circuit with a tester.
- Microchip. It can be a feeder and a manager. A visual inspection will help identify burnt elements that can be replaced using a low-power soldering iron.
- Capacitors. The faulty part appears swollen and is immediately visible.
- Diodes rarely fail, and their performance can only be checked with a continuity tester.
- Getinaks board tracks. Microcracks can be tinned with a layer of tin solder.
Video instructions for repairing a thermopot
Can a thermos boil water on its own? Of course it can if it is a thermopot. This is a combination of an electric kettle and a thermos. Like any piece of equipment, it is prone to breakdowns. Therefore, you need to figure out whether it is possible to repair a thermopot on your own?
Thermopot is a smart kettle. The difference is that:
- In addition to the water tank, it has an electric pump in its body;
- there is a control module;
- the flask retains heat and works like a thermos.
If hot water gradually cools down in a regular thermos, then our unit will maintain the set temperature as long as the device is plugged in. Therefore, all models are equipped with two heaters. One heating element boils water, the second maintains the set temperature. The exception is inexpensive devices that only have a boiling function.
There are models with different thermostats. The device is responsible for the temperature of the liquid. There is a stepless regulator that smoothly increases the heating from 60 to 100 degrees Celsius. And there is a stepped one, which has preset fixed positions. Many models use only three modes to control temperature indicators.
A pump is needed to supply hot water from the container to the cup.
It has several operating modes:
- auto-filling;
- manual bottling;
- pour using a lever on the spout.
The control module is mounted under the cover. The board is responsible for re-boiling using a time relay. And also for lowering the network voltage for the correct operation of the pump and time relay.
Each model has a thermal switch, which is controlled by a thermal fuse. Such protection is needed from overheating and combustion. Parts are attached to the bottom of the device body and the side wall.
If you do not have knowledge or experience in repairing electronics, it is advisable to contact a service center. But it’s still a good idea to have a general idea of how the thermopot circuit works. Then it will be possible to eliminate minor malfunctions without having any special education. For example, fix the power cord, remove and replace a faulty capacitor, or replace a burnt-out heating element or pump yourself.
The thermopot has a power supply. It consists of a pulse transformer and a diode bridge. We do not recommend going inside. Even specialists are unlikely to want to do repairs. Most likely, they will insist on a complete replacement. The elements of an electrical circuit connecting electrical parts include: capacitors, resistors, diodes, transistors, etc. They are mounted on the electrical board.
We have already mentioned the electric pump, control module and thermal protection. They are also included in the scheme. Let's look at a few repair cases that do not require in-depth knowledge.
What is a thermopot and how does it work?
The design technology of this unit simultaneously resembles both a kettle and a thermos. It can boil water, or it can simply heat it to the desired temperature. The maximum hot water in a thermopot is up to 100 degrees (you can brew tea leaves without any problems). The device can maintain the set water temperature for up to several hours. Most models have 4-6 temperature settings.
The thermopot consists of several parts:
- two heating elements that are built into the metal bottom of the tank. The main one brings the water to a boil, the other maintains the set temperature. Also, a stepless or step thermostat is installed in the device, which controls the heating of the liquid to the desired temperature;
- The water pump (pump) is designed to supply boiling water. Electric and manual modes are possible. Most often, both are included in the thermopot device;
- The main electronic board contains a time relay circuit. It turns on in reboil mode;
- control board - it contains buttons for the “Re-boiling” and “Water Supply” modes. It also contains LED indicators of the thermopot operation;
- thermal switch (breaker, thermostat) – temperature sensor. If the device was accidentally turned on without water, the thermal switch contacts open, thereby de-energizing the device.
Thermopot device
The thermopot is a steel flask, the volume of which ranges from 2.5 to 18 liters. The flask is enclosed in a plastic or metal case and closed on top with a sealed lid on which the unit control panel is located.
Boiled water can be poured into a cup using a pump. If the device is disconnected from the network, use a hand pump, or by pressing the edge of the cup on the valve.
More expensive devices have the following functions:
- several modes of maintained temperature (50-90 degrees);
- display showing the specified program;
- boiling water at a certain time:
- several ways to supply water (manual, electric, by pressing the cup on the valve);
- two water tanks - in the first the temperature is regulated by the user, in the second - not;
- reduced vaporization function;
- self-cleaning function.
Thermopot Bosch THD 2023
Common faults
What may not work and how to understand the reasons.
- Not a single indicator light is lit on the display, and the kettle does not turn on. We check the power cord and each wire connection. We also check the thermostat, fuse, and control module.
- Pressing the button does not dispense water into the cup. The reason is the pump.
- Secondary boiling does not work, the thermos does not heat the water. We check the power module of the electrical board.
- Basic boiling doesn't work. Checking the thermostat.
- Only heating works. We check the heating element for boiling.
Now a little more detail - how to check this and what can be done to make everything work again.
Network wire
The power cord needs to be tested with a tester. If a problem is found, the wire is simply replaced with a new one.
Chip
Any thermopot has two modules. One for power, the other for control. We look at the details on the getinax boards, and check the boards themselves for the presence of microcracks. Burnt parts become charred and capacitors swell.
The parts can be desoldered and replaced by workers. Solder the cracks with a soldering iron. If the replaced part burns out again, then there is a short circuit somewhere and the whole unit will have to be replaced.
Heating elements
To check the condition of the heating element, you first need to unsolder it and then ring it. If it does burn out, then it is difficult to repair the heating element with your own hands. Easier to replace with a new one.
Doesn't pump water, pump doesn't work
It may not pump water due to a simple blockage.
It is not difficult to fix such a breakdown by disassembling and cleaning:
- Remove the hoses from the pump, disconnect the pump.
- Unscrew the impeller from the housing.
- Remove scale from the impeller.
- Remove the impeller and clean the magnet from dirt.
- If after cleaning the pump continues to not work, then the winding on the motor may have burned out, then you will have to buy a new pump. When installing the hoses back onto the fittings, secure them securely with clamps to prevent leakage.
Doesn't turn on or off
It happens that the thermopot does not turn off after boiling. And sometimes when you turn it on, the indicator will blink and immediately go out. In both cases, you need to check the thermal switches. In the normal position, the thermal switch contacts are closed. When the maximum temperature is reached they open. When the temperature drops by an average of 20 degrees, the contacts close again.
Check the thermal switch with a tester. To do this, you need to disconnect it. At room temperature, the tester should show 0 ohms. If the switch is placed in boiling water, then - infinity. In case of other indications, the part must be replaced. You also need to check whether the thermal paste, which is used for better contact with the surface, has dried out.
In case the thermal switch protection does not work, there is a thermal fuse that will open the circuit at a temperature of 110 to 150 degrees. Sometimes contact is simply not restored on it, then the fuse needs to be replaced.
Upon completion of work, check the electrical safety of the repaired device. There should be no contacts coming to the housing except grounding!
We looked at repair cases that can be handled without a specialist. In more complex cases, and even more so when you cannot understand what happened to your miracle kettle, you need to take it to a service center. Before repairing, find out how much it will cost. It might be better to buy a new smart kettle.
A thermopot is a small household appliance that combines the properties of two devices at once - an electric kettle and a thermos.
The main advantage is the ability to boil water and maintain its temperature in a given mode, as well as the ability to repair the thermopot yourself if such a need arises.
The electric kettle does not turn on or off
The reasons for the breakdown of an electric kettle, like any electrical installation, often lie in the electrical part, but an electric kettle can turn on or not turn off for other reasons.
Let's look at the main breakdowns of an electric kettle.
- It’s trivial that the socket may not work or there may be no voltage in it (it worked automatically, for example).
- The coil or heating element has burnt out. This happens due to poor quality manufacturing or excessive temperature of the heater. The temperature rises due to the fact that scale has formed on the heater platform or on the spiral heater from the water and the heater has begun to dissipate heat poorly. If heat is not transferred outside, the temperature inside the heater increases, which leads to a break in the heater filament. The heater is checked using a tester and replaced with a new one.
- The contacts on the area under the kettle were burnt. This happens when the kettle is placed on the platform with the button turned on. Upon first contact, a spark is formed that destroys the metal. You should first put the kettle on the platform, and then turn it on. The switch contacts are made of refractory metal, which is not afraid of switching on the load.
- The contacts on the kettle are burnt. The principle is the same as described above.
- One of the connectors has come loose. This can happen if the assembly is poor or the kettle falls.
- The thermal regulation mechanism has failed. In the normal position, the contacts are closed; when the temperature rises during boiling, the contacts open and the kettle turns off. The contacts may burn out and not conduct current. A foreign object may also get in. It happens that the thermal paste in the thermostat dries out.
- In case of poor contact, for example when the kettle is placed crookedly on the platform, the metal can heat up, the plastic will melt and the contacts will move. In this case, the smell of burnt plastic is felt and the kettle no longer turns on.
- Why doesn't the electric kettle turn off?
- The steam pipe that runs through the handle of the kettle from the lid has broken. The tube conducts hot steam to the thermostat and it turns off the kettle. Usually in this case, when boiling, you can see steam coming out of the handle.
- The thermostat is broken and the contacts are constantly closed.
Here are the main reasons why an electric kettle breaks down.
We remind you that the work must be carried out by a qualified technician.
How it works
Note that, despite having a lot of advantages, the thermopot also has specific disadvantages, in particular:
- high cost - much more than a standard electric kettle;
- low boiling speed (compared to electric kettles);
- increased energy costs due to constant switching on and the need to operate in temperature maintenance mode.
The device consists of a housing, external elements of the control panel and internal technical devices.
The housing is made of various materials (depending on the unit model):
- glass;
- plastic;
- metal;
- ceramics.
A combination of these materials is also possible.
Appearance of the thermopot
The shape of the case also depends on the specific model. Often, it is either a half-cylinder or a rectangle.
For ease of maintenance and care, almost all models are equipped with a removable flask into which water is poured.
The device is also equipped with a control panel with buttons that allow you to set certain operating modes.
Since the unit in question combines two traditional devices at once - a kettle and a thermos - there are two heating elements inside:
- one is directly responsible for bringing water to a boil;
- the second performs the function of maintaining the temperature at a given level.
Due to the fact that the thermopot is quite heavy and bulky, manufacturers provide it with a special button for supplying water. This is very convenient - just place a mug under the drain hole and press the drain button. A special water pump is responsible for pumping water.
All thermopots are also equipped with electronic components - namely, a control chip that processes user commands, and a power supply.
Main nodes
How to use a thermopot correctly
- Fill the tank with water no higher than the maximum level indicated on the scale.
- Water should be filtered before use; this procedure will reduce the likelihood of scale formation, and the equipment will last much longer!
- Never place the device under running water from a tap (this may cause damage)!
- We turn on the device to the network. After 20-25 minutes (depending on the power of the device), the water in the thermopot will boil. After two hours, the device will switch to water heating mode: if the water temperature becomes 60 degrees instead of the programmed 90, the thermopot will periodically turn on for 15-20 seconds to maintain the temperature.
- Bring the mug and gently press the valve.
You might think that you're in for a lot of energy bills, but that's not true. Using a thermopot is much more profitable than using an electric kettle.
Bring the container to the spout of the unit and press the valve
Basic operating principles
The device operates in the following order:
- water is poured in;
- the top cover closes;
- a heating element used to boil water heats the water to a temperature of 100 degrees;
- as soon as the water reaches the above temperature, a thermal fuse that protects against overheating turns off the device;
- the water begins to cool to the user-specified temperature;
- a second heating element is switched on to maintain the set temperature.
Features of using a thermopot, or how a thermopot differs from a kettle
The capacity of the thermopot ranges from 3 to 8 liters. Power from less than 1 to 3 kW. The cost depends on the availability of working functions, ranging from 800 to 3000-4000 rubles.
The initial mode required for boiling will take much longer than an electric kettle would do, but secondary boiling takes no more than a minute.
The total operating power required to implement the mode of maintaining a certain temperature level is approximately 800 W, the power value for support is 30 - 40 W, which significantly affects the cost of electricity.
To heat water to a certain level, a thermostat is included in the design of the thermopot. They come in two types:
- Stepless, they allow you to smoothly regulate the temperature in the range from 60 to 100°C.
- Stepped, regulate heating at certain temperature values.
After 6 - 7 hours from the boiling time, with the device turned off, the water heated in the thermopot will be - 80 ° C. If you measure the temperature of the water in the kettle immediately after boiling, it will be 90°C.
To protect the thermopot from overheating, there is a thermostat in the thermopot; the thermostat can be a bottom thermostat or a body thermostat that performs an additional function.
Such interlocks can be very useful; they block water filling when the device is running and protect against erroneous pressing of the pump.
A pump is used to fill water; it can operate in manual or electric mode; some models are equipped with both types of pump.
To prevent scale from getting into the dishes along with hot water, filters are used.
A thermopot is usually only needed when a constant supply of hot water is required.
Schematic diagram
If, you need to familiarize yourself with the circuit diagram.
The circuit of this device is not too complicated - even a non-professional electrician can “read” it.
It can be used to investigate the causes of failure of devices from such popular manufacturers as:
- Polaris;
- Vitek;
- Elenberg;
- Scarlett et al.
Schematic diagram
Explanation of the main symbols used in the diagram
Explanation:
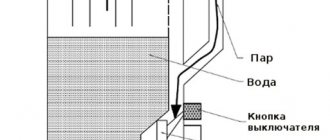
- S1 and S2 are temperature switches from the KSD 302 series, the first is located in the middle of the stainless steel tank and is connected in series to transmit a supply voltage of 220 Volts, the second is located in the bottom of the thermopot - current flows through it to the main heating element;
- F1 – thermal fuse;
- TN2 is an additional water heating coil, which should be checked to answer the question why the thermopot does not maintain the temperature;
- relay S1.1 connected in parallel with the reboiling spiral;
- TN1 – spiral of the main heating element;
- VT1, VT2 – transistors on which there is a relay for controlling the on and off time, which open under the influence of a charged capacitor C3;
- C3 is an electrolytic capacitor, charged by pulses from VD6 when the S4 button is briefly pressed;
- K1 – relay winding through which electric current flows and switches S1.1;
- C1, C2, VDS1 – voltage rectifiers that supply power to the time relay circuit.
Notes:
- C1 serves as a damper for excess voltage;
- C2 – smoothes out electric current ripples resulting from the operation of the bridge rectifier VDS1;
- Some units do not use C1, but a step-down transformer.
Private faults
Like any other household appliance, the thermopot has a list of the most common problems.
Here are some specific malfunctions of the thermopot and parts that should be replaced or repaired with your own hands in this case first:
- The control panel does not light up at all, the device itself does not start and does not work.
In this case, the cause of the breakdown may be:
- thermostat located, depending on the model, either on the bottom or on the side of the device;
- fuse;
- broken wires and connections.
- Only the temperature maintenance mode works, but the main boiling of water does not function.
You can fix the problem by checking:
- bottom thermal switch;
- main heating element designed to heat water up to 100 degrees.
- The opposite situation is that boiling to “one hundred” works, but heating does not function.
There is only one piece of advice - check all elements of the electrical circuit, paying special attention to the board module.
- Pressing the water supply button has no effect.
The problem lies in the pump - you need to disassemble the thermopot, following the instructions below, and find out the real reason.
Disassembling the thermopot - step-by-step instructions
What should I do if the device does not want to turn on, does not heat the water, leaks or does not heat up? In this case, it is recommended to disassemble the unit by following these step-by-step instructions:
- disconnect the device from the electrical network;
- drain the water in the inner flask;
- turn the unit upside down;
- remove the plastic plug from the clamps using a flat screwdriver, knife or other improvised object;
Plastic plug
- use a Phillips screwdriver to remove all screws;
- then remove the pallet (for ease of reassembly, it is recommended to photograph the disassembly process so as not to get confused);
- after removing the pan, access will be made to the water pump, from which you need to remove the hoses held on by plastic ties - you can simply cut them off with scissors;
- Next, you need to remove the hoses from the pipes from the printed circuit board;
- then you can begin to unscrew the printed circuit board, which is held on by small bolts;
- there is a gasket under the board - it must be removed to gain access to the heating coil;
View of the board with the cover removed
- to gain access to the heating element, unscrew the last 8 screws, then remove the protection;
- check the accessed parts using a multimeter in the order indicated later in the article for various types of problems;
- for reliability, before reassembling, it is recommended to clean the heating element from scale, and also inspect the printed circuit board, and if necessary, replace the capacitors with new ones;
- Reassemble in the same manner as disassembly.
Detailed analysis of repair parts
There is a certain list of internal parts of the thermopot that are recommended to be inspected first.
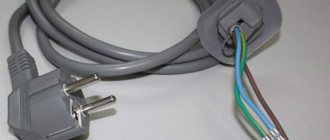
Network wire
The 220 Volt power cord may bend or have poor contact with the three-pin connector located inside the case.
First, you need to check the wire itself directly in the “testing” mode using a multimeter or by connecting the cable to some other device.
Multimeter
If the cable is operational, you should check the presence of voltage at the terminal after the transformer.
Microcircuits
Most models are equipped with two electronic modules:
- power supply board;
- control board.
Control board
In fact, the power board is a power supply unit from which electric current of the required parameters is supplied to each element of the thermopot.
To repair both boards, you must first inspect them for:
- swollen capacitors;
- burnt out resistors;
- unusable fuses;
- torn contact tracks, etc.
All damaged elements must be replaced with new ones, having first taken care of purchasing them on the radio market. Damaged tracks can be restored by tinning with a household soldering iron.
The most common problem here is a blown fuse. You can identify it by a torn thread inside the glass case.
If the fuse is OK, you should check the resistors and diodes with a tester.
Water pump repair
What should you do if the thermopot starts running or, conversely, when you press the water drain button, nothing happens? In this case, you should get to the pump and start testing its performance.
This is done by simply dialing the contacts in pairs.
To check the functionality, you can also apply a standard voltage of 12 Volts, taking it, for example, from powerful batteries or from a car battery.
Also, the corresponding voltage is supplied by power supplies installed in the system units of personal computers.
Repair of heating elements
If heating or main boiling does not work, the problem may be a faulty heating element. It is not recommended to repair the heating element yourself - it is easier to buy a new one. The cost of heating coils starts from 2000 rubles.
Ten disassembled
Do-it-yourself thermopot repair
Objectively speaking, seeing the minimum price limit for the device is 1300 rubles (Eldorado), you consider repairing a thermopot with your own hands a thankless task. Products rarely break; new ones come with a warranty (from the store, manufacturer). For those wishing to repair the thermopot with their own hands, or those who earn their living by repairing it, suppliers will provide spare parts separately for various modifications of the device.
The metal casing protecting the thermopot should not be heated by water. A working product is equipped with a pump controlled by a mechanical button (trivial pump) or electric. The thermopot modes function properly for any duration of operation. The listed features characterize a properly working modern analogue of a samovar. Deviations indicate a breakdown of the thermopot. Even a sticky button.
The power supply board for a Vitek thermopot costs over 800 rubles. Textolite carries:
- transformer;
- diode bridge;
- several resistors, capacitors.
A typical getinax substrate is supplemented with a pair of active elements, mainly transistor switches. A new thermopot VT-1187 costs 2000 rubles, control and power boards cost 1500 rubles (25% difference). A pump that costs $30 will shake the will of an experienced repairman, as strong as a rock - an economically unprofitable undertaking. Still have a strong desire to repair the thermostat yourself? Let's start by inspecting the power cord.
Network wire
The body of the thermopot is secured with several screws: unscrew the fasteners, first unplugging the plug from the socket. There will be a block inside, let's start with a visual inspection. Burnt parts inside the thermopot accurately indicate the location of the breakdown. The cord is carefully separated and rings with a tester (diode mode). A detected fault in the wire will not delay the repair of the thermopot.
Microcircuits
A typical thermopot accommodates two circuit boards:
The technician will examine both, identifying the presence of swollen capacitors, burnt resistors, bad fuses, and broken tracks. Faulty radio elements are replaced with new ones, soldered, contacts are restored by tinning.
The first study concerns the presence of fuses and the integrity of elements. If the replacement is unsuccessful, the new element burns out - the problem is caused by the electronic filling. The thermopot is affected by a short circuit (sharp uncontrolled increase in current).
The resistor values are indicated by colored stripes. A typical problem is to detect the beginning and end of a marking.
Hint: there are special sites containing tables of various types of resistance designations. Gain access to the resource by filling out the search bar with the simple phrase “labeling resistors online.” The direction of the stripes is determined by the observed fact: a fixed set of colors meet at one edge.
Damaged electrolytic capacitors are easier to notice - the cylinders swell. Beginners looking for ways to repair a thermopot are interested in the appearance of a broken container. The answer will come automatically, as soon as a faulty capacitor is found. The appearance of the cylinder evokes the idea: the barrel is 100% swollen. The sidewall especially sticks out (imported ones are cut crosswise).
It is more difficult to test with diodes, but the semiconductor burns less often (silicon keeps temperatures below 150 degrees Celsius). Unsolder the element, ring both sides. The arrow marking shows the direction of flow of positive charges (lean against the positive probe of the tester).
Torn board tracks must be cleaned with sandpaper, removing the varnish from the metal. The shiny surface is tinned (with soldering irons), joined, and covered with solder. It will serve for decades. The mechanics repair the mechatronics and it works...
water pump
The thermopot pump serves the purpose of supplying water through the tap. Manual and electric modes are possible. The design, formed by several simple windings, will not present any mysteries to an experienced electrical engineer. The contacts are called in pairs, otherwise for the mentioned Vitek 1187 you will have to shell out $30 looking for a new pump. It would be useful to check the pump removed from the thermopot for suitability by setting the required voltages to the control windings. Remove the required 12V from the batteries, car battery.
The required voltage is supplied by computer power supplies.
Heating elements and thermal switches
It is not recommended to try to replace flat sheets of metal equipped with terminals with homemade ones. The cost of heating elements on the counters starts at $45.
Protection against overheating is provided by bimetallic thermal switches. The characteristics of the thermopot are determined by the control part. Usually there are several thermal switches, one controls the water parameters, the second is protection against turning on an empty tank. In the latter case, the heating element reaches a temperature above 100 ºС and opens the power circuit.
The surfaces of the tank and the thermal switch flange are in contact. To improve contact, a special paste is used, similar to that covering the pad of a personal computer processor cooler.
The principle of operation of the sensitive element is as simple as possible. Having noted the fact that the controlled environment has reached a certain temperature, the thermal switch contacts open. The parameter value decreases (15 – 30 ºС) - conductivity is restored. The type of components is difficult to find; after reading the description of the thermopot once, the body of the part is marked accordingly. The latter will allow you to select a suitable spare part.
More often, the manufacturer is not satisfied with the given protection scheme, supplementing the equipment with thermal fuses: small cylindrical parts, tightly pressed to the tank wall with strips (brackets), glued. Having detected the achievement of a critical temperature by the metal container of the thermopot, the fuse blows, and further operation is impossible without replacement. Therefore, it is necessary to carefully inspect the product for such damage.
The serviceability of the bimetallic contact (room temperature) is checked by continuity. Before the procedure, desolder the part. Normal conditions leave the contacts short-circuited.
Typical problems
Most thermopots use a hackneyed electrical circuit, allowing you to identify typical signs of malfunction for units:
- The device does not turn on, there are no signs of life. The serviceability of the power cord, fuses, and thermal switches is checked.
- The water does not boil when pouring, the re-boil button is working. The bottom thermal switch is broken.
- The opposite situation: the re-boil button does not work. Electronic components are to blame. It is necessary to trace the circuit from the power supply to the circuit ground.
- There is no main heating, the auxiliary heating is in order. The heating element has burned out, or the electrical circuit feeding the circuit has been broken.
- The water supply is slow. Two options:
- The additional heating element has burned out, the situation is diagnosed by the absence of standby heating.
- The pump motor is faulty.
What are thermopots?
To top it off, we would like to introduce the reader to the types of thermopots. Let's discuss models that the search engine stubbornly hides, ignoring the obvious attractiveness of the product. SEO costs unfairly distribute results.
Analysis of common situations and ways to solve them
Here is a list of the most common problems - with instructions for solving them.
Thermopot provides constant boiling
It is not uncommon to find a situation where... The opposite is also possible - when the unit is turned off at a time when the liquid is still far from starting to boil.
The problem is faulty thermal switches. They are located on the bottom of the device and on the side of the case.
The main problem with their inoperability is that the manufacturer applies a small amount of thermal paste, which is why the thermal relay begins to work incorrectly due to poor contact.
The functionality of the relay is checked with a conventional multimeter - to do this, it is connected to the contacts of the thermostat and set to ohmmeter mode. The tester should show a resistance of 0 ohms.
Thermal relay
The thermopot drains liquid on its own
Some people encounter the following problem - immediately after plugging it into the outlet, the thermopot drains water from the flask, begins to hum, and a characteristic burning smell appears. How to correct such a deficiency?
The problem here is the water pump. First you need to disassemble the thermopot itself (see instructions above) and get to the location of the pump. Next, you should begin disassembling the pump.
After unscrewing the two bolts on the pump itself, you can gain access to the impeller and magnet. In order not to buy a new pump, you can repair the old one - to do this, you need to disconnect the blades from the magnet and clean them of scale with a rag or soft cloth. You should also inspect the magnet itself - tiny metal particles often accumulate on it, interfering with normal operation.
If the above steps have been performed, but the unit still leaks, you should buy a new pump.
The first thing to do is look at the settings on the control panel. You need to set the temperature to which you want to heat the water. If everything is fine with the adjustments, then the cause of the malfunction may be a thermal switch located in the bottom of the thermopot and (or) a thermal fuse attached to the walls of the tank. The reason may also be poor contact of the connectors on the electronic board or the parts themselves.
Disassembling the thermopot
- First you need to remove the top cover so that it does not interfere in the future. Turn the device over and use a flat screwdriver to pry up the support ring, which is secured with latches. You need to apply some force to rotate this element.
- Next you will see a couple of screws (there may be 3-4 of them) that need to be removed using a shaped screwdriver.
- Now again take a flat tool and remove the bottom of the thermopot, which is also secured with latches, so it requires force.
Now all the electronic stuffing is in front of you. Inspect all contact blocks and terminals, make sure that everything is connected (disconnection can occur, for example, if the device is dropped).
Perform disassembly only if you have basic knowledge of electrical engineering!
Thermal switches
They are usually located on the walls of the tank and on the bottom of the device. In the second case, the part is fastened with two screws and a pair of wires extend from it, put on the contact terminals. To improve heat transfer, the contact point between the thermal switch and the housing is treated with a special white paste. Disconnect the terminals and pull out the switch. In a quiet position it should be turned on - this needs to be checked with a tester (resistance will be 0 Ohm). Screw a couple of suitable wires to it and lower it into boiling water. If the resistance has increased to infinity, it means that the sensor is operational, because it has turned off. Otherwise, it must be replaced with a similar one. Below are several varieties of these parts.
An electrical specialist will help you select the right thermal switch.
Side thermal fuses
They are fixed on the walls of the tank (approximately in the middle). But there are models where these elements, which look like small cylinders, are installed on the bottom. They operate at a temperature of +105-110 °C. Their purpose is to turn off the device if you forgot to pour water into it, but have already inserted the plug into the socket. If these elements operate at temperatures below +100 °C, then the thermopot will heat up, but not boil the water, as is the case in your case. To check this, place the part in heating water: if the thermal fuse trips before the liquid boils, it needs to be replaced.
Operating principle of the thermopot
To understand the causes of breakdowns and have a better idea of how to repair a thermopot, you should familiarize yourself with the principle of its operation. First, the device boils water, like a regular kettle, and then the control module of the device comes into action, which, through a thermostat, monitors the set minimum temperature of the liquid and, as soon as it drops below normal, immediately starts re-boiling. For heating, the thermopot uses a second heating element, which is always less powerful than the main one, since its functioning is very fleeting.
Due to the large dimensions and considerable weight of the thermopot, a built-in pump is provided for pouring boiling water into the cup. It can be powered by electricity, like Marta products. This pump allows you to configure auto-filling via the control module. There is also a mechanical (manual) pump, like the MAGNIT RTP-002, then the liquid is pumped into the mug manually through a special spout. Many models (for example: Vitek vt 1187 gy, Saturn ST-EK8032, Mystery MTP-2403 and Bravo TA-65 S thermos kettle) have both types of pumps.
In addition to the above parts (control module, thermostat, two heating elements and a pump), the circuit necessarily includes a thermostat (sometimes two, as in products from Maxwell and Scarlett) and a thermal fuse. Their main task is to prevent overheating and fire of the device. For correct operation of the electric pump and control module, a power supply with a step-down transformer is provided.
Basically, all thermopots work according to the same general scheme and differ only in small details. For example, some models are equipped with an auto-on timer. Budget options may not have a low-power heating element (as in products from Vitek and Magnit). But there are thermopots (for example, the Polaris PWP 4012D thermos kettle) that combine almost all useful functions.